ASTM A767/A767M-00b
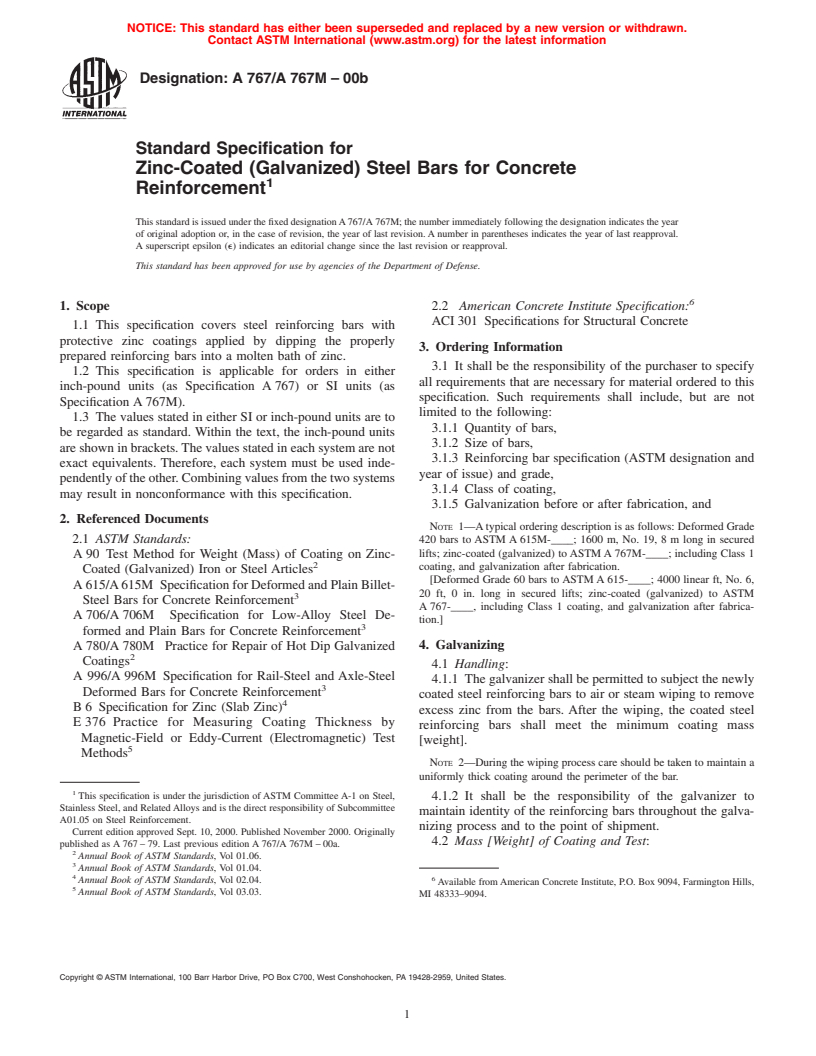
(Specification)Standard Specification for Zinc-Coated (Galvanized) Steel Bars for Concrete Reinforcement
Standard Specification for Zinc-Coated (Galvanized) Steel Bars for Concrete Reinforcement
SCOPE
1.1 This specification covers steel reinforcing bars with protective zinc coatings applied by dipping the properly prepared reinforcing bars into a molten bath of zinc.
1.2 This specification is applicable for orders in either inch-pound units (as Specification A767) or SI units (as Specification A767M).
1.3 The values stated in either SI or inch-pound units are to be regarded as standard. Within the text, the inch-pound units are shown in brackets. The values stated in each system are not exact equivalents. Therefore, each system must be used independently of the other. Combining values from the two systems may result in nonconformance with this specification.
General Information
Relations
Standards Content (Sample)
NOTICE: This standard has either been superseded and replaced by a new version or withdrawn.
Contact ASTM International (www.astm.org) for the latest information
Designation: A 767/A 767M – 00b
Standard Specification for
Zinc-Coated (Galvanized) Steel Bars for Concrete
Reinforcement
This standard is issued under the fixed designationA767/A 767M; the number immediately following the designation indicates the year
of original adoption or, in the case of revision, the year of last revision. A number in parentheses indicates the year of last reapproval.
A superscript epsilon (e) indicates an editorial change since the last revision or reapproval.
This standard has been approved for use by agencies of the Department of Defense.
1. Scope 2.2 American Concrete Institute Specification:
ACI 301 Specifications for Structural Concrete
1.1 This specification covers steel reinforcing bars with
protective zinc coatings applied by dipping the properly
3. Ordering Information
prepared reinforcing bars into a molten bath of zinc.
3.1 It shall be the responsibility of the purchaser to specify
1.2 This specification is applicable for orders in either
all requirements that are necessary for material ordered to this
inch-pound units (as Specification A 767) or SI units (as
specification. Such requirements shall include, but are not
Specification A 767M).
limited to the following:
1.3 The values stated in either SI or inch-pound units are to
3.1.1 Quantity of bars,
be regarded as standard. Within the text, the inch-pound units
3.1.2 Size of bars,
are shown in brackets.The values stated in each system are not
3.1.3 Reinforcing bar specification (ASTM designation and
exact equivalents. Therefore, each system must be used inde-
year of issue) and grade,
pendentlyoftheother.Combiningvaluesfromthetwosystems
3.1.4 Class of coating,
may result in nonconformance with this specification.
3.1.5 Galvanization before or after fabrication, and
2. Referenced Documents
NOTE 1—Atypical ordering description is as follows: Deformed Grade
2.1 ASTM Standards: 420 bars to ASTM A 615M-____; 1600 m, No. 19, 8 m long in secured
lifts; zinc-coated (galvanized) to ASTM A 767M-____; including Class 1
A 90 Test Method for Weight (Mass) of Coating on Zinc-
coating, and galvanization after fabrication.
Coated (Galvanized) Iron or Steel Articles
[Deformed Grade 60 bars to ASTM A 615-____; 4000 linear ft, No. 6,
A615/A615M SpecificationforDeformedandPlainBillet-
20 ft, 0 in. long in secured lifts; zinc-coated (galvanized) to ASTM
Steel Bars for Concrete Reinforcement
A 767-____, including Class 1 coating, and galvanization after fabrica-
A 706/A 706M Specification for Low-Alloy Steel De-
tion.]
formed and Plain Bars for Concrete Reinforcement
4. Galvanizing
A 780/A 780M Practice for Repair of Hot Dip Galvanized
Coatings
4.1 Handling:
A 996/A 996M Specification for Rail-Steel and Axle-Steel
4.1.1 The galvanizer shall be permitted to subject the newly
Deformed Bars for Concrete Reinforcement
coated steel reinforcing bars to air or steam wiping to remove
B 6 Specification for Zinc (Slab Zinc)
excess zinc from the bars. After the wiping, the coated steel
E 376 Practice for Measuring Coating Thickness by
reinforcing bars shall meet the minimum coating mass
Magnetic-Field or Eddy-Current (Electromagnetic) Test
[weight].
Methods
NOTE 2—During the wiping process care should be taken to maintain a
uniformly thick coating around the perimeter of the bar.
This specification is under the jurisdiction of ASTM Committee A-1 on Steel, 4.1.2 It shall be the responsibility of the galvanizer to
Stainless Steel, and RelatedAlloys and is the direct responsibility of Subcommittee
maintain identity of the reinforcing bars throughout the galva-
A01.05 on Steel Reinforcement.
nizing process and to the point of shipment.
Current edition approved Sept. 10, 2000. Published November 2000. Originally
4.2 Mass [Weight] of Coating and Test:
published as A 767 – 79. Last previous edition A 767/A 767M – 00a.
Annual Book of ASTM Standards, Vol 01.06.
Annual Book of ASTM Standards, Vol 01.04.
Annual Book of ASTM Standards, Vol 02.04.
Available fromAmerican Concrete Institute, P.O. Box 9094, Farmington Hills,
Annual Book of ASTM Standards, Vol 03.03.
MI 48333–9094.
Copyright © ASTM International, 100 Barr Harbor Drive, PO Box C700, West Conshohocken, PA 19428-2959, United States.
A 767/A 767M – 00b
4.2.1 This specification includes two classes of coating averaged to obtain the coating thickness. For the stripping
mass [weight]. The mass [weight] of zinc coating based on method and the weighing method, three samples per lot shall
actual area of the bar, shall conform to the requirements shown be measured.
in Table 1.
NOTE 5—Alot shall be as follows:All bars of one size furnished to the
NOTE 3—The nominal diameter of a deformed bar is equivalent to that same steel reinforcing bar specification that have been galvanized within
of a plain round bar having the same mass per metre [weight per foot] as a single production shift.
the deformed bar. Coating mass [weight] shown in Table 1 is based on an
4.2.4 Retests—If the average zinc coating mass [weight]
assumed area ratio of 1.2:1 (actual to nominal surface area of the steel
failstomeettherequirementsofTable1,sixadditionalrandom
reinforcing bar).
samples from the lot shall be permitted to be tested. If the
4.2.2 Magnetic Thickness Measurements—The mass
average zinc coating mass [weight] of the six samples con-
[weight] of the coating shall be determined by magnetic
forms to the requirements of Table 1, the lot shall be accepted.
thickness gage measuremens in accordance with Practice E
4.3 Chromating—The galvanized coating shall be chromate
376. The thickness measurement is used to calculate the mass
treated. This is to preclude a reaction between the bars and
[weight] by multiplying it by the surface area of coated bar and
fresh portland cement paste. Proprietary chromating solutions
bythezincdensity.Oneormoreofthefollowingmethodsshall
of equivalent strength are permitted in place of the generic
be permitted to be used to referee the results obtained by
chemical treatment specified.
magnetic thickness measurments.
4.3.1 If the chromate treatment is performed immediately
4.2.2.1 Stripping Method—The mass [weight] shall be de-
after galvanizing, it may be accomplished by quenching the
termined by stripping the coating from the steel reinforcing bar
steel reinforcing bars in a solution containing at least 0.2 mass
section in accordance with Test Method A 90/A 90M.
[wt] % of sodium dichromate in water (such as 2kg/m [3 oz of
NOTE 4—This is a destructive test appropriate for small samples of a
each 10 gal] of quench water) or by quench chromating in a
2 2
minimum of 2000 mm [3 in. ] of surface area. It does note include the
minimum of 0.2 % chromic acid solution.The solution shall be
mass [weight] of iron reacted with the zinc coating and may overestimate
at least 32°C [90°F]. The galvanized reinforcing bars shall be
coating mass [weight] by up to 10%.
immersed in the solution for at least 20 s.
4.2.2.2 Weighing Before and After Galvanizing—The mass
4.3.2 If the galvanized reinforcing bars are at ambient
[weight]shallbedeterminedbyweighingsteelreinforcingbars
temperature, the chromate treatment shall be the same as
before and after galvanizing. The difference between the two
specified in 4.3.1 except that 0.5 to 1.0 % concentration of
measurements divided by the surfce area of the bars provides
sulfuric acid shall be added as an activator of the chromate
the mass [weight]. The original weighing shall occur after
solution. In this case, there is no temperature requirement for
pickling and drying. The second weighing shall occur after
the activated chromate solution.
cooling to ambient temperature.
4.2.2.3 Microscopy—The mass [weight] shall be deter-
5. General Requirements
mined by cross-sectional and optical measurement in accor-
5.1 The steel reinforcing bars shall conform to one of the
dance with Test Method B 487. A cross-section sample of the
following specifications:A615M,A706M, orA996M [A615,
steel shall be polished and examined with an optical micro-
A 706, or A 996].
scope to determine the coating thickness. The coating mass
[weight] shall be determined by multiplying coating thickness 5.2 The zinc used for coating shall be any grade that
by the surface area of the coated sample and by the density of conforms to Specification B 6.
zinc.
4.2.3 Number of Tests—For determination of the coating
6. Finish and Adherence of Coating
mass [weight], three random samples shall be tested from each
6.1 The zinc coating shall have no bare spots. The coating
lot. For each magnetic thickness measurement sample, five or
shall be free of blisters, flux spots or inclusions, dross, and acid
more measurements shall be made at various points throughout
or black spots. Bars that stick together after galvanizing shall
the sample so as to represent the entire surface of the sample.
be rejected. In addition, the presence of tears or sharp spikes
A total of at least fifteen measurements shall be averaged to
which make the bar hazardous to handle shall be cause for
obtain the coating thickness. For the microscopy method, five
rejection. A matte gray finish appearance shall not be itself a
samples shall be tested per lot. Each sample shall be measured
cause
...


Questions, Comments and Discussion
Ask us and Technical Secretary will try to provide an answer. You can facilitate discussion about the standard in here.