ASTM D5458-95(2007)
(Test Method)Standard Test Method for Peel Cling of Stretch Wrap Film
Standard Test Method for Peel Cling of Stretch Wrap Film
SIGNIFICANCE AND USE
Cling is of critical importance in maintaining a tight wrap after a load is stretch wrapped.
SCOPE
1.1 This test method measures cling between two layers of film, in both a stretched and unstretched condition.
1.2 This standard does not purport to address all of the safety concerns, if any, associated with its use. It is the responsibility of the user of this standard to establish appropriate safety and health practices and determine the applicability of regulatory limitations prior to use.
General Information
Relations
Standards Content (Sample)
NOTICE: This standard has either been superseded and replaced by a new version or withdrawn.
Contact ASTM International (www.astm.org) for the latest information
Designation:D5458–95 (Reapproved 2007)
Standard Test Method for
Peel Cling of Stretch Wrap Film
This standard is issued under the fixed designation D5458; the number immediately following the designation indicates the year of
original adoption or, in the case of revision, the year of last revision. A number in parentheses indicates the year of last reapproval. A
superscript epsilon (´) indicates an editorial change since the last revision or reapproval.
1. Scope 4. Summary of Test Method
1.1 This test method measures cling between two layers of 4.1 This test method is a peel cling procedure. A1 in. (25
film, in both a stretched and unstretched condition. mm) wide film strip is adhered to a flat film attached to an
1.2 This standard does not purport to address all of the inclined surface. The force required to remove the film strip
safety concerns, if any, associated with its use. It is the from the flat film is measured.
responsibility of the user of this standard to establish appro-
5. Significance and Use
priate safety and health practices and determine the applica-
bility of regulatory limitations prior to use. 5.1 Cling is of critical importance in maintaining a tight
wrap after a load is stretch wrapped.
2. Referenced Documents
2 6. Equipment and Preparation
2.1 ASTM Standards:
6.1 Apparatus—Auniversaltestingmachinewithaconstant
D996 Terminology of Packaging and Distribution Environ-
ments rate of grip separation equipped, as follows:
6.1.1 One lightweight jaw equipped with 1 by 1.5 in. (25 by
D1898 Practice for Sampling of Plastics
D4332 Practice for Conditioning Containers, Packages, or 38 mm) flat rubber-faced grips,
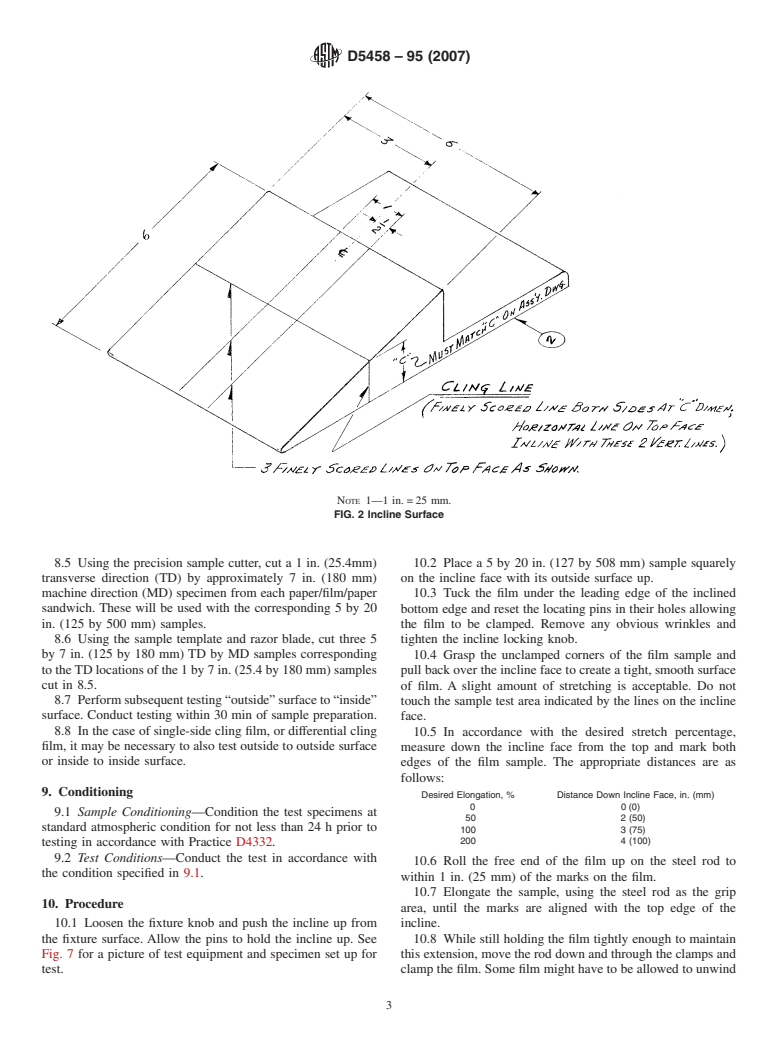
6.1.2 Cling attachment (see Figs. 1-5),
Packaging Components for Testing
E122 Practice for Calculating Sample Size to Estimate, 6.1.3 Cling clamp (see Fig. 6),
6.1.4 Load cell, 500-g load capacity,
With Specified Precision, the Average for a Characteristic
of a Lot or Process 6.1.5 If using pneumatic grips, air supply, 60 to 70 psi with
appropriate filter,
E691 Practice for Conducting an Interlaboratory Study to
Determine the Precision of a Test Method 6.1.6 Sample template, picture-frame style with inside di-
mensions of 5 by 20 in. (125 by 500 mm),
3. Terminology
6.1.7 Precision sample cutter, 1 6 0.001 in. (25.4 6 0.03
3.1 Definitions—General definitions for packaging and dis- mm)width,withprecisionof1 60.001in.(25.4 60.03mm),
tribution environments are found in Terminology D996. 6.1.8 Single-edged safety razor blade,
3.2 Definitions of Terms Specific to This Standard: 6.1.9 Synthetic bristle paint brush, 2 in. (50 mm) wide,
3.2.1 cling—the property of a material’s ability to adhere to 6.1.10 Ruler, 12 in. (approximately 300 mm),
itself. 6.1.11 Separation paper, 8.5 by 12 in. (approximately 125
3.2.2 stretch wrap material—a material used for over- by 280 mm) bond,
wrapping which, when applied under tension, elongates, and 6.1.12 String, 24 in. (approximately 610 mm) nonelastic,
through elastic recovery, conforms to the item(s) packaged. such as dental floss or fishing line,
6.1.13 Steel rod, approximately 0.25 in. (6 mm) in diameter
and 10 in. (255 mm) long.
This test method is under the jurisdiction of ASTM Committee D10 on
6.1.14 Cuttingsurface,approximately36by36in.(approxi-
Packaging and is the direct responsibility of Subcommittee D10.25 on Palletizing
mately 900 by 900 mm) plate glass, 0.25 in. (6 mm) thick.
and Unitizing of Loads.
Current edition approved April 1, 2007. Published May 2007. Originally
6.2 Preparation of Apparatus:
approved in 1994. Last previous edition approved in 2001 as D5458 – 95 (2001).
6.2.1 Install the load cell on the upper set frame and allow
DOI: 10.1520/D5458-95R07.
2 15-min warm-up period.
For referenced ASTM standards, visit the ASTM website, www.astm.org, or
6.2.2 Install the upper lightweight jaw.
contact ASTM Customer Service at service@astm.org. For Annual Book of ASTM
Standards volume information, refer to the standard’s Document Summary page on
the ASTM website.
3 4
Withdrawn. The last approved version of this historical standard is referenced JDC-1-10 Cutter is available from Thwing-Albert Instrument Co., 10960
on www.astm.org. Dutton Rd., Philadelphia, PA 19154 or other manufacturers.
Copyright © ASTM International, 100 Barr Harbor Drive, PO Box C700, West Conshohocken, PA 19428-2959, United States.
D5458–95 (2007)
NOTE 1—1 in. = 25 mm.
FIG. 1 Overall Fixture
6.2.3 Remove the lower jaw and install the cling attach- several production runs of a product. Strong conclusions about
ment, using the locking pin to secure. a specific property of a film cannot be based on a single roll of
6.2.4 Feed the end of the string not fastened to the clamp product.
through the pulley on the cling attachment and place in the
center of the upper jaw. 8. Test Specimens
6.2.5 With the clamp resting at the base of the incline
8.1 The roll to be tested must have at least three outer wraps
(which is in position on the base plate), adjust the crosshead, or
removed just prior to sample selection.
the amount of string pulled through the grips, or both in
8.2 With the film unwinding from the top of the roll, pull
combination, to achieve a distance of 5 by 7 in. (125 by 180
about 30 in. (760 mm) of sample film from the roll at a rate of
mm) between the top of the pulley and the bottom of the grips.
approximately 8 in./s (approximately 200 mm/s). Some films
Tighten the upper jaw. Adjust the crosshead return stop as
are sensitive to unwind speed so a consistent rate that does not
necessary.
induce appearance variations, such as stripes or bars, is
6.2.6 Set the testing machine crosshead speed for 5 in. (125
important.
mm). (Any chart speed is acceptable.)
8.3 Placethefilmbeingsampledontheglasscuttingsurface
6.2.7 Zero, balance, and calibrate the tester in accordance
being cautious not to create wrinkles. Mark the machine
with the operator’s manual.
direction (MD) of the sample. Do not touch the film test
7. Sampling
surface.
7.1 Acceptance sampling shall be in accordance with Prac- 8.4 Align the paper sheets under and over the film in three
tice D1898. locations equidistant across the film. Cut around the outside
7.2 Sampling for Other Purposes—The sampling and the edgesofthepaperstoformpaper/film/papersandwiches.Label
number of test specimens depends on the purposes of the the web location and side of the film that is to be on the outside
testing. Practice E122 is recommended. Test specimens should of a wrapped load; this will be referred to as the “outside”
be taken from several rolls of film, and when possible, from surface and the other side the “inside” surface.
D5458–95 (2007)
NOTE 1—1 in. = 25 mm.
FIG. 2 Incline Surface
8.5 Using the precision sample cutter, cut a 1 in. (25.4mm) 10.2 Placea5by20in. (127 by 508 mm) sample squarely
transverse direction (TD) by approximately 7 in. (180 mm) on the incline face with its outside surface up.
machine direction (MD) specimen from each paper/film/paper 10.3 Tuck the film under the leading edge of the inclined
sandwich. These will be used with the corresponding 5 by 20
bottom edge and reset the locating pins in their holes allowing
in. (125 by 500 mm) samples. the film to be clamped. Remove any obvious wrinkles and
8.6 Using the sample te
...


Questions, Comments and Discussion
Ask us and Technical Secretary will try to provide an answer. You can facilitate discussion about the standard in here.