ASTM D2202-00(2023)
(Test Method)Standard Test Method for Slump of Sealants
Standard Test Method for Slump of Sealants
SIGNIFICANCE AND USE
4.1 Excessive sealant slump or sag in a vertical joint may cause improper bead shape or inadequate sealant thickness in the completed joint. Slump measurements, as described in this test method, serve to evaluate only this application characteristic; they do not predict the performance capability of the sealant after installation.
SCOPE
1.1 This test method covers a laboratory procedure for the determination of the degree of slump of a sealant when used in a vertical joint in a structure.
1.2 The values stated in either inch-pound or SI (metric) units are to be separately regarded as the standard. Within the text, the inch-pound units are shown in parentheses.
1.3 This standard does not purport to address all of the safety concerns, if any, associated with its use. It is the responsibility of the user of this standard to establish appropriate safety, health, and environmental practices and determine the applicability of regulatory limitations prior to use.
Note 1: A related ISO standard is ISO 7390. The user should compare to determine how it differs from this test method.
1.4 This international standard was developed in accordance with internationally recognized principles on standardization established in the Decision on Principles for the Development of International Standards, Guides and Recommendations issued by the World Trade Organization Technical Barriers to Trade (TBT) Committee.
General Information
- Status
- Published
- Publication Date
- 31-May-2023
- Technical Committee
- C24 - Building Seals and Sealants
- Drafting Committee
- C24.20 - General Test Methods
Relations
- Effective Date
- 01-Mar-2019
- Effective Date
- 01-Mar-2018
- Effective Date
- 01-Nov-2017
- Effective Date
- 01-Jan-2017
- Effective Date
- 15-Nov-2016
- Effective Date
- 01-Sep-2016
- Effective Date
- 01-May-2014
- Effective Date
- 01-Feb-2014
- Effective Date
- 01-Nov-2013
- Effective Date
- 01-Dec-2012
- Effective Date
- 01-May-2012
- Effective Date
- 15-Jan-2012
- Effective Date
- 01-Mar-2011
- Effective Date
- 15-Jan-2011
- Effective Date
- 15-Jun-2010
Overview
ASTM D2202-00(2023) - Standard Test Method for Slump of Sealants provides a laboratory procedure for determining the degree of slump, also known as sag, of sealants when applied vertically in construction joints. Excessive slump can compromise proper bead shape and desired sealant thickness, affecting the application quality of building joints. This standard method is crucial for manufacturers, contractors, and quality control professionals to assess and specify how well a sealant retains its form before it has cured.
Key Topics
- Slump Measurement: Describes a controlled method to measure vertical flow (slump) of building sealants, ensuring consistency in test results.
- Application Limitation: This test method evaluates only the slump characteristic during application, not post-installation performance.
- Test Apparatus: Specifies the use of a flow test jig in either SI (metric) or inch-pound units, a gravity convection oven, steel spatula, and plastic scraper.
- Sample Preparation and Conditioning: Instructs on the preparation and conditioning of the sealant and test apparatus to standard ambient conditions and test temperature, providing reproducible results.
- Reporting Results: Slump is quantified and reported from a minimum of two tests per sealant specimen; average values provide quality assessment.
Applications
- Quality Control in Manufacturing: Ensures that formulated sealants meet required specifications for slump, enhancing the reliability and uniformity of products released to the market.
- Construction and Building Maintenance: Helps specifiers and applicators choose sealants that will maintain proper bead shape and coverage in vertical joints, preventing gaps or weak seals.
- Sealant Selection and Specification: Supports architects, builders, and engineers in selecting sealants suitable for specific vertical joint applications, particularly where appearance and structural integrity are priorities.
- Research and Development: Enables sealant producers to compare formulations, optimize material properties, and demonstrate compliance with recognized test methodology.
- Laboratory Testing Services: Offers a repeatable and standardized approach for independent laboratories to evaluate sealant behavior and provide third-party certification.
Related Standards
- ASTM C717: Terminology of Building Seals and Sealants, providing definitions of key terms used in ASTM D2202.
- ISO 7390: Building Construction - Sealants - Determination of Resistance to Flow, a comparable international standard; users should review both standards to identify similarities and differences.
- Other ASTM Standards: Test methods and guides relevant to building sealant performance and quality control.
Keywords: ASTM D2202, sealant slump, sealant sag, building sealants, vertical joint sealant, quality control, laboratory test, sealant testing standard, construction sealant, resistance to flow.
In conclusion, ASTM D2202-00(2023) is a vital standard for verifying the application performance of sealants in vertical joints. By following this method, industry professionals can select, specify, and confirm sealant materials that minimize slump, ensuring long-lasting and visually consistent construction seals.
Buy Documents
ASTM D2202-00(2023) - Standard Test Method for Slump of Sealants
Get Certified
Connect with accredited certification bodies for this standard

ICC Evaluation Service
Building products evaluation and certification.

QAI Laboratories
Building and construction product testing and certification.

Aboma Certification B.V.
Specialized in construction, metal, and transport sectors.
Sponsored listings
Frequently Asked Questions
ASTM D2202-00(2023) is a standard published by ASTM International. Its full title is "Standard Test Method for Slump of Sealants". This standard covers: SIGNIFICANCE AND USE 4.1 Excessive sealant slump or sag in a vertical joint may cause improper bead shape or inadequate sealant thickness in the completed joint. Slump measurements, as described in this test method, serve to evaluate only this application characteristic; they do not predict the performance capability of the sealant after installation. SCOPE 1.1 This test method covers a laboratory procedure for the determination of the degree of slump of a sealant when used in a vertical joint in a structure. 1.2 The values stated in either inch-pound or SI (metric) units are to be separately regarded as the standard. Within the text, the inch-pound units are shown in parentheses. 1.3 This standard does not purport to address all of the safety concerns, if any, associated with its use. It is the responsibility of the user of this standard to establish appropriate safety, health, and environmental practices and determine the applicability of regulatory limitations prior to use. Note 1: A related ISO standard is ISO 7390. The user should compare to determine how it differs from this test method. 1.4 This international standard was developed in accordance with internationally recognized principles on standardization established in the Decision on Principles for the Development of International Standards, Guides and Recommendations issued by the World Trade Organization Technical Barriers to Trade (TBT) Committee.
SIGNIFICANCE AND USE 4.1 Excessive sealant slump or sag in a vertical joint may cause improper bead shape or inadequate sealant thickness in the completed joint. Slump measurements, as described in this test method, serve to evaluate only this application characteristic; they do not predict the performance capability of the sealant after installation. SCOPE 1.1 This test method covers a laboratory procedure for the determination of the degree of slump of a sealant when used in a vertical joint in a structure. 1.2 The values stated in either inch-pound or SI (metric) units are to be separately regarded as the standard. Within the text, the inch-pound units are shown in parentheses. 1.3 This standard does not purport to address all of the safety concerns, if any, associated with its use. It is the responsibility of the user of this standard to establish appropriate safety, health, and environmental practices and determine the applicability of regulatory limitations prior to use. Note 1: A related ISO standard is ISO 7390. The user should compare to determine how it differs from this test method. 1.4 This international standard was developed in accordance with internationally recognized principles on standardization established in the Decision on Principles for the Development of International Standards, Guides and Recommendations issued by the World Trade Organization Technical Barriers to Trade (TBT) Committee.
ASTM D2202-00(2023) is classified under the following ICS (International Classification for Standards) categories: 91.100.50 - Binders. Sealing materials. The ICS classification helps identify the subject area and facilitates finding related standards.
ASTM D2202-00(2023) has the following relationships with other standards: It is inter standard links to ASTM C717-19, ASTM C717-18, ASTM C717-17a, ASTM C717-17, ASTM C717-16a, ASTM C717-16, ASTM C717-14a, ASTM C717-14, ASTM C717-13, ASTM C717-12b, ASTM C717-12a, ASTM C717-12, ASTM C717-11a, ASTM C717-11, ASTM C717-10. Understanding these relationships helps ensure you are using the most current and applicable version of the standard.
ASTM D2202-00(2023) is available in PDF format for immediate download after purchase. The document can be added to your cart and obtained through the secure checkout process. Digital delivery ensures instant access to the complete standard document.
Standards Content (Sample)
This international standard was developed in accordance with internationally recognized principles on standardization established in the Decision on Principles for the
Development of International Standards, Guides and Recommendations issued by the World Trade Organization Technical Barriers to Trade (TBT) Committee.
Designation: D2202 − 00 (Reapproved 2023)
Standard Test Method for
Slump of Sealants
This standard is issued under the fixed designation D2202; the number immediately following the designation indicates the year of
original adoption or, in the case of revision, the year of last revision. A number in parentheses indicates the year of last reapproval. A
superscript epsilon (´) indicates an editorial change since the last revision or reapproval.
1. Scope 4. Significance and Use
1.1 This test method covers a laboratory procedure for the 4.1 Excessive sealant slump or sag in a vertical joint may
determination of the degree of slump of a sealant when used in cause improper bead shape or inadequate sealant thickness in
a vertical joint in a structure. the completed joint. Slump measurements, as described in this
test method, serve to evaluate only this application character-
1.2 The values stated in either inch-pound or SI (metric)
istic; they do not predict the performance capability of the
units are to be separately regarded as the standard. Within the
sealant after installation.
text, the inch-pound units are shown in parentheses.
1.3 This standard does not purport to address all of the
5. Apparatus
safety concerns, if any, associated with its use. It is the
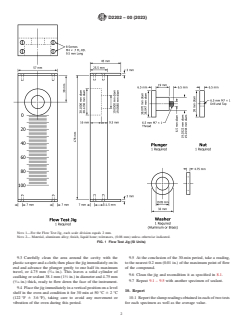
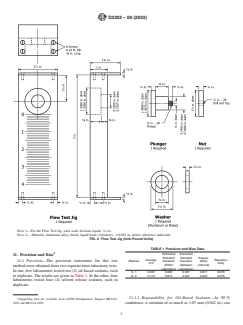
5.1 Flow Test Jig, constructed in accordance with Fig. 1 (SI
responsibility of the user of this standard to establish appro-
units) or Fig. 2 (inch-pound units).
priate safety, health, and environmental practices and deter-
mine the applicability of regulatory limitations prior to use.
NOTE 2—Most existing flow test jigs have been constructed in inch-
pound units. Preferred construction of new jigs is as described in Fig. 1 in
NOTE 1—A related ISO standard is ISO 7390. The user should compare
SI units.
to determine how it differs from this test method.
5.2 Gravity Convection Oven, having a temperature con-
1.4 This international standard was developed in accor-
trolled at 50 °C 6 2 °C (122 °F 6 3.6 °F).
dance with internationally recognized principles on standard-
5.3 Steel Spatula:
ization established in the Decision on Principles for the
Development of International Standards, Guides and Recom-
5.4 Plastic Scraper, such as an ordinary 114 by 114-mm
mendations issued by the World Trade Organization Technical 1 1
(4 ⁄2 by 4 ⁄2-in.) plastic tile.
Barriers to Trade (TBT) Committee.
6. Reagent
2. Referenced Documents
2 6.1 Solvent, such as methyl ethyl ketone.
2.1 ASTM Standards:
C717 Terminology of Building Seals and Sealants
3 7. Sampling
2.2 ISO Standards:
7.1 Take test specimens from a previously unopened con-
ISO 7390 Building Construction–Sealants–Determination of
tainer and mix thoroughly before using, if required for homo-
Resistance to Flow
geneity.
3. Terminology
8. Conditioning
3.1 Definitions—Refer to Terminology C717 for definitions
of the following terms found in this test method: bead, joint,
8.1 Condition both the test jig and the sealant to be tested
sealant.
for at least 5 h at 23 6 2°C (73.4 6 3.6°F).
9. Procedure
This test method is under the jurisdiction of ASTM Committee C24 on Building
Seals and Sealants and is the direct responsibility of Subcommittee C24.20 on
9.1 Thoroughly clean the test jig with the solvent; then place
General Test Methods.
it on a level table with the front face upward and the plunger
Current edition approved June 1, 2023. Published July 2023. Originally approved
in 1963 as D2202 – 63 T. Last previous edition approved in 2019 as D2202 – 00
depressed to the limit of its travel.
(2019). DOI: 10.1520/D2202-00R23.
9.2 Place the mixed, conditioned sealant in the jig cavity.
For referenced ASTM standards, visit the ASTM website, www.astm.org, or
contact ASTM Customer Service at service@astm.org. For Annual Book of ASTM
Level the sealant flush with the surface of the block, using one
Standards volume information, refer to the standard’s Document Summary page on
gentle upward stroke of the plastic scraper held at a 45° angle.
the ASTM website.
3 Avoid forming air pockets in the sealant, especially near the
Available from American National Standards Institute, 11 W. 42nd St., 13th
Floor, New York, NY 10036. surface of the plunger.
Copyright © ASTM International, 100 Barr Harbor Drive, PO Box C700, West Conshohocken, PA 19428-2959. United States
D2202 − 00 (2023)
NOTE 1—For the Flow Test Jig, each scale division equals 2 mm.
NOTE 2— Material, aluminum alloy; finish, liquid hone; tolerances, (0.08 mm) unless otherwise indicated.
FIG. 1 Flow Test Jig (SI Units)
9.3 Carefull
...


Questions, Comments and Discussion
Ask us and Technical Secretary will try to provide an answer. You can facilitate discussion about the standard in here.
Loading comments...