ASTM A1060/A1060M-10
(Specification)Standard Specification for Zinc-Coated (Galvanized) Steel Welded Wire Reinforcement, Plain and Deformed, for Concrete
Standard Specification for Zinc-Coated (Galvanized) Steel Welded Wire Reinforcement, Plain and Deformed, for Concrete
SCOPE
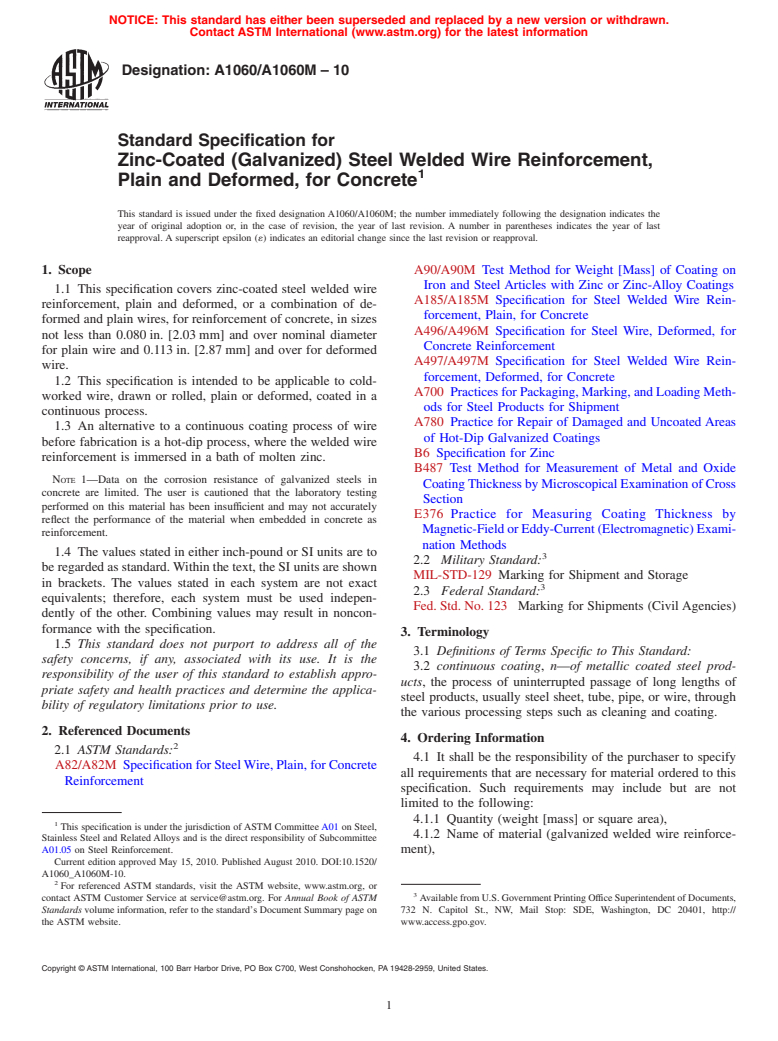
1.1 This specification covers zinc-coated steel welded wire reinforcement, plain and deformed, or a combination of deformed and plain wires, for reinforcement of concrete, in sizes not less than 0.080 in. [2.03 mm] and over nominal diameter for plain wire and 0.113 in. [2.87 mm] and over for deformed wire.
1.2 This specification is intended to be applicable to cold-worked wire, drawn or rolled, plain or deformed, coated in a continuous process.
1.3 An alternative to a continuous coating process of wire before fabrication is a hot-dip process, where the welded wire reinforcement is immersed in a bath of molten zinc.
Note 1—Data on the corrosion resistance of galvanized steels in concrete are limited. The user is cautioned that the laboratory testing performed on this material has been insufficient and may not accurately reflect the performance of the material when embedded in concrete as reinforcement.
1.4 The values stated in either inch-pound or SI units are to be regarded as standard. Within the text, the SI units are shown in brackets. The values stated in each system are not exact equivalents; therefore, each system must be used independently of the other. Combining values may result in nonconformance with the specification.
1.5 This standard does not purport to address all of the safety concerns, if any, associated with its use. It is the responsibility of the user of this standard to establish appropriate safety and health practices and determine the applicability of regulatory limitations prior to use.
General Information
Relations
Standards Content (Sample)
NOTICE: This standard has either been superseded and replaced by a new version or withdrawn.
Contact ASTM International (www.astm.org) for the latest information
Designation: A1060/A1060M – 10
Standard Specification for
Zinc-Coated (Galvanized) Steel Welded Wire Reinforcement,
Plain and Deformed, for Concrete
This standard is issued under the fixed designation A1060/A1060M; the number immediately following the designation indicates the
year of original adoption or, in the case of revision, the year of last revision. A number in parentheses indicates the year of last
reapproval. A superscript epsilon (´) indicates an editorial change since the last revision or reapproval.
1. Scope A90/A90M Test Method for Weight [Mass] of Coating on
Iron and Steel Articles with Zinc or Zinc-Alloy Coatings
1.1 This specification covers zinc-coated steel welded wire
A185/A185M Specification for Steel Welded Wire Rein-
reinforcement, plain and deformed, or a combination of de-
forcement, Plain, for Concrete
formed and plain wires, for reinforcement of concrete, in sizes
A496/A496M Specification for Steel Wire, Deformed, for
not less than 0.080 in. [2.03 mm] and over nominal diameter
Concrete Reinforcement
for plain wire and 0.113 in. [2.87 mm] and over for deformed
A497/A497M Specification for Steel Welded Wire Rein-
wire.
forcement, Deformed, for Concrete
1.2 This specification is intended to be applicable to cold-
A700 PracticesforPackaging,Marking,andLoadingMeth-
worked wire, drawn or rolled, plain or deformed, coated in a
ods for Steel Products for Shipment
continuous process.
A780 Practice for Repair of Damaged and Uncoated Areas
1.3 An alternative to a continuous coating process of wire
of Hot-Dip Galvanized Coatings
before fabrication is a hot-dip process, where the welded wire
B6 Specification for Zinc
reinforcement is immersed in a bath of molten zinc.
B487 Test Method for Measurement of Metal and Oxide
NOTE 1—Data on the corrosion resistance of galvanized steels in
CoatingThicknessbyMicroscopicalExaminationofCross
concrete are limited. The user is cautioned that the laboratory testing
Section
performed on this material has been insufficient and may not accurately
E376 Practice for Measuring Coating Thickness by
reflect the performance of the material when embedded in concrete as
Magnetic-FieldorEddy-Current(Electromagnetic)Exami-
reinforcement.
nation Methods
1.4 The values stated in either inch-pound or SI units are to
2.2 Military Standard:
be regarded as standard.Within the text, the SI units are shown
MIL-STD-129 Marking for Shipment and Storage
in brackets. The values stated in each system are not exact
2.3 Federal Standard:
equivalents; therefore, each system must be used indepen-
Fed. Std. No. 123 Marking for Shipments (Civil Agencies)
dently of the other. Combining values may result in noncon-
formance with the specification.
3. Terminology
1.5 This standard does not purport to address all of the
3.1 Definitions of Terms Specific to This Standard:
safety concerns, if any, associated with its use. It is the
3.2 continuous coating, n—of metallic coated steel prod-
responsibility of the user of this standard to establish appro-
ucts, the process of uninterrupted passage of long lengths of
priate safety and health practices and determine the applica-
steel products, usually steel sheet, tube, pipe, or wire, through
bility of regulatory limitations prior to use.
the various processing steps such as cleaning and coating.
2. Referenced Documents
4. Ordering Information
2.1 ASTM Standards:
4.1 It shall be the responsibility of the purchaser to specify
A82/A82M Specification for SteelWire, Plain, for Concrete
all requirements that are necessary for material ordered to this
Reinforcement
specification. Such requirements may include but are not
limited to the following:
4.1.1 Quantity (weight [mass] or square area),
This specification is under the jurisdiction of ASTM Committee A01 on Steel,
4.1.2 Name of material (galvanized welded wire reinforce-
Stainless Steel and Related Alloys and is the direct responsibility of Subcommittee
A01.05 on Steel Reinforcement. ment),
Current edition approved May 15, 2010. Published August 2010. DOI:10.1520/
A1060_A1060M-10.
For referenced ASTM standards, visit the ASTM website, www.astm.org, or
contact ASTM Customer Service at service@astm.org. For Annual Book of ASTM AvailablefromU.S.GovernmentPrintingOfficeSuperintendentofDocuments,
Standards volume information, refer to the standard’s Document Summary page on 732 N. Capitol St., NW, Mail Stop: SDE, Washington, DC 20401, http://
the ASTM website. www.access.gpo.gov.
Copyright © ASTM International, 100 Barr Harbor Drive, PO Box C700, West Conshohocken, PA 19428-2959, United States.
A1060/A1060M – 10
NOTE 2—Zinc coated wire produced as “regular coating” shall have the
4.1.3 Wire spacing and sizes,
full surface covered with zinc, but there is no specified minimum weight
4.1.4 Conforms to SpecificationA185/A185M or Specifica-
of coating.
tion A497/A497M.
4.1.5 ASTM designation and year of issue, 6.1.1.2 When the product is coated after fabrication in a
4.1.6 Minimum yield strength if Supplement S1 of Specifi- hot-dip process, coating thickness are given in Table 3 for
cation A82/A82M or Specification A496/A496M applies, various zinc coating grades.
4.1.7 Length and width of sheets or rolls,
NOTE 3—At the purchaser’s request the galvanized coating may be
4.1.8 Required zinc coating weight [mass] (coated before
chromate treated. This is to minimize a reaction between the reinforcing
fabrication) or zinc coating thickness (coated after fabrication),
steel and fresh portland cement paste. Proprietary chromating solutions of
and equivalent strength are permitted in place of the generic chemical
treatment specified.
4.1.9 Packaging (see Section 13).
6.1.2 Magnetic Thickness Measurements—The weight
5. General Requirements
[mass]ofthecoatingmaybedeterminedbymagneticthickness
5.1 The wire used in the manufacture of welded wire gage measurements in accordance with Practice E376. The
reinforcement shall conform to either SpecificationA82/A82M thickness measurement is used to calculate the weight [mass]
with optional Supplement S1 or Specification A496/A496M by multiplying it by the surface area of coated wire and by the
with optional Supplement S1. After galvanizing, the welded zincdensity.Becausethisformoftestingcanyieldinconsistent
wire shall meet the required mechanical properties of either and potentially unreliable results on smaller sizes of wire, one
Specifications A82/A82M or A496/A496M, which ever is or more of the following methods shall be permitted to be used
selected, except for the bend test requirements as prescribed in to referee and take precedence over the results obtained by
Table 1 of this specification. magnetic thickness measurements.
5.2 Welded wire reinforcement shall be furnished either in 6.1.2.1 Stripping Method—The weight [mass] shall be de-
flat sheets, or in rolls, as specified by the purchaser. termined by stripping the coating from the steel wire specimen
5.3 The zinc used for coating shall be any grade that in accordance with Section 8 and Test Method A90/A90M.
conforms to Specification B6. 6.1.2.2 Weighing Before and After Galvanizing—The
weight [mass] shall be determined by weighing the sample
6. Galvanizing before and after galvanizing. The difference between the two
measurements divided by the surface area of the sample
6.1 Mass [Weight] Thickness of Coating and Test:
provides the weight [mass]. The original weighing shall occur
6.1.1 This specification includes six classes of coating
after pickling and drying. The second weighing shall occur
weight [mass] when the welded wire reinforcement is coated
after cooling to ambient temperature.
before fabrication and four coating thickness grades when the
6.1.2.3 Microscopy—The weight [mass] shall be deter-
welded wire reinforcement is coated after fabrication. The
mined by cross-sectional and optical measurement in accor-
weight [mass] of zinc coating is based on the measured
dance with Test Method B487. A cross-section sample of the
diameter of the wire when the stripping method is performed
steel shall be polished and examined with an optical micro-
and the nominal diameter for all other methods, and shall
scope to determine the coating thickness. The coating weight
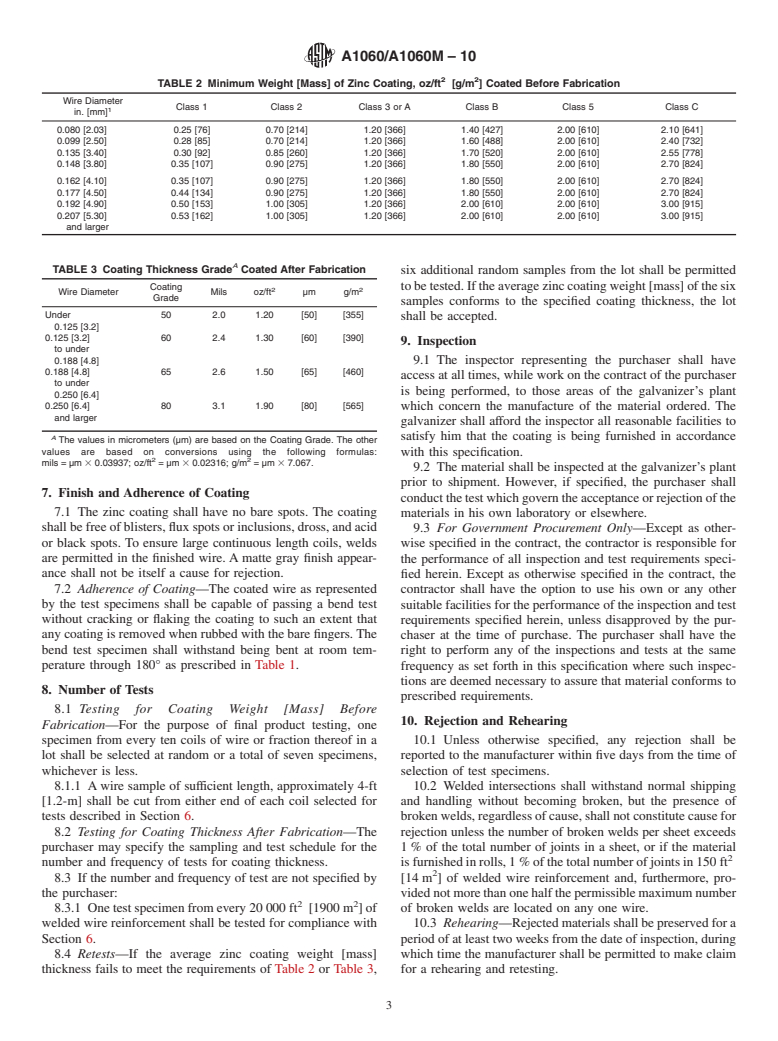
conform to the requirements shown in Table 2 or Table 3.
[mass]shallbedeterminedbymultiplyingcoatingthicknessby
Individual results not more than 10 % below the minimum
the surface area of the coated sample and by the density of
valuesspecifiedinTable2orTable3areallowediftheaverage
zinc.
of at least two samples from the same coil are equal to or
6.1.3 Number of Tests—For determination of the coating
greater than the minimum, individual results shall be not less
2 2
weight [mass], three random samples shall be tested from each
than 1.08 oz/ft [330 g/m ].
lot. For each magnetic thickness measurement sample, five or
6.1.1.1 When the product is coated before fabrication in a
more measurements shall be made along the length and width
continuous coating process, coating weights are given in Table
of the sample so as to represent the entire surface of the
2 for various zinc coating classes.
sample. A total of at least fifteen measurements shall be
averaged to obtain the coating thickness. For the microscopy
method, five samples shall be tested per lot. Each sample shall
TABLE 1 Mandrel Diameters for Test for Adherence of Zinc
be measured on four sides and the total of twenty measure-
Coating Inch-Pound Units [SI Units]
mentsshallbeaveragedtoobtainthecoatingthickness.Forthe
Mandrel Diameters of Coating Classes and Grades
stripping method and the weighing method, three samples per
Class 3 or A, Grade 50,
Regular and
lot shall be measured.
Wire Diameter 4, B, 5, and 60, 65, and
Class 1
C 80
NOTE 4—A lot shall be as follows: all wire of the sa
...


Questions, Comments and Discussion
Ask us and Technical Secretary will try to provide an answer. You can facilitate discussion about the standard in here.