ASTM B571-23
(Practice)Standard Practice for Qualitative Adhesion Testing of Metallic Coatings
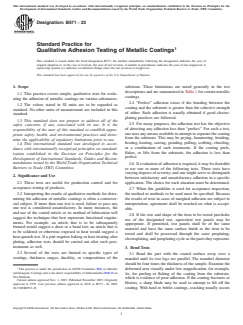
Standard Practice for Qualitative Adhesion Testing of Metallic Coatings
SIGNIFICANCE AND USE
2.1 These tests are useful for production control and for acceptance testing of products.
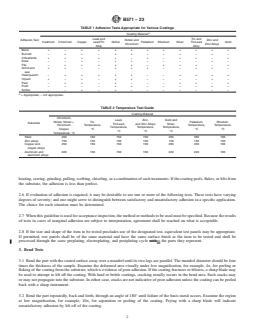
2.2 Interpreting the results of qualitative methods for determining the adhesion of metallic coatings is often a controversial subject. If more than one test is used, failure to pass any one test is considered unsatisfactory. In many instances, the end use of the coated article or its method of fabrication will suggest the technique that best represents functional requirements. For example, an article that is to be subsequently formed would suggest a draw or a bend test; an article that is to be soldered or otherwise exposed to heat would suggest a heat-quench test. If a part requires baking or heat treating after plating, adhesion tests should be carried out after such posttreatment as well.
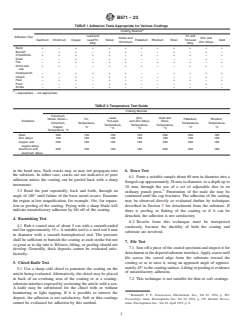
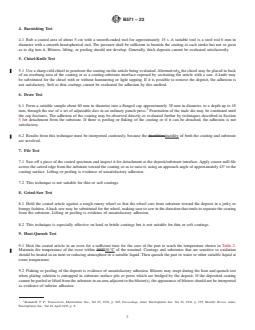
2.3 Several of the tests are limited to specific types of coatings, thickness ranges, ductility, or compositions of the substrate. These limitations are noted generally in the test descriptions and are summarized in Table 1 for certain metallic coatings. (A) + Appropriate; − not appropriate.
2.4 “Perfect” adhesion exists if the bonding between the coating and the substrate is greater than the cohesive strength of either. Such adhesion is usually obtained if good electroplating practices are followed.
2.5 For many purposes, the adhesion test has the objective of detecting any adhesion less than “perfect.” For such a test, one uses any means available to attempt to separate the coating from the substrate. This may be prying, hammering, bending, beating, heating, sawing, grinding, pulling, scribing, chiseling, or a combination of such treatments. If the coating peels, flakes, or lifts from the substrate, the adhesion is less than perfect.
2.6 If evaluation of adhesion is required, it may be desirable to use one or more of the following tests. These tests have varying degrees of severity; and one might serve to distinguish between satisfactory and unsatisfactory adhesion in a ...
SCOPE
1.1 This practice covers simple, qualitative tests for evaluating the adhesion of metallic coatings on various substances.
1.2 The values stated in SI units are to be regarded as standard. No other units of measurement are included in this standard.
1.3 This standard does not purport to address all of the safety concerns, if any, associated with its use. It is the responsibility of the user of this standard to establish appropriate safety, health, and environmental practices and determine the applicability of regulatory limitations prior to use.
1.4 This international standard was developed in accordance with internationally recognized principles on standardization established in the Decision on Principles for the Development of International Standards, Guides and Recommendations issued by the World Trade Organization Technical Barriers to Trade (TBT) Committee.
General Information
- Status
- Published
- Publication Date
- 31-Oct-2023
- Technical Committee
- B08 - Metallic and Inorganic Coatings
- Drafting Committee
- B08.10 - Test Methods
Relations
- Effective Date
- 01-Nov-2023
- Effective Date
- 01-Nov-2023
- Effective Date
- 01-Nov-2023
- Effective Date
- 01-Nov-2023
- Effective Date
- 01-Nov-2023
- Effective Date
- 01-Nov-2023
- Referred By
ASTM B816-00(2021) - Standard Specification for Coatings of Cadmium-Zinc Mechanically Deposited - Effective Date
- 01-Nov-2023
- Referred By
ASTM B734-97(2023) - Standard Specification for Electrodeposited Copper for Engineering Uses - Effective Date
- 01-Nov-2023
- Effective Date
- 01-Nov-2023
- Referred By
ASTM B700-20 - Standard Specification for Electrodeposited Coatings of Silver for Engineering Use - Effective Date
- 01-Nov-2023
- Effective Date
- 01-Nov-2023
- Effective Date
- 01-Nov-2023
- Effective Date
- 01-Nov-2023
- Effective Date
- 01-Nov-2023
- Effective Date
- 01-Nov-2023
Overview
ASTM B571-23: Standard Practice for Qualitative Adhesion Testing of Metallic Coatings provides guidance for qualitative, non-quantitative methods to evaluate the adhesion of metallic coatings to a wide variety of substrates. Developed by ASTM International, this standard is recognized globally and widely used for production control and acceptance testing in manufacturing environments. The practices described in ASTM B571-23 are essential for verifying that metallic coatings such as nickel, chromium, zinc, silver, gold, and others are adequately bonded to base materials, ensuring performance and durability in their end-use applications.
Key Topics
- Purpose of Testing: The standard outlines methods designed for rapid assessment of coating adhesion. It emphasizes that failure in any chosen adhesion test indicates unsatisfactory bonding.
- Test Selection: The choice of test method should be guided by the intended use or fabrication process of the coated article. For example, a component destined for forming may be best evaluated using a bend test, while items exposed to heat might require a heat-quench test.
- Assessment Criteria: The main objective is to detect any adhesion below “perfect”-that is, where the bond between coating and substrate is less robust than the cohesive strength of either material. Evidence of peeling, flaking, or lifting is considered a sign of inadequate adhesion.
- Limitations of Methods: Different techniques may suit only certain metallic coatings, thicknesses, ductility levels, or substrate compositions. The applicability and limitations are summarized within the standard.
- Interpretation and Disputes: Results can be subject to interpretation, especially in borderline cases. Agreement on test method and acceptance criteria should be reached before testing, particularly for acceptance inspections.
Applications
ASTM B571-23 applies across industries where metallic coatings are used to enhance corrosion resistance, aesthetics, wear resistance, or other functional properties. Typical applications include:
- Electronics: Ensuring reliable adhesion of metallic layers in circuit boards or connectors.
- Automotive and Aerospace: Verifying the bond integrity of protective or decorative coatings on parts subjected to mechanical stress, forming, or high-temperature environments.
- General Manufacturing: Production quality control for components receiving electroplated, hot-dip, or other metallic coatings.
- Quality Assurance Laboratories: Third-party or internal testing to confirm product conformance to specifications.
Common Qualitative Adhesion Tests
- Bend Test: Deforming the coated part and checking for coating separation.
- Burnishing Test: Rubbing the coating with a rounded tool to look for blisters or peeling.
- Chisel/Knife Test: Penetrating the coating with a sharp tool to evaluate adhesion.
- Draw Test: Forming the substrate into a shape and observing coating performance.
- File and Grind/Saw Tests: Mechanically stressing the coating/substrate interface.
- Heat-Quench Test: Heating the coated part to a specified temperature then quickly cooling it to check for flaking.
- Impact, Peel, Push, and Scribe-Grid Tests: Each tailored for particular coating types or thickness ranges.
Related Standards
Those utilizing ASTM B571-23 may also reference related ASTM and international standards for metallic coatings, test methods, and quality assurance, such as:
- ASTM B117 - Standard Practice for Operating Salt Spray (Fog) Apparatus
- ASTM B487 - Standard Test Method for Measurement of Metal and Oxide Coating Thickness by Microscopical Examination of Cross Section
- ASTM B633 - Standard Specification for Electrodeposited Coatings of Zinc on Iron and Steel
- ISO 2819 - Metallic Coatings on Metallic Substrates-Preparation of Samples for Testing Adhesion
Practical Value
ASTM B571-23 is vital for organizations wishing to ensure the consistent quality and durability of metallic coatings. Its qualitative adhesion tests provide quick, easy-to-interpret results, supporting rapid decision-making during production and final inspection. Adherence to this standard helps manufacturers and suppliers minimize failure risks, enhance customer satisfaction, and comply with customer or regulatory requirements for metallic coatings.
Keywords: ASTM B571-23, adhesion testing, metallic coating adhesion, qualitative tests, coating evaluation, production control, acceptance testing, electroplating adhesion, quality assurance
Buy Documents
ASTM B571-23 - Standard Practice for Qualitative Adhesion Testing of Metallic Coatings
REDLINE ASTM B571-23 - Standard Practice for Qualitative Adhesion Testing of Metallic Coatings
Get Certified
Connect with accredited certification bodies for this standard

National Aerospace and Defense Contractors Accreditation Program (NADCAP)
Global cooperative program for special process quality in aerospace.

CARES (UK Certification Authority for Reinforcing Steels)
UK certification for reinforcing steels and construction.

DVS-ZERT GmbH
German welding certification society.
Sponsored listings
Frequently Asked Questions
ASTM B571-23 is a standard published by ASTM International. Its full title is "Standard Practice for Qualitative Adhesion Testing of Metallic Coatings". This standard covers: SIGNIFICANCE AND USE 2.1 These tests are useful for production control and for acceptance testing of products. 2.2 Interpreting the results of qualitative methods for determining the adhesion of metallic coatings is often a controversial subject. If more than one test is used, failure to pass any one test is considered unsatisfactory. In many instances, the end use of the coated article or its method of fabrication will suggest the technique that best represents functional requirements. For example, an article that is to be subsequently formed would suggest a draw or a bend test; an article that is to be soldered or otherwise exposed to heat would suggest a heat-quench test. If a part requires baking or heat treating after plating, adhesion tests should be carried out after such posttreatment as well. 2.3 Several of the tests are limited to specific types of coatings, thickness ranges, ductility, or compositions of the substrate. These limitations are noted generally in the test descriptions and are summarized in Table 1 for certain metallic coatings. (A) + Appropriate; − not appropriate. 2.4 “Perfect” adhesion exists if the bonding between the coating and the substrate is greater than the cohesive strength of either. Such adhesion is usually obtained if good electroplating practices are followed. 2.5 For many purposes, the adhesion test has the objective of detecting any adhesion less than “perfect.” For such a test, one uses any means available to attempt to separate the coating from the substrate. This may be prying, hammering, bending, beating, heating, sawing, grinding, pulling, scribing, chiseling, or a combination of such treatments. If the coating peels, flakes, or lifts from the substrate, the adhesion is less than perfect. 2.6 If evaluation of adhesion is required, it may be desirable to use one or more of the following tests. These tests have varying degrees of severity; and one might serve to distinguish between satisfactory and unsatisfactory adhesion in a ... SCOPE 1.1 This practice covers simple, qualitative tests for evaluating the adhesion of metallic coatings on various substances. 1.2 The values stated in SI units are to be regarded as standard. No other units of measurement are included in this standard. 1.3 This standard does not purport to address all of the safety concerns, if any, associated with its use. It is the responsibility of the user of this standard to establish appropriate safety, health, and environmental practices and determine the applicability of regulatory limitations prior to use. 1.4 This international standard was developed in accordance with internationally recognized principles on standardization established in the Decision on Principles for the Development of International Standards, Guides and Recommendations issued by the World Trade Organization Technical Barriers to Trade (TBT) Committee.
SIGNIFICANCE AND USE 2.1 These tests are useful for production control and for acceptance testing of products. 2.2 Interpreting the results of qualitative methods for determining the adhesion of metallic coatings is often a controversial subject. If more than one test is used, failure to pass any one test is considered unsatisfactory. In many instances, the end use of the coated article or its method of fabrication will suggest the technique that best represents functional requirements. For example, an article that is to be subsequently formed would suggest a draw or a bend test; an article that is to be soldered or otherwise exposed to heat would suggest a heat-quench test. If a part requires baking or heat treating after plating, adhesion tests should be carried out after such posttreatment as well. 2.3 Several of the tests are limited to specific types of coatings, thickness ranges, ductility, or compositions of the substrate. These limitations are noted generally in the test descriptions and are summarized in Table 1 for certain metallic coatings. (A) + Appropriate; − not appropriate. 2.4 “Perfect” adhesion exists if the bonding between the coating and the substrate is greater than the cohesive strength of either. Such adhesion is usually obtained if good electroplating practices are followed. 2.5 For many purposes, the adhesion test has the objective of detecting any adhesion less than “perfect.” For such a test, one uses any means available to attempt to separate the coating from the substrate. This may be prying, hammering, bending, beating, heating, sawing, grinding, pulling, scribing, chiseling, or a combination of such treatments. If the coating peels, flakes, or lifts from the substrate, the adhesion is less than perfect. 2.6 If evaluation of adhesion is required, it may be desirable to use one or more of the following tests. These tests have varying degrees of severity; and one might serve to distinguish between satisfactory and unsatisfactory adhesion in a ... SCOPE 1.1 This practice covers simple, qualitative tests for evaluating the adhesion of metallic coatings on various substances. 1.2 The values stated in SI units are to be regarded as standard. No other units of measurement are included in this standard. 1.3 This standard does not purport to address all of the safety concerns, if any, associated with its use. It is the responsibility of the user of this standard to establish appropriate safety, health, and environmental practices and determine the applicability of regulatory limitations prior to use. 1.4 This international standard was developed in accordance with internationally recognized principles on standardization established in the Decision on Principles for the Development of International Standards, Guides and Recommendations issued by the World Trade Organization Technical Barriers to Trade (TBT) Committee.
ASTM B571-23 is classified under the following ICS (International Classification for Standards) categories: 25.220.40 - Metallic coatings. The ICS classification helps identify the subject area and facilitates finding related standards.
ASTM B571-23 has the following relationships with other standards: It is inter standard links to ASTM B571-18, ASTM B200-22, ASTM B984-12(2020)e1, ASTM B766-23, ASTM B650-95(2023), ASTM B867-95(2023), ASTM B816-00(2021), ASTM B734-97(2023), ASTM B699-86(2021)e1, ASTM B700-20, ASTM B679-98(2021), ASTM B832-93(2023), ASTM B733-22, ASTM B634-14a(2021), ASTM B999-15(2022). Understanding these relationships helps ensure you are using the most current and applicable version of the standard.
ASTM B571-23 is available in PDF format for immediate download after purchase. The document can be added to your cart and obtained through the secure checkout process. Digital delivery ensures instant access to the complete standard document.
Standards Content (Sample)
This international standard was developed in accordance with internationally recognized principles on standardization established in the Decision on Principles for the
Development of International Standards, Guides and Recommendations issued by the World Trade Organization Technical Barriers to Trade (TBT) Committee.
Designation: B571 − 23
Standard Practice for
Qualitative Adhesion Testing of Metallic Coatings
This standard is issued under the fixed designation B571; the number immediately following the designation indicates the year of
original adoption or, in the case of revision, the year of last revision. A number in parentheses indicates the year of last reapproval. A
superscript epsilon (´) indicates an editorial change since the last revision or reapproval.
This standard has been approved for use by agencies of the U.S. Department of Defense.
1. Scope substrate. These limitations are noted generally in the test
descriptions and are summarized in Table 1 for certain metallic
1.1 This practice covers simple, qualitative tests for evalu-
coatings.
ating the adhesion of metallic coatings on various substances.
2.4 “Perfect” adhesion exists if the bonding between the
1.2 The values stated in SI units are to be regarded as
coating and the substrate is greater than the cohesive strength
standard. No other units of measurement are included in this
of either. Such adhesion is usually obtained if good electro-
standard.
plating practices are followed.
1.3 This standard does not purport to address all of the
2.5 For many purposes, the adhesion test has the objective
safety concerns, if any, associated with its use. It is the
of detecting any adhesion less than “perfect.” For such a test,
responsibility of the user of this standard to establish appro-
one uses any means available to attempt to separate the coating
priate safety, health, and environmental practices and deter-
from the substrate. This may be prying, hammering, bending,
mine the applicability of regulatory limitations prior to use.
beating, heating, sawing, grinding, pulling, scribing, chiseling,
1.4 This international standard was developed in accor-
or a combination of such treatments. If the coating peels,
dance with internationally recognized principles on standard-
flakes, or lifts from the substrate, the adhesion is less than
ization established in the Decision on Principles for the
perfect.
Development of International Standards, Guides and Recom-
mendations issued by the World Trade Organization Technical
2.6 If evaluation of adhesion is required, it may be desirable
Barriers to Trade (TBT) Committee.
to use one or more of the following tests. These tests have
varying degrees of severity; and one might serve to distinguish
2. Significance and Use
between satisfactory and unsatisfactory adhesion in a specific
2.1 These tests are useful for production control and for application. The choice for each situation must be determined.
acceptance testing of products.
2.7 When this guideline is used for acceptance inspection,
2.2 Interpreting the results of qualitative methods for deter- the method or methods to be used must be specified. Because
mining the adhesion of metallic coatings is often a controver- the results of tests in cases of marginal adhesion are subject to
sial subject. If more than one test is used, failure to pass any
interpretation, agreement shall be reached on what is accept-
one test is considered unsatisfactory. In many instances, the able.
end use of the coated article or its method of fabrication will
2.8 If the size and shape of the item to be tested precludes
suggest the technique that best represents functional require-
use of the designated test, equivalent test panels may be
ments. For example, an article that is to be subsequently
appropriate. If permitted, test panels shall be of the same
formed would suggest a draw or a bend test; an article that is
material and have the same surface finish as the item to be
to be soldered or otherwise exposed to heat would suggest a
tested and shall be processed through the same preplating,
heat-quench test. If a part requires baking or heat treating after
electroplating, and postplating cycle as the parts they represent.
plating, adhesion tests should be carried out after such post-
treatment as well.
3. Bend Tests
2.3 Several of the tests are limited to specific types of
3.1 Bend the part with the coated surface away over a
coatings, thickness ranges, ductility, or compositions of the
mandrel until its two legs are parallel. The mandrel diameter
should be four times the thickness of the sample. Examine the
deformed area visually under low magnification, for example,
This practice is under the jurisdiction of ASTM Committee B08 on Metallic
and Inorganic Coatings and is the direct responsibility of Subcommittee B08.10 on
4×, for peeling or flaking of the coating from the substrate,
Test Methods.
which is evidence of poor adhesion. If the coating fractures or
Current edition approved Nov. 1, 2023. Published November 2023. Originally
blisters, a sharp blade may be used to attempt to lift off the
approved in 1979. Last previous edition approved in 2018 as B571 – 18. DOI:
10.1520/B0571-23. coating. With hard or brittle coatings, cracking usually occurs
Copyright © ASTM International, 100 Barr Harbor Drive, PO Box C700, West Conshohocken, PA 19428-2959. United States
B571 − 23
TABLE 1 Adhesion Tests Appropriate for Various Coatings
A
Coating Material
Lead and Tin and
Adhesion Test
Nickel and Zinc and
Cadmium Chromium Copper Lead/Tin Nickel Palladium Rhodium Silver Tin/Lead Gold
Chromium Zinc Alloys
Alloy Alloy
Bend + − + + + + + + + + + +
Burnish − + + − + + − − + − + −
Chisel/knife + + + + + − + − + + − +
Draw − − + − + + − − − − + −
File − + + + + + − + + + − +
Grind and + + − − + + + − − + + −
saw
Heat/quench − + + + + + − − + + + +
Impact + − + − + + − − − − + −
Peel − + + − + − − − + + − +
Push − − − − + + − − − − + −
Scribe − − + − + − − − − − − −
A
+ Appropriate; − not appropriate.
TABLE 2 Temperature Test Guide
Coating Material
Chromium,
Lead, Zinc, Gold and
Nickel, Nickel + Tin, Palladium, Rhodium,
Substrate
Tin/Lead, and Zinc Alloys Silver,
Chromium, Temperature, Temperature, Temperature,
Temperature, Temperature, Temperature,
Copper, °C °C °C
°C °C °C
Temperature, °C
Steel 250 150 150 150 250 350 185
Zinc alloys 150 150 150 150 150 150 150
Copper and 250 150 150 150 250 350 185
copper alloys
Aluminum and 220 150 150 150 220 220 185
aluminum alloys
in the bend area. Such cracks may or may not propagate into 6. Draw Test
the substrate. In either case, cracks are not indicative of poor
6.1 Form a suitable sample about 60 mm in diameter into a
adhesion unless the coating can be peeled back with a sharp
flanged cap approximately 38 mm in diameter, to a depth up to
instrument.
18 mm, through the use of a set of adjustable dies in an
3.2 Bend the part repeatedly, back and forth, through an
ordinary punch press. Penetration of the male die may be
angle of 180° until failure of the basis metal occurs. Examine
continued until the cap fractures. The adhesion of the coating
the region at low magnification, for example, 10×, for separa-
may be observed directly or evaluated further by techniques
tion or peeling of the coating. Prying with a sharp blade will
described in Section 5 for detachment from the substrate. If
indicate unsatisfactory adhesion by lift off of the coating.
there is peeling or flaking of the coating or if it can be
detached, the adhesion is not satisfactory.
4. Burnishing Test
6.2 Results from this technique must be interpreted
4.1 Rub a coated area of about 5 cm with a smooth-ended
cautiously, because the ductility of both the coating and
tool for approximately 15 s. A suitable tool is a steel rod 6 mm
substrate are involved.
in diameter with a smooth hemispherical end. The pressure
shall be sufficient to burnish the coating at each stroke but not
7. File Test
so great as to dig into it. Blisters, lifting, or peeling should not
7.1 Saw off a piece of the coated specimen and inspect it for
develop. Generally, thick deposits cannot be evaluated satis-
detachment at the deposit/substrate interface. Apply coarse mill
factorily.
file across the sawed edge from the substrate toward the
5. Chisel-Knife Test coating so as to raise it, using an approach angle of approxi
...
This document is not an ASTM standard and is intended only to provide the user of an ASTM standard an indication of what changes have been made to the previous version. Because
it may not be technically possible to adequately depict all changes accurately, ASTM recommends that users consult prior editions as appropriate. In all cases only the current version
of the standard as published by ASTM is to be considered the official document.
Designation: B571 − 18 B571 − 23
Standard Practice for
Qualitative Adhesion Testing of Metallic Coatings
This standard is issued under the fixed designation B571; the number immediately following the designation indicates the year of
original adoption or, in the case of revision, the year of last revision. A number in parentheses indicates the year of last reapproval. A
superscript epsilon (´) indicates an editorial change since the last revision or reapproval.
This standard has been approved for use by agencies of the U.S. Department of Defense.
1. Scope
1.1 This practice covers simple, qualitative tests for evaluating the adhesion of metallic coatings on various substances.
1.2 The values stated in SI units are to be regarded as standard. No other units of measurement are included in this standard.
1.3 This standard does not purport to address all of the safety concerns, if any, associated with its use. It is the responsibility
of the user of this standard to establish appropriate safety, health, and environmental practices and determine the applicability of
regulatory limitations prior to use.
1.4 This international standard was developed in accordance with internationally recognized principles on standardization
established in the Decision on Principles for the Development of International Standards, Guides and Recommendations issued
by the World Trade Organization Technical Barriers to Trade (TBT) Committee.
2. Significance and Use
2.1 These tests are useful for production control and for acceptance testing of products.
2.2 Interpreting the results of qualitative methods for determining the adhesion of metallic coatings is often a controversial subject.
If more than one test is used, failure to pass any one test is considered unsatisfactory. In many instances, the end use of the coated
article or its method of fabrication will suggest the technique that best represents functional requirements. For example, an article
that is to be subsequently formed would suggest a draw or a bend test; an article that is to be soldered or otherwise exposed to
heat would suggest a heat-quench test. If a part requires baking or heat treating after plating, adhesion tests should be carried out
after such posttreatment as well.
2.3 Several of the tests are limited to specific types of coatings, thickness ranges, ductilities,ductility, or compositions of the
substrate. These limitations are noted generally in the test descriptions and are summarized in Table 1 for certain metallic coatings.
2.4 “Perfect” adhesion exists if the bonding between the coating and the substrate is greater than the cohesive strength of either.
Such adhesion is usually obtained if good electroplating practices are followed.
2.5 For many purposes, the adhesion test has the objective of detecting any adhesion less than “perfect.” For such a test, one uses
any means available to attempt to separate the coating from the substrate. This may be prying, hammering, bending, beating,
This practice is under the jurisdiction of ASTM Committee B08 on Metallic and Inorganic Coatings and is the direct responsibility of Subcommittee B08.10 on Test
Methods.
Current edition approved Aug. 1, 2018Nov. 1, 2023. Published August 2018November 2023. Originally approved in 1979. Last previous edition approved in 20132018
as B571 – 97 (2013).B571 – 18. DOI: 10.1520/B0571-18.10.1520/B0571-23.
Copyright © ASTM International, 100 Barr Harbor Drive, PO Box C700, West Conshohocken, PA 19428-2959. United States
B571 − 23
TABLE 1 Adhesion Tests Appropriate for Various Coatings
A
Coating Material
Lead and Tin and
Adhesion Test
Nickel and Zinc and
Cadmium Chromium Copper Lead/Tin Nickel Palladium Rhodium Silver Tin/Lead Gold
Chromium Zinc Alloys
Alloy Alloy
Bend + − + + + + + + + + + +
Burnish − + + − + + − − + − + −
Chisel/knife + + + + + − + − + + − +
Draw − − + − + + − − − − + −
File − + + + + + − + + + − +
Grind and + + − − + + + − − + + −
saw
Heat/quench − + + + + + − − + + + +
Impact + − + − + + − − − − + −
Peel − + + − + − − − + + − +
Push − − − − + + − − − − + −
Scribe − − + − + − − − − − − −
A
+ Appropriate; − not appropriate.
TABLE 2 Temperature Test Guide
Coating Material
Chromium,
Lead, Zinc, Gold and
Nickel, Nickel + Tin, Palladium, Rhodium,
Substrate
Tin/Lead, and Zinc Alloys Silver,
Chromium, Temperature, Temperature, Temperature,
Temperature, Temperature, Temperature,
Copper, °C °C °C
°C °C °C
Temperature, °C
Steel 250 150 150 150 250 350 185
Zinc alloys 150 150 150 150 150 150 150
Copper and 250 150 150 150 250 350 185
copper alloys
Aluminum and 220 150 150 150 220 220 185
aluminum alloys
heating, sawing, grinding, pulling, scribing, chiseling, or a combination of such treatments. If the coating peels, flakes, or lifts from
the substrate, the adhesion is less than perfect.
2.6 If evaluation of adhesion is required, it may be desirable to use one or more of the following tests. These tests have varying
degrees of severity; and one might serve to distinguish between satisfactory and unsatisfactory adhesion in a specific application.
The choice for each situation must be determined.
2.7 When this guideline is used for acceptance inspection, the method or methods to be used must be specified. Because the results
of tests in cases of marginal adhesion are subject to interpretation, agreement shall be reached on what is acceptable.
2.8 If the size and shape of the item to be tested precludes use of the designated test, equivalent test panels may be appropriate.
If permitted, test panels shall be of the same material and have the same surface finish as the item to be tested and shall be
processed through the same preplating, electroplating, and postplating cycle withas the parts they represent.
3. Bend Tests
3.1 Bend the part with the coated surface away over a mandrel until its two legs are parallel. The mandrel diameter should be four
times the thickness of the sample. Examine the deformed area visually under low magnification, for example, 4×, for peeling or
flaking of the coating from the substrate, which is evidence of poor adhesion. If the coating fractures or blisters, a sharp blade may
be used to attempt to lift off the coating. With hard or brittle coatings, cracking usually occurs in the bend area. Such cracks may
or may not propagate into the substrate. In either case, cracks are not indicative of poor adhesion unless the coating can be peeled
back with a sharp instrument.
3.2 Bend the part repeatedly, back and forth, through an angle of 180° until failure of the basis metal occurs. Examine the region
at low magnification, for example, 10×, for separation or peeling of the coating. Prying with a sharp blade will indicate
unsatisfactory adhesion by lift off of the coating.
B571 − 23
4. Burnishing Test
4.1 Rub a coated area of about 5 cm with a smooth-ended tool for approximately 15 s. A suitable tool is a steel rod 6 mm in
diameter with a smooth hemispherical end. The pressure shall be sufficient to burnish the coating at each stroke but not so great
as to dig into it. Blisters, lifting, or peeling should not develop. Generally, thick deposits cannot be evaluated satisfactorily.
5. Chisel-Knife Test
5.1 Use a sharp cold chisel to penetrate the coating on the article being evaluated. Alternatively, the chisel may be placed in back
of an overhang area of the coating or at a coating-substrate interface exposed by sectioning the article with a saw. A knife may
be substituted for the chisel with or without hammering or light tapping. If it is possible to remove the deposit, the adhesion is
not satisfactory. Soft or thin coatings cannot be evaluated for adhesion by this method.
6. Draw Test
6.1 Form a suitable sample about 60 mm in diameter into a flanged cap approximately 38 mm in diameter, to a depth up to 18
mm, through the use of a set of adjustable dies in an ordinary punch press. Penetration of the male die may be continued until
the cap fractures. The adhesion of the coating may be
...

Questions, Comments and Discussion
Ask us and Technical Secretary will try to provide an answer. You can facilitate discussion about the standard in here.
Loading comments...