ASTM F2778-09(2015)
(Test Method)Standard Test Method for Measurement of Percent Crystallinity of Polyetheretherketone (PEEK) Polymers by Means of Specular Reflectance Fourier Transform Infrared Spectroscopy (R-FTIR)
Standard Test Method for Measurement of Percent Crystallinity of Polyetheretherketone (PEEK) Polymers by Means of Specular Reflectance Fourier Transform Infrared Spectroscopy (R-FTIR)
SIGNIFICANCE AND USE
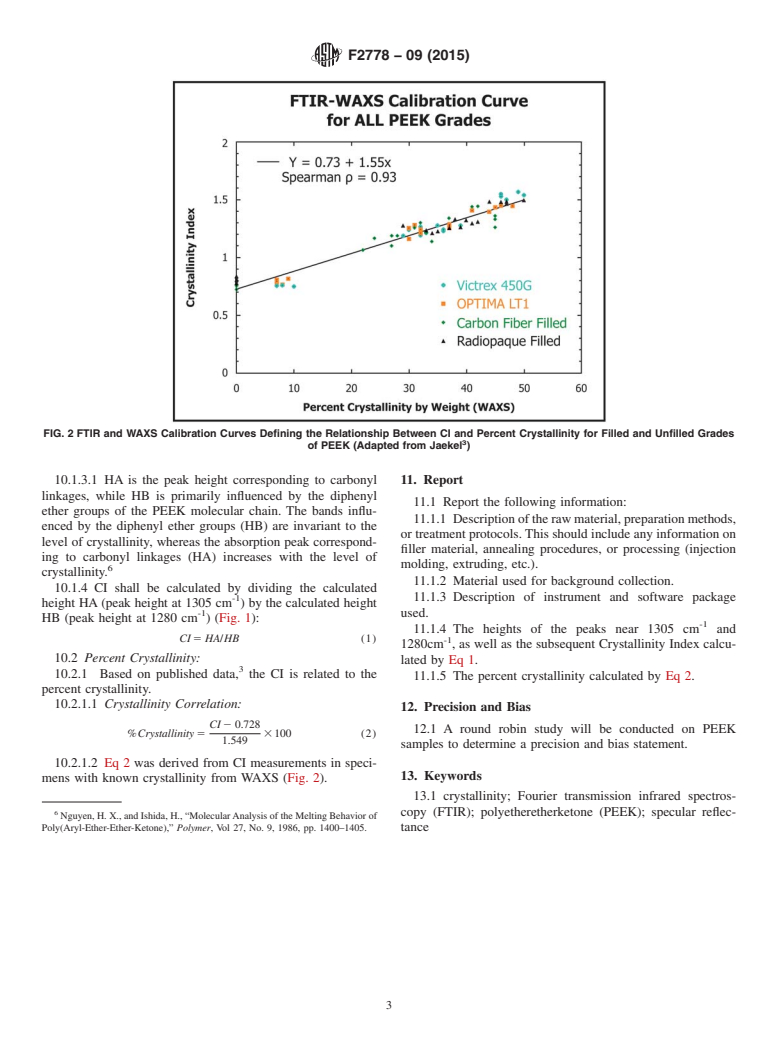
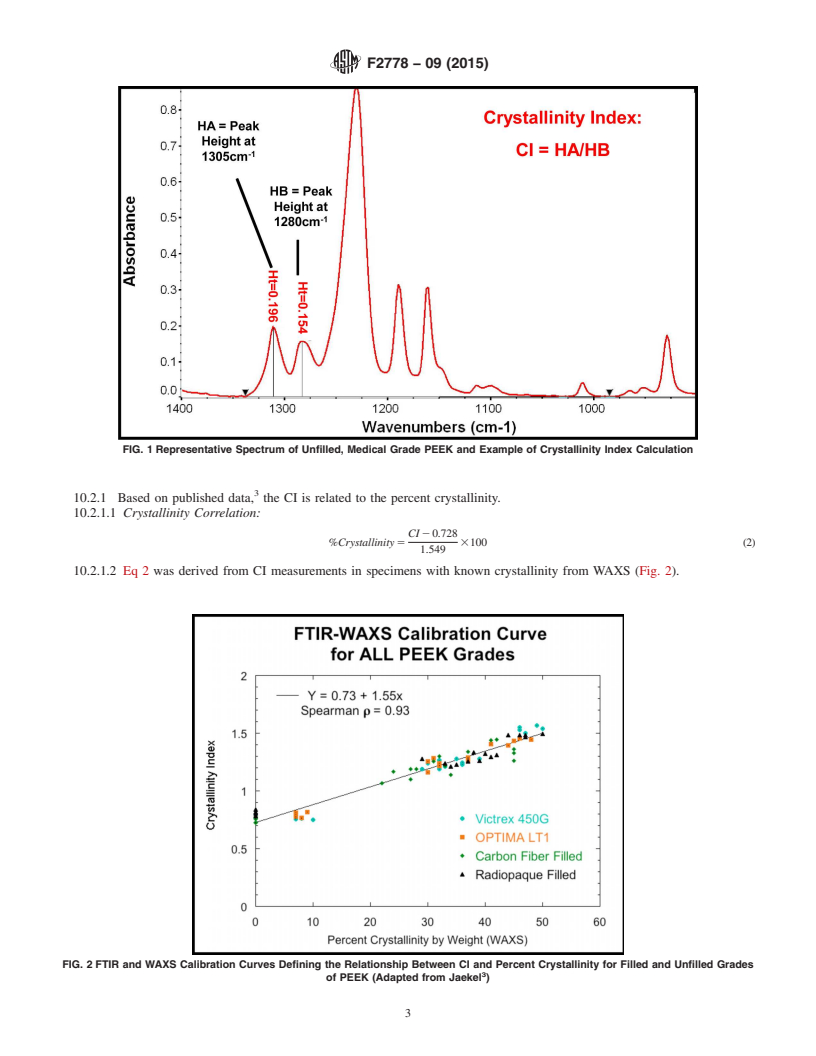
4.1 Mechanical properties of PEEK, such as stiffness or yield strength, are influenced by the level of crystallinity.5 The reported crystallinity index determined by this test method has been correlated with percent crystallinity in PEEK by wide-angle X-ray scattering (WAXS) experiments.2, 3
4.2 This test method may be useful for both process development, process control, product development, and research.
SCOPE
1.1 This test method describes the collection of absorption spectra of polyetheretherketone (PEEK) polymer in filled and unfilled grades, as supplied by a vendor, and the subsequent calculation of the percent crystallinity. The material is evaluated by infrared spectroscopy. The intensity (height) of the absorbance peaks is related to the amount of crystalline regions present in the material.
1.2 This test method can be used for PEEK consolidated forms, such as injection molded parts, as long as the samples are optically flat and smooth.
1.3 The applicability of the infrared method to industrial and medical grade PEEK materials has been demonstrated by scientific studies.2, 3 Percentage of crystallinity is related to R-FTIR measurement by calibration through wide-angle x-ray scattering (WAXS) crystallinity measurements.2, 3 It is anticipated that this test method, involving the peak heights near 1305 cm-1 and 1280 cm-1, will be evaluated in an Interlaboratory Study (ILS) conducted according to Test Method E691.
1.4 This test method does not suggest a desired range of crystallinity for specific applications.
1.5 The values stated in SI units are to be regarded as standard. No other units of measurement are included in this standard.
1.6 This standard may involve hazardous materials, operations, and equipment. This standard does not purport to address all of the safety concerns, if any, associated with its use. It is the responsibility of the user of this standard to establish appropriate safety and health practices and determine the applicability of regulatory limitations prior to use.
General Information
Buy Standard
Standards Content (Sample)
NOTICE: This standard has either been superseded and replaced by a new version or withdrawn.
Contact ASTM International (www.astm.org) for the latest information
Designation:F2778 −09 (Reapproved 2015)
Standard Test Method for
Measurement of Percent Crystallinity of
Polyetheretherketone (PEEK) Polymers by Means of
Specular Reflectance Fourier Transform Infrared
1
Spectroscopy (R-FTIR)
This standard is issued under the fixed designation F2778; the number immediately following the designation indicates the year of
original adoption or, in the case of revision, the year of last revision.Anumber in parentheses indicates the year of last reapproval.A
superscript epsilon (´) indicates an editorial change since the last revision or reapproval.
1. Scope 1.6 This standard may involve hazardous materials,
operations, and equipment. This standard does not purport to
1.1 This test method describes the collection of absorption
address all of the safety concerns, if any, associated with its
spectra of polyetheretherketone (PEEK) polymer in filled and
use. It is the responsibility of the user of this standard to
unfilled grades, as supplied by a vendor, and the subsequent
establish appropriate safety and health practices and deter-
calculation of the percent crystallinity. The material is evalu-
mine the applicability of regulatory limitations prior to use.
ated by infrared spectroscopy. The intensity (height) of the
absorbancepeaksisrelatedtotheamountofcrystallineregions
2. Referenced Documents
present in the material.
4
2.1 ASTM Standards:
1.2 This test method can be used for PEEK consolidated
E691Practice for Conducting an Interlaboratory Study to
forms, such as injection molded parts, as long as the samples
Determine the Precision of a Test Method
are optically flat and smooth.
3. Terminology
1.3 The applicability of the infrared method to industrial
3.1 Definitions of Terms Specific to This Standard:
and medical grade PEEK materials has been demonstrated by
2,3
3.1.1 crystallinity index (CI),, n—the ratio of the height
scientific studies. Percentage of crystallinity is related to
-1 -1
between the absorption peaks 1305 cm and 1280 cm .
R-FTIR measurement by calibration through wide-angle x-ray
2,3
scattering (WAXS) crystallinity measurements. It is antici-
4. Significance and Use
pated that this test method, involving the peak heights near
-1 -1
1305 cm and 1280 cm , will be evaluated in an Interlabora-
4.1 Mechanical properties of PEEK, such as stiffness or
5
tory Study (ILS) conducted according to Test Method E691.
yield strength, are influenced by the level of crystallinity. The
reported crystallinity index determined by this test method has
1.4 This test method does not suggest a desired range of
been correlated with percent crystallinity in PEEK by wide-
crystallinity for specific applications.
2,3
angle X-ray scattering (WAXS) experiments.
1.5 The values stated in SI units are to be regarded as
4.2 This test method may be useful for both process
standard. No other units of measurement are included in this
development, process control, product development, and re-
standard.
search.
5. Interferences
1
ThistestmethodisunderthejurisdictionofASTMCommitteeF04onMedical
5.1 Samples must be smooth and optically flat over the area
andSurgicalMaterialsandDevicesandisthedirectresponsibilityofSubcommittee
of investigation, typical of injection-molded specimens. They
F04.15 on Material Test Methods.
Current edition approved May 1, 2015. Published May 2015. Originally must be sufficiently thick (for example, 1 to 2 mm) such that
approved in 2009. Last previous edition approved in 2009 as F2778 – 09. DOI:
there is no detectable back surface reflected radiation.
10.1520/F2778–09R15.
2
Chalmers J. M., Everall, N. J., Hewitson, K., Chesters, M. A., Pearson, M.,
Grady,A.,Kuzicka,B.,“FourierTransformInfraredMicroscopy:SomeAdvancesin
4
Techniques for Characterisation and Structure-Property Elucidations of Industrial For referenced ASTM standards, visit the ASTM website, www.astm.org, or
Material,” The Analyst, Vol 23, 1998, pp. 579–586. contact ASTM Customer Service at service@astm.org. For Annual Book of ASTM
3
Jaekel, D. J., Medel, F. J., Kurtz, S. M., “Validation of Crystallinity Measure- Standards volume information, refer to the standard’s Document Summary page on
ments of Medical Grade PEEK Using Specular Reflectance FTIR-microscopy,” the ASTM website.
5
Society of Plastics Engineers Annual Technical Conference 2009, Chicago 2009, Kurtz, S. M., Devine, J. N., “PEEK biomaterials in trauma, orthopedic, and
Manuscript ID ANTEC-0248-2009. spinal implants,” Biomaterials , Vol 28, No. 32, 2007, pp. 4845–4869.
Copyright © ASTM International, 100 Barr Harbor Drive, PO Box C700, West Conshohocken, PA 19428-2959. United States
1
---------------------- Page: 1 ----------------------
F2778−09 (2015)
5.2 Samples must be sized appropriately to be accommo- while using the same scanning settings as the test parameters
dated in the FTIR apparatus. dict
...
This document is not an ASTM standard and is intended only to provide the user of an ASTM standard an indication of what changes have been made to the previous version. Because
it may not be technically possible to adequately depict all changes accurately, ASTM recommends that users consult prior editions as appropriate. In all cases only the current version
of the standard as published by ASTM is to be considered the official document.
Designation: F2778 − 09 F2778 − 09 (Reapproved 2015)
Standard Test Method for
Measurement of Percent Crystallinity of
Polyetheretherketone (PEEK) Polymers by Means of
Specular Reflectance Fourier Transform Infrared
1
Spectroscopy (R-FTIR)
This standard is issued under the fixed designation F2778; the number immediately following the designation indicates the year of
original adoption or, in the case of revision, the year of last revision. A number in parentheses indicates the year of last reapproval. A
superscript epsilon (´) indicates an editorial change since the last revision or reapproval.
1. Scope
1.1 This test method describes the collection of absorption spectra of polyetheretherketone (PEEK) polymer in filled and
unfilled grades, as supplied by a vendor, and the subsequent calculation of the percent crystallinity. The material is evaluated by
infrared spectroscopy. The intensity (height) of the absorbance peaks is related to the amount of crystalline regions present in the
material.
1.2 This test method can be used for PEEK consolidated forms, such as injection molded parts, as long as the samples are
optically flat and smooth.
1.3 The applicability of the infrared method to industrial and medical grade PEEK materials has been demonstrated by scientific
2,3
studies. Percentage of crystallinity is related to R-FTIR measurement by calibration through wide-angle x-ray scattering
2,3 -1
(WAXS) crystallinity measurements. It is anticipated that this test method, involving the peak heights near 1305 cm and 1280
-1
cm , will be evaluated in an Interlaboratory Study (ILS) conducted according to Test Method E691.
1.4 This test method does not suggest a desired range of crystallinity for specific applications.
1.5 The values stated in SI units are to be regarded as standard. No other units of measurement are included in this standard.
1.6 This standard may involve hazardous materials, operations, and equipment. This standard does not purport to address all
of the safety concerns, if any, associated with its use. It is the responsibility of the user of this standard to establish appropriate
safety and health practices and determine the applicability of regulatory limitations prior to use.
2. Referenced Documents
4
2.1 ASTM Standards:
E691 Practice for Conducting an Interlaboratory Study to Determine the Precision of a Test Method
3. Terminology
3.1 Definitions of Terms Specific to This Standard:
-1 -1
3.1.1 crystallinity index (CI),, n—the ratio of the height between the absorption peaks 1305 cm and 1280 cm .
4. Significance and Use
5
4.1 Mechanical properties of PEEK, such as stiffness or yield strength, are influenced by the level of crystallinity. The reported
crystallinity index determined by this test method has been correlated with percent crystallinity in PEEK by wide-angle X-ray
2,3
scattering (WAXS) experiments.
1
This test method is under the jurisdiction of ASTM Committee F04 on Medical and Surgical Materials and Devices and is the direct responsibility of Subcommittee
F04.15 on Material Test Methods.
Current edition approved Nov. 15, 2009May 1, 2015. Published December 2009May 2015. DOI: 10.1520/F2778–09.Originally approved in 2009. Last previous edition
approved in 2009 as F2778 – 09. DOI: 10.1520/F2778–09R15.
2
Chalmers J. M., Everall, N. J., Hewitson, K., Chesters, M. A., Pearson, M., Grady, A., Kuzicka, B., “Fourier Transform Infrared Microscopy: Some Advances in
Techniques for Characterisation and Structure-Property Elucidations of Industrial Material,” The Analyst, Vol 23, 1998, pp. 579–586.
3
Jaekel, D. J., Medel, F. J., Kurtz, S. M., “Validation of Crystallinity Measurements of Medical Grade PEEK Using Specular Reflectance FTIR-microscopy,” Society of
Plastics Engineers Annual Technical Conference 2009, Chicago 2009, Manuscript ID ANTEC-0248-2009.
4
For referenced ASTM standards, visit the ASTM website, www.astm.org, or contact ASTM Customer Service at service@astm.org. For Annual Book of ASTM Standards
volume information, refer to the standard’s Document Summary page on the ASTM website.
5
Kurtz, S. M., Devine, J. N., “PEEK biomaterials in trauma, orthopedic, and spinal implants,” Biomaterials , Vol 28, No. 32, 2007, pp. 4845–4869.
Copyright © ASTM International, 100 Barr Harbor Drive, PO Box C700, West Conshohocken, PA 19428-2959. United States
1
---------------------- Page: 1 ----------------------
F2778 − 09 (2015)
4.2 This test method may be useful for both process development, process control, product development, and research.
5. Interferences
5.1 Samples mu
...


Questions, Comments and Discussion
Ask us and Technical Secretary will try to provide an answer. You can facilitate discussion about the standard in here.