ASTM E2503-07
(Practice)Standard Practice for Qualification of Basket and Paddle Dissolution Apparatus
Standard Practice for Qualification of Basket and Paddle Dissolution Apparatus
SIGNIFICANCE AND USE
This practice outlines a procedure for the mechanical calibration of paddle and basket dissolution units to ensure reproducibility of results.
Once a unit meets all of the mechanical specifications included in this practice, it is considered calibrated and further calibration with dissolution calibrator tablets is not required.
SCOPE
1.1 This practice covers the set-up and calibration of the paddle and basket dissolution apparatus.
1.2 Use of this practice may be applied to apparatus that have been modified to enable automatic dissolution testing (that is, a valve in the bottom of the vessel or sampling through the shaft).
1.3 This standard does not purport to address all of the safety concerns, if any, associated with its use. It is the responsibility of the user of this standard to establish appropriate safety and health practices and determine the applicability of regulatory limitations prior to use.
General Information
Relations
Standards Content (Sample)
NOTICE: This standard has either been superseded and replaced by a new version or withdrawn.
Contact ASTM International (www.astm.org) for the latest information
Designation:E2503 −07
StandardPractice for
Qualification of Basket and Paddle Dissolution Apparatus
This standard is issued under the fixed designation E2503; the number immediately following the designation indicates the year of
original adoption or, in the case of revision, the year of last revision. A number in parentheses indicates the year of last reapproval. A
superscript epsilon (´) indicates an editorial change since the last revision or reapproval.
1. Scope 4.3 ApparatusSet-up—Duringapparatusinstallationorafter
replacement of parts or components, verify that the description
1.1 This practice covers the set-up and calibration of the
and critical dimensions for each part meets the original
paddle and basket dissolution apparatus.
description and dimension.
1.2 Use of this practice may be applied to apparatus that
4.3.1 VesselDimensions—In the absence of a COAor COC,
have been modified to enable automatic dissolution testing
the vessel’s internal dimensions should be measured with an
(that is, a valve in the bottom of the vessel or sampling through
appropriate measuring device and vessel shape and condition
the shaft).
should be noted. For example, for a cylindrical, hemispherical
1.3 This standard does not purport to address all of the
vessel, the vessel’s sides must be cylindrical, the internal
safety concerns, if any, associated with its use. It is the
dimension should be measured, and the vessel bottom should
responsibility of the user of this standard to establish appro-
be smooth and without defects. The vessel must fit within the
priate safety and health practices and determine the applica-
apparatus in such a manner as to ensure stable operation and
bility of regulatory limitations prior to use.
centering of the shaft in the vessel.
4.3.2 Basket/ShaftDimensions—In the absence of a COAor
2. Significance and Use
COC, an appropriate measuring device is used to measure the
2.1 This practice outlines a procedure for the mechanical relevant basket dimensions. Critical dimensions to be mea-
suredoneachbasketshouldincludebutarenotlimitedto:shaft
calibration of paddle and basket dissolution units to ensure
reproducibility of results. diameter, vent hole diameter, thickness of wide portion of the
basket-to-shaft adaptor, total basket height, internal diameter at
2.2 Once a unit meets all of the mechanical specifications
the top of the basket, outer diameter of the screen, height of the
included in this practice, it is considered calibrated and further
open screen, outer diameter of bottom, diameter of screen on
calibration with dissolution calibrator tablets is not required.
the bottom, and screen mesh number.
4.3.3 Paddle Dimensions—In the absence of a COA or
3. Analyst Responsibilities
COC, an appropriate measuring device is used to measure the
3.1 Verify the vessel, basket, and paddle dimensions on
relevant dimensions of the paddle. Examples of dimensions to
receipt through measurement or Certificate ofAnalysis (COA)
be determined on each paddle should include but are not
or Certificate of Conformity (COC).
limited to: shaft diameter, blade height, blade thickness, total
3.2 Ensure the instrument is calibrated and fit for perform-
blade length, length of flat portion on bottom of blade, radius
ing dissolution analysis.
of the angle on the top outer edge of the top of the blade, radius
of the outside edge of the blade, difference between the
4. Procedure distance from the midline of the shaft to the top outer edge for
the two sides, and difference between the heights of both sides
4.1 Background—The set-up, mechanical, and operational
of the paddles at the outside top.
checks are used to minimize variability during dissolution
testing to ensure the reproducibility of dissolution results.
4.4 Maintenance—Consult the manufacturer’s maintenance
recommendations and maintenance schedule to establish an
4.2 Wherever possible, tools shall be traceable to an ac-
appropriate maintenance program based on the frequency of
cepted standard calibration source from a national or interna-
apparatus use and quality system requirements.
tional calibration laboratory.
4.5 Mechanical Calibration—Perform these tests on the
frequency determined by the quality system or after repair or
This practice is under the jurisdiction of ASTM Committee E55 on Manufac-
move. If the instrument is not in routine use, the mechanical
ture of Pharmaceutical Products and is the direct responsibility of Subcommittee
calibration may be performed before performing the first
E55.03 on General Pharmaceutical Standards.
dissolution test. Some instrument manufacturers supply special
Current edition approved March 15, 2007. Published April 2007. DOI: 10.1520/
E2503-07. tools or incorporate automatic mechanical calibration devices
Copyright © ASTM International, 100 Barr Harbor Drive, PO Box C700, West Conshohocken, PA 19428-2959. United States
E2503−07
within their equipment, and these may be used. Depending on within 8 % of desired height. For example, for a paddle at 25
the adjustments necessary to meet the mechanical calibration mm from the bottom, the height needs to be 62 mm.
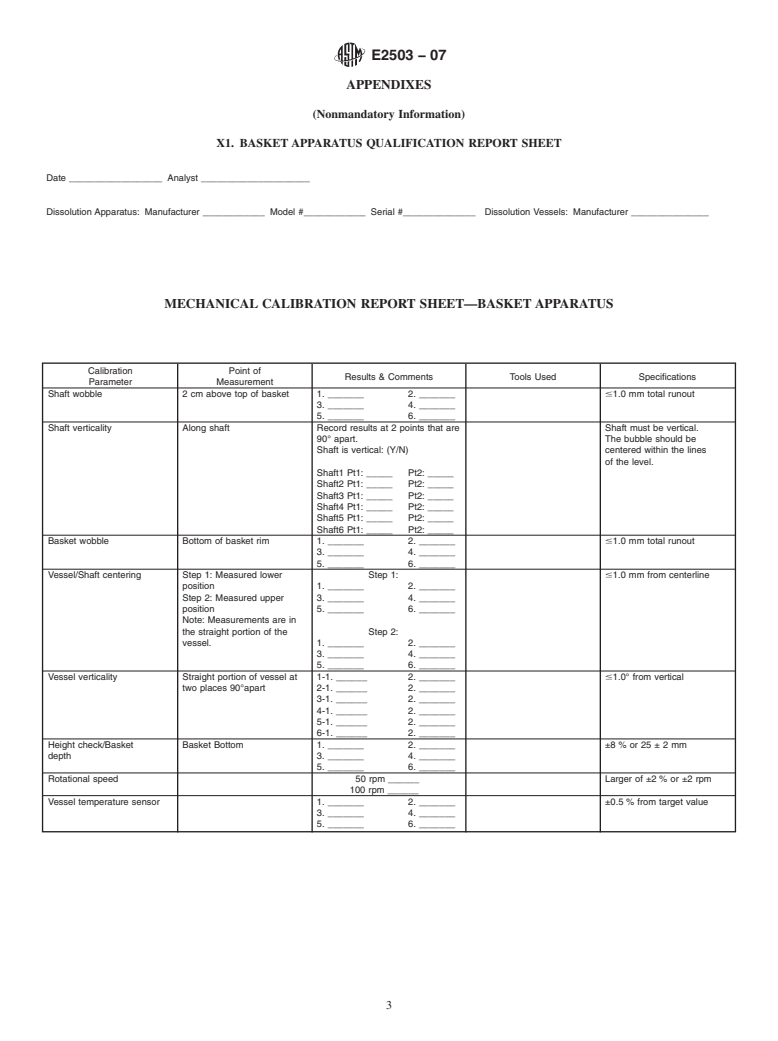
criteria, the position and orientation of each vessel may need to 4.5.7 Rotational Speed—A tachometer is used to measure
be noted to ensure proper subsequent set-up. the rotational speed of the paddle or basket.The rate of rotation
must be within 2 % or 62 rpm of the stated rate, whichever is
4.5.1 Shaft Wobble—A runout gauge is positioned so that
larger.
the gauge probe touches the turning shaft about 2 cm above the
4.5.8 Vessel’s Temperature Sensor—If the system has a
top of the paddle blade or basket. The gauge is placed so that
thermal sensor in each vessel to check the temperature of the
the probe slightly presses in on the turning shaft. The absolute
medium, the performance of each thermal sensor should be
value of the difference between the maximum and minimum
verified against a traceable standard.
readings is the wobble. The measured value must not exceed
1.0 mm total runout.
4.6 Operation—Before each dissolution test perform the
4.5.2 Paddle and Basket Shaft Verticality—Use an accurate following:
bubble level or digital leveling device to determine that the 4.6.1 Vessel Examination—Each vessel must be free of
shafts are vertical in two directions 90° apart around the scratches, cracks, pits, and residue.
vertical axis while the drive unit is in the operating position. If 4.6.2 Basket Examination—Each basket must be free of
a bubble level is used, the bubble should be centered within the defects such as rusting or corrosion, any wires sticking out
lines of the level. If necessary, the verticality may be checked beyond the basket, clogged mesh holes, and dented mesh sides
with the shafts raised above the drive unit. or bottom. Make sure the basket is not deformed from its
original configuration. Verify that the method of attaching the
4.5.3 Basket Wobble—A runout gauge is positioned so that
basket to the shaft (that is, clips, O-rings, and so forth) is the
the gauge probe touches the bottom rim of the turning basket.
one described in the analytical method to be used.
Theabsolutevalueofthedifferencebetweenthemaximumand
4.6.3 Paddle Examination—Each paddle must be visually
minimum readings is the wobble.The measured value must not
examined for defects such as rusting and loose pieces of
exceed 1.0 mm total runout.
coating sticking out from the paddles (for paddles coated with
4.5.4 Vessel Centering—A mechanical or digital centering
polytetrafluoroethylene (PTFE) or anoth
...


Questions, Comments and Discussion
Ask us and Technical Secretary will try to provide an answer. You can facilitate discussion about the standard in here.