ASTM F392/F392M-11
(Test Method)Standard Practice for Conditioning Flexible Barrier Materials for Flex Durability
Standard Practice for Conditioning Flexible Barrier Materials for Flex Durability
SIGNIFICANCE AND USE
This practice is valuable in determining the resistance of flexible-packaging materials to flex-formed pinhole failures. Conditioning levels A, B, or C are typically used for this evaluation.
This practice is valuable for determining the effect of flexing on barrier properties such as gas and/or moisture transmission rates. Conditioning levels D or E are typically used for this evaluation.
This practice does not measure any abrasion component relating to flex failure.
Failures in the integrity of one or more of the plies of a multi-ply structure may require different testing than the detection of holes completely through the structure. Permeation tests using gas or water vapor can be used in conjunction with the flex test to measure the loss of ply integrity. However, any permeation test requiring a pressure differential will not measure the permeation coefficient in the presence of pinholes. For a list of test methods refer to Guide F2097.
The various conditions described in this procedure are to prevent testing a structure under conditions that either give too many holes to effectively count (normally greater than 50), or too few to be significant (normally less than five per sample). Material structure, purpose for testing and a mutual agreement between parties involved are important points to consider in the selection of conditioning level for testing.
SCOPE
1.1 This practice covers conditioning of flexible barrier materials for the determination of flex resistance. Subsequent testing can be performed to determine the effects of flexing on material properties. These tests are beyond the scope of this practice.
1.2 The values stated in either SI units or inch-pound units are to be regarded separately as standard. The values stated in each system may not be exact equivalents; therefore, each system shall be used independently of the other. Combining values from the two systems may result in non-conformance with the standard.
1.3 This standard does not purport to address all of the safety concerns, if any, associated with its use. It is the responsibility of the user of this standard to establish appropriate safety and health practices and determine the applicability of regulatory limitations prior to use.
General Information
Relations
Buy Standard
Standards Content (Sample)
NOTICE: This standard has either been superseded and replaced by a new version or withdrawn.
Contact ASTM International (www.astm.org) for the latest information
Designation: F392/F392M − 11
StandardPractice for
1
Conditioning Flexible Barrier Materials for Flex Durability
This standard is issued under the fixed designation F392/F392M; the number immediately following the designation indicates the year
of original adoption or, in the case of revision, the year of last revision. A number in parentheses indicates the year of last reapproval.
A superscript epsilon (´) indicates an editorial change since the last revision or reapproval.
1. Scope 4. Summary of Practice
1.1 This practice covers conditioning of flexible barrier 4.1 Specimens of flexible materials are flexed at standard
materials for the determination of flex resistance. Subsequent atmospheric conditions defined in Specification E171, unless
otherwise specified. Flexing conditions and number and sever-
testing can be performed to determine the effects of flexing on
material properties. These tests are beyond the scope of this ity of flexing strokes vary with the type of structure being
tested. The flexing action consists of a twisting motion
practice.
followed, in most cases, by a horizontal motion, thus, repeat-
1.2 The values stated in either SI units or inch-pound units
edly twisting and crushing the film. The frequency is at a rate
are to be regarded separately as standard. The values stated in
of 45 cycles per minute (cpm.)
each system may not be exact equivalents; therefore, each
4.2 Flex failure is determined by measuring the effect of the
system shall be used independently of the other. Combining
flexconditioningonthebarrierand/ormechanicalperformance
values from the two systems may result in non-conformance
of the structure. The property to be evaluated determines the
with the standard.
appropriate conditioning level.
1.3 This standard does not purport to address all of the
safety concerns, if any, associated with its use. It is the 4.3 The various flex conditioning levels are summarized as
responsibility of the user of this standard to establish appro- follows:
priate safety and health practices and determine the applica- 4.3.1 Condition A—Full flex for 1 h (that is, 2700 cycles).
bility of regulatory limitations prior to use. 4.3.2 ConditionB—Fullflexfor20min(thatis,900cycles).
4.3.3 Condition C—Full flex for 6 min (that is, 270 cycles).
2. Referenced Documents 4.3.4 Condition D—Full flex for 20 cycles.
4.3.5 Condition E—Partial flex only for 20 cycles.
2
2.1 ASTM Standards:
E171 Practice for Conditioning and Testing Flexible Barrier
5. Significance and Use
Packaging
5.1 This practice is valuable in determining the resistance of
F2097 Guide for Design and Evaluation of Primary Flexible
flexible-packaging materials to flex-formed pinhole failures.
Packaging for Medical Products
Conditioning levels A, B, or C are typically used for this
evaluation.
3. Terminology
5.2 This practice is valuable for determining the effect of
3.1 pinhole, n—a small opening of non-specific shape or
flexing on barrier properties such as gas and/or moisture
dimension that passes completely through all layers of a
transmission rates. Conditioning levels D or E are typically
flexible material.
used for this evaluation.
3.1.1 Discussion—The use of the term “pin” provides the
relativesizereferenceasinasmallholemadewithorasifwith
5.3 This practice does not measure any abrasion component
a pin.
relating to flex failure.
5.4 Failures in the integrity of one or more of the plies of a
multi-ply structure may require different testing than the
1
This practice is under the jurisdiction of ASTM Committee F02 on Flexible
detection of holes completely through the structure. Perme-
Barrier Packaging and is the direct responsibility of Subcommittee F02.50 on
ation tests using gas or water vapor can be used in conjunction
Package Design and Development.
with the flex test to measure the loss of ply integrity. However,
Current edition approved April 1, 2011. Published June 2011. Originally
any permeation test requiring a pressure differential will not
approvedin1974.Lastpreviouseditionapprovedin2004asF392 - 93 (2004).DOI:
10.1520F0392_F0392M-11.
measure the permeation coefficient in the presence of pinholes.
2
For referenced ASTM standards, visit the ASTM website, www.astm.org, or
For a list of test methods refer to Guide F2097.
contact ASTM Customer Service at service@astm.org. For Annual Book of ASTM
5.4.1 The various conditions described in this procedure are
Standards volume information, refer to the standard’s Document Summary page on
the ASTM website. to prevent testing a structure under conditions that either give
Copyright © ASTM International, 100 Barr Harbor Drive, PO Box C700, West Conshohocken, PA 19428-2959. United States
1
---------------------- Page: 1 ----------------------
F392/F392M − 11
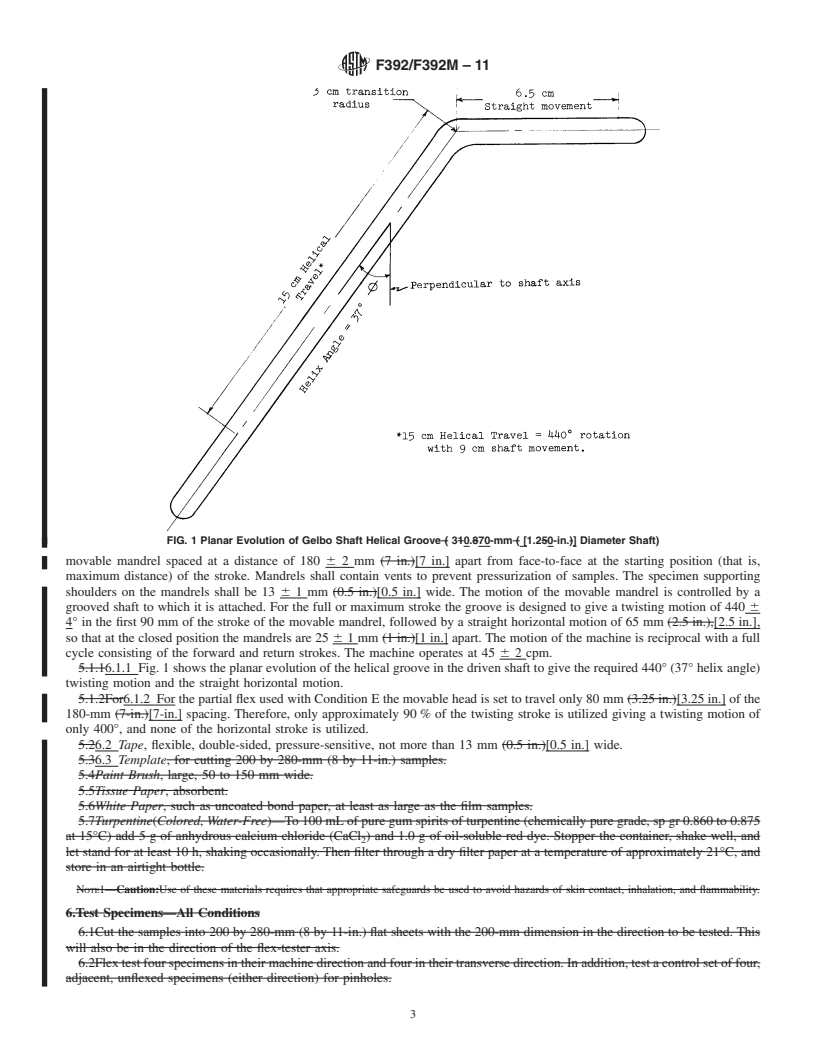
FIG. 1 Planar Evolution of Gelbo Shaft Helical Groove 30.70-mm [1.20-in.] Diameter Shaft)
too many
...
This document is not an ASTM standard and is intended only to provide the user of an ASTM standard an indication of what changes have been made to the previous version. Because
it may not be technically possible to adequately depict all changes accurately, ASTM recommends that users consult prior editions as appropriate. In all cases only the current version
of the standard as published by ASTM is to be considered the official document.
Designation:F392–93 (Reapproved 2004)
Standard Test Method for Flex Durability of Flexible Barrier
MaterialsDesignation: F392/F392M – 11
Standard Practice for
1
Conditioning Flexible Barrier Materials for Flex Durability
This standard is issued under the fixed designation F392/F392M; the number immediately following the designation indicates the year
of original adoption or, in the case of revision, the year of last revision. A number in parentheses indicates the year of last reapproval.
A superscript epsilon (´) indicates an editorial change since the last revision or reapproval.
1. Scope
1.1This test method covers the determination of the flex resistance of flexible barrier materials. Pinhole formation is the criterion
presented for measuring failure, but other tests such as gas-transmission rates can be used in place of the pinhole test.
1.2This standard does not purport to address all of the safety problems, if any, associated with its use. It is the responsibility
of the user of this standard to establish appropriate safety and health practices and determine the applicability of regulatory
limitations prior to use. Specific precautionary statements are given in 5.7.
1.1 This practice covers conditioning of flexible barrier materials for the determination of flex resistance. Subsequent testing
can be performed to determine the effects of flexing on material properties. These tests are beyond the scope of this practice.
1.2 The values stated in either SI units or inch-pound units are to be regarded separately as standard. The values stated in each
system may not be exact equivalents; therefore, each system shall be used independently of the other. Combining values from the
two systems may result in non-conformance with the standard.
1.3 This standard does not purport to address all of the safety concerns, if any, associated with its use. It is the responsibility
of the user of this standard to establish appropriate safety and health practices and determine the applicability of regulatory
limitations prior to use.
2. Referenced Documents
2
2.1 ASTM Standards:
D618Practice for Conditioning Plastics for Testing
D722Test Method for Grease Resistance of Paper
E691Practice for Conducting an Interlaboratory Study to Determine the Precision of a Test Method 171 Specification for
Atmospheres for Conditioning and Testing Flexible Barrier Materials
F2097 Guide for Design and Evaluation of Primary Flexible Packaging for Medical Products
3. Summary of Test Method
3.1Specimens of flexible materials are flexed at standard atmospheric conditions (23°C and 50% relative humidity), unless
otherwise specified. Flexing conditions and number and severity of flexing strokes vary with the type of structure being tested.The
flexing action consists of a twisting motion followed, in most cases, by a horizontal motion, thus, repeatedly twisting and crushing
the film. The frequency is at a rate of 45 cpm.
3.2Flex failure is determined by measuring the pinholes formed in the structure.These pinholes are determined by using colored
turpentine and allowing it to stain through the holes onto a white backing. In addition, other failure criteria such as gas permeation
or moisture-vapor transmission can be used at the discretion of the tester.
3.3The various test conditions are summarized as follows:
3.3.1Terminology
1
This test method practice is under the jurisdiction of ASTM Committee F02 on Flexible Barrier MaterialsPackaging and is the direct responsibility of Subcommittee
F02.20 on Physical Properties.
Current edition approved May 15, 1993. Published August 1993. Originally published as F392–74. Last previous edition F392–74 (1987). DOI: 10.1520/F0392-93R04.
Current edition approved April 1, 2011. Published June 2011. Originally approved in 1974. Last previous edition approved in 2004 as F392 - 93 (2004). DOI:
10.1520F0392_F0392M-11.
2
For referencedASTM standards, visit theASTM website, www.astm.org, or contactASTM Customer Service at service@astm.org. For Annual Book of ASTM Standards
volume information, refer to the standard’s Document Summary page on the ASTM website.
Copyright © ASTM International, 100 Barr Harbor Drive, PO Box C700, West Conshohocken, PA 19428-2959, United States.
1
---------------------- Page: 1 ----------------------
F392/F392M – 11
3.1 pinhole, n—a small opening of non-specific shape or dimension that passes completely through all layers of a flexible
material.
3.1.1 Discussion—The use of the term “pin” provides the relative size reference as in a small hole made with or as if with a
pi
...


Questions, Comments and Discussion
Ask us and Technical Secretary will try to provide an answer. You can facilitate discussion about the standard in here.