ASTM D5458-95(2020)
(Test Method)Standard Test Method for Peel Cling of Stretch Wrap Film
Standard Test Method for Peel Cling of Stretch Wrap Film
SIGNIFICANCE AND USE
5.1 Cling is of critical importance in maintaining a tight wrap after a load is stretch wrapped.
SCOPE
1.1 This test method measures cling between two layers of film, in both a stretched and unstretched condition.
1.2 The values stated in inch-pound units are to be regarded as standard. The values given in parentheses are mathematical conversions to SI units that are provided for information only and are not considered standard.
1.3 This standard does not purport to address all of the safety concerns, if any, associated with its use. It is the responsibility of the user of this standard to establish appropriate safety, health, and environmental practices and determine the applicability of regulatory limitations prior to use.
1.4 This international standard was developed in accordance with internationally recognized principles on standardization established in the Decision on Principles for the Development of International Standards, Guides and Recommendations issued by the World Trade Organization Technical Barriers to Trade (TBT) Committee.
General Information
Standards Content (Sample)
This international standard was developed in accordance with internationally recognized principles on standardization established in the Decision on Principles for the
Development of International Standards, Guides and Recommendations issued by the World Trade Organization Technical Barriers to Trade (TBT) Committee.
Designation: D5458 − 95 (Reapproved 2020)
Standard Test Method for
1
Peel Cling of Stretch Wrap Film
This standard is issued under the fixed designation D5458; the number immediately following the designation indicates the year of
original adoption or, in the case of revision, the year of last revision. A number in parentheses indicates the year of last reapproval. A
superscript epsilon (´) indicates an editorial change since the last revision or reapproval.
1. Scope 3. Terminology
1.1 This test method measures cling between two layers of 3.1 Definitions—General definitions for packaging and dis-
film, in both a stretched and unstretched condition. tribution environments are found in Terminology D996.
1.2 The values stated in inch-pound units are to be regarded 3.2 Definitions of Terms Specific to This Standard:
as standard. The values given in parentheses are mathematical 3.2.1 cling—the property of a material’s ability to adhere to
conversions to SI units that are provided for information only itself.
and are not considered standard.
3.2.2 stretch wrap material—a material used for over-
1.3 This standard does not purport to address all of the wrapping which, when applied under tension, elongates, and
safety concerns, if any, associated with its use. It is the through elastic recovery, conforms to the item(s) packaged.
responsibility of the user of this standard to establish appro-
4. Summary of Test Method
priate safety, health, and environmental practices and deter-
mine the applicability of regulatory limitations prior to use.
4.1 This test method is a peel cling procedure. A 1 in. (25
1.4 This international standard was developed in accor-
mm) wide film strip is adhered to a flat film attached to an
dance with internationally recognized principles on standard-
inclined surface. The force required to remove the film strip
ization established in the Decision on Principles for the
from the flat film is measured.
Development of International Standards, Guides and Recom-
mendations issued by the World Trade Organization Technical
5. Significance and Use
Barriers to Trade (TBT) Committee.
5.1 Cling is of critical importance in maintaining a tight
wrap after a load is stretch wrapped.
2. Referenced Documents
2
6. Equipment and Preparation
2.1 ASTM Standards:
D996 Terminology of Packaging and Distribution Environ-
6.1 Apparatus—Auniversal testing machine with a constant
ments
rate of grip separation equipped, as follows:
3
D1898 Practice for Sampling of Plastics (Withdrawn 1998)
6.1.1 One lightweight jaw equipped with 1 by 1.5 in. (25 by
D4332 Practice for Conditioning Containers, Packages, or
38 mm) flat rubber-faced grips,
Packaging Components for Testing
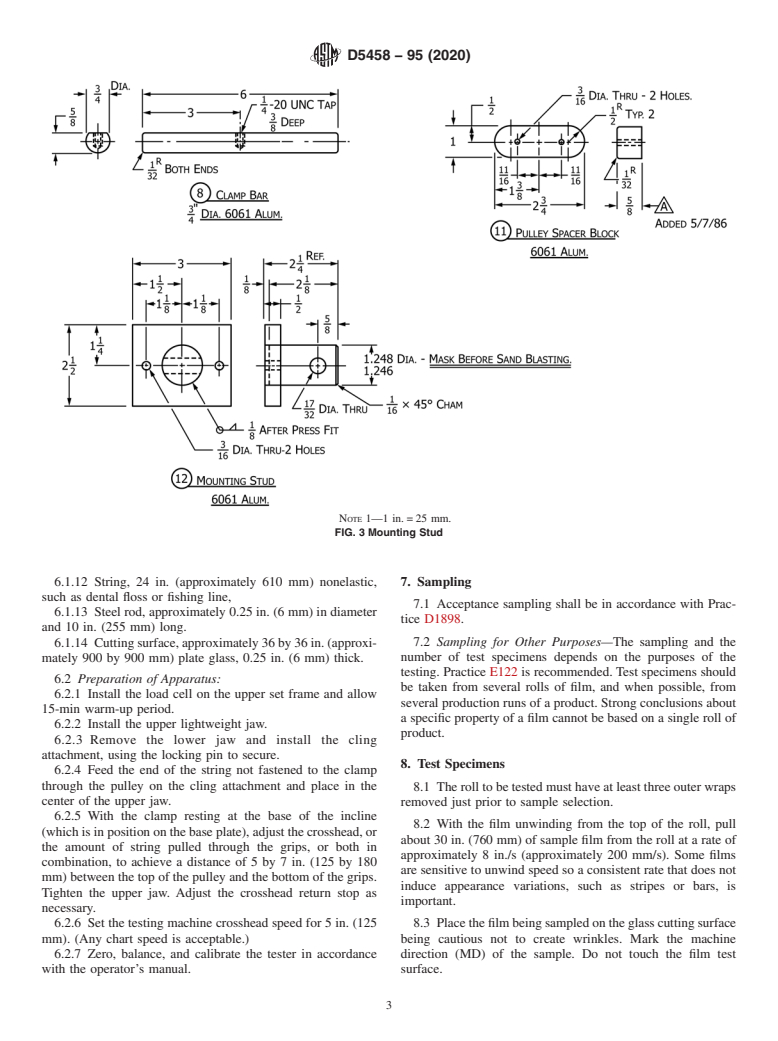
6.1.2 Cling attachment (see Figs. 1-5),
E122 Practice for Calculating Sample Size to Estimate,With
6.1.3 Cling clamp (see Fig. 6),
Specified Precision, the Average for a Characteristic of a
6.1.4 Load cell, 500-g load capacity,
Lot or Process
6.1.5 If using pneumatic grips, air supply, 60 to 70 psi with
E691 Practice for Conducting an Interlaboratory Study to
appropriate filter,
Determine the Precision of a Test Method
6.1.6 Sample template, picture-frame style with inside di-
mensions of 5 by 20 in. (125 by 500 mm),
6.1.7 Precision sample cutter, 1 6 0.001 in. (25.4 6 0.03
4
1
mm)width,withprecisionof1 60.001in.(25.4 60.03mm),
This test method is under the jurisdiction of ASTM Committee D10 on
Packaging and is the direct responsibility of Subcommittee D10.25 on Palletizing
6.1.8 Single-edged safety razor blade,
and Unitizing of Loads.
6.1.9 Synthetic bristle paint brush, 2 in. (50 mm) wide,
Current edition approved Nov. 1, 2020. Published November 2020. Originally
6.1.10 Ruler, 12 in. (approximately 300 mm),
approved in 1994. Last previous edition approved in 2012 as D5458 – 95 (2012).
DOI: 10.1520/D5458-95R20. 6.1.11 Separation paper, 8.5 by 12 in. (approximately 125
2
For referenced ASTM standards, visit the ASTM website, www.astm.org, or
by 280 mm) bond,
contact ASTM Customer Service at service@astm.org. For Annual Book of ASTM
Standards volume information, refer to the standard’s Document Summary page on
the ASTM website.
3 4
The last approved version of this historical standard is referenced on JDC-1-10 Cutter is available from Thwing-Albert Instrument Co., 10960
www.astm.org. Dutton Rd., Philadelphia, PA 19154 or other manufacturers.
Copyright © ASTM International, 100 Barr Harbor Drive, PO Box C700, West Conshohocken, PA 19428-2959. United States
1
---------------------- Page: 1 ----------------------
D5458 − 95 (2020)
NOTE 1—1 in. = 25 mm.
FIG. 1 Overall Fixture
NOTE 1—1 in. = 25 mm.
FIG. 2 Incline Surface
2
---------------------- Page: 2 ----
...


Questions, Comments and Discussion
Ask us and Technical Secretary will try to provide an answer. You can facilitate discussion about the standard in here.