ASTM B905-00
(Test Method)Standard Test Methods for Assessing the Adhesion of Metallic and Inorganic Coatings by the Mechanized Tape Test
Standard Test Methods for Assessing the Adhesion of Metallic and Inorganic Coatings by the Mechanized Tape Test
SCOPE
1.1 These test methods describe procedures for assessing the adhesion of metallic and inorganic coatings and other thin films to metallic and nonmetallic substrates. Assessment is made by applying pressure-sensitive tape to a coated surface and then utilizing a mechanical device to remove the tape at a regulated, uniform rate and constant angle while simultaneously recording the removal force.
1.2 Four methods are described. Methods A1 and A2 are intended primarily for use on parts. Methods B1 and B2 are intended primarily for use in laboratory evaluations. Methods B1 and B2 are not recommended for testing coatings and films on polymer substrates.
1.3 These test methods may be used to establish whether the adhesion of a coating to a substrate is within a required range (between a quantified low and a quantified high level). Determination of actual adhesive forces requires more sophisticated methods of measurement. In multilayer systems adhesion failure may occur between intermediate coating layers so that the adhesion of the total coating system to the substrate may not necessarily be determined.
This standard does not purport to address all of the safety concerns, if any, associated with its use. It is the responsibility of the user of this standard to establish appropriate safety and health practices and determine the applicability of regulatory limitations prior to use.
General Information
Relations
Standards Content (Sample)
NOTICE: This standard has either been superseded and replaced by a new version or withdrawn.
Contact ASTM International (www.astm.org) for the latest information
Designation:B905–00
Standard Test Methods for
Assessing the Adhesion of Metallic and Inorganic Coatings
by the Mechanized Tape Test
This standard is issued under the fixed designation B 905; the number immediately following the designation indicates the year of
original adoption or, in the case of revision, the year of last revision. A number in parentheses indicates the year of last reapproval. A
superscript epsilon (e) indicates an editorial change since the last revision or reapproval.
1. Scope B 253 Guide for Preparation of Aluminum Alloys for Elec-
troplating
1.1 These test methods describe procedures for assessing
B 254 Practice for Preparation of and Electroplating on
the adhesion of metallic and inorganic coatings and other thin
Stainless Steel
films to metallic and nonmetallic substrates. Assessment is
B 281 Practice for Preparation of Copper and Copper-Base
made by applying pressure-sensitive tape to a coated surface
Alloys for Electroplating and Conversion Coating
and then utilizing a mechanical device to remove the tape at a
B 319 Guide for Preparation of Lead and Lead Alloys for
regulated, uniform rate and constant angle while simulta-
Electroplating
neously recording the removal force.
B 320 Practice for Preparation of Iron Castings for Electro-
1.2 Four methods are described. Methods A1 and A2 are
plating
intended primarily for use on parts. Methods B1 and B2 are
B 343 Practice for Preparation of Preparation of Nickel for
intended primarily for use in laboratory evaluations. Methods
Electroplating with Nickel
B1 and B2 are not recommended for testing coatings and films
B 480 GuideforPreparationofMagnesiumandMagnesium
on polymer substrates.
Alloys for Electroplating
1.3 Thesetestmethodsmaybeusedtoestablishwhetherthe
B 481 Practice for Preparation of Titanium and Titanium
adhesion of a coating to a substrate is within a required range
Alloys for Electroplating
(between a quantified low and a quantified high level). Deter-
B 482 Practice for Preparation of Tungsten and Tungsten
mination of actual adhesive forces requires more sophisticated
Alloys for Electroplating
methods of measurement. In multilayer systems adhesion
B 537 Practice for Rating of Electroplated Panels Subjected
failure may occur between intermediate coating layers so that
to Atmospheric Exposure
the adhesion of the total coating system to the substrate may
B 538 Method of FACT (Ford Anodized Aluminum Corro-
not necessarily be determined.
sion) Test
1.4 This standard does not purport to address all of the
B 558 Practice for Preparation of NickelAlloys for Electro-
safety concerns, if any, associated with its use. It is the
plating
responsibility of the user of this standard to establish appro-
B 629 Practice for Preparation of Molybdenum and Molyb-
priate safety and health practices and determine the applica-
denum Alloys for Electroplating
bility of regulatory limitations prior to use.
B 630 Practice for Preparation of Chromium for Electro-
2. Referenced Documents
plating with Chromium
B 727 Practice for Preparation of Plastics Materials for
2.1 ASTM Standards:
Electroplating
B 183 Practice for Preparation of Low-Carbon Steel for
D 1730 Practices for Preparation of Aluminum and
Electroplating
Aluminum-Alloy Surfaces for Painting
B 242 Practice for Preparation of High-Carbon Steel for
D 1731 Practices for Preparation of Hot-Dip Aluminum
Electroplating
Surfaces for Painting
B 252 Guide for Preparation of ZincAlloy Die Castings for
D 1732 Practices for Preparation of Magnesium Alloy Sur-
Electroplating and Conversion Coating
faces for Painting
D 2370 Test Method for Tensile Properties of Organic
Coatings
These test methods are under the jurisdiction of ASTM Committee B08 on
Metallic and Inorganic Coatings and are the direct responsibility of Subcommittee
B08.08.01 on Engineering Coatings.
Current edition approved March 10, 2000. Published July 2000. Discontinued 1987; See 1986 Annual Book of ASTM Standards, Vol 02.05.
2 4
Annual Book of ASTM Standards, Vol 02.05. Annual Book of ASTM Standards, Vol 06.01.
Copyright © ASTM International, 100 Barr Harbor Drive, PO Box C700, West Conshohocken, PA 19428-2959, United States.
B905
D 3330/D 3330M Test Methods for Peel Adhesion of 90 (MethodA1 and B1) or 180° (MethodA2 and B2).The peel
Pressure-Sensitive Tape at 180° Angle rate should be controllable between 20 mm/s and 200 mm/s for
D 3359 Test Methods for Measuring Adhesion by Tape Method A1 and B1 and between 14 mm/s and 140 mm/s for
Test Methods A2 and B2. A recording force gage is fitted between
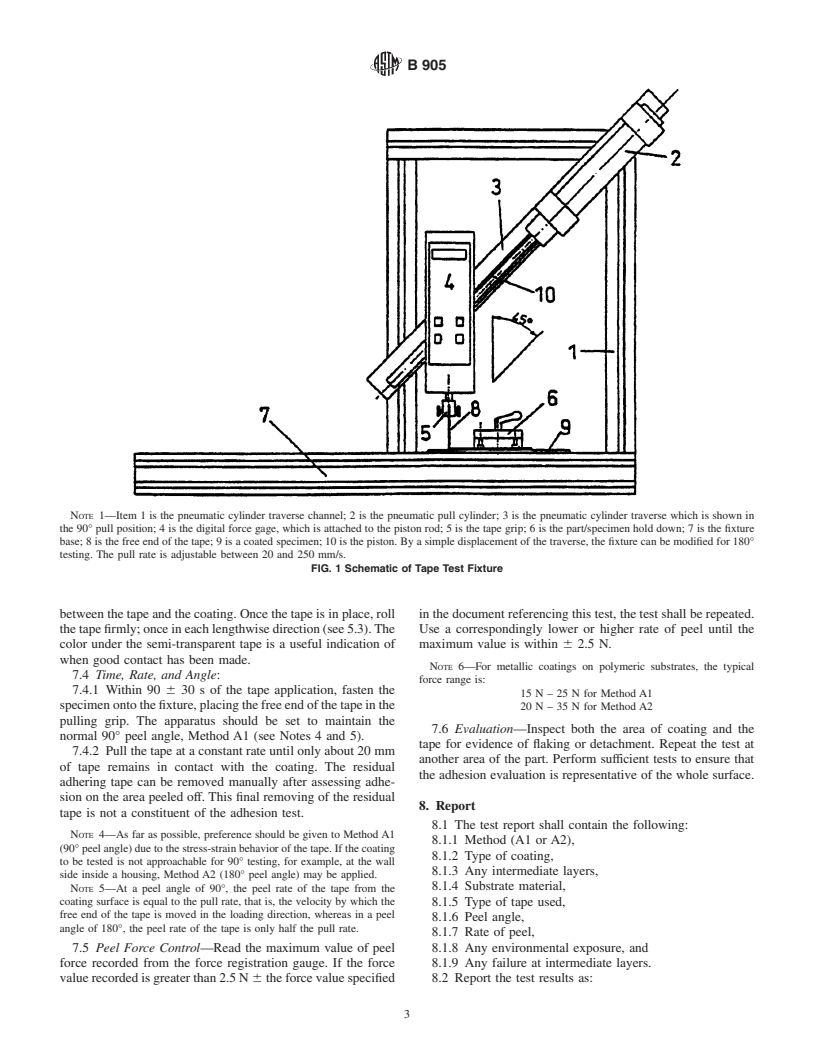
the tape grip and the movable beam (see Fig. 1).
3. Summary of Test Method
5.2 Pressure-Sensitive Tape—Unless otherwise specified in
3.1 Pressure-sensitive tape is adhered to the surface of the the document referencing this test, the tape shall be 25 mm
coating and then removed utilizing a motorized mechanical
wide,semitransparent,pressure-sensitivetapewithanadhesion
device that peels the tape at a constantly maintained angle and strength of 43 6 5.6 g/mm or N/100 mm width when tested in
controlled rate of peel.Adigital recording force gage is used to
accordance with D 3330/D 3330M. The adhesion shall not
record the maximum peel force. change by more than + 6.5 % of its mean value within 12
months.Thebackingofthetapemayconsistoffiber-reinforced
NOTE 1—All due care must be taken to ensure that test specimens are
cellulose acetate, unplasticized poly (vinyl chloride), or poly-
handled and stored such that they are not subjected to conditions that will
ester film. When results obtained in different laboratories do
cause deleterious effects. These conditions include but are not limited to
handling without the use of gloves, storing in areas that accumulate dust, notagreeitisrecommendedthatthetestberepeatedusingtape
areas of high humidity or where the sample may be subjected to fumes or
from the same batch.
vapors that might condense on the sample.
5.3 Roller—The roller , which is hand operated, consists of
a steel roller 85 6 2.5 mm in diameter and 45 6 1.5 mm in
3.2 Methods A1 and A2:
width, covered with rubber approximately 6 mm in thickness,
3.2.1 In these methods, which are nondestructive, the mea-
having a Shore scale A durometer hardness of 80 6 5. The
surement area used is the unbroken coating surface with peel
surfaceoftherollershallbeatruecylindervoidofanyconcave
angles of 90 and 180° respectively.
or convex deviations.The mass of the roller shall be 20406 45
3.2.2 Adhesion is assessed in terms of “passed,” if the
g.
coating does not detach, or “failed,” if the coating detaches
within the specified range of peel forces as recorded during the
NOTE 2—A standardized roller is used in place of the pencil eraser of
test.
Test Methods D 3359 because of the variety of rubber and abrasives
3.3 Methods B1 and B2:
formulations used to make pencil erasers.Afurther consideration was the
3.3.1 In these methods, which are destructive, the measure- extended range of localized pressures that could be exerted by the pencil
and eraser.
ment area used is a broken coating surface created by scoring
alatticepatternthroughthecoatingtothesubstrateandpeeling
TEST METHOD A
at angles of 90 and 180°, respectively.
NONDESTRUCTIVE, PARTS TAPE TEST
3.3.2 Adhesion is assessed qualitatively on the 0 to 5 scale.
6. Test Specimen
4. Significance and Use
6.1 Parts—This test normally is performed on parts. Any
4.1 If a coating is to fulfill its function of protecting or
requirements for test specimens will be found in the document
imparting unique properties to the surface of a substrate, it
specifying their use.
must adhere to the substrate for the expected service life.
Because surface preparation (or lack of it) has a drastic effect
NOTE 3—When specified by the document referencing this test, the
on adhesion of coatings, a test method for evaluating adhesion coated parts shall be subjected to a preliminary exposure, such as water
immersion, salt spray, or humidity, before conducting the tape test.
to different surface treatments or of different coatings to the
same treatment is of considerable use to the industry.
7. Procedure
4.2 The limitations of all adhesion methods, and the specific
7.1 Test Area—Select a flat area, on a significant surface,
limitation of this test method to lower levels of adhesion (see
free of blemishes and minor surface imperfections. Ensure that
1.3) should be recognized before using it. These test methods
the surface is clean and dry. Extremes in temperature or
aremechanizedadaptationsofTestMethodsD 3359;therefore,
relative humidity may affect the adhesion of the tape or the
the intra- and interlaboratory precision of these test methods
coating.
are similar to Test Methods D 3359 and to other widely-
7.2 Tape Section—Remove two complete laps of the
accepted tests for coated substrates, for example, Test Method
pressure-sensitive tape from the roll and discard. Remove an
D 2370, but this is partly the result of it being insensitive to all
additional length at a steady (that is, not jerked) rate and cut a
but large differences in adhesion. The pass-fail scale of 0 to 5
piece off at least 100 mm long plus an additional length equal
for Method B1 and B2 was selected deliberately to avoid a
to the space between the test surface and the grip on the fixture
false impression of being sensitive.
for pulling the tape.
5. Apparatus and Materials 7.3 TapePlacement—Carefullyplacethetapeontheareaof
coating to be tested and lightly press and smooth the tape into
5.1 PeelTestFixture—Thefixtureshallconsistofaframeto
place, taking care to prevent any entrapment of air bubbles
which the specimen is rigidly clamped, and a moveable beam
by which the tape is pulled off under a constant peel angle of
Available from the Pressure-Sensitive Tape Council (PSTC), 104 Wilmot Rd.,
Annual Book of ASTM Standards, Vol 15.09. Suite 201, Deerfield, IL 60015.
B905
NOTE 1—Item 1 is the pneumatic cylinder traverse channel; 2 is the pneumatic pull cylinder; 3 is the pneumatic cylinder traverse which is shown in
the 90° pull position; 4 is the digital force gage, which is attached to the piston rod; 5 is the tape grip; 6 is the part/specimen hold down; 7 is the fixture
base; 8 is the free end of the tape; 9 is a coated specimen; 10 is the piston. By a simple displacement of the traverse, the fixture can be modified for 180°
testing. The pull rate is adjustable between 20 and 250 mm/s.
FIG. 1 Schematic of Tape Test Fixture
between the tape and the coating. Once the tape is in place, roll in the document referencing thi
...


Questions, Comments and Discussion
Ask us and Technical Secretary will try to provide an answer. You can facilitate discussion about the standard in here.