ASTM D4512-99
(Test Method)Standard Test Method for Vibrated Apparent Packing Density of Fine Catalyst and Catalyst Carrier Particles and Powder
Standard Test Method for Vibrated Apparent Packing Density of Fine Catalyst and Catalyst Carrier Particles and Powder
SCOPE
1.1 This test method covers the determination of the apparent packing density of fine catalyst and catalyst carrier powders smaller than 0.8 mm in diameter.
1.2 This standard does not purport to address all of the safety concerns, if any, associated with its use. It is the responsibility of the user of this standard to establish appropriate safety and health practices and determine the applicability of regulatory limitations prior to use.
General Information
Relations
Standards Content (Sample)
NOTICE: This standard has either been superceded and replaced by a new version or discontinued.
Contact ASTM International (www.astm.org) for the latest information.
Designation: D 4512 – 99
Standard Test Method for
Vibrated Apparent Packing Density of Fine Catalyst and
Catalyst Carrier Particles and Powder
This standard is issued under the fixed designation D 4512; the number immediately following the designation indicates the year of
original adoption or, in the case of revision, the year of last revision. A number in parentheses indicates the year of last reapproval. A
superscript epsilon (e) indicates an editorial change since the last revision or reapproval.
1. Scope
1.1 This test method covers the determination of the appar-
ent packing density of fine catalyst and catalyst carrier powders
smaller than 0.8 mm in diameter.
1.2 This standard does not purport to address all of the
safety concerns, if any, associated with its use. It is the
responsibility of the user of this standard to establish appro-
priate safety and health practices and determine the applica-
bility of regulatory limitations prior to use.
2. Referenced Documents
2.1 ASTM Standards:
E 177 Practice for Use of the Terms Precision and Bias in
ASTM Test Methods
E 456 Terminology Relating to Quality and Statistics
E 691 Practice for Conducting an Interlaboratory Study to
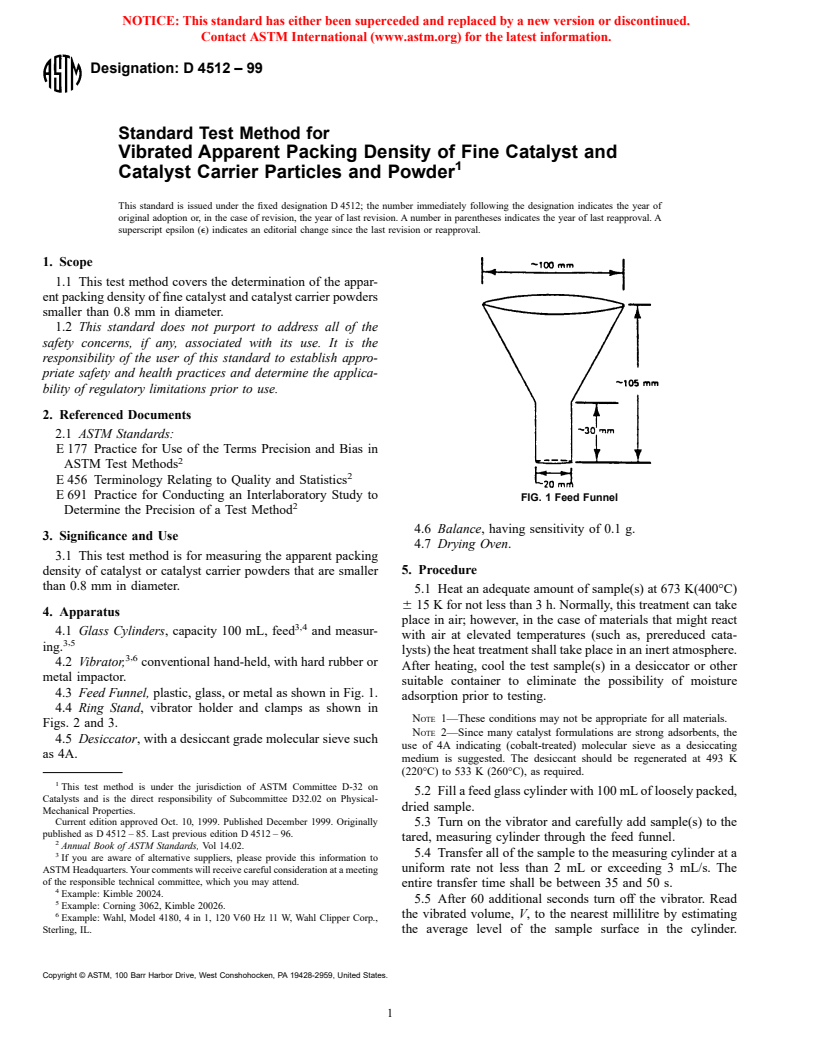
FIG. 1 Feed Funnel
Determine the Precision of a Test Method
4.6 Balance, having sensitivity of 0.1 g.
3. Significance and Use
4.7 Drying Oven.
3.1 This test method is for measuring the apparent packing
5. Procedure
density of catalyst or catalyst carrier powders that are smaller
than 0.8 mm in diameter.
5.1 Heat an adequate amount of sample(s) at 673 K(400°C)
6 15 K for not less than 3 h. Normally, this treatment can take
4. Apparatus
place in air; however, in the case of materials that might react
3,4
4.1 Glass Cylinders, capacity 100 mL, feed and measur-
with air at elevated temperatures (such as, prereduced cata-
,
3 5
ing.
lysts) the heat treatment shall take place in an inert atmosphere.
3,6
4.2 Vibrator, conventional hand-held, with hard rubber or
After heating, cool the test sample(s) in a desiccator or other
metal impactor.
suitable container to eliminate the possibility of moisture
4.3 Feed Funnel, plastic, glass, or metal as shown in Fig. 1.
adsorption prior to testing.
4.4 Ring Stand, vibrator holder and clamps as shown in
NOTE 1—These conditions may not be appropriate for all materials.
Figs. 2 and 3.
NOTE 2—Since many catalyst formulations are strong adsorbents, the
4.5 Desiccator, with a desiccant grade molecular sieve such
use of 4A indicating (cobalt-treated) molecular sieve as a desiccating
as 4A.
medium is suggested. The desiccant should be regenerated at 493 K
(220°C) to 533 K (260°C), as required.
This test method is under the jurisdiction of ASTM Committee D-32 on
5.2 Fill a feed glass cylinder with 100 mL of loosely packed,
Catalysts and is the direct responsibility of Subcommittee D32.02 on Physical-
dried sample.
Mechanical Properties.
Current edition approved Oct. 10, 1999. Published December 1999. Originally 5.3 Turn on the vibrator and carefully add sample(s) to the
published as D 4512 – 85. Last previous edition D 4512 – 96.
tared, measuring cylinder through the feed funnel.
Annual Book of ASTM Standards, Vol 14.02.
5.4 Transfer all of the sample to the measuring cylinder at a
If you are aware of alternative suppliers, please provide this information to
uniform rate not less than 2 mL or exceeding 3 mL/s. The
ASTM Headquarters. Your comments will receive careful consideration at a meeting
of the responsible technical committee, which you may attend.
entire transfer time shall be between 35 and 50 s.
Example: Kimble 20024.
5.5 After 60 additional seconds turn off the vibrator. R
...


Questions, Comments and Discussion
Ask us and Technical Secretary will try to provide an answer. You can facilitate discussion about the standard in here.