ASTM E982-94(1998)
(Specification)Standard Specification for Laboratory Glass Test Tubes
Standard Specification for Laboratory Glass Test Tubes
SCOPE
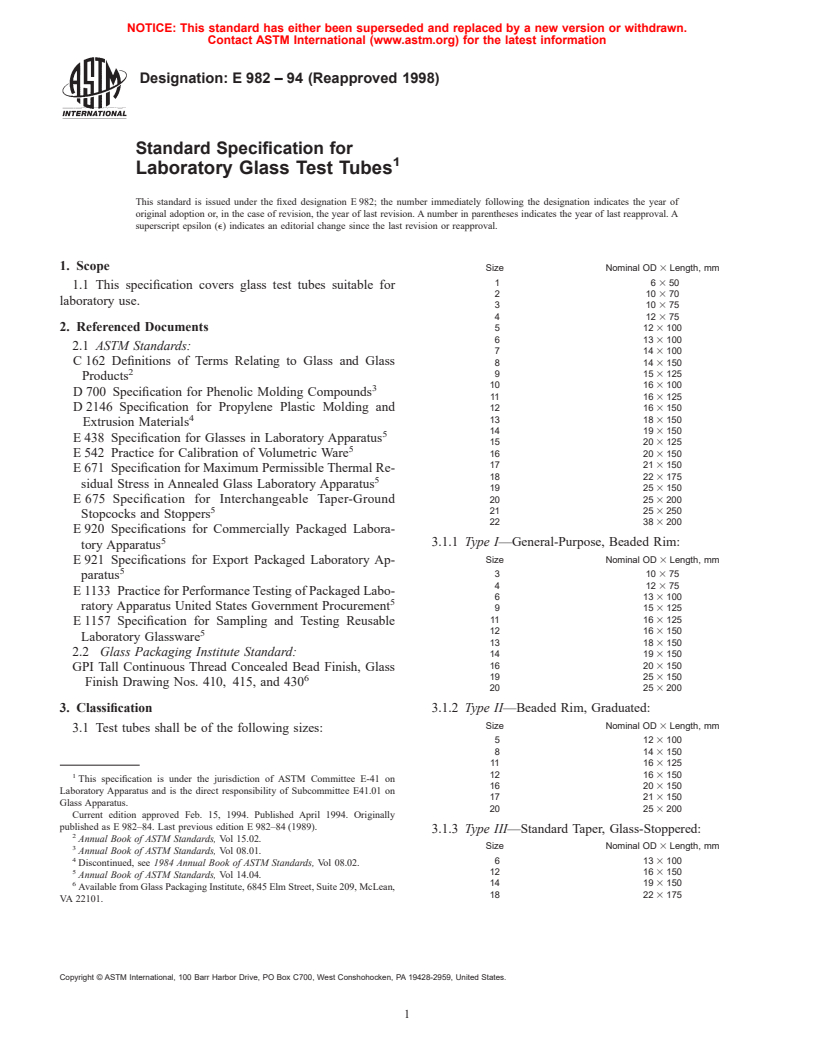
1.1 This specification covers glass test tubes suitable for laboratory use.
General Information
Relations
Standards Content (Sample)
NOTICE: This standard has either been superseded and replaced by a new version or withdrawn.
Contact ASTM International (www.astm.org) for the latest information
Designation: E 982 – 94 (Reapproved 1998)
Standard Specification for
Laboratory Glass Test Tubes
This standard is issued under the fixed designation E 982; the number immediately following the designation indicates the year of
original adoption or, in the case of revision, the year of last revision. A number in parentheses indicates the year of last reapproval. A
superscript epsilon (e) indicates an editorial change since the last revision or reapproval.
1. Scope
Size Nominal OD 3 Length, mm
16 3 50
1.1 This specification covers glass test tubes suitable for
210 3 70
laboratory use.
310 3 75
412 3 75
2. Referenced Documents
512 3 100
613 3 100
2.1 ASTM Standards:
714 3 100
C 162 Definitions of Terms Relating to Glass and Glass
814 3 150
915 3 125
Products
10 16 3 100
D 700 Specification for Phenolic Molding Compounds
11 16 3 125
D 2146 Specification for Propylene Plastic Molding and 12 16 3 150
4 13 18 3 150
Extrusion Materials
14 19 3 150
E 438 Specification for Glasses in Laboratory Apparatus
15 20 3 125
E 542 Practice for Calibration of Volumetric Ware 16 20 3 150
17 21 3 150
E 671 Specification for Maximum Permissible Thermal Re-
18 22 3 175
sidual Stress in Annealed Glass Laboratory Apparatus
19 25 3 150
20 25 3 200
E 675 Specification for Interchangeable Taper-Ground
21 25 3 250
Stopcocks and Stoppers
22 38 3 200
E 920 Specifications for Commercially Packaged Labora-
3.1.1 Type I—General-Purpose, Beaded Rim:
tory Apparatus
Size Nominal OD 3 Length, mm
E 921 Specifications for Export Packaged Laboratory Ap-
310 3 75
paratus
412 3 75
E 1133 Practice for Performance Testing of Packaged Labo-
613 3 100
ratory Apparatus United States Government Procurement
915 3 125
11 16 3 125
E 1157 Specification for Sampling and Testing Reusable
12 16 3 150
Laboratory Glassware
13 18 3 150
2.2 Glass Packaging Institute Standard:
14 19 3 150
16 20 3 150
GPI Tall Continuous Thread Concealed Bead Finish, Glass
19 25 3 150
Finish Drawing Nos. 410, 415, and 430
20 25 3 200
3. Classification 3.1.2 Type II—Beaded Rim, Graduated:
Size Nominal OD 3 Length, mm
3.1 Test tubes shall be of the following sizes:
512 3 100
814 3 150
11 16 3 125
1 12 16 3 150
This specification is under the jurisdiction of ASTM Committee E-41 on
16 20 3 150
Laboratory Apparatus and is the direct responsibility of Subcommittee E41.01 on
17 21 3 150
Glass Apparatus.
20 25 3 200
Current edition approved Feb. 15, 1994. Published April 1994. Originally
published as E 982–84. Last previous edition E 982–84 (1989).
3.1.3 Type III—Standard Taper, Glass-Stoppered:
Annual Book of ASTM Standards, Vol 15.02.
3 Size Nominal OD 3 Length, mm
Annual Book of ASTM Standards, Vol 08.01.
613 3 100
Discontinued, see 1984 Annual Book of ASTM Standards, Vol 08.02.
12 16 3 150
Annual Book of ASTM Standards, Vol 14.04.
6 14 19 3 150
Available from Glass Packaging Institute, 6845 Elm Street, Suite 209, McLean,
18 22 3 175
VA 22101.
Copyright © ASTM International, 100 Barr Harbor Drive, PO Box C700, West Conshohocken, PA 19428-2959, United States.
E 982
to Specification D 2146. Screw caps shall not deform, crack,
20 25 3 200
turn color, or become tacky; and liners shall not detach or
3.1.4 Type IV—Culture Tubes, Rimless:
become tacky when autoclaved the first time.
Size Nominal OD 3 Length, mm
4.3 Liners—Liners for Class A screw caps shall be fabri-
16 3 50
cated of resilient white rubber. Class B caps shall have a
310 3 75
412 3 75
polytetrafluoroethylene liner interface firmly bonded to the
613 3 100
glued-in white rubber liner as described for Class A caps.
915 3 125
10 16 3 100 4.4 Annealing—Maximum thermal residual stress shall be
11 16 3 125
such as to conform to Specification E 671.
12 16 3 150
13 18 3 150
14 19 3 150 5. Design
16 20 3 150
5.1 Shape—Test tubes covered by this specification shall be
18 22 3 125
19 25 3 150
tubular, with one end having a rounded closure.
20 25 3 200
5.2 Capacity—Capacities on ungraduated tubes are only
21 25 3 250
approximate, but any graduation on Type II tubes shall indicate
3.1.5 Type V—Culture Tubes, Filtered for Wave Lengths in
the contained capacity within 65 % of nominal tube capacity.
the 3 000 to 5 000-Å Range:
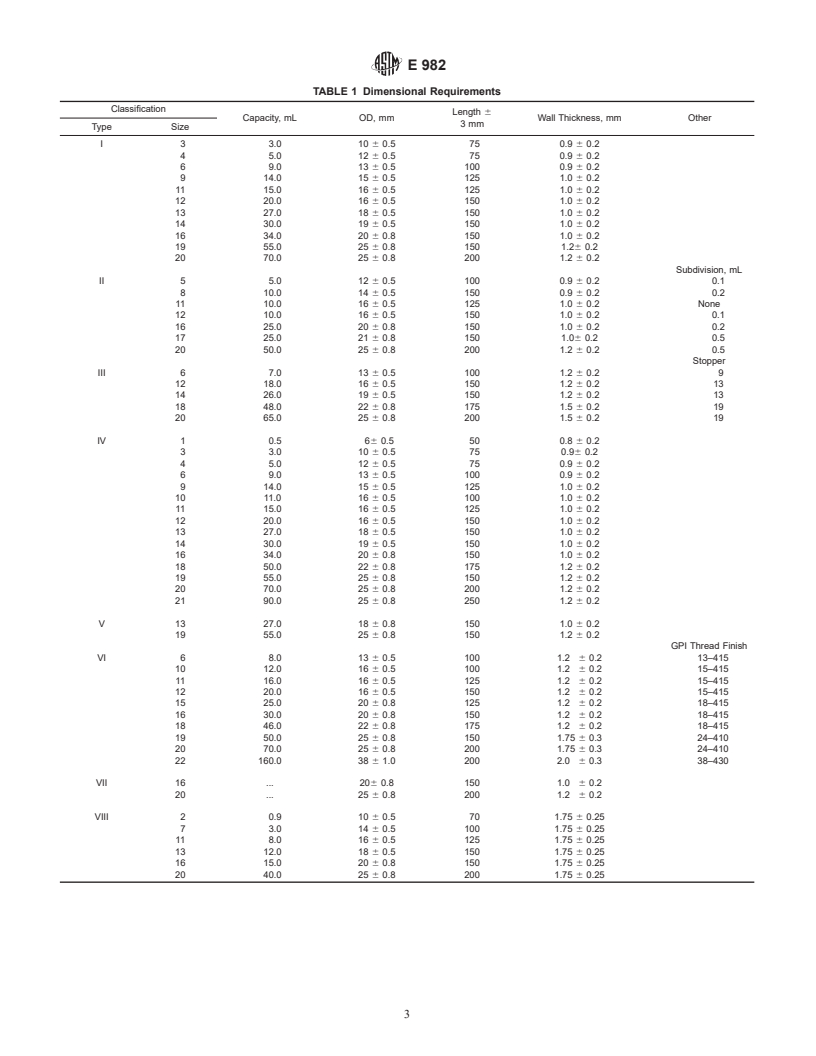
5.3 Types I and II—The open end of Types I and II test tubes
Size Nominal OD 3 Length, mm
shall have a beaded rim; dimensions shall be as specified in
13 18 3 150
Table 1.
19 25 3 150
5.4 Type III—The open end of Type III test tubes shall have
3.1.6 Type VI—Culture Tubes, Screw Caps:
a standard taper stopper. The joint and stopper shall conform to
Size Nominal OD 3 Length, mm
Specification E 675 and Table 1.
613 3 100
5.5 Types IV, V, and VIII—The open end of Types IV, V and
10 16 3 100
VIII test tubes shall be rimless and fire polished, dimensions
11 16 3 125
12 16 3 150
shall be as specified in Table 1.
15 20 3 125
5.6 Type VI—The open end of Type VI test tubes shall have
16 20 3 150
18 22 3 175
a standard GPI thread finish made to accommodate a plastic
19 25 3 150
screw-on type cap. The inner edge of the cap shall be
20 25 3 200
sufficiently threaded with a continuous thread formed as an
...


Questions, Comments and Discussion
Ask us and Technical Secretary will try to provide an answer. You can facilitate discussion about the standard in here.