ASTM G38-01(2021)
(Practice)Standard Practice for Making and Using C-Ring Stress-Corrosion Test Specimens
Standard Practice for Making and Using C-Ring Stress-Corrosion Test Specimens
SIGNIFICANCE AND USE
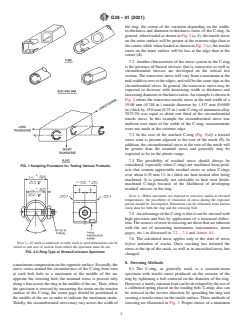
4.1 The C-ring is a versatile, economical specimen for quantitatively determining the susceptibility to stress-corrosion cracking of all types of alloys in a wide variety of product forms. It is particularly suitable for making transverse tests of tubing and rod and for making short-transverse tests of various products as illustrated for plate in Fig. 1.
FIG. 1 Sampling Procedure for Testing Various Products
SCOPE
1.1 This practice covers the essential features of the design and machining, and procedures for stressing, exposing, and inspecting C-ring type of stress-corrosion test specimens. An analysis is given of the state and distribution of stress in the C-ring.
1.2 Specific considerations relating to the sampling process and to the selection of appropriate test environments are outside the scope of this practice.
1.3 The values stated in SI units are to be regarded as standard. The values given in parentheses after SI units are provided for information only and are not considered standard.
1.4 This standard does not purport to address all of the safety concerns, if any, associated with its use. It is the responsibility of the user of this standard to establish appropriate safety, health, and environmental practices and determine the applicability of regulatory limitations prior to use.
1.5 This international standard was developed in accordance with internationally recognized principles on standardization established in the Decision on Principles for the Development of International Standards, Guides and Recommendations issued by the World Trade Organization Technical Barriers to Trade (TBT) Committee.
General Information
- Status
- Published
- Publication Date
- 31-Jul-2021
- Technical Committee
- G01 - Corrosion of Metals
- Drafting Committee
- G01.06 - Environmentally Assisted Cracking
Overview
ASTM G38-01(2021) - Standard Practice for Making and Using C-Ring Stress-Corrosion Test Specimens establishes guidelines for the design, preparation, stressing, exposure, and inspection of C-ring specimens used to evaluate the stress-corrosion cracking (SCC) susceptibility in metal alloys. Developed by ASTM International, this standard offers a flexible and economical approach to quantitatively testing various product forms, such as tubing, rods, and plates, under controlled stress and environmental conditions.
The C-ring method provides reliable data for engineers and materials scientists focused on corrosion resistance and the long-term durability of alloys exposed to aggressive environments.
Key Topics
Specimen Design and Preparation
Recommends sizes, machining practices, and surface preparations critical for accurate SCC testing. Emphasizes minimizing residual and machining-induced stresses, achieving high-quality finishes, and proper orientation of grains relative to stress for meaningful results.Stress Application Methods
Details procedures for stressing C-ring specimens, including constant-strain and constant-load techniques. Discusses best practices for using bolts, springs, and strain gauges to ensure precise and reproducible loading.State and Distribution of Stress
Explains the complex stress distribution within C-rings, including circumferential, transverse, and in notched scenarios, triaxial stresses. Highlights the importance of measuring and calibrating stress to interpret SCC susceptibility accurately.Exposure and Environmental Control
Advises on suitable exposure methods for SCC testing in laboratory and field environments. Stresses the use of appropriate coatings and insulators to prevent galvanic and crevice corrosion during exposure.Inspection and Failure Criteria
Outlines recommended inspection techniques, including visual and low-magnification examination, and guidance for identifying crack initiation and progression as criteria for specimen failure.Reporting Requirements
Specifies the need for detailed reporting on specimen preparation, testing parameters, alloy information, and observed results to ensure traceability and comparison across studies.
Applications
ASTM G38-01(2021) is widely used in:
- Materials selection and evaluation - Assessing SCC resistance of alloys prior to deployment in engineering structures and components, particularly for harsh chemical or marine environments.
- Quality assurance - Ensuring manufactured products such as tubing, rods, and plates meet required corrosion resistance standards.
- Failure analysis - Investigating in-service failures due to SCC by replicating service conditions in lab-based C-ring tests.
- Research and development - Supporting the development of new alloys and coatings with improved stress-corrosion resistance.
Common industries applying this standard include aerospace, petrochemical, power generation, transportation, and infrastructure.
Related Standards
- NACE TM0177 - Laboratory testing of metals for resistance to sulfide stress cracking and stress corrosion cracking in H₂S environments; referenced for procedures and comparisons with the C-ring test.
- ASTM G30 - Practice for Making and Using U-Bend Stress-Corrosion Test Specimens.
- ASTM G36 - Practice for Evaluating Stress-Corrosion Cracking Resistance of Metals and Alloys in a Boiling Magnesium Chloride Solution.
- ISO 7539 series - Corrosion of metals and alloys - Stress corrosion testing.
For detailed procedures and supplementary guidelines, refer to the latest ASTM and NACE documents.
Keywords: ASTM G38-01, C-ring specimen, stress-corrosion cracking, SCC testing, alloy evaluation, corrosion resistance, laboratory testing, metallurgical testing, materials science, standard practice for metals
Buy Documents
ASTM G38-01(2021) - Standard Practice for Making and Using C-Ring Stress-Corrosion Test Specimens
Get Certified
Connect with accredited certification bodies for this standard

Element Materials Technology
Materials testing and product certification.

Inštitut za kovinske materiale in tehnologije
Institute of Metals and Technology. Materials testing, metallurgical analysis, NDT.
Sponsored listings
Frequently Asked Questions
ASTM G38-01(2021) is a standard published by ASTM International. Its full title is "Standard Practice for Making and Using C-Ring Stress-Corrosion Test Specimens". This standard covers: SIGNIFICANCE AND USE 4.1 The C-ring is a versatile, economical specimen for quantitatively determining the susceptibility to stress-corrosion cracking of all types of alloys in a wide variety of product forms. It is particularly suitable for making transverse tests of tubing and rod and for making short-transverse tests of various products as illustrated for plate in Fig. 1. FIG. 1 Sampling Procedure for Testing Various Products SCOPE 1.1 This practice covers the essential features of the design and machining, and procedures for stressing, exposing, and inspecting C-ring type of stress-corrosion test specimens. An analysis is given of the state and distribution of stress in the C-ring. 1.2 Specific considerations relating to the sampling process and to the selection of appropriate test environments are outside the scope of this practice. 1.3 The values stated in SI units are to be regarded as standard. The values given in parentheses after SI units are provided for information only and are not considered standard. 1.4 This standard does not purport to address all of the safety concerns, if any, associated with its use. It is the responsibility of the user of this standard to establish appropriate safety, health, and environmental practices and determine the applicability of regulatory limitations prior to use. 1.5 This international standard was developed in accordance with internationally recognized principles on standardization established in the Decision on Principles for the Development of International Standards, Guides and Recommendations issued by the World Trade Organization Technical Barriers to Trade (TBT) Committee.
SIGNIFICANCE AND USE 4.1 The C-ring is a versatile, economical specimen for quantitatively determining the susceptibility to stress-corrosion cracking of all types of alloys in a wide variety of product forms. It is particularly suitable for making transverse tests of tubing and rod and for making short-transverse tests of various products as illustrated for plate in Fig. 1. FIG. 1 Sampling Procedure for Testing Various Products SCOPE 1.1 This practice covers the essential features of the design and machining, and procedures for stressing, exposing, and inspecting C-ring type of stress-corrosion test specimens. An analysis is given of the state and distribution of stress in the C-ring. 1.2 Specific considerations relating to the sampling process and to the selection of appropriate test environments are outside the scope of this practice. 1.3 The values stated in SI units are to be regarded as standard. The values given in parentheses after SI units are provided for information only and are not considered standard. 1.4 This standard does not purport to address all of the safety concerns, if any, associated with its use. It is the responsibility of the user of this standard to establish appropriate safety, health, and environmental practices and determine the applicability of regulatory limitations prior to use. 1.5 This international standard was developed in accordance with internationally recognized principles on standardization established in the Decision on Principles for the Development of International Standards, Guides and Recommendations issued by the World Trade Organization Technical Barriers to Trade (TBT) Committee.
ASTM G38-01(2021) is classified under the following ICS (International Classification for Standards) categories: 77.040.30 - Chemical analysis of metals. The ICS classification helps identify the subject area and facilitates finding related standards.
ASTM G38-01(2021) is available in PDF format for immediate download after purchase. The document can be added to your cart and obtained through the secure checkout process. Digital delivery ensures instant access to the complete standard document.
Standards Content (Sample)
This international standard was developed in accordance with internationally recognized principles on standardization established in the Decision on Principles for the
Development of International Standards, Guides and Recommendations issued by the World Trade Organization Technical Barriers to Trade (TBT) Committee.
Designation: G38 − 01 (Reapproved 2021)
Standard Practice for
Making and Using C-Ring Stress-Corrosion Test Specimens
ThisstandardisissuedunderthefixeddesignationG38;thenumberimmediatelyfollowingthedesignationindicatestheyearoforiginal
adoptionor,inthecaseofrevision,theyearoflastrevision.Anumberinparenthesesindicatestheyearoflastreapproval.Asuperscript
epsilon (´) indicates an editorial change since the last revision or reapproval.
This standard has been approved for use by agencies of the U.S. Department of Defense.
1. Scope application of a bending load. Characteristics of the stress
system and the distribution of stresses are discussed. Guidance
1.1 This practice covers the essential features of the design
is given for methods of exposure and inspection.
and machining, and procedures for stressing, exposing, and
inspecting C-ring type of stress-corrosion test specimens. An
4. Significance and Use
analysis is given of the state and distribution of stress in the
4.1 The C-ring is a versatile, economical specimen for
C-ring.
quantitativelydeterminingthesusceptibilitytostress-corrosion
1.2 Specific considerations relating to the sampling process
cracking of all types of alloys in a wide variety of product
and to the selection of appropriate test environments are
forms. It is particularly suitable for making transverse tests of
outside the scope of this practice.
tubingandrodandformakingshort-transversetestsofvarious
1.3 The values stated in SI units are to be regarded as
products as illustrated for plate in Fig. 1.
standard. The values given in parentheses after SI units are
5. Sampling
provided for information only and are not considered standard.
5.1 Test specimens shall be taken from a location and with
1.4 This standard does not purport to address all of the
an orientation so that they adequately represent the material to
safety concerns, if any, associated with its use. It is the
be tested.
responsibility of the user of this standard to establish appro-
priate safety, health, and environmental practices and deter-
5.2 In testing thick sections that have a directional grain
mine the applicability of regulatory limitations prior to use.
structure, it is essential that the C-ring be oriented in the
1.5 This international standard was developed in accor-
section so that the direction of principal stress (parallel to the
dance with internationally recognized principles on standard-
stressing bolt) is in the direction of minimum resistance to
ization established in the Decision on Principles for the
stress-corrosion cracking. For example, in the case of alumi-
Development of International Standards, Guides and Recom-
numalloys (1), thisistheshort-transversedirectionrelativeto
mendations issued by the World Trade Organization Technical
the grain structure. If the ring is not so oriented it will tend to
Barriers to Trade (TBT) Committee.
crack off-center at a location where the stress is unknown.
2. Referenced Documents
6. Specimen Design
2.1 NACE Document:
6.1 Sizes for C-rings may be varied over a wide range, but
NACE TM0177–96Laboratory Testing of Metals for Resis- C-ringswithanoutsidediameterlessthanabout16mm( ⁄8in.)
tance to Sulfide Stress Cracking and Stress Corrosion
are not recommended because of increased difficulties in
Cracking in H S Environments machining and decreased precision in stressing. The dimen-
sions of the ring can affect the stress state, and these consid-
3. Summary of Practice
erations are discussed in Section 7.Atypical shop drawing for
the manufacture of a C-ring is shown in Fig. 2.
3.1 This practice involves the preparation of and the quan-
titative stressing of a C-ring stress-corrosion test specimen by
7. Stress Considerations
7.1 The stress of principal interest in the C-ring specimen is
This practice is under the jurisdiction ofASTM Committee G01 on Corrosion
the circumferential stress. It should be recognized that this
of Metals and is the direct responsibility of Subcommittee G01.06 on Environmen-
stressisnotuniform (2, 3).First,thereisagradientthroughthe
tally Assisted Cracking.
thickness, varying from a maximum tension on one surface to
Current edition approved Aug. 1, 2021. Published August 2021. Originally
approved in 1973. Last previous edition approved in 2013 as G38–01 (2013). DOI:
10.1520/G0038-01R21.
2 3
AvailablefromNACEInternational(NACE),15835ParkTenPl.,Houston,TX Theboldfacenumbersinparenthesesrefertothelistofreferencesattheendof
77084, http://www.nace.org. this practice.
Copyright © ASTM International, 100 Barr Harbor Drive, PO Box C700, West Conshohocken, PA 19428-2959. United States
G38 − 01 (2021)
the ring, the extent of the variation depending on the width-
to-thickness and diameter-to-thickness ratios of the C-ring. In
general,whenloadedasshowninFig.3(a,b),thetensilestress
on the outer surface will be greater at the extreme edge than at
thecenter,whilewhenloadedasshowninFig.3(c),thetensile
stress on the inner surface will be less at the edge than at the
center (4).
7.2 Another characteristic of the stress system in the C-ring
is the presence of biaxial stresses; that is, transverse as well as
circumferential stresses are developed on the critical test
section.The transverse stress will vary from a maximum at the
mid-widthtozeroattheedges,andwillbethesamesignasthe
circumferential stress. In general, the transverse stress may be
expected to decrease with decreasing width to thickness and
increasingdiametertothicknessratios.Anexampleisshownin
Fig. 4 where the transverse tensile stress at the mid-width of a
19.00 mm (0.748 in.) outside diameter by 1.537 mm (0.0605
in.)thickby19.0mm(0.75in.)wideC-ringofaluminumalloy
7075-T6 was equal to about one third of the circumferential
tensile stress. In this example the circumferential stress was
uniform over most of the width of the C-ring; measurements
were not made at the extreme edge.
7.3 In the case of the notched C-ring (Fig. 3(d)) a triaxial
stress state is present adjacent to the root of the notch (5).In
addition, the circumferential stress at the root of the notch will
be greater than the nominal stress and generally may be
expected to be in the plastic range.
7.4 The possibility of residual stress should always be
considered, especially when C-rings are machined from prod-
FIG. 1 Sampling Procedure for Testing Various Products
ucts that contain appreciable residual stress or when C-rings
over about 6.35 mm ( ⁄4 in.) thick are heat treated after being
machined. It is generally not advisable to heat treat finish-
machined C-rings because of the likelihood of developing
residual stresses in the ring.
NOTE 1—When specimens are exposed to corrosive media at elevated
temperatures, the possibility of relaxation of stress during the exposure
period should be investigated. Relaxation can be estimated from known
creep data for both the ring and the stressing bolt.
7.5 AnadvantageoftheC-ringisthatitcanbestressedwith
high precision and bias by application of a measured deflec-
tion.Thesourcesoferrorinstressingarethosethatareinherent
with the use of measuring instruments (micrometers, strain
gages, etc.) as discussed in 7.2 – 7.4 and Annex A1.
7.6 The calculated stress applies only to the state of stress
NOTE 1—If stock is undersize or tube stock is used dimensions can be
before initiation of cracks. Once cracking has initiated the
varied to suit size of section from which the specimen must be cut.
stress at the tip of the crack, as well as in uncracked areas, has
FIG. 2 C-Ring Type of Stress-Corrosion Specimen
changed.
8. Stressing Methods
amaximumcompressionontheoppositesurface.Secondly,the
stress varies around the circumference of the C-ring from zero 8.1 The C-ring, as generally used, is a constant-strain
at each bolt hole to a maximum at the middle of the arc specimen with tensile stress produced on the exterior of the
opposite the stressing bolt; the nominal stress is present only ring by tightening a bolt centered on the diameter of the ring.
alongalineacrosstheringatthemiddleofthearc.Thus,when However,anearlyconstantloadcanbedevelopedbytheuseof
the specimen is stressed by measuring the strain on the tension a calibrated spring placed on the loading bolt. C-rings also can
surface of the C-ring, the strain gage should be positioned at be stressed in the reverse direction by spreading the ring and
the middle of the arc in order to indicate the maximum strain. creatingatensilestressontheinsidesurface.Thesemethodsof
Thirdly,thecircumferentialstressmayvaryacrossthewidthof stressing are illustrated in Fig. 3. Proper choice of a minimum
G38 − 01 (2021)
NOTE 1—For Fig 3 (d) a similar notch could be used on the tension side of (b) or (c).
FIG. 3 Methods of Stressing C-Rings
ε = transverse strain.
T
NOTE2—Whenusingelectricalstraingageswiththin-walledC-rings,a
correction should be allowed for the displacement of the gage from the
surface of the ring. All traces of the gage and the adhesive must be
removed from the C-ring before it is exposed.
NOTE 3—Stresses may be calculated from measured strains using the
modulus of elasticity, provided the stresses and strains do not exceed the
proportional limit.
8.3 When several rings of the same alloy and dimensions
are to be loaded, it is convenient to determine a calibration
curve of circumferential stress versus ring deflection as in Fig.
4 to avoid the inconvenience of strain gaging each ring.
8.4 The amount of compression required on the C-ring to
produce elastic straining only, and the degree of elastic strains
canbepredictedtheoretically (2, 3).Therefore,C-ringsmaybe
stressed by calculating the deflection required to develop a
desiredelasticstressbyusingtheindividualringdimensionsin
a modified curved beam equation as shown in TableA1.1.The
accuracy of calculated stresses is shown in Fig. 4 by the
agreement of the calculated curve and the actual data points.
See AnnexA1 for the equation for stressing C-ring specimens.
8.5 In the case of notched specimens a nominal stress is
FIG. 4 Stresses in 7075-T6 Aluminum Alloy C-Ring Stress-
assumed using the ring outside diameter measured at the root
Corrosion Specimen (4)
of the notch. Consideration then should be given to the stress
concentration factor (K ) for the specific notch when calculat-
T
ing the ∆ required to develop the intended stress.
bolt diameter or a spring constant is, of course, required to
assure achieving true constant strain or constant load stressing.
NOTE 4—The NACE International Standard TM0177–96 provides
procedures for stressing C-Rings to the 0.2% offset yield strength of the
8.2 The most accurate stressing procedure is to attach
materialtobetested.Experimentationunderthereviewandscrutinyofthe
circumferential and transverse electrical strain gages to the
ASTM subcommittee holding jurisdiction of this standard was conducted
surfacestressedintensionandtotightentheboltuntilthestrain
to assess the accuracy and validity of such procedures. It was found that
measurements indicate the desired circumferential stress. The
for a wide range of alloy systems, heat treatments, and test specimen
dimensions,errorsinthetargetstrainassociatedwiththe0.2%offsetyield
circumferential(σ )andtransverse(σ ),stressesarecalculated
C T
strength occurred which would be of significance. However, it was also
as follows:
determined that in all cases the actual strain realized following the
σ 5 E/ 1 2 µ · ε 1µε , and
~ ! ~ ! procedures exceeded that associated with the 0.2% offset yield stress,
C C T
σ 5 E/ 1 2 µ · ε 1µε rendering results following such procedures conservative from an engi-
~ ! ~ !
T T C
neering analysis standpoint.
where:
9. Machining
E = Young’s modulus of elasticity,
µ = Poisson’s ratio,
9.1 When rings are machined from solid stock, precautions
ε = circumferential strain, and
C
should be taken to avoid practices that overheat, plastically
G38 − 01 (2021)
FIG. 5 Protection Against Galvanic Effects
deform, or develop residual stress in the metal surface. 12.2 Care must be exercised to avoid galvanic effects
Machining should be done in stages so that the final cut leaves betweentheC-ring,thestressingbolt,andexposureracks.Itis
theprincipalsurfacewithacleanfinishof0.7µm(30µin.)rms essential also to prevent crevice corrosion that could develop
or better. Necessary machining sequences, type of tool, feed corrosion products between ring and bolt and alter the stress in
rate, etc., depend upon the alloy and temper of the test piece. the C-ring. Protection can readily be applied by means of
Lapping, mechanical polishing, and similar operations that suitable coatings or by insulating bushing as shown in Fig. 5.
produce flow of the metal should be avoided. Consideration must be given to the selection of coatings or
insulators that will neither contaminate the corroding medium
10. Surface Prep
...


Questions, Comments and Discussion
Ask us and Technical Secretary will try to provide an answer. You can facilitate discussion about the standard in here.
Loading comments...