ASTM B588-88(2006)
(Test Method)Standard Test Method for Measurement of Thickness of Transparent or Opaque Coatings by Double-Beam Interference Microscope Technique
Standard Test Method for Measurement of Thickness of Transparent or Opaque Coatings by Double-Beam Interference Microscope Technique
SIGNIFICANCE AND USE
The thickness of a coating is often critical to its performance.
For some coating-substrate combinations, the interference microscope method is a reliable method for measuring coating thickness.
This test method is suitable for specification acceptance.
SCOPE
1.1 This test method covers the measurement of the thickness of transparent metal oxide and metallic coatings by utilizing a double-beam interference microscope.
1.2 The test method requires that the specimen surface or surfaces be sufficiently mirrorlike to form recognizable fringes.
1.3 This test method can be used nondestructively to measure 1 to 10 m thick transparent coatings, such as anodic coatings on aluminum. The test method is used destructively for 0.1 to 10 m thick opaque coatings by stripping a portion of the coating and measuring the step height between the coating and the exposed substrate. The stripping method can also be used to measure 0.2 to 10 m thick anodic coatings on aluminum.
1.4 The test method is usable as a reference method for the measurement of the thickness of the anodic film on aluminum or of metallic coatings when the technique includes complete stripping of a portion of the coating without attack of the substrate. For anodic films on aluminum, the thickness must be greater than 0.4 m; the uncertainty can be as great as 0.2 m. For metallic coatings, the thickness must be greater than 0.25 m; the uncertainty can be as great as 0.1 m.
This standard does not purport to address all of the safety concerns, if any, associated with its use. It is the responsibility of the user of this standard to establish appropriate safety and health practices and determine the applicability of regulatory limitations prior to use.
General Information
Relations
Standards Content (Sample)
NOTICE: This standard has either been superseded and replaced by a new version or withdrawn.
Contact ASTM International (www.astm.org) for the latest information
Designation:B588–88(Reapproved 2006)
Standard Test Method for
Measurement of Thickness of Transparent or Opaque
Coatings by Double-Beam Interference Microscope
Technique
This standard is issued under the fixed designation B588; the number immediately following the designation indicates the year of
original adoption or, in the case of revision, the year of last revision. A number in parentheses indicates the year of last reapproval. A
superscript epsilon (´) indicates an editorial change since the last revision or reapproval.
1. Scope B504 Test Method for Measurement of Thickness of Me-
tallic Coatings by the Coulometric Method
1.1 This test method covers the measurement of the thick-
ness of transparent metal oxide and metallic coatings by
3. Summary of Test Method
utilizing a double-beam interference microscope.
3.1 While observing the specimen surface through the
1.2 The test method requires that the specimen surface or
interference microscope, the top surface of the coating and the
surfacesbesufficientlymirrorliketoformrecognizablefringes.
substrate surface are located with white light interference
1.3 This test method can be used nondestructively to mea-
fringe group(s). Then the elevation difference between the two
sure 1 to 10µ m thick transparent coatings, such as anodic
surfaces is ascertained by counting the number of monochro-
coatings on aluminum. The test method is used destructively
matic fringes by which the white light fringes are displaced.
for 0.1 to 10 µm thick opaque coatings by stripping a portion
The number of fringes, multiplied by one half of the light
of the coating and measuring the step height between the
wavelength, is the film thickness.
coating and the exposed substrate. The stripping method can
3.2 When light is reflected, it undergoes a phase shift, the
also be used to measure 0.2 to 10 µm thick anodic coatings on
magnitude of which depends on the material and on its
aluminum.
structure. The uncertainty of the thickness measurement due to
1.4 The test method is usable as a reference method for the
this phenomenon is, theoretically, less than ⁄8 the wavelength
measurement of the thickness of the anodic film on aluminum
of the light for metals and ⁄4 wavelength for nonmetallic
or of metallic coatings when the technique includes complete
coatings on metal. Those uncertainties are included in those
stripping of a portion of the coating without attack of the
givenin1.4.Theycanbeeliminatedformeasurementsmadein
substrate. For anodic films on aluminum, the thickness must be
accordancewith1.3and7.1.2bycoatingthespecimenafterthe
greater than 0.4 µm; the uncertainty can be as great as 0.2 µm.
stripping operation with a thin but uniform reflective layer of a
For metallic coatings, the thickness must be greater than 0.25
metal by evaporation. The two reflecting surfaces will then be
µm; the uncertainty can be as great as 0.1 µm.
of the same material and the phase shifts will be the same.
1.5 This standard does not purport to address all of the
3.3 The aperture of the microscope objective contributes to
safety concerns, if any, associated with its use. It is the
the fringe displacement by an amount determined by the
responsibility of the user of this standard to establish appro-
aperture size. Therefore, a correction is added equal to a /4
priate safety and health practices and determine the applica-
where a, expressed in radians, is the arc sine of the numerical
bility of regulatory limitations prior to use.
aperture of the microscope objective.
2. Referenced Documents
NOTE 1—When the angle is given in radians and is less than 0.6, the
2.1 ASTM Standards:
angle is approximately equal to its sine.
3.4 With a reticle such as shown in the figures, the fringe
1 1
count is likely to have an uncertainty of ⁄10 wavelength ( ⁄5
This test method is under the jurisdiction ofASTM Committee B08 on Metallic
fringe interval). More precise measurements can be made with
and Inorganic Coatings and is the direct responsibility of Subcommittee B08.10 on
Test Methods.
the aid of a filar micrometer eyepiece.
Current edition approved April 1, 2006. Published April 2006. Originally
approved in 1973. Last previous edition approved in 2001 as B588 – 88 (2001).
4. Significance and Use
DOI: 10.1520/B0588-88R06.
4.1 The thickness of a coating is often critical to its
Saur, R. L., “New Interference Microscope Techniques for Microtopographic
Measurements in the Electroplating Laboratory,” Plating, PLATA, Vol 52, July
performance.
1965, pp. 663–666.
For referenced ASTM standards, visit the ASTM website, www.astm.org, or
contact ASTM Customer Service at service@astm.org. For Annual Book of ASTM
Standards volume information, refer to the standard’s Document Summary page on Bruce, C. F., andThornton, B. S., Journal of Scientific Instruments, JSINA,Vol
the ASTM website. 34, 1957, p. 203.
Copyright © ASTM International, 100 Barr Harbor Drive, PO Box C700, West Conshohocken, PA 19428-2959, United States.
B588–88 (2006)
4.2 For some coating-substrate combinations, the interfer- 7.1.1.2 Determine the number of monochromatic fringes
ence microscope method is a reliable method for measuring between the centers of the white light fringe groups.Appendix
coating thickness. X2 indicates alternative ways of doing this.
4.3 This test method is suitable for specification acceptance. 7.1.1.3 Calculate thickness T as follows:
T 5 ~nl/2µ! [1 1 ~a /4!# (1)
5. Apparatus
5.1 Interference Microscope equipped with a reticle or filar
where:
n = number of fringes,
micrometer eyepiece for linear measurements.
l = wavelength of monochromatic light, µm,
5.2 Incandescent and Monochromatic Light Sources.
µ = refractive index of coating for light of wave length, l,
6. Sample Preparation for Destructive Technique and
a = arc sine (numerical aperture of objective) in radians.
6.1 Anodic Coating on Aluminum—After masking (Note 2),
Thus for the thickness of the anodic coating on aluminum
thecoatingisstrippedbyimmersioninasolutioncontaining33
represented in Fig. 1,
g/L chromic acid (CrO ) and 0.5 cm /L phosphoric acid
(H PO ) (85%). Operating temperature is 85 to 95°C.
3 4 T 5 [~24 3 0.546!/~2 3 1.62!# [1 1 ~0.78 /4!# 5 4.66 µm (2)
NOTE 2—Masking for both transparent and opaque coatings can be where the monochromatic source is a mercury green light
accomplishedbyapplyinganadhesivetapesuchas3M#470orequivalent
with a wavelength of 0.546 µm, where the refractive index of
with its edge at a location where the thickness measurement is desired.
the anodic coating is 1.62, and where alpha is equal to 0.78.
The tape must be sufficiently adherent and impervious to protect the
7.1.2 Destructive Technique:
coating beneath from subsequent stripping action.
7.1.2.1 Position the boundary between the stripped and
NOTE 3—In certain cases, this method causes attack of the basis metal.
unstripped portion of the specimen in the field of view of the
The attack is usually accompanied by pitting, which is easily observable
intheinterferencemicroscopebycomparingthegeneralcontourexhibited
microscope.
by the fringes on the unstripped portion with the general contour on the
7.1.2.2 Asthesurfaceofthespecimenisviewedthroughthe
stripped portion. If such attack occurs, the method is not valid.
interference microscope using the white light, adjust the
6.2 Metallic Coatings on Metallic Substrates—After mask-
microscope fine-focus knob and the reference mirror controls
ing (Note 2), the coating is stripped without attack of the so that the group of fringes arising from the bare substrate and
substrate (see Appendix X1).
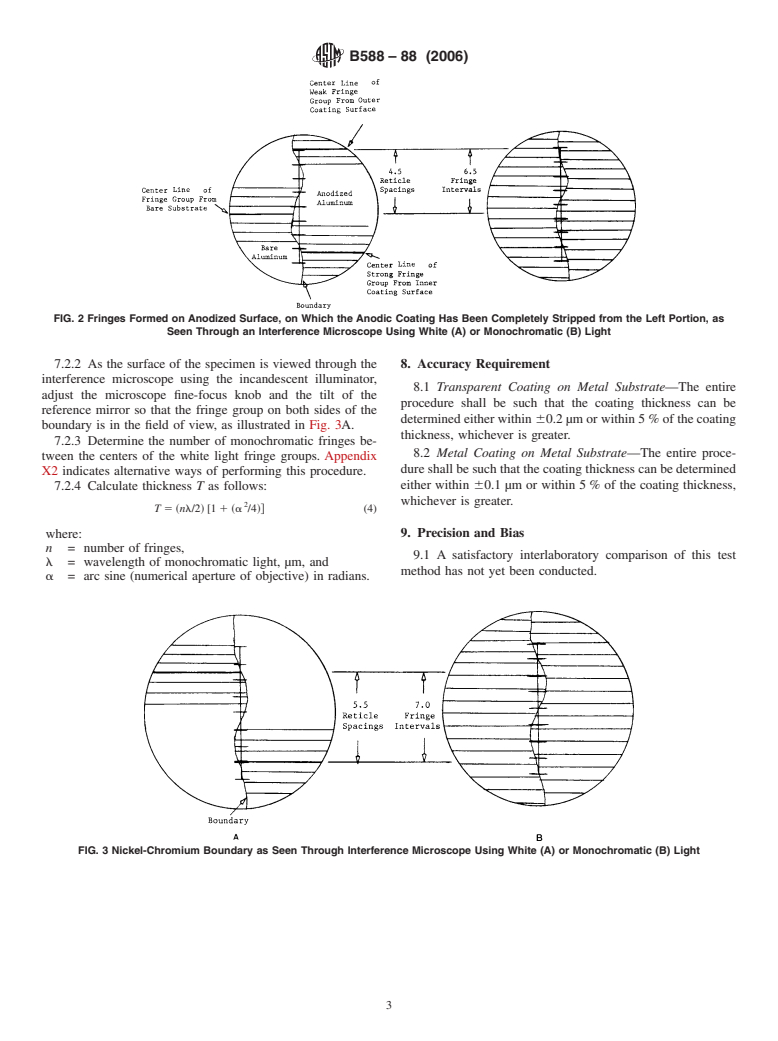
the weak fringes arising from the coating-air interface are both
in view, as illustrated in Fig. 2A.
7. Thickness Measurement
7.1.2.3 Determine the number of monochromatic fringes
between the centers of the white light fringe groups.Appendix
NOTE 4—Many surfaces have microscopical ridges or valleys produced
X2 indicates alternative ways of performing this procedure.
by a previous operation (such as rolling or polishing). Measurements of
film thickness are made best with the fringes oriented in a direction
7.1.2.4 Calculate thickness T as follows:
perpendicular to the directional surface roughness.
T 5 ~nl/2! [1 1 ~a /4!# (3)
7.1 Transparent Coatings:
7.1.1 Nondestructive Technique:
where:
7.1.1.1 As the surface of a specimen is viewed through the n = number of fringes,
interference microscope using the incandescent illuminator l = wavelength of monochromatic light, µm, and
a = arc sine (numerical aperture of objective) in radians.
(white light), adjust the microscope fine-focus knob and the
reference mirror controls so that a group of strong fringes 7.2 Opaque Coatings—Destructive Technique:
(arisi
...


Questions, Comments and Discussion
Ask us and Technical Secretary will try to provide an answer. You can facilitate discussion about the standard in here.