ASTM A632-04(2014)
(Specification)Standard Specification for Seamless and Welded Austenitic Stainless Steel Tubing (Small-Diameter) for General Service
Standard Specification for Seamless and Welded Austenitic Stainless Steel Tubing (Small-Diameter) for General Service
ABSTRACT
The specification covers grades of stainless steel tubing for general corrosion-resisting and low or high-temperature service. The tubes shall be cold finished and shall be made by the seamless or welded process. All material shall be furnished in the heat-treated condition. The heat-treatment procedure shall consist of heating the material and quenching in water or rapidly cooling by other means. Tension tests, flaring tests, hydrostatic tests, air underwater pressure tests, and nondestructive electric tests shall be performed in accordance to the specified requirements.
SCOPE
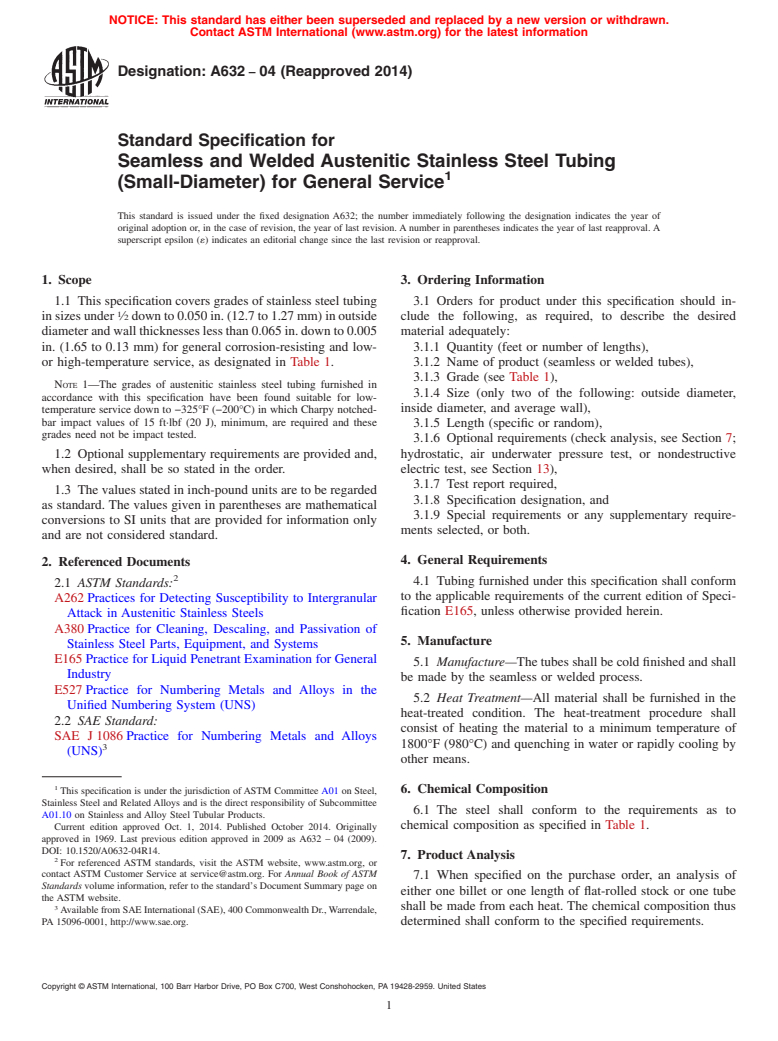
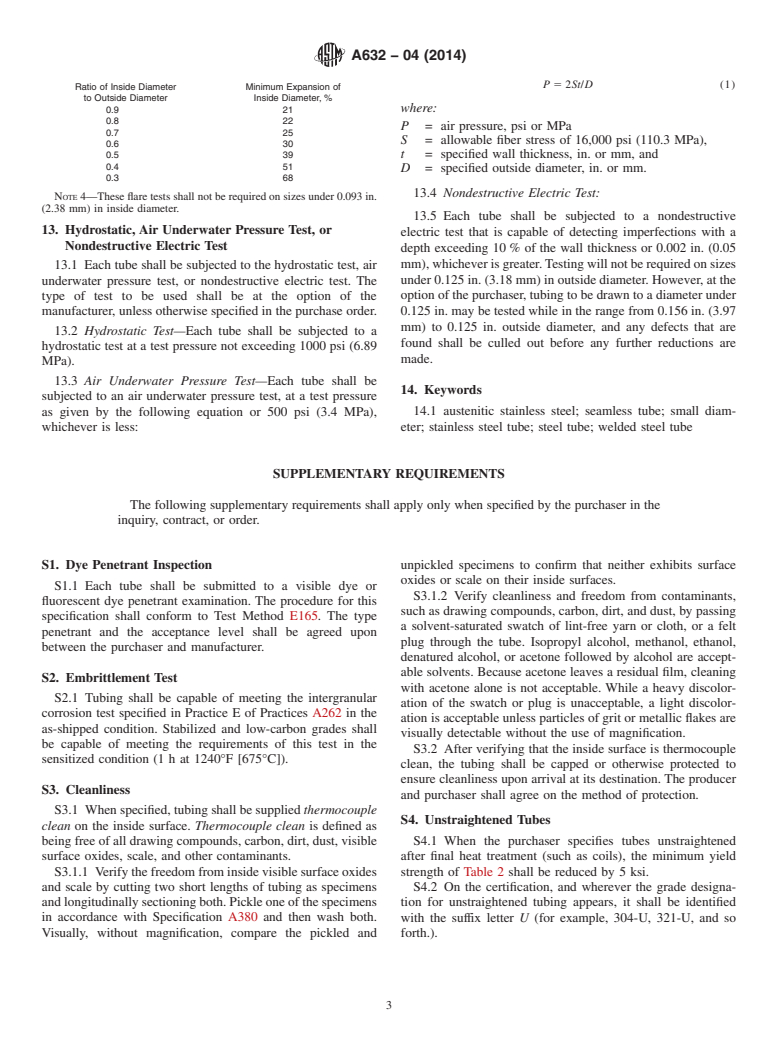
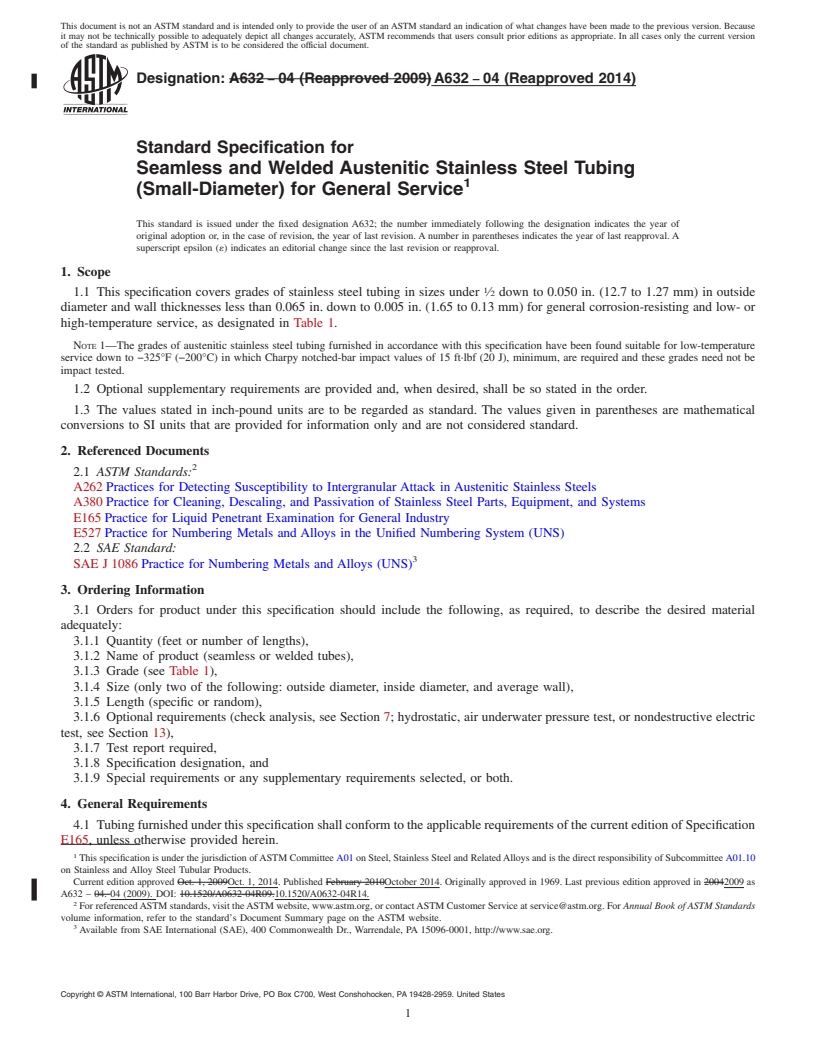
1.1 This specification covers grades of stainless steel tubing in sizes under 1/2 down to 0.050 in. (12.7 to 1.27 mm) in outside diameter and wall thicknesses less than 0.065 in. down to 0.005 in. (1.65 to 0.13 mm) for general corrosion-resisting and low- or high-temperature service, as designated in Table 1.
Note 1: The grades of austenitic stainless steel tubing furnished in accordance with this specification have been found suitable for low-temperature service down to −325°F (−200°C) in which Charpy notched-bar impact values of 15 ft·lbf (20 J), minimum, are required and these grades need not be impact tested. (A) New designation established in accordance with Practice E527 and SAE J 1086, Practice for Numbering Metals and Alloys (UNS).(B) For seamless TP316L tubes, the silicon maximum shall be 1.00 %.(C) For welded TP 316 tubes, the nickel range shall be 10.0–14.0 %.(D) Grade TP 321 shall have a titanium content of not less than five times the carbon content and not more than 0.60 %.(E) Grades TP 347 and TP 348 shall have a columbium plus tantalum content of not less than ten times the carbon content and not more than 1.0 %.
1.2 Optional supplementary requirements are provided and, when desired, shall be so stated in the order.
1.3 The values stated in inch-pound units are to be regarded as standard. The values given in parentheses are mathematical conversions to SI units that are provided for information only and are not considered standard.
General Information
Relations
Buy Standard
Standards Content (Sample)
NOTICE: This standard has either been superseded and replaced by a new version or withdrawn.
Contact ASTM International (www.astm.org) for the latest information
Designation:A632 −04 (Reapproved 2014)
Standard Specification for
Seamless and Welded Austenitic Stainless Steel Tubing
(Small-Diameter) for General Service
This standard is issued under the fixed designation A632; the number immediately following the designation indicates the year of
original adoption or, in the case of revision, the year of last revision.Anumber in parentheses indicates the year of last reapproval.A
superscript epsilon (´) indicates an editorial change since the last revision or reapproval.
1. Scope 3. Ordering Information
1.1 This specification covers grades of stainless steel tubing 3.1 Orders for product under this specification should in-
insizesunder ⁄2downto0.050in.(12.7to1.27mm)inoutside clude the following, as required, to describe the desired
diameterandwallthicknesseslessthan0.065in.downto0.005 material adequately:
in. (1.65 to 0.13 mm) for general corrosion-resisting and low- 3.1.1 Quantity (feet or number of lengths),
or high-temperature service, as designated in Table 1. 3.1.2 Name of product (seamless or welded tubes),
3.1.3 Grade (see Table 1),
NOTE 1—The grades of austenitic stainless steel tubing furnished in
3.1.4 Size (only two of the following: outside diameter,
accordance with this specification have been found suitable for low-
inside diameter, and average wall),
temperature service down to −325°F (−200°C) in which Charpy notched-
bar impact values of 15 ft·lbf (20 J), minimum, are required and these
3.1.5 Length (specific or random),
grades need not be impact tested.
3.1.6 Optional requirements (check analysis, see Section 7;
1.2 Optional supplementary requirements are provided and, hydrostatic, air underwater pressure test, or nondestructive
when desired, shall be so stated in the order. electric test, see Section 13),
3.1.7 Test report required,
1.3 The values stated in inch-pound units are to be regarded
3.1.8 Specification designation, and
as standard. The values given in parentheses are mathematical
3.1.9 Special requirements or any supplementary require-
conversions to SI units that are provided for information only
ments selected, or both.
and are not considered standard.
4. General Requirements
2. Referenced Documents
4.1 Tubing furnished under this specification shall conform
2.1 ASTM Standards:
to the applicable requirements of the current edition of Speci-
A262Practices for Detecting Susceptibility to Intergranular
fication E165, unless otherwise provided herein.
Attack in Austenitic Stainless Steels
A380Practice for Cleaning, Descaling, and Passivation of
5. Manufacture
Stainless Steel Parts, Equipment, and Systems
E165Practice for Liquid Penetrant Examination for General
5.1 Manufacture—Thetubesshallbecoldfinishedandshall
Industry
be made by the seamless or welded process.
E527Practice for Numbering Metals and Alloys in the
5.2 Heat Treatment—All material shall be furnished in the
Unified Numbering System (UNS)
heat-treated condition. The heat-treatment procedure shall
2.2 SAE Standard:
consist of heating the material to a minimum temperature of
SAE J1086Practice for Numbering Metals and Alloys
1800°F (980°C) and quenching in water or rapidly cooling by
(UNS)
other means.
This specification is under the jurisdiction ofASTM Committee A01 on Steel, 6. Chemical Composition
Stainless Steel and RelatedAlloys and is the direct responsibility of Subcommittee
6.1 The steel shall conform to the requirements as to
A01.10 on Stainless and Alloy Steel Tubular Products.
Current edition approved Oct. 1, 2014. Published October 2014. Originally chemical composition as specified in Table 1.
approved in 1969. Last previous edition approved in 2009 as A632 – 04 (2009).
DOI: 10.1520/A0632-04R14.
7. Product Analysis
For referenced ASTM standards, visit the ASTM website, www.astm.org, or
contact ASTM Customer Service at service@astm.org. For Annual Book of ASTM
7.1 When specified on the purchase order, an analysis of
Standards volume information, refer to the standard’s Document Summary page on
either one billet or one length of flat-rolled stock or one tube
the ASTM website.
shall be made from each heat. The chemical composition thus
AvailablefromSAEInternational(SAE),400CommonwealthDr.,Warrendale,
PA 15096-0001, http://www.sae.org. determined shall conform to the specified requirements.
Copyright © ASTM International, 100 Barr Harbor Drive, PO Box C700, West Conshohocken, PA 19428-2959. United States
A632−04 (2014)
TABLE 1 Chemical Requirements
Composition, %
Grade TP 304 TP 304L TP 310 TP 316 TP 316L TP 317 TP 321 TP 347 TP 348
Element
UNS
S30400 S30403 S31000 S31600 S31603 S31700 S32100 S34700 S34800
A
Designation
Carbon, max 0.08 0.030 0.15 0.08 0.030 0.08 0.08 0.08 0.08
Manganese max 2.00 2.00 2.00 2.00 2.00 2.00 2.00 2.00 2.00
Phosphorus, max 0.045 0.045 0.045 0.045 0.045 0.045 0.045 0.045 0.045
Sulfur, max 0.030 0.030 0.030 0.030 0.030 0.030 0.030 0.030 0.030
B
Silicon, max 0.75 0.75 0.75 0.75 0.75 0.75 0.75 0.75 0.75
C
Nickel 8.0–11.0 8.0–13.0 19.0–22.0 11.0–14.0 10.0–15.0 11.0–14.0 9.0–13.0 9.0–13.0 9.0–13.0
Chromium 18.0–20.0 18.0–20.0 24.0–26.0 16.0–18.0 16.0–18.0 18.0–20.0 17.0–20.0 17.0–20.0 17.0–20.0
Molybdenum . . . 2.00–3.00 2.00–3.00 3.00–4.00 . . .
D
Titanium . . . . . . . .
EE
Columbium + tantalum . . . . . . .
Tantalum, max . . . . . . . . 0.10
A
New designation established in accordance with Practice E527 and SAE J 1086, Practice for Numbering Metals and Alloys (UNS).
B
For seamless TP316L tubes, the silicon maximum shall be 1.00 %.
C
For welded TP 316 tubes, the nickel range shall be 10.0–14.0 %.
D
Grade TP 321 shall have a titanium content of not less than five times the carbon content and not more than 0.60 %.
E
Grades TP 347 and TP 348 shall have a columbium plus tantalum content of not less than ten times the carbon content and not more than 1.0 %.
TABLE 3 Permissible Variations in Dimensions
7.2 If the analysis made in accordance with 7.1 does not
Wall,
conform to the specified requirements, an analysis of each
Outside Inside plus
billet or length of flat-rolled stock or tube from the same heat
Outside Diameter Range Diameter, Diameter, and
may be made and all billets, stock, or tubes thus conforming to
in. (mm) in. (mm) minus, %
the requirements shall be accepted so far as chemical compo-
Up to, but not including ⁄32 +0.002 (0.05) +0.000 10
sition is concerned.
(0.094) in. (2.38 mm) −0.000 −0.002 (0.05)
⁄32 (0.094) in. (2.38 mm) but +0.003 (0.08) +0.000 10
8. Mechanical Properties
not including ⁄16 (0.188) −0.000 −0.003 (0.08)
in. (4.76 mm)
8.1 Tensile Requirements—The material shall conform to
3 1
⁄16 to, but not including, ⁄2 +0.004 (0.10) +0.000 10
the requirements as to tensile properties specified in Table 2.
(0.500) in. (12.70 mm) −0.000 −0.004 (0.10)
These mechanical properties apply to tubing ⁄8 in. (3.2 mm)
and larger in outside diameter by 0.015 in. (0.38 mm) in wall
thickness and heavier. Smaller sizes are available meeting the
11.2 One tension test shall be made on a specimen for lots
minimum tensile strength specified in Table 2; however, yield
of not more than 50 tubes. Tension tests shall be made on
strength is not generally determined on such sizes, and the
specimens from two tubes for lots of more than 50 tubes (see
minimum elongation shall be 25%.
Note 3).
9. Permissible Variations in Dimensions
NOTE2—Forflaringrequirements,thetermlotappliestoalltubesofthe
same nominal size and wall thickness that are produced from the same
9.1 Variations in diameter and wall thickness from those
heat of steel and subjected to the same finishing treatment in a continuous
specified shall not exceed the amounts specified in Table 3.
furnace; when final heat treatment is in a batch-type furnace, the lot shall
include only those tu
...
This document is not an ASTM standard and is intended only to provide the user of an ASTM standard an indication of what changes have been made to the previous version. Because
it may not be technically possible to adequately depict all changes accurately, ASTM recommends that users consult prior editions as appropriate. In all cases only the current version
of the standard as published by ASTM is to be considered the official document.
Designation: A632 − 04 (Reapproved 2009) A632 − 04 (Reapproved 2014)
Standard Specification for
Seamless and Welded Austenitic Stainless Steel Tubing
(Small-Diameter) for General Service
This standard is issued under the fixed designation A632; the number immediately following the designation indicates the year of
original adoption or, in the case of revision, the year of last revision. A number in parentheses indicates the year of last reapproval. A
superscript epsilon (´) indicates an editorial change since the last revision or reapproval.
1. Scope
1.1 This specification covers grades of stainless steel tubing in sizes under ⁄2 down to 0.050 in. (12.7 to 1.27 mm) in outside
diameter and wall thicknesses less than 0.065 in. down to 0.005 in. (1.65 to 0.13 mm) for general corrosion-resisting and low- or
high-temperature service, as designated in Table 1.
NOTE 1—The grades of austenitic stainless steel tubing furnished in accordance with this specification have been found suitable for low-temperature
service down to −325°F (−200°C) in which Charpy notched-bar impact values of 15 ft·lbf (20 J), minimum, are required and these grades need not be
impact tested.
1.2 Optional supplementary requirements are provided and, when desired, shall be so stated in the order.
1.3 The values stated in inch-pound units are to be regarded as standard. The values given in parentheses are mathematical
conversions to SI units that are provided for information only and are not considered standard.
2. Referenced Documents
2.1 ASTM Standards:
A262 Practices for Detecting Susceptibility to Intergranular Attack in Austenitic Stainless Steels
A380 Practice for Cleaning, Descaling, and Passivation of Stainless Steel Parts, Equipment, and Systems
E165 Practice for Liquid Penetrant Examination for General Industry
E527 Practice for Numbering Metals and Alloys in the Unified Numbering System (UNS)
2.2 SAE Standard:
SAE J 1086 Practice for Numbering Metals and Alloys (UNS)
3. Ordering Information
3.1 Orders for product under this specification should include the following, as required, to describe the desired material
adequately:
3.1.1 Quantity (feet or number of lengths),
3.1.2 Name of product (seamless or welded tubes),
3.1.3 Grade (see Table 1),
3.1.4 Size (only two of the following: outside diameter, inside diameter, and average wall),
3.1.5 Length (specific or random),
3.1.6 Optional requirements (check analysis, see Section 7; hydrostatic, air underwater pressure test, or nondestructive electric
test, see Section 13),
3.1.7 Test report required,
3.1.8 Specification designation, and
3.1.9 Special requirements or any supplementary requirements selected, or both.
4. General Requirements
4.1 Tubing furnished under this specification shall conform to the applicable requirements of the current edition of Specification
E165, unless otherwise provided herein.
This specification is under the jurisdiction of ASTM Committee A01 on Steel, Stainless Steel and Related Alloys and is the direct responsibility of Subcommittee A01.10
on Stainless and Alloy Steel Tubular Products.
Current edition approved Oct. 1, 2009Oct. 1, 2014. Published February 2010October 2014. Originally approved in 1969. Last previous edition approved in 20042009 as
A632 – 04. 04 (2009). DOI: 10.1520/A0632-04R09.10.1520/A0632-04R14.
For referenced ASTM standards, visit the ASTM website, www.astm.org, or contact ASTM Customer Service at service@astm.org. For Annual Book of ASTM Standards
volume information, refer to the standard’s Document Summary page on the ASTM website.
Available from SAE International (SAE), 400 Commonwealth Dr., Warrendale, PA 15096-0001, http://www.sae.org.
Copyright © ASTM International, 100 Barr Harbor Drive, PO Box C700, West Conshohocken, PA 19428-2959. United States
A632 − 04 (2014)
TABLE 1 Chemical Requirements
Composition, %
Grade TP 304 TP 304L TP 310 TP 316 TP 316L TP 317 TP 321 TP 347 TP 348
Element
UNS
S30400 S30403 S31000 S31600 S31603 S31700 S32100 S34700 S34800
A
Designation
Carbon, max 0.08 0.030 0.15 0.08 0.030 0.08 0.08 0.08 0.08
Manganese max 2.00 2.00 2.00 2.00 2.00 2.00 2.00 2.00 2.00
Phosphorus, max 0.045 0.045 0.045 0.045 0.045 0.045 0.045 0.045 0.045
Sulfur, max 0.030 0.030 0.030 0.030 0.030 0.030 0.030 0.030 0.030
B
Silicon, max 0.75 0.75 0.75 0.75 0.75 0.75 0.75 0.75 0.75
C
Nickel 8.0–11.0 8.0–13.0 19.0–22.0 11.0–14.0 10.0–15.0 11.0–14.0 9.0–13.0 9.0–13.0 9.0–13.0
Chromium 18.0–20.0 18.0–20.0 24.0–26.0 16.0–18.0 16.0–18.0 18.0–20.0 17.0–20.0 17.0–20.0 17.0–20.0
Molybdenum . . . 2.00–3.00 2.00–3.00 3.00–4.00 . . .
D
Titanium . . . . . . . .
E E
Columbium + tantalum . . . . . . .
Tantalum, max . . . . . . . . 0.10
A
New designation established in accordance with Practice E527 and SAE J 1086, Practice for Numbering Metals and Alloys (UNS).
B
For seamless TP316L tubes, the silicon maximum shall be 1.00 %.
C
For welded TP 316 tubes, the nickel range shall be 10.0–14.0 %.
D
Grade TP 321 shall have a titanium content of not less than five times the carbon content and not more than 0.60 %.
E
Grades TP 347 and TP 348 shall have a columbium plus tantalum content of not less than ten times the carbon content and not more than 1.0 %.
5. Manufacture
5.1 Manufacture—The tubes shall be cold finished and shall be made by the seamless or welded process.
5.2 Heat Treatment—All material shall be furnished in the heat-treated condition. The heat-treatment procedure shall consist of
heating the material to a minimum temperature of 1800°F (980°C) and quenching in water or rapidly cooling by other means.
6. Chemical Composition
6.1 The steel shall conform to the requirements as to chemical composition as specified in Table 1.
7. Product Analysis
7.1 When specified on the purchase order, an analysis of either one billet or one length of flat-rolled stock or one tube shall be
made from each heat. The chemical composition thus determined shall conform to the specified requirements.
7.2 If the analysis made in accordance with 7.1 does not conform to the specified requirements, an analysis of each billet or
length of flat-rolled stock or tube from the same heat may be made and all billets, stock, or tubes thus conforming to the
requirements shall be accepted so far as chemical composition is concerned.
8. Mechanical Properties
8.1 Tensile Requirements—The material shall conform to the requirements as to tensile properties specified in Table 2. These
mechanical properties apply to tubing ⁄8 in. (3.2 mm) and larger in outside diameter by 0.015 in. (0.38 mm) in wall thickness and
heavier. Smaller sizes are available meeting the minimum tensile strength specified in Table 2; however, yield strength is not
generally determined on such sizes, and the minimum elongation shall be 25 %.
9. Permissible Variations in Dimensions
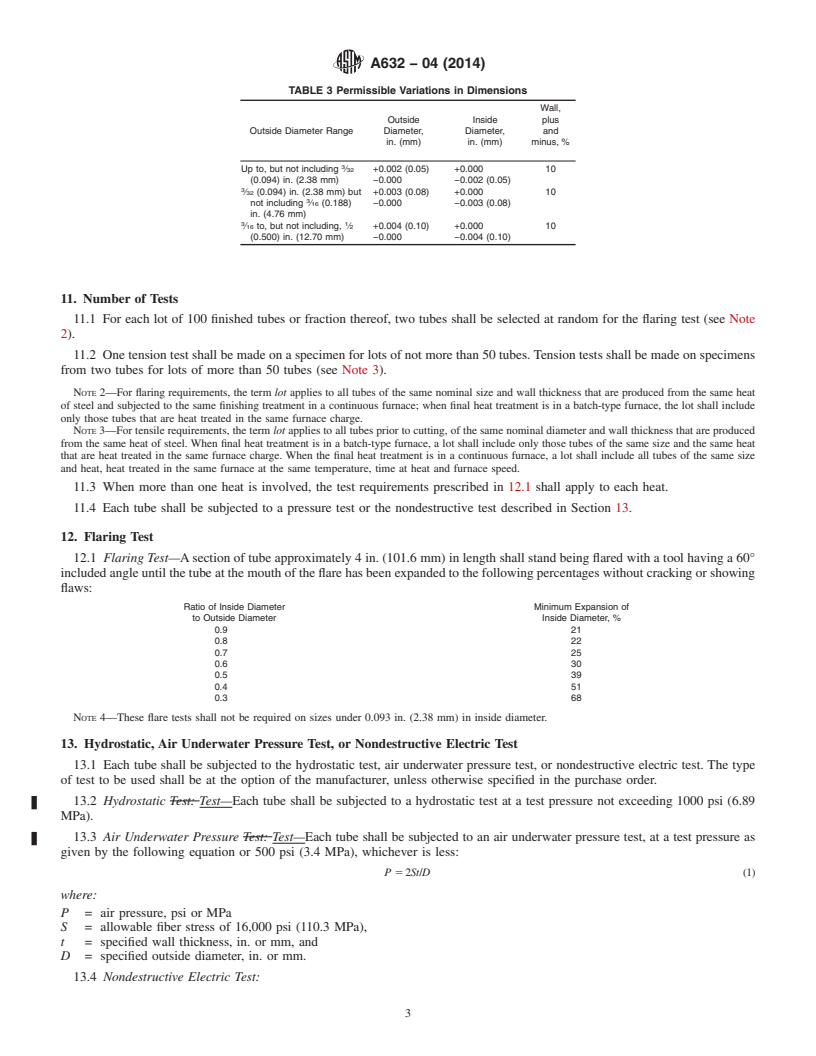
9.1 Variations in diameter and wall thickness from those specified shall not exceed the amounts specified in Table 3.
10. Surface Condition
10.1 The tubes shall be pickled free of scale. When bright annealing is used, pickling is not required.
TABLE 2 Tensile Requirements
A A
Tensile strength, min, ksi (MPa) 75 (515)
A,B A,B
Yield strength, min, ksi (MPa) 30 (205)
B
Elongation in 2 in. or 50 mm, min, % 35
A
Grades TP 304L and TP 316L shall have a minimum tensile strength of 70 ksi
(485 MPa) and a minimum yield strength of 25 ksi (170 MPa).
B 1
Yield strength is not generally determined on tubing sizes smaller than ⁄8 in. (3.2
mm) in outside diameter or thinner than 0.015 in. (0.38 mm) wall, so yield strength
is not required on such sizes. Also, the minimum elongation required on these
smaller or thinner sizes is 25 %.
A632 − 04 (2014)
TABLE 3 Permissible Variations in Dimensions
Wall,
Outside Inside pl
...


Questions, Comments and Discussion
Ask us and Technical Secretary will try to provide an answer. You can facilitate discussion about the standard in here.