ASTM C786/C786M-10(2016)
(Test Method)Standard Test Method for Fineness of Hydraulic Cement and Raw Materials by the 300-μm (No. 50), 150-μm (No. 100), and 75-μm (No. 200) Sieves by Wet Methods
Standard Test Method for Fineness of Hydraulic Cement and Raw Materials by the 300-μm (No. 50), 150-μm (No. 100), and 75-μm (No. 200) Sieves by Wet Methods
ABSTRACT
This test method covers wet sieving techniques for determination of fineness of hydraulic cement and raw materials by means of the No. 50, No. 100, and No. 200 sieves. The following apparatus shall be utilized: wet test sieves; spray nozzle; pressure gage; balance; weights; brush; dry test sieves; and NBS SRM No. 1004 (glass bead standard). Dry sieve standardization shall be performed by determining the correction factors and by preparing the standard samples. Wet sieve calibration shall follow and shall utilize the sieve correction factor. The procedure for wet sieving shall include the following: weighing of the sample; recording the weight and transferring the sample quantitatively to a clean dry sieve; wetting the sample thoroughly with a gentle stream of water; removing the sieve from under the nozzle and adjusting the pressure of the spray nozzle; returning the sieve to its position under the nozzle and washing it; moving the sieve in the spray with a circular motion; rinsing the sieve with distilled or deionized water immediately after removing it from the spray; blotting the lower surface of the screen cloth with a damp, clean cloth; drying the sieve and residue in an oven or over a hot plate; cooling the sieve; brushing the residue from the sieve; and weighing the sieve on a balance.
SCOPE
1.1 This test method covers wet sieving techniques for determination of fineness of hydraulic cement and raw materials by means of the 300-μm (No. 50), the 150-μm (No. 100), and the 75-μm (No. 200) sieves.
1.2 The values stated in either SI units or inch-pound units are to be regarded separately as standard. The values stated in each system may not be exact equivalents; therefore, each system shall be used independently of the other. Combining values from the two systems may result in non-conformance with the standard. Values in SI units [or inch-pound units] shall be obtained by measurement in SI units [or inch-pound units] or by appropriate conversion, using the Rules for Conversion and Rounding given in IEEE/ASTM SI 10 of measurements made in other units. Values are stated in SI units when inch-pound units are not used in practice.
1.3 This standard does not purport to address all of the safety concerns, if any, associated with its use. It is the responsibility of the user of this standard to establish appropriate safety and health practices and determine the applicability of regulatory limitations prior to use.
General Information
Relations
Buy Standard
Standards Content (Sample)
NOTICE: This standard has either been superseded and replaced by a new version or withdrawn.
Contact ASTM International (www.astm.org) for the latest information
Designation: C786/C786M − 10 (Reapproved 2016)
Standard Test Method for
Fineness of Hydraulic Cement and Raw Materials by the
300-µm (No. 50), 150-µm (No. 100), and 75-µm (No. 200)
Sieves by Wet Methods
This standard is issued under the fixed designation C786/C786M; the number immediately following the designation indicates the year
of original adoption or, in the case of revision, the year of last revision.Anumber in parentheses indicates the year of last reapproval.
A superscript epsilon (´) indicates an editorial change since the last revision or reapproval.
1. Scope* C184Test Method for Fineness of Hydraulic Cement by the
150-µm (No. 100) and 75-µm (No. 200) Sieves (With-
1.1 This test method covers wet sieving techniques for
drawn 2002)
determination of fineness of hydraulic cement and raw mate-
C430Test Method for Fineness of Hydraulic Cement by the
rials by means of the 300-µm (No. 50), the 150-µm (No. 100),
45-µm (No. 325) Sieve
and the 75-µm (No. 200) sieves.
E11Specification forWovenWireTest Sieve Cloth andTest
1.2 The values stated in either SI units or inch-pound units
Sieves
are to be regarded separately as standard. The values stated in
IEEE/ASTM SI 10American National Standard for Use of
each system may not be exact equivalents; therefore, each
theInternationalSystemofUnits(SI):TheModernMetric
system shall be used independently of the other. Combining
System
values from the two systems may result in non-conformance
withthestandard.ValuesinSIunits[orinch-poundunits]shall
3. Apparatus
be obtained by measurement in SI units [or inch-pound units]
3.1 Wet Test Sieves—Standard300-µm (No. 50), 150-µm
or by appropriate conversion, using the Rules for Conversion
(No. 100), or 75-µm (No. 200) sieve cloth conforming to the
and Rounding given in IEEE/ASTM SI 10 of measurements
requirements of Specification E11, for standard sieves shall be
made in other units. Values are stated in SI units when
wovenfromAISIType304wire.Theclothshallbemountedin
inch-pound units are not used in practice.
the frame without distortion, looseness, or wrinkling. Sieve
1.3 This standard does not purport to address all of the
frames are designated as 76.2 or 101.6-mm [3 or 4-in.]
safety concerns, if any, associated with its use. It is the
diameter type, as follows:
responsibility of the user of this standard to establish appro-
Sieves
priate safety and health practices and determine the applica-
76 mm 102 mm
bility of regulatory limitations prior to use.
[3-in.] [4-in.]
mm [in.] mm [in.]
1.4 This international standard was developed in accor-
dance with internationally recognized principles on standard-
Diameter of frame 76 ± 6 102±6
ization established in the Decision on Principles for the [3.0 ± 0.25] [4.0 ± 0.25]
Development of International Standards, Guides and Recom-
Depth of sieve from top of frame 83 ± 6 108±6
mendations issued by the World Trade Organization Technical
[3.25 ± 0.25] [4.25 ± 0.25]
Barriers to Trade (TBT) Committee.
Overall height 102 ± 6 127±6
[4.0 ± 0.25] [5.0 ± 0.25]
2. Referenced Documents
2 3.1.1 For a sieve fabricated by soldering the cloth to the
2.1 ASTM Standards:
frame, the joint shall be made smooth to prevent material from
C114Test Methods for Chemical Analysis of Hydraulic
lodging in the joints between the sieve cloth and the frame.
Cement
Two-piece sieves shall clamp tightly on the cloth to prevent
particlesfromlodginginthejointsbetweenthesieveclothand
ThistestmethodisunderthejurisdictionofASTMCommitteeC01onCement
the frame, and shall have legs of sufficient length, 19-mm
and is the direct responsibility of Subcommittee C01.25 on Fineness.
[0.75-in.] minimum, to allow air circulation beneath the sieve
Current edition approved April 1, 2016. Published April 2016. Originally
approved in 1974. Last previous edition approved in 2010 as C786/C786M–10. cloth.
DOI: 10.1520/C0786_C0786M-10R16.
For referenced ASTM standards, visit the ASTM website, www.astm.org, or
contact ASTM Customer Service at service@astm.org. For Annual Book of ASTM
Standards volume information, refer to the standard’s Document Summary page on The last approved version of this historical standard is referenced on
the ASTM website. www.astm.org.
*A Summary of Changes section appears at the end of this standard
Copyright © ASTM International, 100 Barr Harbor Drive, PO Box C700, West Conshohocken, PA 19428-2959. United States
C786/C786M − 10 (2016)
3.2 Spray Nozzle—conforming to the requirements of Test 5. Wet Sieve Calibration
MethodC430.Nozzleshavinganalternativedesignareaccept-
5.1 Weigh the contents of the applicable size standard
able if the sieve test results agree with those performed using
sample vial for the desired sieve determination on a balance of
a nozzle conforming to Test Method C430.
appropriate sensitivity to the nearest 0.01 g. Record the weight
and transfer the sample quantitatively to a clean dry wet test
3.3 Pressure Gage—conforming to the requirements ofTest
300-µm(No.50),150-µm(No.100),or75-µm(No.200)sieve
Method C430.
and proceed as directed in Section 6. The sieve correction
3.4 Balance—analytical, accurate to within 0.005 g.
factor is the difference between the test residue obtained and
3.5 Weights—The weights used in fineness determinations the residue value indicated by the standardization tests of
shall conform to the requirements of Test Methods C114.
Section 4, expressed as a percentage of the test residue. This
factor is expressed as follows:
3.6 Brush—A nylon or pure bristle brush will be required
Rs 3Wt/100 2 Rt
~ !
for use in cleaning the sieves. A 13-mm [0.5-in.] diameter
C 5 3100 (1)
Rt
round-stylebrushwitha229-mm[9-in.]handleisaconvenient
size. (Warning—Do not use brass or steel-bristle brushes for
where:
cleaning sieves due to the possibility that the stiff bristle will
C = sieve correction factor (which may be either plus or
part the wire weave, thereby altering the size of the openings
minus),%,
and rendering the sieve useless. A 13-mm [ ⁄2-in.] hog bristle
R = test residue from sample retained on sieve, g,
t
stencil brush is also satisfactory for brushing sieves.)
R = standard residue retained on sieve,%, and
s
W = weight of test sample, g.
3.7 Dry Test Sieves—The standard samples for calibrating
t
the wet test sieves must be standardized on 203-mm [8-in.]
5.1.1 Example of Determination of Wet Sieve Calibration:
diameter sieves meeting the requirements of Test Method
% Residue on 150-µm (No. 100) sieve for = 5.40%
C184. The 300-µm (No. 50) sieve shall meet the same
standard sample, R
s
Residue from test sample, R =1.25g
requirements.
t
Weight of sample, W = 25.5 g
t
3.8 NBS SRM No. 1004—Glass Bead Standard.
5.40 325.5/100 2 1.25
~ !
Correctionfactor,C,% 5 (2)
1.25
4. Dry Sieve Standardization
31005610.2
4.1 Correction Factors:
NOTE1—Thesievecorrectionisspecifiedasafactortobemultipliedby
4.1.1 Correction of the residues obtained on the 203-mm
theresidueobtained,andthereforetheamounttobeaddedtoorsubtracted
[8-in.] diameter 300-µm (No. 50) and 150-µm (No. 100) dry
from the test residue in any given instance is proportional to the amount
testing sieves is not required.
of the residue.
4.1.2 Whereapplicable,acorrectionfactorfora75-µm(No.
6. Procedure for Wet Sieving
200) sieve shall be determined using the instructions given in
Annex A1. A correction factor should be determined when
6.1 Weigh the sample to the nearest 0.01 g using approxi-
accuracy is desired in order to compare results between
mately 50 g for a 300-µm (No. 50), 25 g for a 150-µm (No.
laboratories.
100), or 10 g for a 75-µm (No. 200) determination. Record the
weight and transfer the sample quantitatively to a clean dry
4.2 Standard Samples—Each laboratory must prepare its
sieve.Wetthesamplethoroughlywithagentlestreamofwater.
own standard samples for wet-sieve tests for each of the sieve
Remove the sieve from under the nozzle and adjust the
sizes used. Select standard samples at a level of fineness in the
p
...
This document is not an ASTM standard and is intended only to provide the user of an ASTM standard an indication of what changes have been made to the previous version. Because
it may not be technically possible to adequately depict all changes accurately, ASTM recommends that users consult prior editions as appropriate. In all cases only the current version
of the standard as published by ASTM is to be considered the official document.
Designation: C786/C786M − 10 C786/C786M − 10 (Reapproved 2016)
Standard Test Method for
Fineness of Hydraulic Cement and Raw Materials by the
300-μm (No. 50), 150-μm (No. 100), and 75-μm (No. 200)
Sieves by Wet Methods
This standard is issued under the fixed designation C786/C786M; the number immediately following the designation indicates the year
of original adoption or, in the case of revision, the year of last revision. A number in parentheses indicates the year of last reapproval.
A superscript epsilon (´) indicates an editorial change since the last revision or reapproval.
1. Scope*
1.1 This test method covers wet sieving techniques for determination of fineness of hydraulic cement and raw materials by
means of the 300-μm (No. 50), the 150-μm (No. 100), and the 75-μm (No. 200) sieves.
1.2 The values stated in either SI units or inch-pound units are to be regarded separately as standard. The values stated in each
system may not be exact equivalents; therefore, each system shall be used independently of the other. Combining values from the
two systems may result in non-conformance with the standard. Values in SI units [or inch-pound units] shall be obtained by
measurement in SI units [or inch-pound units] or by appropriate conversion, using the Rules for Conversion and Rounding given
in IEEE/ASTM SI 10 of measurements made in other units. Values are stated in SI units when inch-pound units are not used in
practice.
1.3 This standard does not purport to address all of the safety concerns, if any, associated with its use. It is the responsibility
of the user of this standard to establish appropriate safety and health practices and determine the applicability of regulatory
limitations prior to use.
2. Referenced Documents
2.1 ASTM Standards:
C114 Test Methods for Chemical Analysis of Hydraulic Cement
C184 Test Method for Fineness of Hydraulic Cement by the 150-μm (No. 100) and 75-μm (No. 200) Sieves (Withdrawn 2002)
C430 Test Method for Fineness of Hydraulic Cement by the 45-μm (No. 325) Sieve
E11 Specification for Woven Wire Test Sieve Cloth and Test Sieves
IEEE/ASTM SI 10 American National Standard for Use of the International System of Units (SI): The Modern Metric System
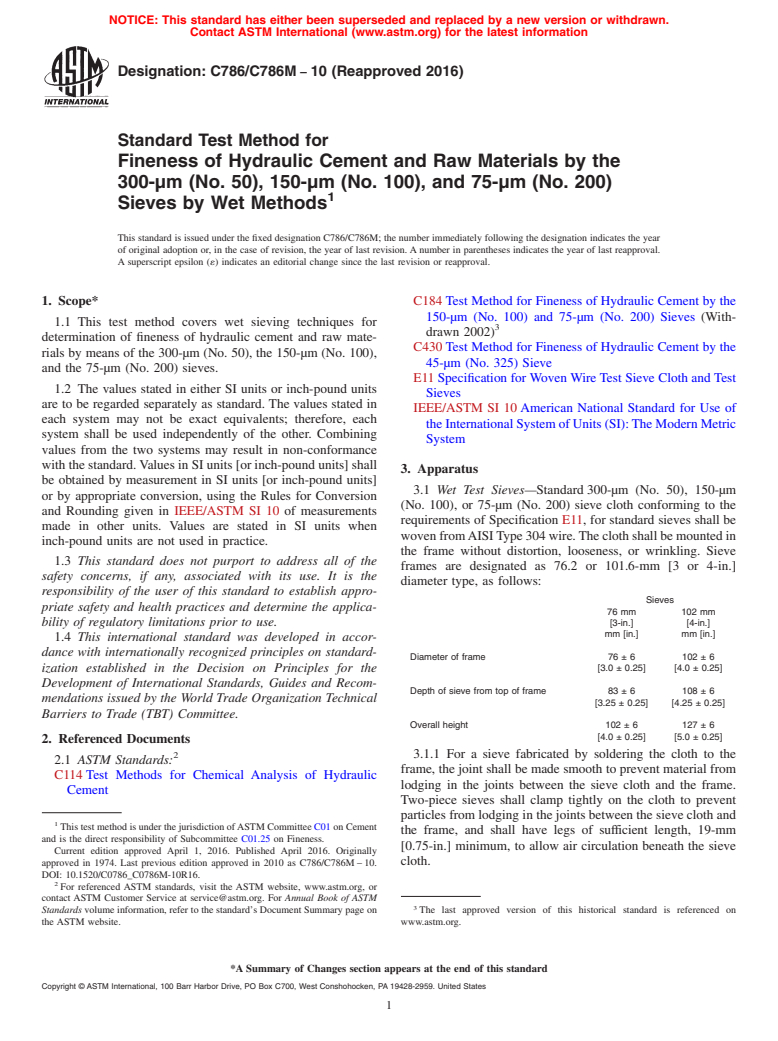
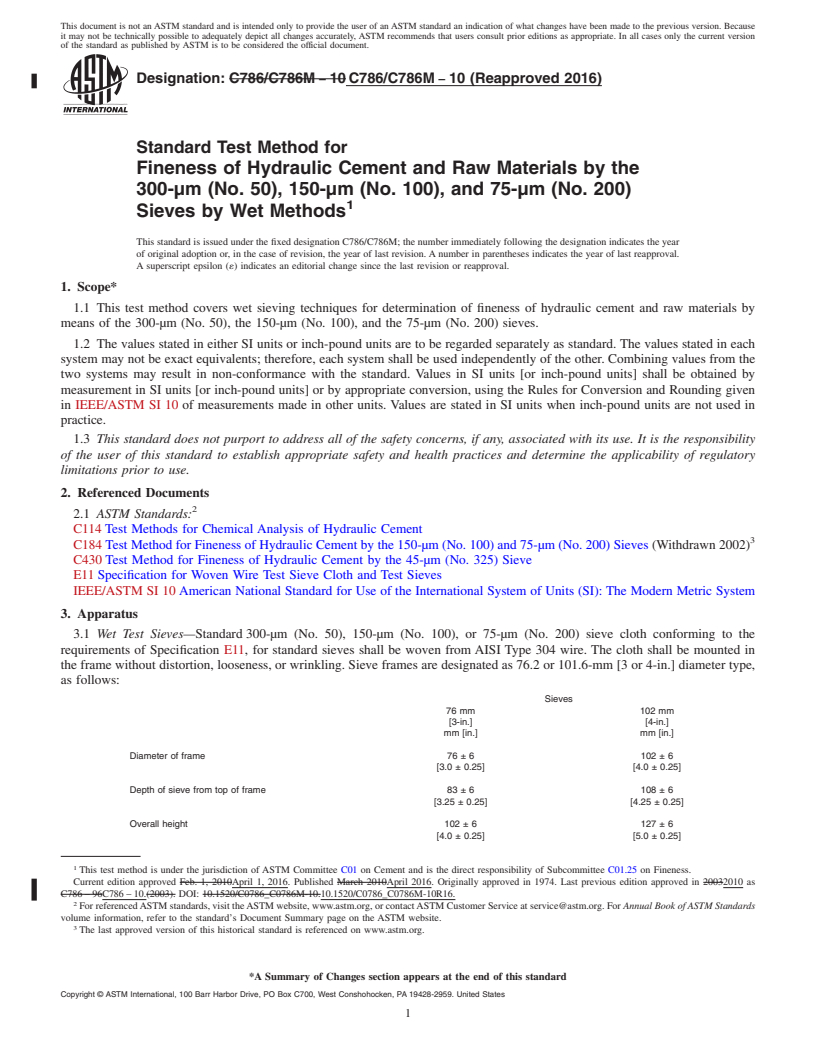
3. Apparatus
3.1 Wet Test Sieves—Standard 300-μm (No. 50), 150-μm (No. 100), or 75-μm (No. 200) sieve cloth conforming to the
requirements of Specification E11, for standard sieves shall be woven from AISI Type 304 wire. The cloth shall be mounted in
the frame without distortion, looseness, or wrinkling. Sieve frames are designated as 76.2 or 101.6-mm [3 or 4-in.] diameter type,
as follows:
Sieves
76 mm 102 mm
[3-in.] [4-in.]
mm [in.] mm [in.]
Diameter of frame 76 ± 6 102 ± 6
[3.0 ± 0.25] [4.0 ± 0.25]
Depth of sieve from top of frame 83 ± 6 108 ± 6
[3.25 ± 0.25] [4.25 ± 0.25]
Overall height 102 ± 6 127 ± 6
[4.0 ± 0.25] [5.0 ± 0.25]
This test method is under the jurisdiction of ASTM Committee C01 on Cement and is the direct responsibility of Subcommittee C01.25 on Fineness.
Current edition approved Feb. 1, 2010April 1, 2016. Published March 2010April 2016. Originally approved in 1974. Last previous edition approved in 20032010 as
C786 – 96C786 – 10.(2003). DOI: 10.1520/C0786_C0786M-10.10.1520/C0786_C0786M-10R16.
For referenced ASTM standards, visit the ASTM website, www.astm.org, or contact ASTM Customer Service at service@astm.org. For Annual Book of ASTM Standards
volume information, refer to the standard’s Document Summary page on the ASTM website.
The last approved version of this historical standard is referenced on www.astm.org.
*A Summary of Changes section appears at the end of this standard
Copyright © ASTM International, 100 Barr Harbor Drive, PO Box C700, West Conshohocken, PA 19428-2959. United States
C786/C786M − 10 (2016)
3.1.1 For a sieve fabricated by soldering the cloth to the frame, the joint shall be made smooth to prevent material from lodging
in the joints between the sieve cloth and the frame. Two-piece sieves shall clamp tightly on the cloth to prevent particles from
lodging in the joints between the sieve cloth and the frame, and shall have legs of sufficient length, 19-mm [0.75-in.] minimum,
to allow air circulation beneath the sieve cloth.
3.2 Spray Nozzle—conforming to the requirements of Test Method C430. Nozzles having an alternative design are acceptable
if the sieve test results agree with those performed using a nozzle conforming to Test Method C430.
3.3 Pressure Gage—conforming to the requirements of Test Method C430.
3.4 Balance—analytical, accurate to within 0.005 g.
3.5 Weights—The weights used in fineness determinations shall conform to the requirements of Test Methods C114.
3.6 Brush—A nylon or pure bristle brush will be required for use in cleaning the sieves. A 13-mm [0.5-in.] diameter round-style
brush with a 229-mm [9-in.] handle is a convenient size. (Warning—Do not use brass or steel-bristle brushes for cleaning sieves
due to the possibility that the stiff bristle will part the wire weave, thereby altering the size of the openings and rendering the sieve
useless. A 13-mm [ ⁄2-in.] hog bristle stencil brush is also satisfactory for brushing sieves.)
3.7 Dry Test Sieves—The standard samples for calibrating the wet test sieves must be standardized on 203-mm [8-in.] diameter
sieves meeting the requirements of Test Method C184. The 300-μm (No. 50) sieve shall meet the same requirements.
3.8 NBS SRM No. 1004—Glass Bead Standard.
4. Dry Sieve Standardization
4.1 Correction Factors:
4.1.1 Correction of the residues obtained on the 203-mm [8-in.] diameter 300-μm (No. 50) and 150-μm (No. 100) dry testing
sieves is not required.
4.1.2 Where applicable, a correction factor for a 75-μm (No. 200) sieve shall be determined using the instructions given in
Annex A1. A correction factor should be determined when accuracy is desired in order to compare results between laboratories.
4.2 Standard Samples—Each laboratory must prepare its own standard samples for wet-sieve tests for each of the sieve sizes
used. Select standard samples at a level of fineness in the same range as that used in routine work. After the selected material is
reserved, uniformly mix the gross sample by placing it on a sheet of rubber, oil cloth, or heavy wrapping paper, depending on the
sample size, and raising first one corner of the sheet and then the other so as to roll the sample over and over at least 100 times.
Temporarily seal the prepared standard material in airtight containers during the standardization procedure prior to sealing small
portions as standard samples in vials. Using the 203-mm [8-in.] diameter sieves from 3.7, perform the dry sieving tests, following
the procedure of Test Method C184. Repeat the test three times and use the average of the amounts passing, expressed as percent,
as the standard value of the sample. Use this standard sample to calibrate the wet sieves. Place the entire sample in airtight vials
as soon as possible to prevent changes due to humidity. Vials shall be prepared in denominations such as to contain approximately
50 g for standardizing the 300-μm (No. 50); 25 g for the 150-μm (No. 100); or 10 g for the 75-μm (No. 200) sieve.
5. Wet Sieve Calibration
5.1 Weigh the contents of the applicable size standard sample vial for the desired sieve determination on a balance of
appropriate sensitivity to the nearest 0.01 g. Record the weight and transfer the sample quantitatively to a clean dry wet test 300-μm
(No. 50), 150-μm (No. 100), or 75-μm (No. 200) sieve and proceed as directed in Section 6. The sieve correction factor is the
difference between the test residue obtained and the residue value indicated by the standardization tests of Section 4, expressed
as a percentage of the test residue. This factor is expressed as follows:
~Rs 3Wt/100!2 Rt
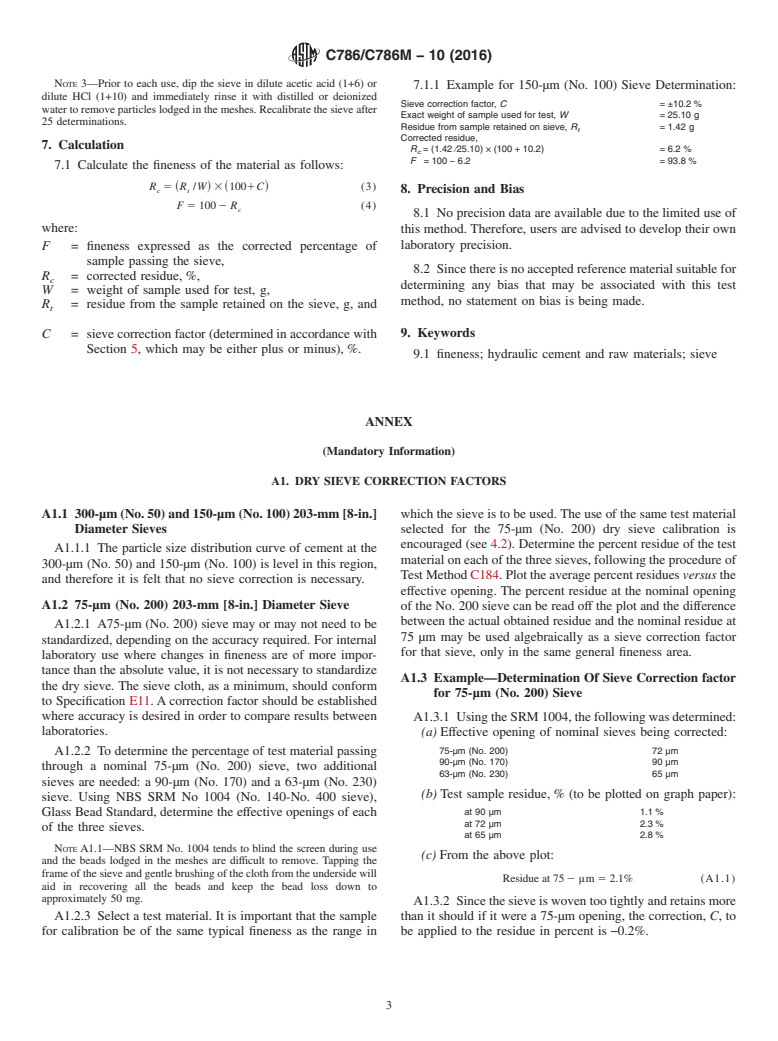
C 5 3100 (1)
Rt
where:
C = sieve correction factor (which may be either plus or minus), %,
R = test residue from sample retained on sieve, g,
t
R = standard residue retained on sieve, %, and
s
W = weight of test sample, g.
t
5.1.1 Example of Determination of Wet Siev
...


Questions, Comments and Discussion
Ask us and Technical Secretary will try to provide an answer. You can facilitate discussion about the standard in here.