ASTM D6761-04a
(Test Method)Standard Test Method for Determination of the Total Pore Volume of Catalysts and Catalyst Carriers
Standard Test Method for Determination of the Total Pore Volume of Catalysts and Catalyst Carriers
SCOPE
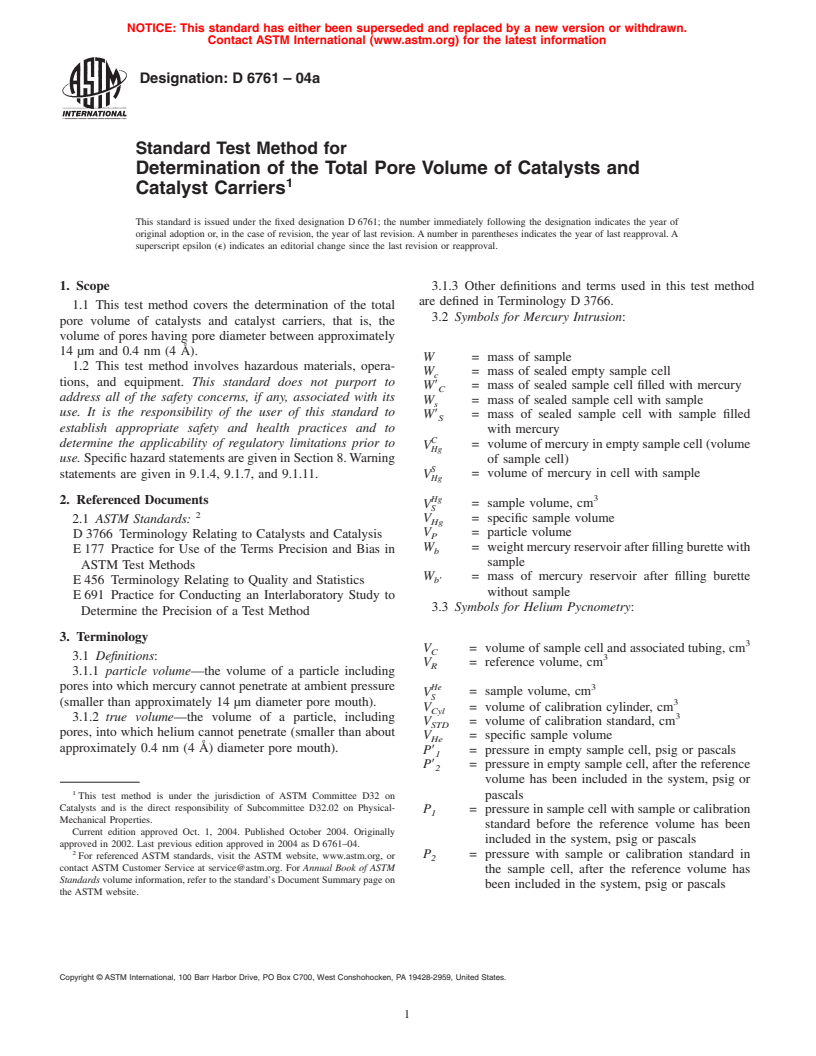
1.1 This test method covers the determination of the total pore volume of catalysts and catalyst carriers, that is, the volume of pores having pore diameter between approximately 14 m and 0.4 nm (4 ).
1.2 This test method involves hazardous materials, operations, and equipment. This standard does not purport to address all of the safety concerns, if any, associated with its use. It is the responsibility of the user of this standard to establish appropriate safety and health practices and to determine the applicability of regulatory limitations prior to use. Specific hazard statements are given in Section 8. Warning statements are given in 9.1.4, 9.1.7, and 9.1.11.
General Information
Relations
Standards Content (Sample)
NOTICE: This standard has either been superseded and replaced by a new version or withdrawn.
Contact ASTM International (www.astm.org) for the latest information
Designation:D6761–04a
Standard Test Method for
Determination of the Total Pore Volume of Catalysts and
1
Catalyst Carriers
This standard is issued under the fixed designation D 6761; the number immediately following the designation indicates the year of
original adoption or, in the case of revision, the year of last revision. A number in parentheses indicates the year of last reapproval. A
superscript epsilon (e) indicates an editorial change since the last revision or reapproval.
1. Scope 3.1.3 Other definitions and terms used in this test method
are defined in Terminology D 3766.
1.1 This test method covers the determination of the total
3.2 Symbols for Mercury Intrusion:
pore volume of catalysts and catalyst carriers, that is, the
volume of pores having pore diameter between approximately
14 µm and 0.4 nm (4 Å).
W = mass of sample
1.2 This test method involves hazardous materials, opera-
W = mass of sealed empty sample cell
c
tions, and equipment. This standard does not purport to
W8 = mass of sealed sample cell filled with mercury
C
address all of the safety concerns, if any, associated with its
W = mass of sealed sample cell with sample
s
use. It is the responsibility of the user of this standard to
W8 = mass of sealed sample cell with sample filled
S
establish appropriate safety and health practices and to
with mercury
C
determine the applicability of regulatory limitations prior to = volume of mercury in empty sample cell (volume
V
Hg
use. Specific hazard statements are given in Section 8.Warning
of sample cell)
S
= volume of mercury in cell with sample
statements are given in 9.1.4, 9.1.7, and 9.1.11. V
Hg
3
Hg
2. Referenced Documents
V = sample volume, cm
S
2
V = specific sample volume
2.1 ASTM Standards:
Hg
V = particle volume
D 3766 Terminology Relating to Catalysts and Catalysis
P
W = weightmercuryreservoirafterfillingburettewith
E 177 Practice for Use of the Terms Precision and Bias in b
sample
ASTM Test Methods
W = mass of mercury reservoir after filling burette
E 456 Terminology Relating to Quality and Statistics b8
without sample
E 691 Practice for Conducting an Interlaboratory Study to
3.3 Symbols for Helium Pycnometry:
Determine the Precision of a Test Method
3. Terminology
3
V = volume of sample cell and associated tubing, cm
C
3.1 Definitions:
3
V = reference volume, cm
R
3.1.1 particle volume—the volume of a particle including
pores into which mercury cannot penetrate at ambient pressure He 3
= sample volume, cm
V
S
3
(smaller than approximately 14 µm diameter pore mouth).
V = volume of calibration cylinder, cm
Cyl
3
3.1.2 true volume—the volume of a particle, including
V = volume of calibration standard, cm
STD
pores, into which helium cannot penetrate (smaller than about
V = specific sample volume
He
approximately 0.4 nm (4 Å) diameter pore mouth).
P8 = pressure in empty sample cell, psig or pascals
1
P8 = pressure in empty sample cell, after the reference
2
volume has been included in the system, psig or
1
pascals
This test method is under the jurisdiction of ASTM Committee D32 on
Catalysts and is the direct responsibility of Subcommittee D32.02 on Physical-
P = pressure in sample cell with sample or calibration
1
Mechanical Properties.
standard before the reference volume has been
Current edition approved Oct. 1, 2004. Published October 2004. Originally
included in the system, psig or pascals
approved in 2002. Last previous edition approved in 2004 as D 6761–04.
2
P = pressure with sample or calibration standard in
For referenced ASTM standards, visit the ASTM website, www.astm.org, or
2
contact ASTM Customer Service at service@astm.org. For Annual Book of ASTM
the sample cell, after the reference volume has
Standards volume information, refer to the standard’s Document Summary page on
been included in the system, psig or pascals
the ASTM website.
Copyright © ASTM International, 100 Barr Harbor Drive, PO Box C700, West Conshohocken, PA 19428-2959, United States.
1
---------------------- Page: 1 ----------------------
D6761–04a
W = tare weight of sample cup, g
1
W = mass of sample + tare weight of sample cup, g
2
W = mass of sample, g
3
P.V. = pore volume
4. Summary of Test Method
4.1 The total pore volume of a catalyst or catalyst carrier is
determined as the difference between the particle volume and
the true volume, measured by mercury intrusion and helium
pycnometry, respectively. The particle volume is determined
by mercury intrusion at ambient pressure and the true volume
is determined by helium displacement at pressures above
ambient.
5. Significance and Use
5.1 This test method provides for the measurement of
volume of pores that are in the range of catalytic importance
and possibly for adsorption processes.
6. Apparatus
6.1 For Mercury Intrusion:
6.1.1 Chamber, capable of holding the sample cell (com-
monly referred to as
...


Questions, Comments and Discussion
Ask us and Technical Secretary will try to provide an answer. You can facilitate discussion about the standard in here.