ASTM C363/C363M-16(2024)
(Test Method)Standard Test Method for Node Tensile Strength of Honeycomb Core Materials
Standard Test Method for Node Tensile Strength of Honeycomb Core Materials
SIGNIFICANCE AND USE
5.1 The honeycomb tensile-node bond strength is a fundamental property than can be used in determining whether honeycomb cores can be handled during cutting, machining and forming without the nodes breaking. The tensile-node bond strength is the tensile stress that causes failure of the honeycomb by rupture of the bond between the nodes. It is usually a peeling-type failure.
5.2 This test method provides a standard method of obtaining tensile-node bond strength data for quality control, acceptance specification testing, and research and development.
SCOPE
1.1 This test method covers the determination of the tensile-node bond strength of honeycomb core materials.
1.2 The values stated in either SI units or inch-pound units are to be regarded separately as standard. The values stated in each system may not be exact equivalents; therefore, each system shall be used independently of the other. Combining values from the two systems may result in non-conformance with the standard.
1.3 This standard does not purport to address all of the safety concerns, if any, associated with its use. It is the responsibility of the user of this standard to establish appropriate safety, health, and environmental practices and determine the applicability of regulatory limitations prior to use.
1.4 This international standard was developed in accordance with internationally recognized principles on standardization established in the Decision on Principles for the Development of International Standards, Guides and Recommendations issued by the World Trade Organization Technical Barriers to Trade (TBT) Committee.
General Information
- Status
- Published
- Publication Date
- 30-Apr-2024
- Technical Committee
- D30 - Composite Materials
- Drafting Committee
- D30.09 - Sandwich Construction
Overview
ASTM C363/C363M-16(2024), Standard Test Method for Node Tensile Strength of Honeycomb Core Materials, establishes a reliable procedure for determining the tensile-node bond strength of honeycomb core materials. This property is critical in assessing whether honeycomb cores can withstand handling, processing, and forming without node bond failure. The method applies to both metallic and nonmetallic honeycomb sandwiches utilized in various industries, and provides a foundation for quality control, specification compliance, and research purposes.
Key Topics
- Tensile-Node Bond Strength: Measures the tensile stress required to break the bond between nodes within the honeycomb core, typically resulting in a peeling-type failure. This property underpins the integrity and performance of honeycomb structures during manufacturing and end-use.
- Test Procedure: The standard describes subjecting honeycomb specimens to a uniaxial tensile force parallel to the core plane, with force transmitted via pins inserted along the cell rows. The only valid failure mode is rupture within the node-to-node bond, excluding failures at pin locations or elsewhere.
- Sampling and Specimen Preparation: Recommendations are provided for specimen geometry, preparation, and labeling to ensure consistency and traceability. Factors including cell size, cell wall thickness, specimen dimensions, and preparation methods are addressed.
- Influencing Factors: The standard notes the influence of system alignment, geometry, and test environment on results. Bending, geometric inconsistencies, or varying environmental conditions can significantly affect the strength and failure mode.
- Reporting and Quality Control: Clear guidance is offered for statistical analysis (mean, standard deviation, coefficient of variation) and mandatory reporting items, ensuring rigor and repeatability in test results.
Applications
ASTM C363/C363M is widely used in industries where honeycomb core materials are integral to lightweight, high-strength structural components. Its principal applications include:
- Aerospace and Aviation: Ensuring honeycomb cores in composite panels meet quality and safety specifications for aircraft interiors, airframes, and control surfaces.
- Automotive and Transport: Validating the durability of honeycomb materials in automotive panels, floors, and crash structures.
- Construction and Architecture: Assessing node bond strength for honeycomb cores used in curtain walls, sandwich panels, and cladding systems.
- Manufacturing and R&D: Facilitating material selection, process optimization, and product development by providing comparable tensile-node data for different honeycomb materials.
Implementing this standard helps manufacturers and testing labs ensure honeycomb core products can be processed, handled, and installed without premature failure, enhancing end-product performance and durability.
Related Standards
This test method works alongside several other key ASTM standards:
- ASTM D3878: Terminology for Composite Materials
- ASTM D883: Terminology Relating to Plastics
- ASTM D5229/D5229M: Test Method for Moisture Absorption Properties and Equilibrium Conditioning of Polymer Matrix Composite Materials
- ASTM E4: Practices for Force Calibration and Verification of Testing Machines
- ASTM E6: Terminology Relating to Methods of Mechanical Testing
- ASTM E122: Practice for Calculating Sample Size to Estimate, With Specified Precision, the Average for a Characteristic of a Lot or Process
- ASTM E177 & E456: Practice for Use of Terms Precision and Bias in ASTM Test Methods; Terminology Relating to Quality and Statistics
Adhering to these interlinked standards ensures harmonization across testing procedures and material evaluations.
Keywords: node tensile strength, honeycomb core materials, peel failure, ASTM C363, quality control, bond strength test, composite sandwich panels, mechanical property testing
Buy Documents
ASTM C363/C363M-16(2024) - Standard Test Method for Node Tensile Strength of Honeycomb Core Materials
Get Certified
Connect with accredited certification bodies for this standard

Smithers Quality Assessments
US management systems and product certification.

DIN CERTCO
DIN Group product certification.
Sponsored listings
Frequently Asked Questions
ASTM C363/C363M-16(2024) is a standard published by ASTM International. Its full title is "Standard Test Method for Node Tensile Strength of Honeycomb Core Materials". This standard covers: SIGNIFICANCE AND USE 5.1 The honeycomb tensile-node bond strength is a fundamental property than can be used in determining whether honeycomb cores can be handled during cutting, machining and forming without the nodes breaking. The tensile-node bond strength is the tensile stress that causes failure of the honeycomb by rupture of the bond between the nodes. It is usually a peeling-type failure. 5.2 This test method provides a standard method of obtaining tensile-node bond strength data for quality control, acceptance specification testing, and research and development. SCOPE 1.1 This test method covers the determination of the tensile-node bond strength of honeycomb core materials. 1.2 The values stated in either SI units or inch-pound units are to be regarded separately as standard. The values stated in each system may not be exact equivalents; therefore, each system shall be used independently of the other. Combining values from the two systems may result in non-conformance with the standard. 1.3 This standard does not purport to address all of the safety concerns, if any, associated with its use. It is the responsibility of the user of this standard to establish appropriate safety, health, and environmental practices and determine the applicability of regulatory limitations prior to use. 1.4 This international standard was developed in accordance with internationally recognized principles on standardization established in the Decision on Principles for the Development of International Standards, Guides and Recommendations issued by the World Trade Organization Technical Barriers to Trade (TBT) Committee.
SIGNIFICANCE AND USE 5.1 The honeycomb tensile-node bond strength is a fundamental property than can be used in determining whether honeycomb cores can be handled during cutting, machining and forming without the nodes breaking. The tensile-node bond strength is the tensile stress that causes failure of the honeycomb by rupture of the bond between the nodes. It is usually a peeling-type failure. 5.2 This test method provides a standard method of obtaining tensile-node bond strength data for quality control, acceptance specification testing, and research and development. SCOPE 1.1 This test method covers the determination of the tensile-node bond strength of honeycomb core materials. 1.2 The values stated in either SI units or inch-pound units are to be regarded separately as standard. The values stated in each system may not be exact equivalents; therefore, each system shall be used independently of the other. Combining values from the two systems may result in non-conformance with the standard. 1.3 This standard does not purport to address all of the safety concerns, if any, associated with its use. It is the responsibility of the user of this standard to establish appropriate safety, health, and environmental practices and determine the applicability of regulatory limitations prior to use. 1.4 This international standard was developed in accordance with internationally recognized principles on standardization established in the Decision on Principles for the Development of International Standards, Guides and Recommendations issued by the World Trade Organization Technical Barriers to Trade (TBT) Committee.
ASTM C363/C363M-16(2024) is classified under the following ICS (International Classification for Standards) categories: 83.120 - Reinforced plastics. The ICS classification helps identify the subject area and facilitates finding related standards.
ASTM C363/C363M-16(2024) is available in PDF format for immediate download after purchase. The document can be added to your cart and obtained through the secure checkout process. Digital delivery ensures instant access to the complete standard document.
Standards Content (Sample)
This international standard was developed in accordance with internationally recognized principles on standardization established in the Decision on Principles for the
Development of International Standards, Guides and Recommendations issued by the World Trade Organization Technical Barriers to Trade (TBT) Committee.
Designation: C363/C363M − 16 (Reapproved 2024)
Standard Test Method for
Node Tensile Strength of Honeycomb Core Materials
This standard is issued under the fixed designation C363/C363M; the number immediately following the designation indicates the year
of original adoption or, in the case of revision, the year of last revision. A number in parentheses indicates the year of last reapproval.
A superscript epsilon (´) indicates an editorial change since the last revision or reapproval.
1. Scope E177 Practice for Use of the Terms Precision and Bias in
ASTM Test Methods
1.1 This test method covers the determination of the tensile-
E456 Terminology Relating to Quality and Statistics
node bond strength of honeycomb core materials.
1.2 The values stated in either SI units or inch-pound units
3. Terminology
are to be regarded separately as standard. The values stated in
3.1 Definitions—Terminology D3878 defines terms relating
each system may not be exact equivalents; therefore, each
to high-modulus fibers and their composites, as well as terms
system shall be used independently of the other. Combining
relating to sandwich constructions. Terminology D883 defines
values from the two systems may result in non-conformance
terms relating to plastics. Terminology E6 defines terms
with the standard.
relating to mechanical testing. Terminology E456 and Practice
1.3 This standard does not purport to address all of the
E177 define terms relating to statistics. In the event of a
safety concerns, if any, associated with its use. It is the
conflict between terms, Terminology D3878 shall have prece-
responsibility of the user of this standard to establish appro-
dence over the other Terminologies.
priate safety, health, and environmental practices and deter-
3.2 Symbols:
mine the applicability of regulatory limitations prior to use.
3.2.1 σ—tensile node strength, MPa [psi].
1.4 This international standard was developed in accor-
3.2.2 P—ultimate tensile force, N [lb].
dance with internationally recognized principles on standard-
ization established in the Decision on Principles for the
3.2.3 b—initial width of specimen, mm [in.].
Development of International Standards, Guides and Recom-
3.2.4 t—thickness of specimen, mm [in.].
mendations issued by the World Trade Organization Technical
3.2.5 x¯—sample mean (average).
Barriers to Trade (TBT) Committee.
3.2.6 S —sample standard deviation.
n − 1
2. Referenced Documents
3.2.7 CV—sample coefficient of variation (in percent).
2.1 ASTM Standards:
3.2.8 n—number of specimens.
D883 Terminology Relating to Plastics
3.2.9 x —measured or derived property.
D3878 Terminology for Composite Materials
D5229/D5229M Test Method for Moisture Absorption Prop-
4. Summary of Test Method
erties and Equilibrium Conditioning of Polymer Matrix
4.1 This test method consists of subjecting a honeycomb
Composite Materials
construction to a uniaxial tensile force parallel to the plane of
E4 Practices for Force Calibration and Verification of Test-
the honeycomb. The force is transmitted to the honeycomb
ing Machines
through pins, which are placed in cell rows on the top and
E6 Terminology Relating to Methods of Mechanical Testing
bottom portions of one specimen.
E122 Practice for Calculating Sample Size to Estimate, With
Specified Precision, the Average for a Characteristic of a
4.2 The only acceptable failure mode for tensile-node bond
Lot or Process
strength is the tensile failure of the node-to-node honeycomb
bond within the body of the honeycomb specimen. Failure of
the honeycomb material at the loading pin location is not a
This test method is under the jurisdiction of ASTM Committee D30 on
Composite Materials and is the direct responsibility of Subcommittee D30.09 on
valid failure mode.
Sandwich Construction.
Current edition approved May 1, 2024. Published May 2024. Originally
5. Significance and Use
approved in 1955. Last previous edition approved in 2016 as C363 – 16. DOI:
10.1520/C0363_C0363M-16R24.
5.1 The honeycomb tensile-node bond strength is a funda-
For referenced ASTM standards, visit the ASTM website, www.astm.org, or
mental property than can be used in determining whether
contact ASTM Customer Service at service@astm.org. For Annual Book of ASTM
honeycomb cores can be handled during cutting, machining
Standards volume information, refer to the standard’s Document Summary page on
the ASTM website. and forming without the nodes breaking. The tensile-node
Copyright © ASTM International, 100 Barr Harbor Drive, PO Box C700, West Conshohocken, PA 19428-2959. United States
C363/C363M − 16 (2024)
bond strength is the tensile stress that causes failure of the
honeycomb by rupture of the bond between the nodes. It is
usually a peeling-type failure.
5.2 This test method provides a standard method of obtain-
ing tensile-node bond strength data for quality control, accep-
tance specification testing, and research and development.
6. Interferences
6.1 System Alignment—Excessive bending will cause pre-
mature failure. Every effort should be made to eliminate excess
bending from the test system. Bending may occur as a result of
misaligned grips, poor specimen preparation, or poor align-
ment of the loading fixture.
6.2 Geometry—Specific geometric factors that affect the
tensile-node bond strength include cell geometry, cell size, cell
wall thickness and, specimen dimensions (length, width and
thickness).
6.3 Environment—Results are affected by the environmental
conditions under which the tests are conducted. Specimens
tested in various environments can exhibit significant differ-
ences in both strength behavior and failure mode. Critical
environments must be assessed independently.
7. Apparatus
7.1 Testing Machine—The testing machine shall be in ac-
cordance with Practices E4 and shall satisfy the following
requirements:
7.1.1 Testing Machine Configuration—The testing machine
shall have both an essentially stationary head and a movable
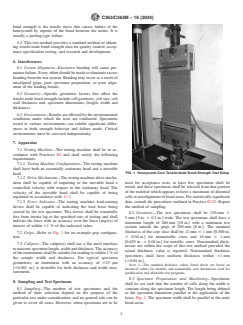
FIG. 1 Honeycomb Core Tensile-Node Bond Strength Test Setup
head.
7.1.2 Drive Mechanism—The testing machine drive mecha-
used for acceptance tests, at least five specimens shall be
nism shall be capable of imparting to the movable head a
tested, and these specimens shall be selected from that portion
controlled velocity with respect to the stationary head. The
of the material which appears to have a maximum of distorted
velocity of the movable head shall be capable of being
cells or misalignment of bond areas. For statistically significant
regulated in accordance with 11.3.
data, consult the procedures outlined in Practice E122. Report
7.1.3 Force Indicator—The testing machine load-sensing
the method of sampling.
device shall be capable of indicating the total force being
carried by the test specimen. This device shall be essentially
8.2 Geometry—The test specimens shall be 130 mm 6
free from inertia lag at the specified rate of testing and shall
5 mm [5 in. 6 0.2 in.] wide. The test specimens shall have a
indicate the force with an accuracy over the force range(s) of
minimum length of 260 mm [10 in.] with a minimum test
interest of within 61 % of the indicated value.
section outside the grips of 200 mm [8 in.]. The standard
thickness of the core slice shall be 12 mm 6 1 mm [0.500 in.
7.2 Grips—Refer to Fig. 1 for an example grip configura-
6 0.04 in.] for nonmetallic cores and 16 mm 6 1 mm
tion.
[0.625 in. 6 0.04 in.] for metallic cores. Nonstandard thick-
7.3 Calipers—The caliper(s) shall use a flat anvil interface
nesses are within the scope of this test method provided the
to measure specimen length, width and thickness. The accuracy
actual thickness value is reported. Nonstandard thickness
of the instruments shall be suitable for reading to within 1 % of
specimens shall have uniform thickness within 61 mm
the sample width and thickness. For typical specimen
[60.04 in.].
geometries, an instrument with an accuracy of 625 μm
NOTE 1—The standard thickness values listed above are based on
[60.001 in.] is desirable for both thickness and width mea-
historical values for metallic and nonmetallic core thicknesses used for
surements.
qualification and allowable test programs.
8.3 Specimen Preparation and Machining—Specimens
8. Sampling and Test Specimens
shall be cut such that the number of cells along the width is
8.1 Sampling—The number of test specimens and the constant along the specimen length. The length being defined
method of their selection depend on the purpose of the as the specimen dimension parallel to the application of the
particular test under consideration, and no general rule can be force, Fig. 1. The specimen width shall be parallel to the node
given to cover all cases. However, when specimens are to be bond areas.
C363/C363M − 16 (2024)
8.4 Labeling—Label the test specimens so that they will be of the material cannot be reasonably estimated, initial trials
distinct from each other and traceable back to the panel of should be conducted using standard speeds until
...


Questions, Comments and Discussion
Ask us and Technical Secretary will try to provide an answer. You can facilitate discussion about the standard in here.
Loading comments...