ASTM D7635/D7635M-18
(Test Method)Standard Test Method for Measurement of Thickness of Coatings Over Fabric Reinforcement
Standard Test Method for Measurement of Thickness of Coatings Over Fabric Reinforcement
SCOPE
1.1 This test method covers measuring the thickness of the coating over fiber backing or reinforcing fabric.
1.2 The values stated in either SI units or inch-pound units are to be regarded separately as standard. The values stated in each system may not be exact equivalents; therefore, each system shall be used independently of the other. Combining values from the two systems may result in non-conformance with the standard.
1.3 This standard may involve hazardous materials, operations, and equipment. This standard does not purport to address all of the safety concerns, if any, associated with its use. It is the responsibility of the user of this standard to establish appropriate safety, health, and environmental practices and determine the applicability of regulatory limitations prior to use.
1.4 This international standard was developed in accordance with internationally recognized principles on standardization established in the Decision on Principles for the Development of International Standards, Guides and Recommendations issued by the World Trade Organization Technical Barriers to Trade (TBT) Committee.
General Information
Relations
Buy Standard
Standards Content (Sample)
This international standard was developed in accordance with internationally recognized principles on standardization established in the Decision on Principles for the
Development of International Standards, Guides and Recommendations issued by the World Trade Organization Technical Barriers to Trade (TBT) Committee.
Designation: D7635/D7635M − 18
Standard Test Method for
Measurement of Thickness of Coatings Over Fabric
1
Reinforcement
This standard is issued under the fixed designation D7635/D7635M; the number immediately following the designation indicates the
year of original adoption or, in the case of revision, the year of last revision. A number in parentheses indicates the year of last
reapproval. A superscript epsilon (´) indicates an editorial change since the last revision or reapproval.
1. Scope MEASUREMENT METHOD
1.1 This test method covers measuring the thickness of the
3. Principle
coating over fiber backing or reinforcing fabric.
3.1 The thickness of coating material over fiber, fabric, or
1.2 The values stated in either SI units or inch-pound units
scrim can be measured with a standard or digital optical or
are to be regarded separately as standard. The values stated in
reflectancemicroscope.Measurementismadewithacalibrated
each system may not be exact equivalents; therefore, each
viewing device.
system shall be used independently of the other. Combining
values from the two systems may result in non-conformance
4. Apparatus
with the standard.
4.1 Microscope, 30 to 100× magnification capability.
1.3 This standard may involve hazardous materials,
4.1.1 Light Source—If the light source on the microscope is
operations, and equipment. This standard does not purport to
not adequate, use a small high-intensity lamp.
address all of the safety concerns, if any, associated with its
4.1.2 Stage Micrometer, 25 µm [0.001 in.] divisions.
use. It is the responsibility of the user of this standard to
4.2 Calibrated Viewing Device—A digital or analog device
establish appropriate safety, health, and environmental prac-
designed to provide an enlarged electronic image with calibra-
tices and determine the applicability of regulatory limitations
tions to provide measurements.
prior to use.
1.4 This international standard was developed in accor-
5. Calibration Procedure
dance with internationally recognized principles on standard-
5.1 Place a standard reflectance stage micrometer or cali-
ization established in the Decision on Principles for the
brated sample blocks in place of the specimen.
Development of International Standards, Guides and Recom-
mendations issued by the World Trade Organization Technical
5.2 Turn on the light source.
Barriers to Trade (TBT) Committee.
5.3 Position the viewing device (calibrated reticule or cam-
era) such that the scales are superimposed. For electronic
2. Referenced Documents
imaging, place the calibrated scale marker on the microscope
2
2.1 ASTM Standards:
stage. Focus the viewing device on the specimen.
D4434/D4434M Specification for Poly(Vinyl Chloride)
5.4 Calibrate using micrometer or calibrated sample blocks
Sheet Roofing
to nearest 10 µm.
E177Practice for Use of the Terms Precision and Bias in
5.5 If using digital image for calibration step, record reso-
ASTM Test Methods
lution and magnification of calibration image.
E691Practice for Conducting an Interlaboratory Study to
Determine the Precision of a Test Method
6. Specimen Preparation
6.1 Make a clean cut perpendicular to the plane of the
specimen, normal to one of the yarn intersections, completely
1
ThistestmethodisunderthejurisdictionofASTMCommitteeD08onRoofing
throughthesheetexposingtheareatobemeasured(seeFig.1).
and Waterproofing and is the direct responsibility of Subcommittee D08.18 on
Nonbituminous Organic Roof Coverings.
6.2 Remove the razor-cut section and mount with the cut
Current edition approved Nov. 1, 2018. Published December 2018. Originally
surface (analytical plane) facing downward into a sample clip.
approved in 2010. Last previous edition approved in 2010 as D7635/D7635M–10.
DOI: 10.1520/D7635_D7635M-18.
Securesampleclipin3.175-cm[1.25-in.]samplecupwithcap.
2
For referenced ASTM standards, visit the ASTM website, www.astm.org, or
Use a piece of double-sided tape to securely attach clip to the
contact ASTM Customer Service at service@astm.org. For Annual Book of ASTM
cap part of the cup. Record sample orientation and position
Standards volume information, refer to the standard’s Document Summary page on
the ASTM website. within cup. Multiclips can be used for mounting multiple
Copyright © ASTM International, 100 Barr Harbor Drive, PO Box C700, West Conshohocken, PA 19428-2959. United States
1
---------------------- Page: 1 ----------------------
D7635/D7635M − 18
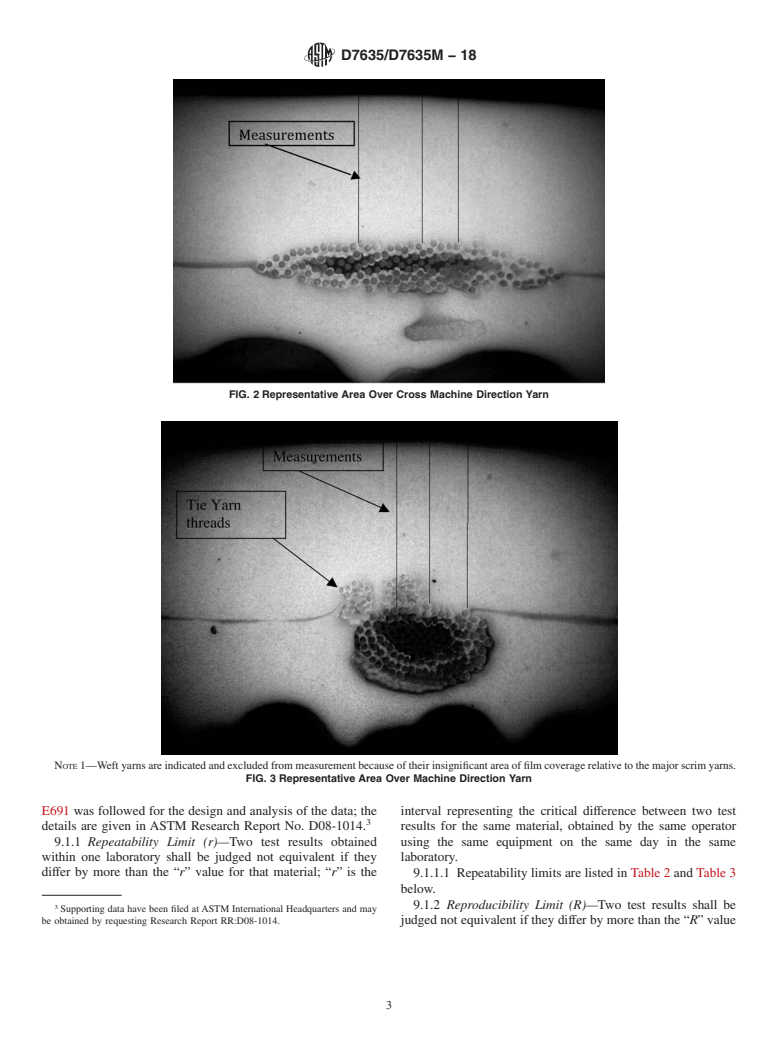
FIG. 1 Schematic of Preparation Illustrating Cuts Normal to Scrim Directions
samples per mount. Assure all that all samples are oriented 7.3 Average all the results.
normal to the plane of the sample cup cap.
7.4 If using electronic imaging tec
...
This document is not an ASTM standard and is intended only to provide the user of an ASTM standard an indication of what changes have been made to the previous version. Because
it may not be technically possible to adequately depict all changes accurately, ASTM recommends that users consult prior editions as appropriate. In all cases only the current version
of the standard as published by ASTM is to be considered the official document.
Designation: D7635/D7635M − 10 D7635/D7635M − 18
Standard Test Method for
Measurement of Thickness of Coatings Over Fabric
1
Reinforcement
This standard is issued under the fixed designation D7635/D7635M; the number immediately following the designation indicates the
year of original adoption or, in the case of revision, the year of last revision. A number in parentheses indicates the year of last
reapproval. A superscript epsilon (´) indicates an editorial change since the last revision or reapproval.
1. Scope
1.1 This test method covers measuring the thickness of the coating over fiber backing or reinforcing fabric.
1.2 The values stated in either SI units or inch-pound units are to be regarded separately as standard. The values stated in each
system may not be exact equivalents; therefore, each system shall be used independently of the other. Combining values from the
two systems may result in non-conformance with the standard.
1.3 This standard may involve hazardous materials, operations, and equipment. This standard does not purport to address all
of the safety concerns, if any, associated with its use. It is the responsibility of the user of this standard to establish appropriate
safety and health practices and determine the applicability of regulatory limitations prior to use.
1.3 This standard may involve hazardous materials, operations, and equipment. This standard does not purport to address all
of the safety concerns, if any, associated with its use. It is the responsibility of the user of this standard to establish appropriate
safety, health, and environmental practices and determine the applicability of regulatory limitations prior to use.
1.4 This international standard was developed in accordance with internationally recognized principles on standardization
established in the Decision on Principles for the Development of International Standards, Guides and Recommendations issued
by the World Trade Organization Technical Barriers to Trade (TBT) Committee.
2. Referenced Documents
2
2.1 ASTM Standards:
D4434D4434/D4434M Specification for Poly(Vinyl Chloride) Sheet Roofing
E177 Practice for Use of the Terms Precision and Bias in ASTM Test Methods
E691 Practice for Conducting an Interlaboratory Study to Determine the Precision of a Test Method
MEASUREMENT METHOD
3. Principle
3.1 The thickness of coating material over fiber, fabric, or scrim can be measured with a standard or digital optical or reflectance
microscope. Measurement is made with a calibrated viewing device.
4. Apparatus
4.1 Microscope, 30 to 100× magnification capability.
4.1.1 Light Source—If the light source on the microscope is not adequate, use a small high-intensity lamp.
4.1.2 Stage Micrometer, 25 μm [0.001 in.] divisions.
4.2 Calibrated Viewing Device—A digital or analog device designed to provide an enlarged electronic image with calibrations
to provide measurements.
5. Calibration Procedure
5.1 Place a standard reflectance stage micrometer or calibrated sample blocks in place of the specimen.
5.2 Turn on the light source.
1
This test method is under the jurisdiction of ASTM Committee D08 on Roofing and Waterproofing and is the direct responsibility of Subcommittee D08.18 on
Nonbituminous Organic Roof Coverings.
Current edition approved June 1, 2010Nov. 1, 2018. Published July 2010December 2018. Originally approved in 2010. Last previous edition approved in 2010 as
D7635/D7635M – 10. DOI: 10.1520/D7635_D7635M–10. 10.1520/D7635_D7635M-18.
2
For referenced ASTM standards, visit the ASTM website, www.astm.org, or contact ASTM Customer Service at service@astm.org. For Annual Book of ASTM Standards
volume information, refer to the standard’s Document Summary page on the ASTM website.
Copyright © ASTM International, 100 Barr Harbor Drive, PO Box C700, West Conshohocken, PA 19428-2959. United States
1
---------------------- Page: 1 ----------------------
D7635/D7635M − 18
5.3 Position the viewing device (calibrated reticule or camera) such that the scales are superimposed. For electronic imaging,
place the calibrated scale marker on the microscope stage. Focus the viewing device on the specimen.
5.4 Calibrate using micrometer or calibrated sample blocks to nearest 10 μm.
5.5 If using digital image for calibration step, record resolution and magnification of calibration image.
6. Specimen Preparation
6.1 Make a clean cut perpendicular to the plane of the specimen, normal to one of the threadyarn intersections, completely
through the sheet exposing the area to be measured (see Fig. 1).
6.2 Remove the razor-cu
...


Questions, Comments and Discussion
Ask us and Technical Secretary will try to provide an answer. You can facilitate discussion about the standard in here.