ASTM E672-87(2001)e1
(Specification)Standard Specification for Disposable Glass Micropipets
Standard Specification for Disposable Glass Micropipets
SCOPE
1.1 This specification covers two different types of disposable micropipets, calibrated "to contain," used in measuring microlitre volumes of liquids.
1.2 The values stated in SI units are to be regarded as the standard.
1.3 The following precautionary caveat pertains only to paragraph 9.1.1 of this specification. This standard does not purport to address all of the safety concerns, if any, associated with its use. It is the responsibility of the user of this standard to establish appropriate safety and health practices and determine the applicability of regulatory limitations prior to use.
General Information
Relations
Standards Content (Sample)
NOTICE: This standard has either been superseded and replaced by a new version or withdrawn.
Contact ASTM International (www.astm.org) for the latest information
e1
Designation: E 672 – 87 (Reapproved 2001)
Standard Specification for
Disposable Glass Micropipets
This standard is issued under the fixed designation E 672; the number immediately following the designation indicates the year of
original adoption or, in the case of revision, the year of last revision. A number in parentheses indicates the year of last reapproval. A
superscript epsilon (e) indicates an editorial change since the last revision or reapproval.
e NOTE—Keywords were added editorially October 2001.
in cases where the distributions are Gaussian.
1. Scope
1.1 This specification covers two different types of dispos- 3.1.3 repeatability—theclosenessofagreementbetweenthe
individual volumes obtained by applying the test procedure
able micropipets, calibrated “to contain,” used in measuring
microlitre volumes of liquids. specified in 9.4.2. It is quantified by the imprecision.
1.2 The values stated in SI units are to be regarded as the
4. Classification
standard.
4.1 This specification covers two different pipet designs as
1.3 The following precautionary caveat pertains only to
follows:
paragraph 9.1.1 of this specification. This standard does not
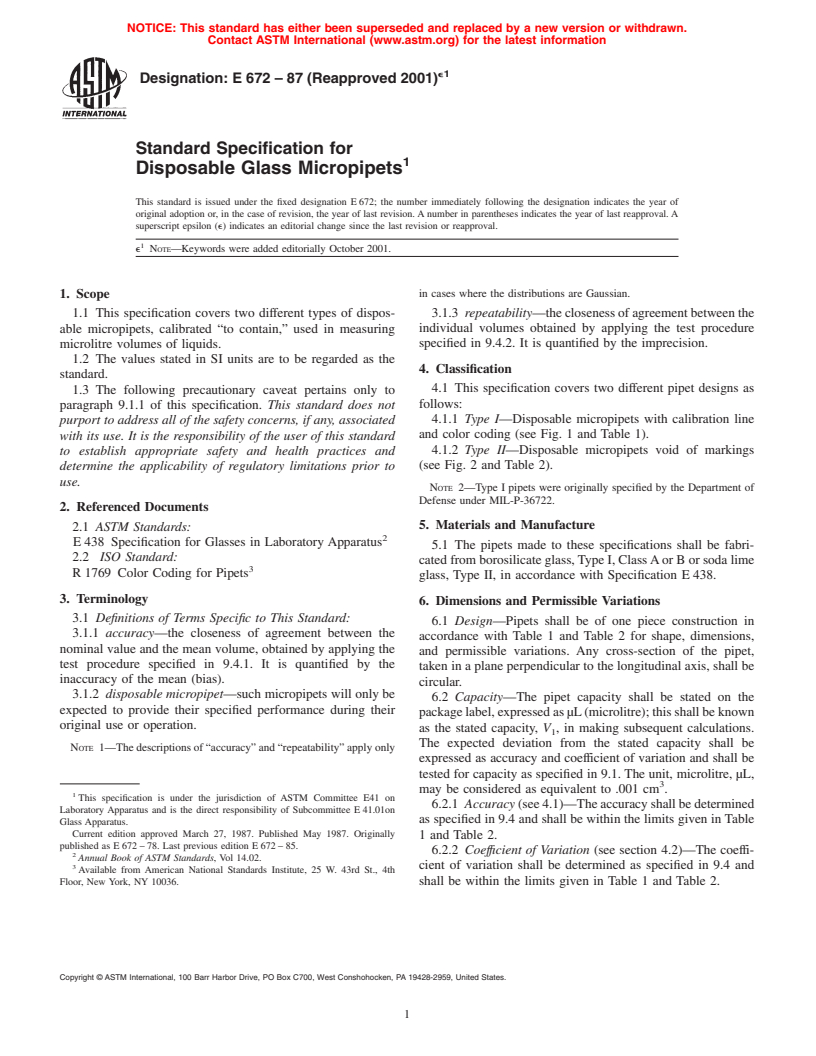
4.1.1 Type I—Disposable micropipets with calibration line
purport to address all of the safety concerns, if any, associated
and color coding (see Fig. 1 and Table 1).
with its use. It is the responsibility of the user of this standard
4.1.2 Type II—Disposable micropipets void of markings
to establish appropriate safety and health practices and
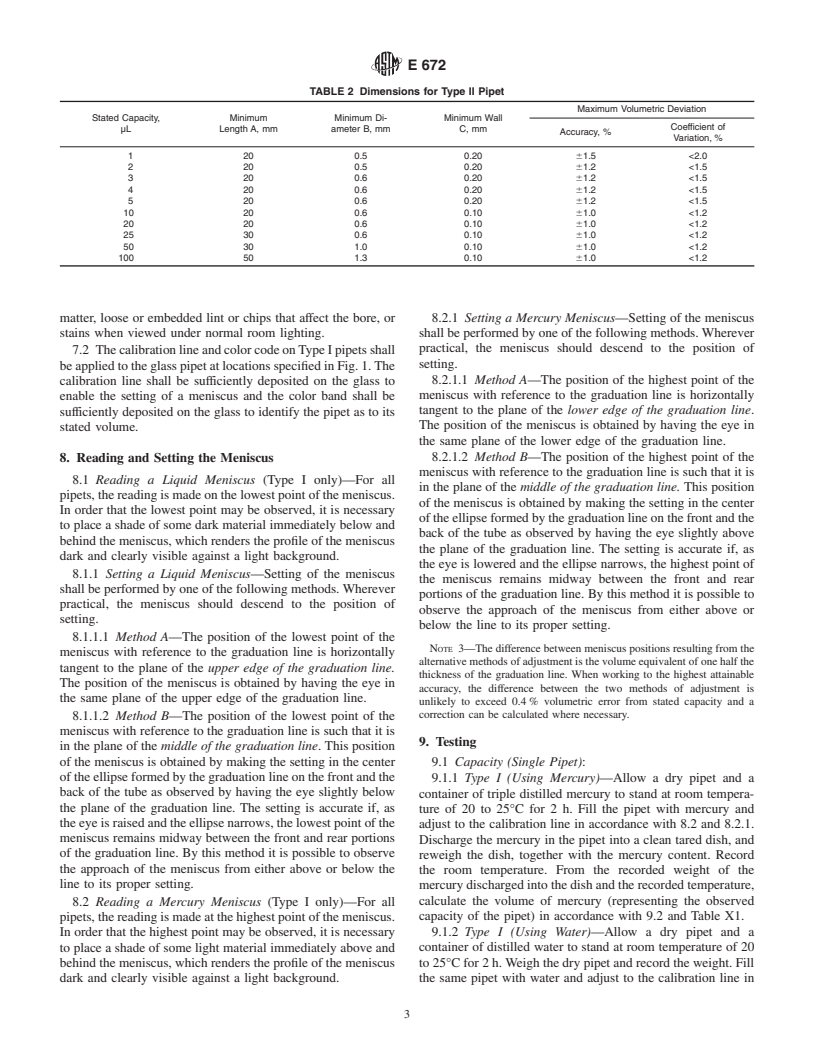
(see Fig. 2 and Table 2).
determine the applicability of regulatory limitations prior to
use.
NOTE 2—Type I pipets were originally specified by the Department of
Defense under MIL-P-36722.
2. Referenced Documents
5. Materials and Manufacture
2.1 ASTM Standards:
E 438 Specification for Glasses in Laboratory Apparatus
5.1 The pipets made to these specifications shall be fabri-
2.2 ISO Standard:
cated from borosilicate glass,Type I, ClassAor B or soda lime
R 1769 Color Coding for Pipets
glass, Type II, in accordance with Specification E 438.
3. Terminology
6. Dimensions and Permissible Variations
3.1 Definitions of Terms Specific to This Standard:
6.1 Design—Pipets shall be of one piece construction in
3.1.1 accuracy—the closeness of agreement between the
accordance with Table 1 and Table 2 for shape, dimensions,
nominal value and the mean volume, obtained by applying the
and permissible variations. Any cross-section of the pipet,
test procedure specified in 9.4.1. It is quantified by the
taken in a plane perpendicular to the longitudinal axis, shall be
inaccuracy of the mean (bias).
circular.
3.1.2 disposable micropipet—such micropipets will only be
6.2 Capacity—The pipet capacity shall be stated on the
expected to provide their specified performance during their
packagelabel,expressedasµL(microlitre);thisshallbeknown
original use or operation.
as the stated capacity, V , in making subsequent calculations.
The expected deviation from the stated capacity shall be
NOTE 1—The descriptions of “accuracy” and “repeatability” apply only
expressed as accuracy and coefficient of variation and shall be
tested for capacity as specified in 9.1. The unit, microlitre, µL,
may be considered as equivalent to .001 cm .
This specification is under the jurisdiction of ASTM Committee E41 on
6.2.1 Accuracy(see4.1)—Theaccuracyshallbedetermined
Laboratory Apparatus and is the direct responsibility of Subcommittee E 41.01on
as specified in 9.4 and shall be within the limits given in Table
Glass Apparatus.
Current edition approved March 27, 1987. Published May 1987. Originally
1 and Table 2.
published as E 672 – 78. Last previous edition E 672 – 85.
6.2.2 Coeffıcient of Variation (see section 4.2)—The coeffi-
Annual Book of ASTM Standards, Vol 14.02.
cient of variation shall be determined as specified in 9.4 and
Available from American National Standards Institute, 25 W. 43rd St., 4th
Floor, New York, NY 10036. shall be within the limits given in Table 1 and Table 2.
Copyright © ASTM International, 100 Barr Harbor Drive, PO Box C700, West Conshohocken, PA 19428-2959, United States.
E 672
FIG. 1 Type I Pipet
TABLE 1 Dimensions for Type I Pipet
Maximum Volumetric Deviation
Stated Capacity, Minimum Di- Minimum Wall
Color Code
Coefficient of
µL ameter A, mm B, mm
Accuracy, %
Variation, %
5 white 1.0 0.35 61.0 <1.5
10 orange 1.0 0.25 60.5 <1.0
20 black 1.1 0.25 60.5 <1.0
25 2 white 1.1 0.25 60.5 <1.0
50 green 1.3 0.20 60.5 <1.0
100 blue 1.6 0.20 60.5 <1.0
200 red 2.2 0.20 60.5 <1.0
FIG.2TypeIIPipet
6.3 Capacity Mark—Pipets in Fig. 1 shall have a capacity bands, shall completely encircle the pipet in a plane perpen-
line that is calibrated “to contain” a volume of liquid at 20°C. dicular to its longitudinal axis. The location of color band, or
The capacity line shall be 0.3 to 0.5 mm wide and shall bands, shall be as specified in Fig. 1 with the selection of color,
completely encircle the pipet in a plane perpendicular to its to designate capacity, according to ISO Recommendation
longitudinal axis. R-1769.
6.4 Identification Markings: 6.4.2 Type II—Pipets in Fig. 2 are devoid of any markings
6.4.1 Type I—The pipets in Fig. 1 shall be identified for and shall be identified for capacity on the package label.
capacity by a color code marking on each pipet consisting of
7. Workmanship, Finish, and Appearance
one or two color bands (see Table 1). For a code consisting of
one band, the band shall be from 2 to 6 mm wide; for a code 7.1 The pipets in Fig. 1 and Fig. 2 shall be free of defects
consistingoftwobands,eachbandshallbe2to6mmwideand that will detract from their appearance or may impair their
separated with a space of 2 to 6 mm. The color code band, or serviceability. The pipets shall be free of significant foreign
E 672
TABLE 2 Dimensions for Type II Pipet
Maximum Volumetric Deviation
Stated Capacity, Minimum Minimum Di- Minimum Wall
Coefficient of
µL Length A, mm ameter B, mm C, mm
Accuracy, %
Variation, %
1 20 0.5 0.20 61.5 <2.0
2 20 0.5 0.20 61.2 <1.5
3 20 0.6 0.20 61.2 <1.5
4 20 0.6 0.20 61.2 <1.5
5 20 0.6 0.20 61.2 <1.5
10 20 0.6 0.10 61.0 <1.2
20 20 0.6 0.10 61.0 <1.2
25 30 0.6 0.10 61.0 <1.2
50 30 1.0 0.10 61.0 <1.2
100 50 1.3 0.10 61.0 <1.2
matter, loose or embedded lint or chips that affect the bore, or 8.2.1 Setting a Mercury Meniscus—Setting of the meniscus
stains when viewed under normal room lighting. shall be performed by one of the following methods.Wherever
practical, the meniscus should descend to the position of
7.2 ThecalibrationlineandcolorcodeonTypeIpipetsshall
setting.
beappliedtotheglasspipetatlocationsspecifiedinFig.1.The
8.2.1.1 Method A—The position of the highest point of the
calibration line shall be sufficiently deposited on the glass to
meniscus with reference to the graduation line is horizontally
enable the setting of a meniscus and the color band shall be
tangent to the plane of the lower edge of the graduation line.
sufficiently deposited on the glass to identify the pipet as to its
The position of the meniscus is obtained by having the eye in
stated volume.
the same plane of the lower edge of the graduation line.
8.2.1.2 Method B—The position of the highest point of the
8. Reading and Setting the Meniscus
meniscus with reference to the graduation line is such that it is
8.1 Reading a Liquid Meniscus (Type I only)—For all
in the plane of the middle of the graduation line. This position
pipets,thereadingismadeonthelowestpointofthemeniscus.
of the meniscus is obtained by making the setting in the center
In order that the lowest point may be observed, it is necessary
oftheellipseformedbythegraduationlineonthefrontandthe
to place a shade of some dark material immediately below and
back of the tube as observed by having the eye slightly above
behind the meniscus, which renders the profile of the meniscus
the plane of the graduation line. The setting is accurate if, as
dark and clearly visible against a light background.
the eye is lowered and t
...


Questions, Comments and Discussion
Ask us and Technical Secretary will try to provide an answer. You can facilitate discussion about the standard in here.