ASTM C786-96(2003)
(Test Method)Standard Test Method for Fineness of Hydraulic Cement and Raw Materials by the 300-μm (No. 50), 150-μm (No. 100), and 75-μm (No. 200) Sieves by Wet Methods
Standard Test Method for Fineness of Hydraulic Cement and Raw Materials by the 300-μm (No. 50), 150-μm (No. 100), and 75-μm (No. 200) Sieves by Wet Methods
ABSTRACT
This test method covers wet sieving techniques for determination of fineness of hydraulic cement and raw materials by means of the No. 50, No. 100, and No. 200 sieves. The following apparatus shall be utilized: wet test sieves; spray nozzle; pressure gage; balance; weights; brush; dry test sieves; and NBS SRM No. 1004 (glass bead standard). Dry sieve standardization shall be performed by determining the correction factors and by preparing the standard samples. Wet sieve calibration shall follow and shall utilize the sieve correction factor. The procedure for wet sieving shall include the following: weighing of the sample; recording the weight and transferring the sample quantitatively to a clean dry sieve; wetting the sample thoroughly with a gentle stream of water; removing the sieve from under the nozzle and adjusting the pressure of the spray nozzle; returning the sieve to its position under the nozzle and washing it; moving the sieve in the spray with a circular motion; rinsing the sieve with distilled or deionized water immediately after removing it from the spray; blotting the lower surface of the screen cloth with a damp, clean cloth; drying the sieve and residue in an oven or over a hot plate; cooling the sieve; brushing the residue from the sieve; and weighing the sieve on a balance.
SCOPE
1.1 This test method covers wet sieving techniques for determination of fineness of hydraulic cement and raw materials by means of the 300-μm (No. 50), the 150-μm (No. 100), and the 75-μm (No. 200) sieves.
1.2 The values stated in SI units are to be regarded as the standard.
1.3 This standard does not purport to address all of the safety concerns, if any, associated with its use. It is the responsibility of the user of this standard to establish appropriate safety and health practices and determine the applicability of regulatory limitations prior to use.
General Information
Relations
Standards Content (Sample)
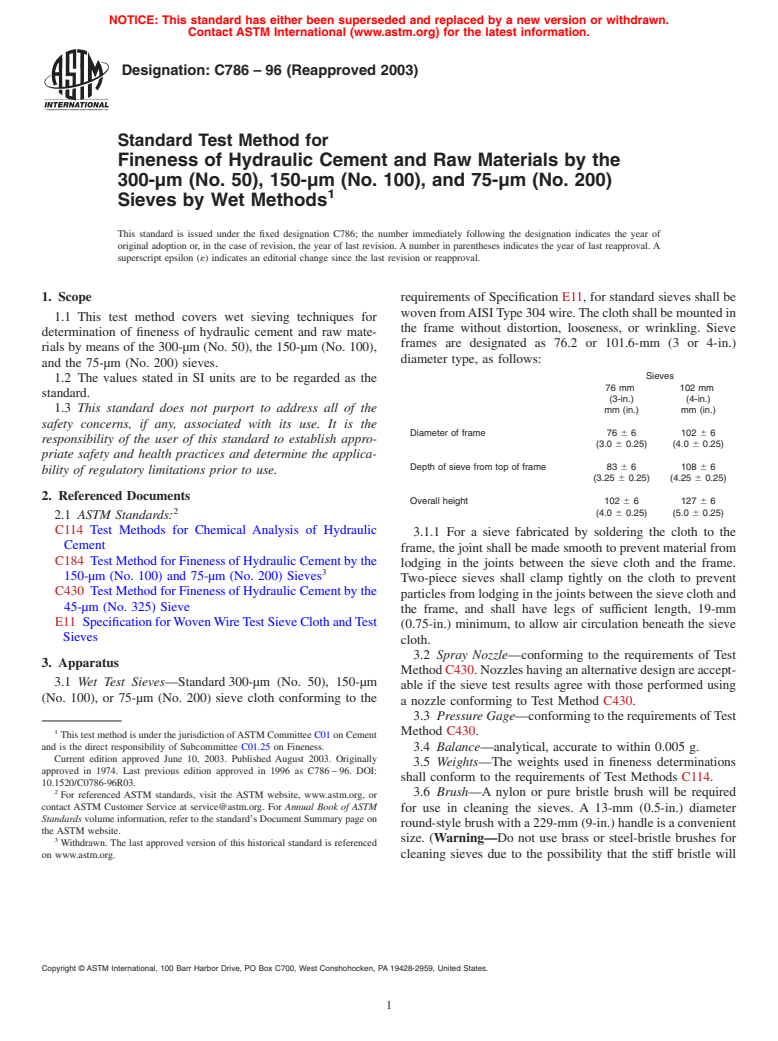
NOTICE: This standard has either been superseded and replaced by a new version or withdrawn.
Contact ASTM International (www.astm.org) for the latest information.
Designation: C786 – 96 (Reapproved 2003)
Standard Test Method for
Fineness of Hydraulic Cement and Raw Materials by the
300-µm (No. 50), 150-µm (No. 100), and 75-µm (No. 200)
Sieves by Wet Methods
This standard is issued under the fixed designation C786; the number immediately following the designation indicates the year of
original adoption or, in the case of revision, the year of last revision.Anumber in parentheses indicates the year of last reapproval.A
superscript epsilon (´) indicates an editorial change since the last revision or reapproval.
1. Scope requirements of Specification E11, for standard sieves shall be
wovenfromAISIType304wire.Theclothshallbemountedin
1.1 This test method covers wet sieving techniques for
the frame without distortion, looseness, or wrinkling. Sieve
determination of fineness of hydraulic cement and raw mate-
frames are designated as 76.2 or 101.6-mm (3 or 4-in.)
rials by means of the 300-µm (No. 50), the 150-µm (No. 100),
diameter type, as follows:
and the 75-µm (No. 200) sieves.
Sieves
1.2 The values stated in SI units are to be regarded as the
76 mm 102 mm
standard.
(3-in.) (4-in.)
1.3 This standard does not purport to address all of the
mm (in.) mm (in.)
safety concerns, if any, associated with its use. It is the
Diameter of frame 76 6 6 102 6 6
responsibility of the user of this standard to establish appro-
(3.0 6 0.25) (4.0 6 0.25)
priate safety and health practices and determine the applica-
Depth of sieve from top of frame 83 6 6 108 6 6
bility of regulatory limitations prior to use.
(3.25 6 0.25) (4.25 6 0.25)
2. Referenced Documents
Overall height 102 6 6 127 6 6
(4.0 6 0.25) (5.0 6 0.25)
2.1 ASTM Standards:
C114 Test Methods for Chemical Analysis of Hydraulic
3.1.1 For a sieve fabricated by soldering the cloth to the
Cement
frame, the joint shall be made smooth to prevent material from
C184 TestMethodforFinenessofHydraulicCementbythe
lodging in the joints between the sieve cloth and the frame.
150-µm (No. 100) and 75-µm (No. 200) Sieves
Two-piece sieves shall clamp tightly on the cloth to prevent
C430 TestMethodforFinenessofHydraulicCementbythe
particlesfromlodginginthejointsbetweenthesieveclothand
45-µm (No. 325) Sieve
the frame, and shall have legs of sufficient length, 19-mm
E11 SpecificationforWovenWireTestSieveClothandTest
(0.75-in.) minimum, to allow air circulation beneath the sieve
Sieves
cloth.
3.2 Spray Nozzle—conforming to the requirements of Test
3. Apparatus
MethodC430.Nozzleshavinganalternativedesignareaccept-
3.1 Wet Test Sieves—Standard300-µm (No. 50), 150-µm
able if the sieve test results agree with those performed using
(No. 100), or 75-µm (No. 200) sieve cloth conforming to the
a nozzle conforming to Test Method C430.
3.3 Pressure Gage—conformingtotherequirementsofTest
Method C430.
ThistestmethodisunderthejurisdictionofASTMCommitteeC01onCement
and is the direct responsibility of Subcommittee C01.25 on Fineness. 3.4 Balance—analytical, accurate to within 0.005 g.
Current edition approved June 10, 2003. Published August 2003. Originally
3.5 Weights—The weights used in fineness determinations
approved in 1974. Last previous edition approved in 1996 as C786–96. DOI:
shall conform to the requirements of Test Methods C114.
10.1520/C0786-96R03.
3.6 Brush—A nylon or pure bristle brush will be required
For referenced ASTM standards, visit the ASTM website, www.astm.org, or
contact ASTM Customer Service at service@astm.org. For Annual Book of ASTM
for use in cleaning the sieves. A 13-mm (0.5-in.) diameter
Standards volume information, refer to the standard’s Document Summary page on
round-stylebrushwitha229-mm(9-in.)handleisaconvenient
the ASTM website.
size. (Warning—Do not use brass or steel-bristle brushes for
Withdrawn. The last approved version of this historical standard is referenced
on www.astm.org. cleaning sieves due to the possibility that the stiff bristle will
Copyright © ASTM International, 100 Barr Harbor Drive, PO Box C700, West Conshohocken, PA 19428-2959, United States.
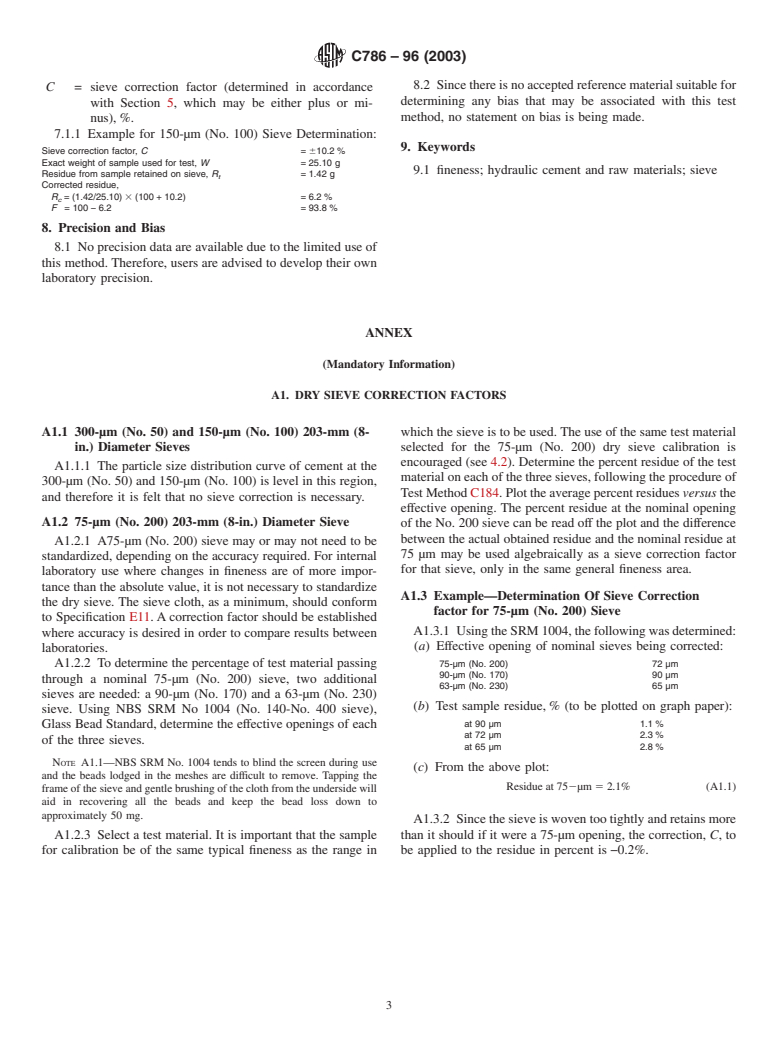
C786 – 96 (2003)
part the wire weave, thereby altering the size of the openings
C = sieve correction factor (which may be either plus or
and rendering the sieve useless. A 13-mm ( ⁄2-in.) hog bristle
minus),%,
stencil brush is also satisfactory for brushing sieves.)
R = test residue from sample retained on sieve, g,
t
R = standard residue retained on sieve,%, and
3.7 Dry Test Sieves—The standard samples for calibrating
s
W = weight of test sample, g.
the wet test sieves must be standardized on 203-mm (8-in.) t
5.1.1 Example of Determination of Wet Sieve Calibration:
diameter sieves meeting the requirements of Test Method
% Residue on 150-µm (No. 100) sieve for = 5.40%
C184. The 300-µm (No. 50) sieve shall meet the same
standard sample, R
s
requirements.
Residue from test sample, R =1.25 g
t
3.8 NBS SRM No. 1004—Glass Bead Standard.
Weight of sample, W = 25.5 g
t
~5.40 325.5/100! 21.25
Correctionfactor, C,% 5 (2)
4. Dry Sieve Standardization
1.25
4.1 Correction Factors: 31005610.2
4.1.1 Correction of the residues obtained on the 203-mm
NOTE 1—The sieve correction is specified as a factor to be multiplied
(8-in.) diameter 300-µm (No. 50) and 150-µm (No. 100) dry
by the residue obtained, and therefore the amount to be added to or
testing sieves is not required. subtractedfromthetestresidueinanygiveninstanceisproportionaltothe
amount of the residue.
4.1.2 Whereapplicable,acorrectionfactorfora75-µm(No.
200) sieve shall be determined using the instructions given in
6. Procedure for Wet Sieving
Annex A1. A correction factor should be determined when
6.1 Weigh the sample to the nearest 0.01 g using approxi-
accuracy is desired in order to compare results between
mately 50 g for a 300-µm (No. 50), 25 g for a 150-µm (No.
laboratories.
100), or 10 g for a 75-µm (No. 200) determination. Record the
4.2 Standard Samples—Each laboratory must prepare its
weight and transfer the sample quantitatively to a clean dry
own standard samples for wet-sieve tests for each of the sieve
sieve.Wetthesamplethoroughlywithagentlestreamofwater.
sizes used. Select standard samples at a level of fineness in the
Remove the sieve from under the nozzle and adjust the
same range as that used in routine work. After the selected
pressure on the spray nozzle to 69 6 4 kPa (10 6 0.5 psi).
material is reserved, uniformly mix the gross sample by
Return the sieve to its position under the nozzle and wash for
placing it on a sheet of rubber, oil cloth, or heavy wrapping
1 ⁄2 min, moving the sieve in the spray with a circular motion
paper, depending on the sample size, and raising first one
in a horizontal plane at the rate of one motion per second.
corner of the sheet and then the other so as to roll the sample
Every portion of the screen should be sprayed during each
overandoveratleast100times.Temporarilysealtheprepared
circular motion of the sieve. Hold the sieve so that the bottom
standard material in airtight containers during the standardiza-
of the spray nozzle extends 13 mm (0.5 in.) below the top of
tion procedure prior to sealing small portions as standard
thesieveframe.Immediatelyafterremovingthesievefromthe
samples in vials. Using the 203-mm (8-in.) diameter sieves
spr
...


Questions, Comments and Discussion
Ask us and Technical Secretary will try to provide an answer. You can facilitate discussion about the standard in here.