Standard Test Method for Adhesion or Cohesion Strength of Thermal Spray Coatings

SIGNIFICANCE AND USE
This test method is recommended for quality control, acceptance testing; or it may help to develop or qualify a thermal spray operator's equipment and procedure or to aid in developing thermal spray coatings with improved adhesion and integrity.
This test method is useful for comparing adhesion or cohesion strengths of coatings of similar types of thermal spray materials. The test should not be considered to provide an intrinsic value for direct use in making calculations, such as to determine if a coating will withstand specific environmental stresses. Because of residual stresses in thermal spray coatings, actual strength depends upon the shape of the particular coated part. Also, in use, a coating may be stressed in a more complex manner than is practical for a standard test.
SCOPE
1.1 This test method covers the determination of the degree of adhesion (bonding strength) of a coating to a substrate or the cohesion strength of the coating in a tension normal to the surface. The test consists of coating one face of a substrate fixture, bonding this coating to the face of a loading fixture, and subjecting this assembly of coating and fixtures to a tensile load normal to the plane of the coating. It is adapted particularly for testing coatings applied by thermal spray, which is defined to include the combustion flame, plasma arc, two-wire arc, high-velocity oxygen fuel, and detonation processes for spraying feedstock, which may be in the form of, wire, rod, or powder.
Note 1—Thermal spray coating materials include ceramics, such as metal oxides or carbides, and metals. In some cases, a coating is formed of different spray materials, such as an oxide layer sprayed onto a sprayed metal-bonding layer. The substrate generally is a metal, but may be a ceramic, such as an oxide or graphite.
1.2 Usually this test method is performed at ambient temperature. Higher temperature testing is restricted by the need for a suitable adhesive bonding agent. For certain fundamental investigations, it is suggested that very low (cryogenic) temperature be used.
1.3 This test method is limited to testing thermal spray coatings that can be applied in thickness greater than 0.015 in. (0.38 mm). The limitation is imposed because an adhesive bonding agent is used in the test. Those bonding agents established so far for this method tend to penetrate thermal spray coatings and may invalidate results unless the coatings are thick enough to prevent penetration through the coating. Further development may establish that thin layers of certain types of especially dense coatings may be tested satisfactorily. Alternatively, new adhesive bonding agents that would allow reduction of the minimum thickness limitation may become available.
1.4 This standard does not purport to address all of the safety concerns, if any, associated with its use. It is the responsibility of the user of this standard to establish appropriate safety and health limitations prior to use.

General Information

Status
Historical
Publication Date
31-Jul-2008
Current Stage
Ref Project

Relations

Buy Standard

Standard
ASTM C633-01(2008) - Standard Test Method for Adhesion or Cohesion Strength of Thermal Spray Coatings
English language
7 pages
sale 15% off
Preview
sale 15% off
Preview
Standard
REDLINE ASTM C633-01(2008) - Standard Test Method for Adhesion or Cohesion Strength of Thermal Spray Coatings
English language
7 pages
sale 15% off
Preview
sale 15% off
Preview

Standards Content (Sample)


NOTICE: This standard has either been superseded and replaced by a new version or withdrawn.
Contact ASTM International (www.astm.org) for the latest information
Designation: C633 − 01(Reapproved 2008)
Standard Test Method for
Adhesion or Cohesion Strength of Thermal Spray Coatings
This standard is issued under the fixed designation C633; the number immediately following the designation indicates the year of
original adoption or, in the case of revision, the year of last revision.Anumber in parentheses indicates the year of last reapproval.A
superscript epsilon (´) indicates an editorial change since the last revision or reapproval.
This standard has been approved for use by agencies of the Department of Defense.
1. Scope 1.4 This standard does not purport to address all of the
safety concerns, if any, associated with its use. It is the
1.1 This test method covers the determination of the degree
responsibility of the user of this standard to establish appro-
ofadhesion(bondingstrength)ofacoatingtoasubstrateorthe
priate safety and health limitations prior to use.
cohesion strength of the coating in a tension normal to the
surface. The test consists of coating one face of a substrate
2. Referenced Documents
fixture,bondingthiscoatingtothefaceofaloadingfixture,and
2.1 ASTM Standards:
subjecting this assembly of coating and fixtures to a tensile
E4Practices for Force Verification of Testing Machines
load normal to the plane of the coating. It is adapted particu-
larly for testing coatings applied by thermal spray, which is
3. Significance and Use
defined to include the combustion flame, plasma arc, two-wire
3.1 This test method is recommended for quality control,
arc, high-velocity oxygen fuel, and detonation processes for
acceptance testing; or it may help to develop or qualify a
spraying feedstock, which may be in the form of, wire, rod, or
thermal spray operator’s equipment and procedure or to aid in
powder.
developingthermalspraycoatingswithimprovedadhesionand
NOTE 1—Thermal spray coating materials include ceramics, such as
integrity.
metal oxides or carbides, and metals. In some cases, a coating is formed
ofdifferentspraymaterials,suchasanoxidelayersprayedontoasprayed
3.2 This test method is useful for comparing adhesion or
metal-bonding layer. The substrate generally is a metal, but may be a
cohesionstrengthsofcoatingsofsimilartypesofthermalspray
ceramic, such as an oxide or graphite.
materials. The test should not be considered to provide an
1.2 Usually this test method is performed at ambient tem-
intrinsic value for direct use in making calculations, such as to
perature. Higher temperature testing is restricted by the need
determine if a coating will withstand specific environmental
for a suitable adhesive bonding agent. For certain fundamental
stresses.Becauseofresidualstressesinthermalspraycoatings,
investigations, it is suggested that very low (cryogenic) tem-
actualstrengthdependsupontheshapeoftheparticularcoated
perature be used.
part.Also,inuse,acoatingmaybestressedinamorecomplex
manner than is practical for a standard test.
1.3 This test method is limited to testing thermal spray
coatings that can be applied in thickness greater than 0.015 in.
4. Apparatus
(0.38 mm). The limitation is imposed because an adhesive
bonding agent is used in the test. Those bonding agents 4.1 Atension testing machine shall conform to the require-
established so far for this method tend to penetrate thermal ments of Practices E4. The loads used in determining the
adhesionortensilestrengthshallbewithintheloadingrangeof
spray coatings and may invalidate results unless the coatings
are thick enough to prevent penetration through the coating. the testing machine, as defined in Practices E4. Permissible
variation shall be less than 1.0%. It shall be possible to apply
Further development may establish that thin layers of certain
types of especially dense coatings may be tested satisfactorily. increasing tensile load at a constant rate of cross-head travel
Alternatively, new adhesive bonding agents that would allow between 0.030 in./min (0.013 mm/s) and 0.050 in./min (0.021
reduction of the minimum thickness limitation may become mm/s).Themachineshallincludeaload-indicatingdevicethat
available. registers the maximum load applied before rupture occurs.
4.2 Self-aligningdevices,forapplyingthetensileloadtothe
assembly of the coating and fixtures, shall not permit eccentric
ThistestmethodisunderthejurisdictionofASTMCommitteeB08onMetallic
and Inorganic Coatingsand is the direct responsibility of Subcommittee B08.12 on
Materials for Porcelain Enamel and Ceramic-Metal Systems. For referenced ASTM standards, visit the ASTM website, www.astm.org, or
Current edition approved Aug. 1, 2008. Published September 2008. Originally contact ASTM Customer Service at service@astm.org. For Annual Book of ASTM
approved in 1969. Last previous edition approved in 2001 as C633–01. DOI: Standards volume information, refer to the standard’s Document Summary page on
10.1520/C0633-01R08. the ASTM website.
Copyright © ASTM International, 100 Barr Harbor Drive, PO Box C700, West Conshohocken, PA 19428-2959. United States
C633 − 01 (2008)
load or bending moment to the specimen. Self-alignment is 5.1.2 The bonding agent shall be sufficiently viscous not to
often provided by the manufacturer as an integral part of the penetrate through a 0.015-in. (0.38-mm) thickness of the
testingmachine.Analternative,satisfactoryapparatusisshown coating. Certain commercial resins that cure or harden at room
in Fig. 1, which also shows methods of connecting the temperature by means of a curing agent have been proven
self-aligning apparatus to an assembled test specimen. satisfactory. If any other bonding agent is to be used, it shall
first be compared with a proven bonding agent using this test
5. Material method with the desired thermal spray coating.
5.1 Adhesive Bonding Agent—A suitable adhesive bonding
NOTE 2—Thermal spray coatings may have an inherent porosity.
Excessive penetration of the adhesive bonding agent into this porosity
agent shall be agreed between the purchaser and manufacturer
may affect the results determined by this test method. Unless proved
of the coating and shall meet the following requirements.
satisfactory by comparison testing, any agent requiring elevated tempera-
5.1.1 The bonding agent shall be capable of bonding the
ture for curing should be avoided because viscosity may decrease at high
coating to the loading fixture with a tensile strength that is at
temperature, allowing penetration.
least as great as the minimum required adhesion and cohesion
NOTE 3—When liquid epoxy bonding agents are used, there should be
a procedure in place to ensure relatively consistent thickness on every
strength of the coating.
sample.
5.1.3 The adhesion strength of the bonding agent shall be
determined each time this test method is performed. This shall
be done by using the bonding agent to attach a loading fixture
Alistofsatisfactorybondingagentsisprovidedintheannexwhichfollowsthis
standard.
Metric Equivalents
3 1 3 1 7 1 1
in. ⁄16 ⁄4 ⁄4 11 ⁄8 1 ⁄16 1 ⁄2 2 ⁄2
(mm) (4.8) (6.4) (19) (25.4) (29) (37) (38) (64)
FIG. 1 Self-Aligning Device
C633 − 01 (2008)
to a second loading fixture, in accordance with 6.5, except that mm). The diameters of the two fixtures shall be the same and
the coated substrate fixture of 6.5 is replaced with the second shall be measured so that the error is no greater than 0.5%.
loading fixture.
NOTE 5—In Appendix X1, an alternative substrate and fixture arrange-
NOTE4—Onereasonfortestingthebondingagenteachtimeistodetect ment is provided that has proved cost effective and simple.
improper preparation of the agent if it is a two-part mix. Another reason
6.1.1 Material for Substrate Fixture— The substrate fixture
isthatadhesionstrengthgenerallydecreaseswithageoftheunusedagent.
If strength is lower than required, more adhesive bonding agent shall be shallbeconstructedofmetal,preferablymetalintendedforuse
prepared and tested, or the agent shall be discarded and replaced.
as the substrate for the coating. If no such substrate material is
specified,thesubstratefixtureshallbeSAE1018or1020steel.
6. Test Specimens
NOTE 6—If desired because of cost or ease of fabrication, it may be
6.1 Substrate and Loading Fixtures— Each test specimen is
suitable to attach or bond a layer of the specified substrate material to a
an assembly comprising a substrate fixture, to which the
fixture formed of any convenient metal. Such a layer of substrate material
coating is applied, and a loading fixture. The substrate and
need not be metal. The layer must be substantially thicker than the
possible depth of effects on the substrate, such as recrystallization or
loadingfixturesshalleachbecircular,solidcylindersofnoless
diffusionzones,thatmayresultfromapplyingthecoating.Alayergreater
than 1.5 in. in length, or as agreed upon by the manufacturer
than 0.1 in. (2.5 mm) thick should be sufficient.
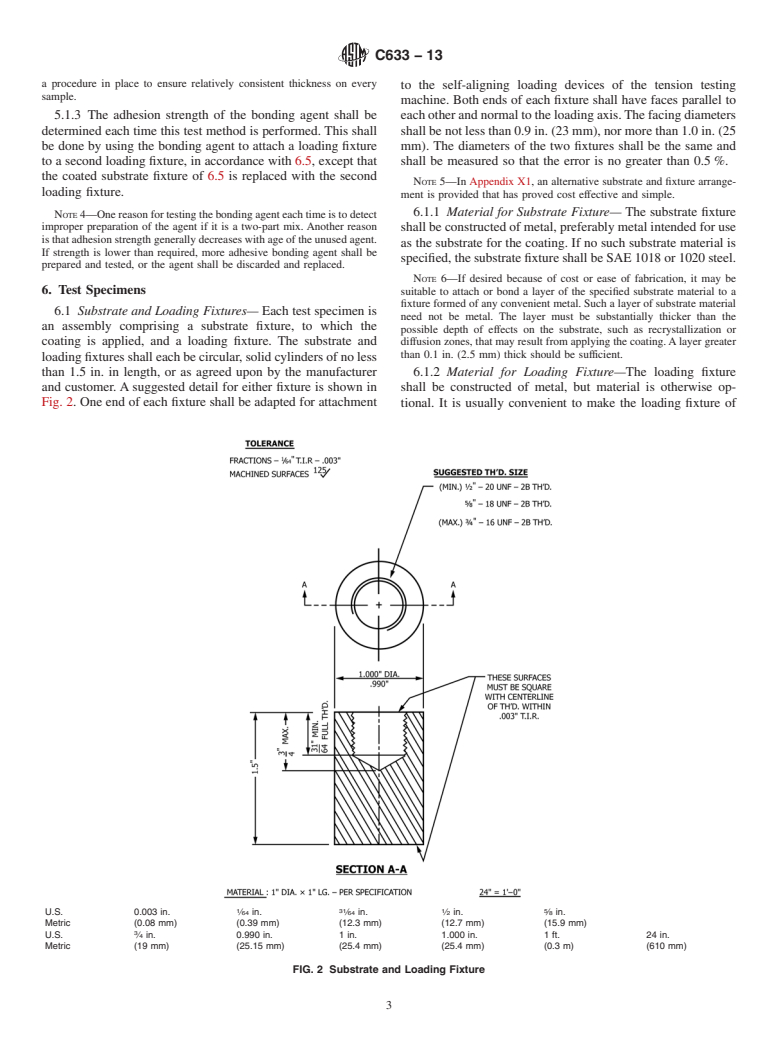
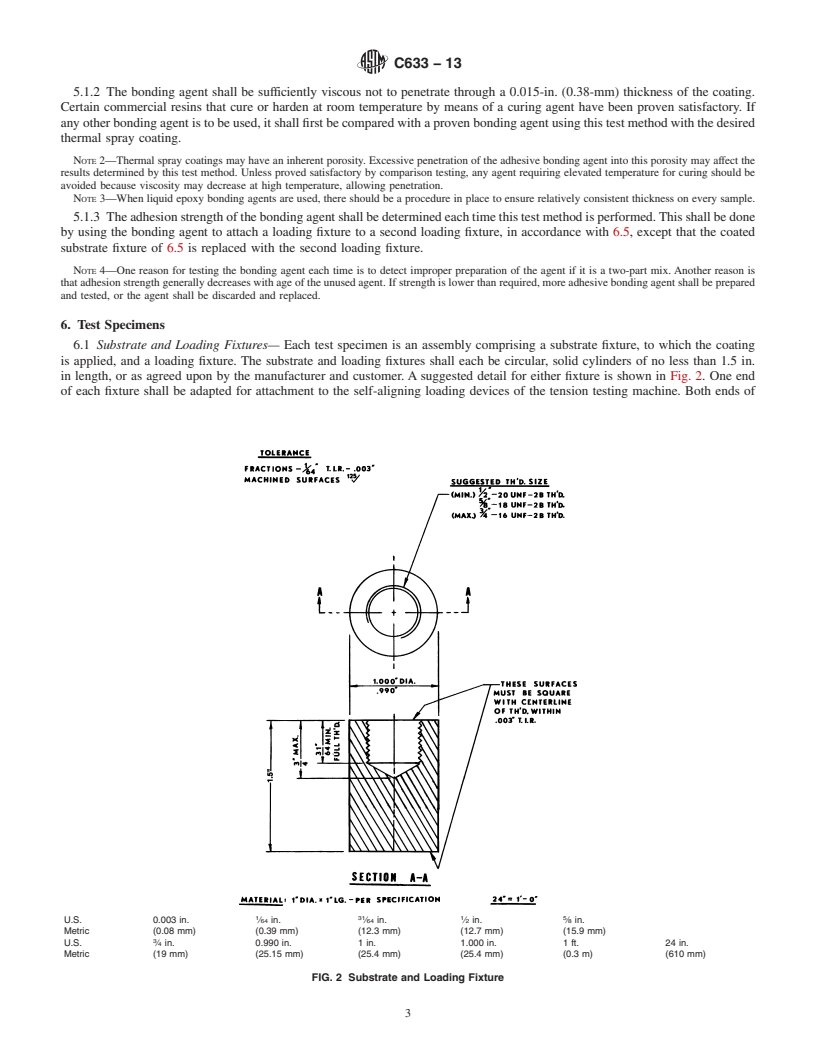
and customer.Asuggested detail for either fixture is shown in
6.1.2 Material for Loading Fixture—The loading fixture
Fig. 2. One end of each fixture shall be adapted for attachment
to the self-aligning loading devices of the tension testing shall be constructed of metal, but material is otherwise op-
machine. Both ends of each fixture shall have faces parallel to tional. It is usually convenient to make the loading fixture of
eachotherandnormaltotheloadingaxis.Thefacingdiameters thesamematerialasthesubstratefixture;thus,thefixturesmay
shallbenotlessthan0.9in.(23mm),normorethan1.0in.(25 be interchangeable until a coating is applied to one.
1 31 1 5
U.S. 0.003 in. ⁄64 in. ⁄64 in. ⁄2 in. ⁄8 in.
Metric (0.08 mm) (0.39 mm) (12.3 mm) (12.7 mm) (15.9 mm)
U.S. ⁄4 in. 0.990 in. 1 in. 1.000 in. 1 ft. 24 in.
Metric (19 mm) (25.15 mm) (25.4 mm) (25.4 mm) (0.3 m) (610 mm)
FIG. 2 Substrate and Loading Fixture
C633 − 01 (2008)
6.2 Coating Application—The front facing of the substrate 7. Procedure
fixture shall be prepared in the manner required by the
7.1 Prepare the chosen number of substrate fixtures, and
specification for the coating. (Roughening by grit blasting or
apply a thermal spray coating to each. Finish the coating
surface grinding may be typical preparations.) The coating
surface if required.
shall be thermal sprayed onto this prepared surface.
7.2 Prepare the adhesive bonding agent. Attach cleaned
6.3 CoatingThickness—Thecoatingthicknessshallbemea-
loadingfixturestoallthecoatedsubstratefixturesatessentially
sured with a micrometer by measuring the total length of the
thesametime.Inaddition,prepareonesetofuncoatedfixtures
coating fixture before and after the coating is applied. (Care
formeasurementoftheadhesionstrengthofthebondingagent.
must be taken to avoid cont
...


This document is not anASTM standard and is intended only to provide the user of anASTM standard an indication of what changes have been made to the previous version. Because
it may not be technically possible to adequately depict all changes accurately, ASTM recommends that users consult prior editions as appropriate. In all cases only the current version
of the standard as published by ASTM is to be considered the official document.
Designation:C633–79 (Reapproved 1999) Designation: C 633 – 01 (Reapproved 2008)
Standard Test Method for
Adhesion or Cohesive Strength of Flame-Sprayed
CoatingsAdhesion or Cohesion Strength of Thermal Spray
Coatings
This standard is issued under the fixed designation C 633; the number immediately following the designation indicates the year of
original adoption or, in the case of revision, the year of last revision. A number in parentheses indicates the year of last reapproval. A
superscript epsilon (´) indicates an editorial change since the last revision or reapproval.
This standard has been approved for use by agencies of the Department of Defense.
1. Scope
1.1 This test method covers the determination of the degree of adhesion (bonding strength) of a coating to a substrate, or the
cohesivecohesion strength of the coating in a tension normal to the surface. The test consists of coating one face of a substrate
fixture, bonding this coating to the face of a loading fixture, and subjecting this assembly of coating and fixtures to a tensile load
normal to the plane of the coating. It is particularly adapted particularly for testing coatings applied by flame spraying,thermal
spray, which is defined to include the combustion flame, plasma flame, arc gun, arc, two-wire arc, high-velocity oxygen fuel, and
detonation processes for spraying feedstock, which may be in the form of, wire, rod, or powder.
NOTE1—Flame-sprayed 1—Thermal spray coating materials include ceramics, such as metal oxides or carbides, and metals. In some cases, a coating
is formed of several layers of different flame-sprayedspray materials, such as an oxide layer sprayed onto a sprayed metal-bonding layer. The substrate
is generally is a metal, but may be a ceramic, such as an oxide or graphite.
1.2 Usually this test method is performed at ambient temperature. Higher temperature testing is restricted by the need for a
suitable adhesive bonding agent. For certain fundamental investigations, it is suggested that very low (cryogenic) temperature be
used.
1.3 This test method is limited to testing flame-sprayed thermal spray coatings that can be applied in thickness greater than
0.015 in. (0.38 mm). The limitation is imposed because an adhesive bonding agent is used in the test. Those bonding agents
established so far for this method tend to penetrate flame-sprayed thermal spray coatings and may invalidate results unless the
coatings are thick enough to prevent penetration through the coating. Further development may establish that thin layers of certain
types of especially dense coatings may be tested satisfactorily. Alternatively, new adhesive bonding agents that would allow
reduction of the minimum thickness limitation may be discovered or developed. become available.
1.4 This standard does not purport to address all of the safety concerns, if any, associated with its use. It is the responsibility
of the user of this standard to establish appropriate safety and health limitations prior to use.
2. Referenced Documents
2.1 ASTM Standards:
E 4 Practices for Force Verification of Testing Machines
3. Significance and Use
3.1 This test method is recommended for quality- control, acceptance testing; or it may help to develop or qualify a flame-spray
thermal spray operator’s equipment and procedure or to aid in developing flame-sprayed thermal spray coatings with improved
adhesion and integrity.
3.2 This test method is useful for comparing adhesion or cohesivecohesion strengths of coatings of similar types of
flame-sprayed thermal spray materials. The test should not be considered to provide an intrinsic value for direct use in making
calculations, such as to determine if a coating will withstand specific environmental stresses. Because of residual stresses in
flame-sprayed thermal spray coatings, actual strength is dependent depends upon the shape of the particular coated part. Also, in
This test method is under the jurisdiction of ASTM Committee B-8B08 on Metallic and Inorganic Coatings and is the direct responsibility of Subcommittee
B08.13B08.12 on Test Methods Materials for Porcelain Enamel and Ceramic-Metal Systems.
CurrenteditionapprovedDec.28,1979.Aug.1,2008.PublishedFebruary1980.September2008.OriginallypublishedasC633–69.approvedin1969.Lastpreviousedition
C633–69 (1974).approved in 2001 as C 633 – 01.
For referencedASTM standards, visit theASTM website, www.astm.org, or contactASTM Customer Service at service@astm.org. ForAnnualBookofASTMStandards
, Vol 03.01.volume information, refer to the standard’s Document Summary page on the ASTM website.
Copyright © ASTM International, 100 Barr Harbor Drive, PO Box C700, West Conshohocken, PA 19428-2959, United States.
C 633 – 01 (2008)
actual use use, a coating is may be stressed in a much more complicatedcomplex manner than is practical for a standardized-
standard test.
4. Apparatus
4.1 A tension testing machine shall conform to the requirements of Practices E 4. The loads used in determining the
adherenceadhesion or tensile strength shall be within the loading range of the testing machine, as defined in Practices E 4.
Permissible variation shall be less than 1.0 %. It shall be possible to apply increasing tensile load at a constant rate of cross-head
travel between 0.030 in./min (0.013 mm/s) and 0.050 in./min (0.021 mm/s). The machine shall include a load-indicating device
that registers the maximum load applied before rupture occurs.
4.2 Self-aligningdevices,forapplyingthetensileloadtotheassemblyofthecoatingandfixtures,shallnotpermiteccentricload
or bending moment to the specimen. Self-alignment is often provided by the manufacturer as an integral part of the testing
machine. An alternative, satisfactory apparatus is shown in Fig. 1, which also shows a methodmethods of connecting the
self-aligning apparatus to an assembled test specimen.
5. Material
5.1 Adhesive Bonding Agent—A suitable adhesive bonding agent shall be agreed between the purchaser and manufacturer of
the coating and shall meet the following requirements.
A list of satisfactory bonding agents is provided in the annex which follows this standard.
Metric Equivalents
3 1 3 1 7 1 1
in. ⁄16 ⁄4 ⁄4 1 1 ⁄8 1 ⁄16 1 ⁄2 2 ⁄2
(mm) (4.8) (6.4) (19) (25.4) (29) (37) (38) (64)
FIG. 1 Self-Aligning Device
C 633 – 01 (2008)
5.1.1 The bonding agent shall be capable of bonding the coating to the loading fixture with a tensile strength that is at least as
great as the minimum required adhesion and cohesivecohesion strength of the coating.
5.1.2 The bonding agent shall be sufficiently viscous not to penetrate through a 0.015-in. (0.38-mm) thickness of the coating.
Certain commercial resins that cure or harden at room temperature by means of a curing agent have been proven satisfactory. If
anyotherbondingagentistobeused,itshallfirstbecomparedwithaprovenbondingagentusingthistestmethodwiththedesired
flame-sprayedthermal spray coating.
NOTE2—Flame-sprayed 2—Thermal spray coatings generallymay have an inherent porosity. Excessive penetration of the adhesive bonding agent into
this porosity may affect the results determined by this test method. Unless proved satisfactory by comparison testing, any agent requiring elevated
temperature for curing should be avoided because viscosity may decrease at high temperature, allowing penetration.
NOTE 3—When liquid epoxy bonding agents are used, there should be a procedure in place to ensure relatively consistent thickness on every sample.
5.1.3 Theadhesionstrengthofthebondingagentshallbedeterminedeachtimethistestmethodisperformed.Thisshallbedone
by using the bonding agent to attach a loading fixture to a second loading fixture, in accordance with 6.5, except that the coated
substrate fixture of 6.5 is replaced with the second loading fixture.
NOTE3—One 4—Onereasonfortestingthebondingagenteachtimeistodetectimproperpreparationoftheagentifitisatwo-partmix.Anotherreason
is that adhesiveadhesion strength generally decreases with age of the unused agent. If strength is lower than required, more adhesive bonding agent shall
be prepared and tested, or the agent shall be discarded and replaced.
6. Test Specimens
6.1 Substrate and Loading Fixtures— Each test specimen is an assembly comprising a substrate fixture, to which the coating
is applied, and a loading fixture. The substrate and loading fixtures shall each be circular, solid cylinders of a length not
substantially less than no less than 1.5 in. in length, or as agreed upon by the diameter.manufacturer and customer. A suggested
detail for either fixture is shown in Fig. 2. One end of each fixture shall be adapted for attachingattachment to the self-aligning
1 31 1 5
U.S. 0.003 in. ⁄64 in. ⁄64 in. ⁄2 in. ⁄8 in.
Metric (0.08 mm) (0.39 mm) (12.3 mm) (12.7 mm) (15.9 mm)
U.S. ⁄4 in. 0.990 in. 1in. 1.000 in. 1 ft. 24 in.
Metric (19 mm) (25.15 mm) (25.4 mm) (25.4 mm) (0.3 m) (610 mm)
FIG. 2 Substrate and Loading Fixture
C 633 – 01 (2008)
loading devices of the tension testing machine. Both ends of each fixture shall have facingsfaces parallel to each other and normal
to the loading axis. The facing diameters shall be not less than 0.9 in. (23 mm), nor more than 1.0 in. (25 mm). The diameters of
the two fixtures shall be the same and shall be measured so that there the error is not a no greater than 0.5 %.
NOTE 5—In Appendix X1, an alternative substrate and fixture arrangement is provided that has proved cost effective and simple.
6.1.1 Material for Substrate Fixture— The substrate fixture shall be constructed of metal, preferably metal intended for use as
the substrate for the coating. If no such substrate material is specified, the substrate fixture shall be SAE 1018 or 1020 steel.
NOTE4—If 6—Ifdesiredbecauseofcostoreaseoffabrication,itmaybesuitabletoattachorbondalayerofthespecifiedsubstratematerialtoafixture
formed of any convenient metal. Such a layer of substrate material need not be metal. The layer must be substantially thicker than the possible depth of
effects on the substrate, such as recrystallization or diffusion zones, that may result from applying the coating; acoating.Alayer greater than 0.1 in. (2.5
mm) thick should be sufficient.
6.1.2 Material for Loading Fixture—The loading fixture shall be constructed of metal, but material is otherwise optional. It is
usually convenient to make the loading fixture of the same material as the substrate fixture; thus, the fixtures may be
interchangeable until a coating is applied to one.
6.2 CoatingApplication—The front facing of the substrate fixture shall be prepared in the manner required by the specification
for the coating. (Roughening by grit blasting or surface grinding may be typical preparations.) The coating shall be flame-sprayed
thermal sprayed onto this prepared surface.
6.3 CoatingThickness—Thecoatingthicknessshallbemeasuredwithamicrometer,bymeasuringthetotallengthofthecoating
fixture before and after the coating is applied. (Care must be taken to avoid contaminating the prepared surface prior to before
coating.) The final coating thickness shall be more than 0.015 in. (0.38 mm). If the coating is to be ground or machined, the
as-sprayedcoatingshallbeapproximately0.005in.(0.13mm)thickertoallowforremovalofmaterial.Thecoatingthicknessshall
not vary across the surface by more than 0.001 in. (0.025 mm). (This thickness variation, as measured from the rarerear face, does
not refer to the ordinary surface texture or roughness typical of flame-sprayed thermal spray coatings.) If, upon completion of the
flamethermal spraying, the coating thickness varies in excess of this limit, this shall be corrected by removing the coating and
respraying, or by grinding or machining the coating surface.
6.4 Grinding or Machining the Coating Surface—The surface of the coating may be finished by grinding or machining when
the thickness variation is excessive as defined in 6.3. excessive. If the thickness variation is not excessive, it shall be optional to
finish the surface of the coating as a useful and convenient aid in holding the fixtures together parallel and aligned as required for
the next step, 6.5. step. No specific grinding or machining procedure can be recommended, as this depends on the type of coating
material.Usuallymanufacturersofthecoatingshaverecommendationspublishedoravailable.Onlyaroughgrindingormachining
step is needed, in order to provide a final coating thickness that does not vary by more than 0.001 in. (0.025 mm). Removal rate
shall be insufficient to damage the coating or bond. A recommended method is to use a surface grinder with a magnetic chuck,
positioning the rear face of the coated fixture on this magnetic chuck. No other treatment, such as grit blasting, shall be done to
the surface of the coating.
6.5 AttachmentofFixtures—Thefacingoftheloadingfixtureshallbefreeofoil,grease,orgrindingorcuttingfluids.Thefacing
shall be mechanically cleaned by such means as machining, grinding, light grit blasting, or rubbing with emory cloth. This facing
shall be attached to the surface of the coating, using the adhesive bonding agent according to its manufacturer’s instructions.
Excessive adhesive shall be wiped from the assembly with soft paper or cloth. The two fixtures shall be held together parallel and
aligned until the bonding agent is cured or hardened.Asuitable holding device such as a “V-block” shall be used for the purpose,
except such a device is not necessary if the surface of the coating has been ground or machined smooth.
6.6 Number of Test Specimens—The number of test specimens chosen depends upon the purpose of the particular tests under
consideration. However, if specimens are to be used for acceptance tests, not less than five specimens of a type shall be tested.
7. Procedure
7.1 Preparethechosennumberofsubstratefixtures,andapplyaflame-sprayedthermalspraycoatingtoeach.Finishthecoating
surface if required.
7.2 Preparetheadhesivebondingagent.Attachcleanedloadingfixturestoallthecoatedsubstratefixturesatessentiallythesame
time. In addition, prepare one uncoated test specimen set of uncoated fixtures for measurement of the adhesion strength of the
bonding agent.
7.3 Apply a tensile load to each test specimen at a constant rate of cross-head travel between 0.030 in./min (0.013 mm/s) and
0.050 in./min (0.021 mm/s) until rupture occurs. Record the maximum load applied.
NOTE 7—Loading fixtures may be gravity or pressure devices. The design of the loading fixtures sho
...

Questions, Comments and Discussion

Ask us and Technical Secretary will try to provide an answer. You can facilitate discussion about the standard in here.