ASTM E1502-10
(Guide)Standard Guide for Use of Fixed-Point Cells for Reference Temperatures
Standard Guide for Use of Fixed-Point Cells for Reference Temperatures
SIGNIFICANCE AND USE
A pure material has a well-defined phase transition behavior, and the phase transition plateau, a characteristic of the material, can serve as a reproducible reference temperature for the calibration of thermometers. The melting or freezing points of some highly purified metals have been designated as defining fixed points on ITS-90. The fixed points of other materials have been determined carefully enough that they can serve as secondary reference points (see Table 1 and Table 2). This guide presents information on the phase transition process as it relates to establishing a reference temperature.
Fixed-point cells provide users with a means of realizing melting and freezing points. If the cells are appropriately designed and constructed, if they contain material of adequate purity, and if they are properly used, they can establish reference temperatures with uncertainties of a few millikelvins or less. This guide describes some of the design and use considerations.
Fixed-point cells can be constructed and operated less stringently than required for millikelvin uncertainty, yet still provide reliable, durable, easy-to-use fixed points for a variety of industrial calibration and heat treatment purposes. For example, any freezing-point cell can be operated, often advantageously, as a melting-point cell. Such use may result in reduced accuracy, but under special conditions, the accuracy may be commensurate with that of freezing points (see 6.3.10).
The test procedure described in this guide produces qualification test data as an essential part of the procedure. These data furnish the basis for quality control of the fixed-point procedure. They provide for evaluation of results, assure continuing reliability of the method, and yield insight into the cause of test result discrepancies. The test procedure is applicable to the most demanding uses of fixed-point cells for precise thermometer calibration; it may not be appropriate or cost-effective for all applicatio...
SCOPE
1.1 This guide describes the essential features of fixed-point cells and auxiliary apparatus, and the techniques required to realize fixed points in the temperature range from 29 to 1085°C.
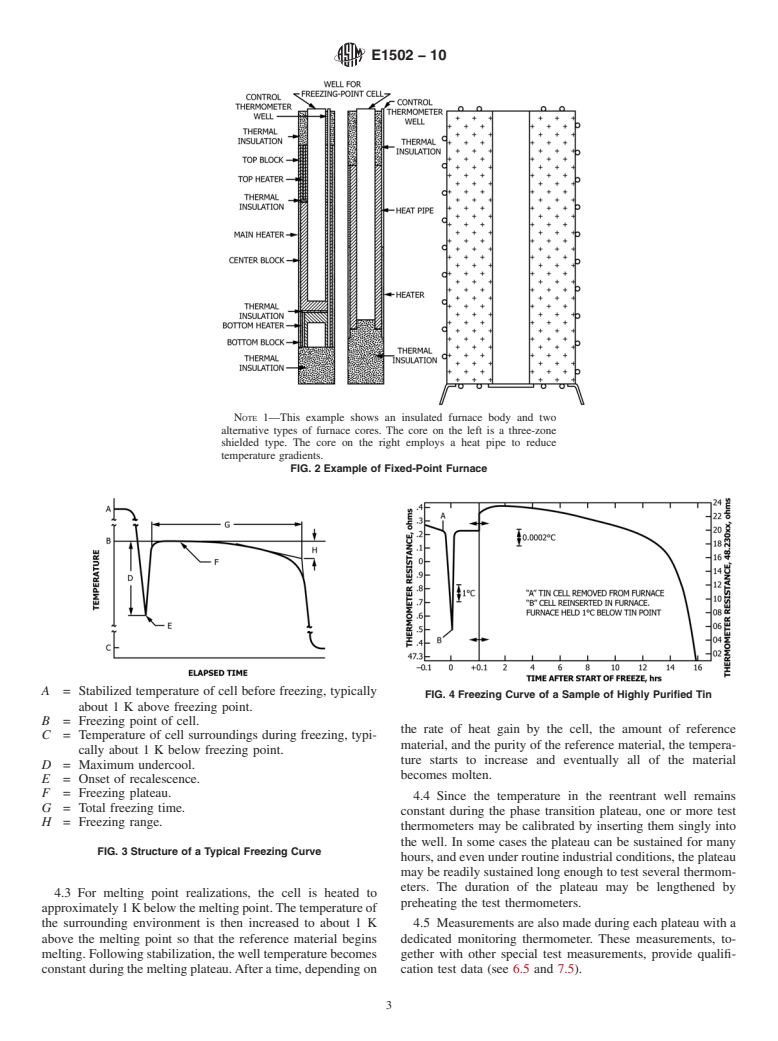
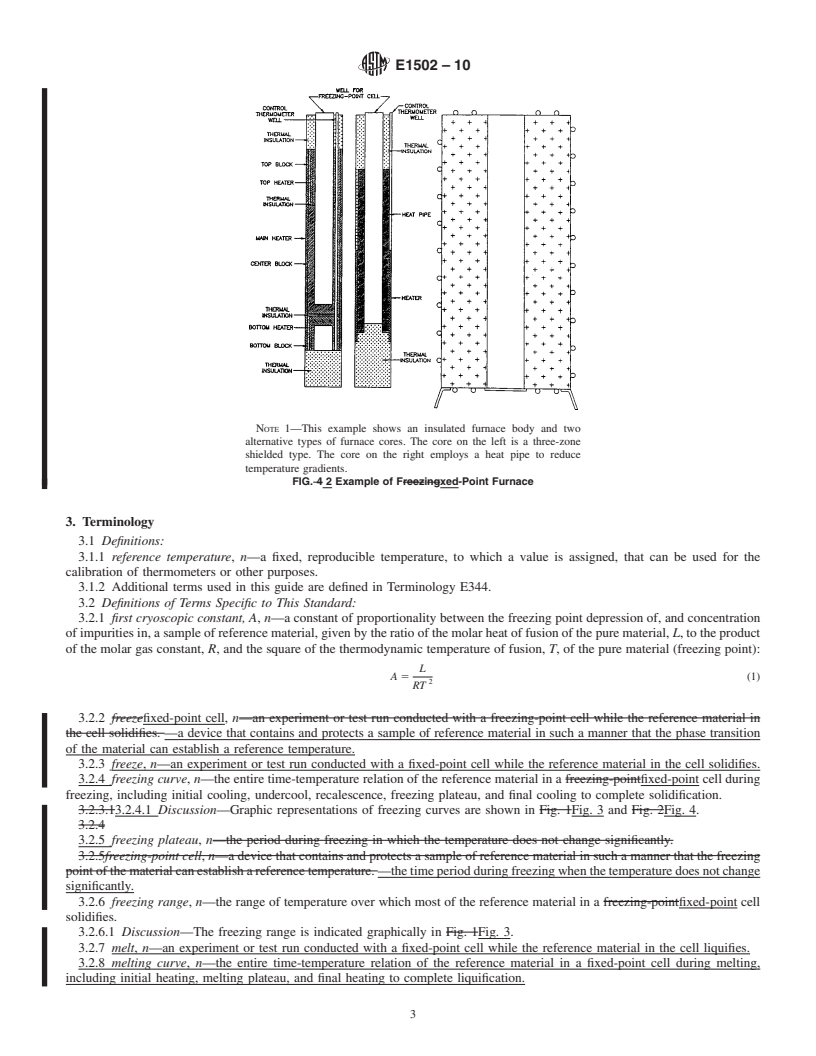
1.2 Design and construction requirements of fixed-point cells are not addressed in this guide. Typical examples are given in Fig. 1 and Fig. 2.
1.3 This guide is intended to describe good practice and establish uniform procedures for the realization of fixed points.
1.4 This guide emphasizes principles. The emphasis on principles is intended to aid the user in evaluating cells, in improving technique for using cells, and in establishing procedures for specific applications.
1.5 For the purposes of this guide, the use of fixed-point cells for the accurate calibration of thermometers is restricted to immersion-type thermometers that, when inserted into the reentrant well of the cell, (1) indicate the temperature only of the isothermal region of the well, and (2) do not significantly alter the temperature of the isothermal region of the well by heat transfer.
1.6 This guide does not address all of the details of thermometer calibration.
1.7 This guide is intended to complement special operating instructions supplied by manufacturers of fixed-point apparatus.
1.8 The values stated in SI units are to be regarded as standard. No other units of measurement are included in this standard.
1.9 The following hazard caveat pertains only to the test method portion, Section 7, of this guide. This standard does not purport to address all of the safety concerns, if any, associated with its use. It is the responsibility of the user of this standard to establish appropriate safety and health practices and determine the applicability of regulatory limitations prior to use.
General Information
Relations
Buy Standard
Standards Content (Sample)
NOTICE: This standard has either been superseded and replaced by a new version or withdrawn.
Contact ASTM International (www.astm.org) for the latest information
Designation: E1502 − 10
StandardGuide for
1
Use of Fixed-Point Cells for Reference Temperatures
This standard is issued under the fixed designation E1502; the number immediately following the designation indicates the year of
original adoption or, in the case of revision, the year of last revision. A number in parentheses indicates the year of last reapproval. A
superscript epsilon (´) indicates an editorial change since the last revision or reapproval.
INTRODUCTION
Duringmeltingandfreezing,purematerialtransformsfromthesolidstatetotheliquidstateorfrom
the liquid state to the solid state at a constant temperature. That constant temperature is referred to as
a fixed point. Fixed points approached in the melting direction are referred to as melting points and
fixed points approached in the freezing direction are referred to as freezing points. Fixed points of
highly purified materials can serve as reference temperatures, and in fact, the International
2
Temperature Scale of 1990 (ITS-90) relies on the melting and freezing points of some highly purified
metals as defining fixed points. Fixed points can be realized in commercially available systems
incorporating fixed-point cells. When the cells are properly made and used, they establish useful
reference temperatures for the calibration of thermometers and for other industrial and laboratory
3
purposes; with care, these fixed points can be realized with an uncertainty of a few millikelvins or
less.
1. Scope the isothermal region of the well, and (2) do not significantly
alter the temperature of the isothermal region of the well by
1.1 This guide describes the essential features of fixed-point
heat transfer.
cells and auxiliary apparatus, and the techniques required to
realize fixed points in the temperature range from 29 to 1.6 This guide does not address all of the details of
3
1085°C. thermometer calibration.
1.2 Design and construction requirements of fixed-point 1.7 This guide is intended to complement special operating
cells are not addressed in this guide. Typical examples are instructions supplied by manufacturers of fixed-point appara-
given in Fig. 1 and Fig. 2. tus.
1.3 This guide is intended to describe good practice and 1.8 The values stated in SI units are to be regarded as
establish uniform procedures for the realization of fixed points. standard. No other units of measurement are included in this
standard.
1.4 This guide emphasizes principles. The emphasis on
1.9 The following hazard caveat pertains only to the test
principles is intended to aid the user in evaluating cells, in
methodportion,Section7,ofthisguide.Thisstandarddoesnot
improving technique for using cells, and in establishing pro-
purport to address all of the safety concerns, if any, associated
cedures for specific applications.
with its use. It is the responsibility of the user of this standard
1.5 For the purposes of this guide, the use of fixed-point
to establish appropriate safety and health practices and
cells for the accurate calibration of thermometers is restricted
determine the applicability of regulatory limitations prior to
to immersion-type thermometers that, when inserted into the
use.
reentrant well of the cell, (1) indicate the temperature only of
2. Referenced Documents
4
1
This guide is under the jurisdiction of ASTM Committee E20 on Temperature
2.1 ASTM Standards:
Measurement and is the direct responsibility of Subcommittee E20.07 on Funda-
E344 Terminology Relating to Thermometry and Hydrom-
mentals in Thermometry.
etry
Current edition approved Nov. 1, 2010. Published January 2011. Originally
approved in 1992. Last previous edition approved in 2003 as E1502 – 98R03E01.
DOI: 10.1520/E1502-10.
2
Preston-Thomas, H., “The International Temperature Scale of 1990 (ITS-90),”
4
Metrologia, Vol 27, No. 1, 1990, pp. 3–10. For errata see ibid, Vol 27, No. 2, 1990, For referenced ASTM standards, visit the ASTM website, www.astm.org, or
p. 107. contact ASTM Customer Service at service@astm.org. For Annual Book of ASTM
3
In this guide, temperature intervals are expressed in kelvins (K) and millikel- Standards volume information, refer to the standard’s Document Summary page on
vins (mK). Values of temperature are expressed in degrees Celsius (°C), ITS-90. the ASTM website.
Copyright © ASTM International, 100 Barr Harbor Drive, PO Box C700, West Conshohocken, PA 19428-2959. United States
1
---------------------- Page: 1 ----------------------
E1502 − 10
including initial cooling, undercool, recalescence, freezing
plateau, and final cooling to complete solidification.
3.2.4.1 Discussion—Graphic representations of freezing
curves are shown in Fig. 3 and Fig. 4.
3.2.5 freezing plateau, n—the time period during freezing
when the temperature does not change significantly.
3.2.6 freezing range, n—the range of temperature over
which most of th
...
This document is not an ASTM standard and is intended only to provide the user of an ASTM standard an indication of what changes have been made to the previous version. Because
it may not be technically possible to adequately depict all changes accurately, ASTM recommends that users consult prior editions as appropriate. In all cases only the current version
of the standard as published by ASTM is to be considered the official document.
´1
Designation:E1502–98(Reapproved 2003) Designation: E1502 – 10
Standard Guide for
Use of Freezing-PointFixed-Point Cells for Reference
1
Temperatures
This standard is issued under the fixed designation E1502; the number immediately following the designation indicates the year of
original adoption or, in the case of revision, the year of last revision. A number in parentheses indicates the year of last reapproval. A
superscript epsilon (´) indicates an editorial change since the last revision or reapproval.
1
´ NOTE—Updated caution note in Section 7.2.2 in November 2003.
INTRODUCTION
During freezing, pure material transforms from the liquid state to the solid state at a constant
temperature known as the freezing point. The freezing points of highly purified materials can serve as
reference temperatures, and in fact, the International Temperature Scale of 1990 (ITS-90)
During melting and freezing, pure material transforms from the solid state to the liquid state or from
the liquid state to the solid state at a constant temperature. That constant temperature is referred to as
a fixed point. Fixed points approached in the melting direction are referred to as melting points and
fixed points approached in the freezing direction are referred to as freezing points. Fixed points of
highly purified materials can serve as reference temperatures, and in fact, the International
2
Temperature Scale of 1990 (ITS-90) relies on the melting and freezing points of some highly purified
metals as defining fixed points. FreezingFixed points can be realized in commercially available
systemsincorporatingfreezing-pointfixed-pointcells.Whenthecellsareproperlymadeandused,they
establish useful reference temperatures for the calibration of thermometers and for other industrial and
laboratory purposes; with care, the freezingthese fixed points of highly purified materials can be
3
realized with an uncertainty of a few millikelvins or less.
1. Scope
1.1 This guide describes the essential features of freezing-pointfixed-point cells and auxiliary apparatus, and the techniques
3
required to realize freezingfixed points in the temperature range from 29 to 1085°C.
1.2Detailed design 1.2 Design and construction requirements of fixed-point cells are not addressed in this guide. Typical
examples are given in Fig. 1 and Fig. 2.
1.3 This guide is intended to describe good practice and establish uniform procedures for the realization of freezingfixed points.
1.4 This guide emphasizes principles. The emphasis on principles is intended to aid the user in evaluating cells, in improving
technique for using cells, and in establishing procedures for specific applications.
1.5 For the purposes of this guide, the use of freezing-pointfixed-point cells for the accurate calibration of thermometers is
restricted to immersion-type thermometers that, when inserted into the reentrant well of the cell, (1) indicate the temperature only
of the isothermal region of the well, and (2) do not significantly alter the temperature of the isothermal region of the well by heat
transfer.
1.6 This guide does not address all of the details of thermometer calibration.
1.7This guide is intended to complement special operating instructions supplied by manufacturers of freezing-point apparatus.
1.8
1.7 This guide is intended to complement special operating instructions supplied by manufacturers of fixed-point apparatus.
1.8 The values stated in SI units are to be regarded as standard. No other units of measurement are included in this standard.
1.9 Thefollowinghazardcaveatpertainsonlytothetestmethodportion,Section7,ofthisguide. This standard does not purport
to address all of the safety concerns, if any, associated with its use. It is the responsibility of the user of this standard to establish
1
This guide is under the jurisdiction of ASTM Committee E20 on Temperature Measurement and is the direct responsibility of Subcommittee E20.07 on Fundamentals
in Thermometry.
Current edition approved Nov. 1, 2003.2010. Published November 2003.January 2011. Originally approved in 1992. Last previous edition aprpovedapproved in 19982003
as E1502 – 98R03E01. DOI: 10.1520/E1502-98R03E01.10.1520/E1502-10.
2
Preston-Thomas, H., “The International Temperature Scale of 1990 (ITS-90),” Metrologia, Vol 27, No. 1, 1990, pp. 3–10. For errata see ibid, Vol 27, No. 2, 1990, p.
107.
3
In this guide, temperature intervals are expressed in kelvins (K) and millikelvins (mK). Values of temperature are expressed in degrees Celsius (°C), ITS-90.
Copyright © ASTM International, 100 Barr Harbor
...


Questions, Comments and Discussion
Ask us and Technical Secretary will try to provide an answer. You can facilitate discussion about the standard in here.