ASTM B754-89(1999)e1
(Test Method)Standard Test Method for Measuring and Recording the Deviations from Flatness in Copper and Copper Alloy Strip
Standard Test Method for Measuring and Recording the Deviations from Flatness in Copper and Copper Alloy Strip
SCOPE
1.1 This test method covers the measurement of distortions in thin metal strip and the application of these measurements to an equation that will indicate the deviation from flatness.
1.2 The distortions to be measured in this test method are dish, wavy edges, buckle, longitudinal corrugation, and herringbone.
1.3 This test method is not intended to include the measurement of coil set or longitudinal curl, camber or edgewise curvature, or twist.
1.4 This test method is limited to metal strip 0.003 to 0.020 in. (0.08 to 0.50 mm) thick and not more than 6.0 in. (150.0 mm) wide.
1.5 The values stated in inch-pound units are to be regarded as standard. The values given in parentheses are for information only.
1.6 This standard does not purport to address all of the safety concerns, if any, associated with its use. It is the responsibility of the user of this standard to establish appropriate safety and health practices and determine the applicability of regulatory limitations prior to use.
General Information
Relations
Standards Content (Sample)
NOTICE: This standard has either been superseded and replaced by a new version or withdrawn.
Contact ASTM International (www.astm.org) for the latest information
e1
Designation:B754–89(Reapproved1999)
Standard Test Method for
Measuring and Recording the Deviations from Flatness in
Copper and Copper Alloy Strip
This standard is issued under the fixed designation B 754; the number immediately following the designation indicates the year of
original adoption or, in the case of revision, the year of last revision. A number in parentheses indicates the year of last reapproval. A
superscript epsilon (e) indicates an editorial change since the last revision or reapproval.
e NOTE—Editorial changes were made throughout this standard in March 2000.
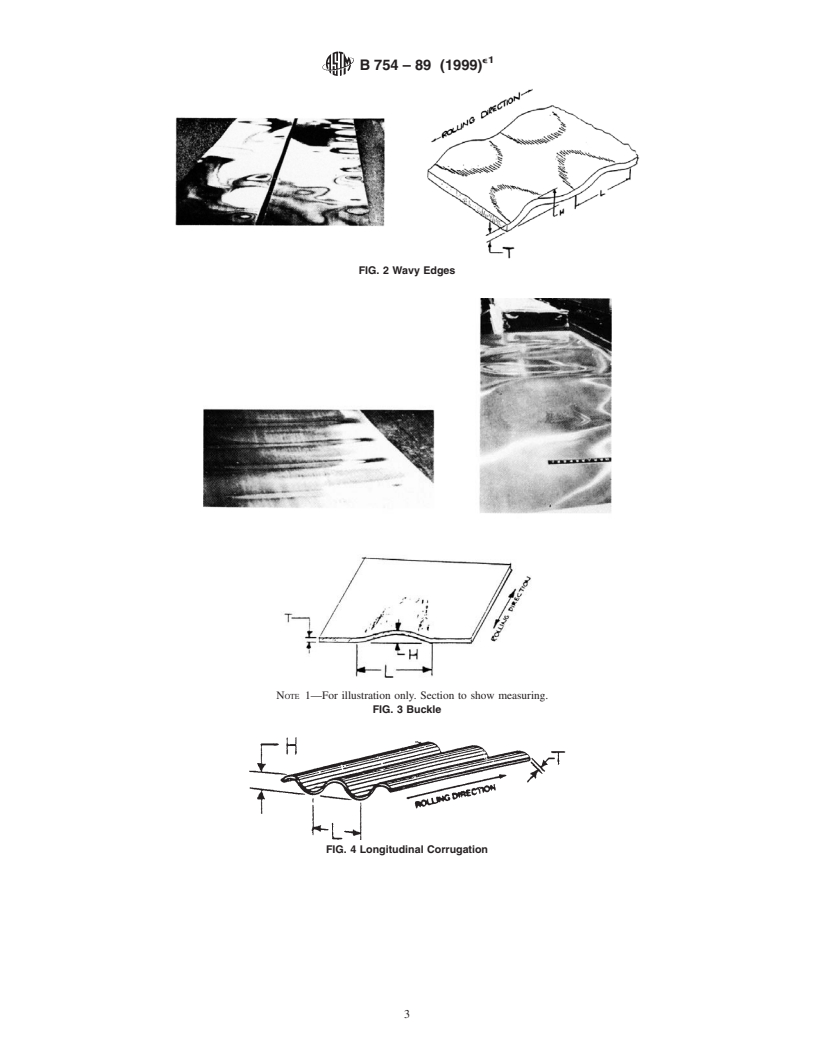
1. Scope * 2.1.5 wavy edges (waves—edge wave)—a continuous pat-
tern of waves or wrinkles along the edges of the strip, with a
1.1 This test method describes a procedure for the measure-
relatively flat center portion.
ment of distortions in thin metal strip and the application of
these measurements to an equation that will indicate the
3. Significance and Use
deviation from flatness.
3.1 This test method is intended for measuring distortion in
1.2 The distortions to be measured in this test method are
strip used for making close tolerance parts. Since distortion in
dish, wavy edges, buckle, longitudinal corrugation, and her-
this strip would influence the shape of the part being produced
ringbone.
and cause difficulties in feeding through close-fitting dies and
1.3 This test method is not intended to include the measure-
other manufacturing equipment, it is important that this mate-
ment of coil set or longitudinal curl, camber or edgewise
rial be flat.
curvature, or twist.
3.2 This test method provides a universal procedure for
1.4 This test method is limited to metal strip 0.003 to 0.020
measuring the irregularities that cause the deviation from
in. (0.08 to 0.50 mm) thick and not more than 6.0 in. (150.0
flatness.
mm) wide.
3.3 This test method allows the purchaser and manufacturer
1.5 The values stated in inch-pound units are the standard.
to inspect strip with a standard technique to a mutually agreed
The values given in parentheses are for information only.
upon and acceptable percentage deviation from flatness.
1.6 This standard does not purport to address all of the
safety concerns, if any, associated with its use. It is the
4. Apparatus
responsibility of the user of this standard to establish appro-
4.1 Surface Plate,tobeusedasareferenceflat.Itmusthave
priate safety and health practices and determine the applica-
a large enough surface area to accommodate the maximum size
bility of regulatory limitations prior to use.
test specimen. It shall be flat within 0.0002 in. (0.005 mm) per
1 in. (25 mm).
2. Terminology
4.2 Micrometer, for measuring metal thickness. It shall be
2.1 Definitions of Terms Specific to This Standard:
graduated in 0.0001-in. (0.0025-mm) increments.
2.1.1 buckle (center bulge or oil can)—alternate bulges and
4.3 Height Gage, for measuring the height of irregularities.
hollows recurring along the length of a strip with the edges
Thearmofthisgagemustbelongenoughtoextendbeyondthe
remaining relatively flat.
center of the widest strip to be measured. It shall be graduated
2.1.2 dish (cross or transverse bow)—the departure from
in 0.001-in. (0.025-mm) increments.
flatness across the full width of the strip in the form of a single
4.4 Steel Rule, for measuring the lengths of the irregulari-
arc, excluding burrs.
ties. It shall be graduated in 0.02-in. (0.50-mm) increments.
2.1.3 herringbone—a series of long continuous waves run-
ning at various angles to the rolling direction.
5. Test Specimens
2.1.4 longitudinal corrugation—a condition similar to dish
5.1 The test specimen shall be the full-finished slit width of
except that the sense of curvature changes sign at least once
the strip and cut long enough so that measurement will not be
across the width of the strip.
influenced by the distortions referred to in 1.3.
5.2 When cutting specimens, caution must be taken to
prevent additional distortion.
This test method is under the jurisdiction ofASTM Committee B05 on Copper
and Copper Alloys and is the direct responsibility of Subcommittee B05.06 on
Methods of Test.
Current edition approved June 30, 1989. Published August 1989. Originally An electronic touch sensitive system, which will
...


Questions, Comments and Discussion
Ask us and Technical Secretary will try to provide an answer. You can facilitate discussion about the standard in here.