ASTM A556/A556M-18
(Specification)Standard Specification for Seamless Cold-Drawn Carbon Steel Feedwater Heater Tubes
Standard Specification for Seamless Cold-Drawn Carbon Steel Feedwater Heater Tubes
ABSTRACT
This specification covers minimum-wall-thickness, seamless cold-drawn carbon steel tubes including bending into the form of U-tubes for use in tubular feedwater heaters. Mechanical tests shall be made on specimens including: tension test; flattening test; flaring test; hardness test; and hydrostatic test. Each tube shall be tested after the finish heat treatment following the final cold-drawn pass by passing through a nondestructive tester capable of detecting defects on the entire cross section of the tube.
SCOPE
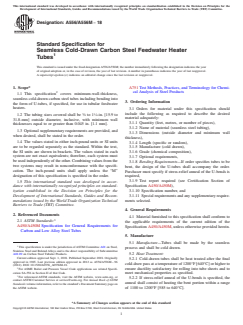
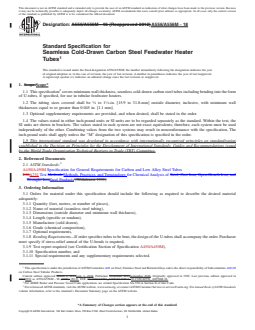
1.1 This specification2 covers minimum-wall-thickness, seamless cold-drawn carbon steel tubes including bending into the form of U-tubes, if specified, for use in tubular feedwater heaters.
1.2 The tubing sizes covered shall be 5/8 to 11/4-in. [15.9 to 31.8-mm] outside diameter, inclusive, with minimum wall thicknesses equal to or greater than 0.045 in. [1.1 mm].
1.3 Optional supplementary requirements are provided, and when desired, shall be stated in the order.
1.4 The values stated in either inch-pound units or SI units are to be regarded separately as the standard. Within the text, the SI units are shown in brackets. The values stated in each system are not exact equivalents; therefore, each system must be used independently of the other. Combining values from the two systems may result in nonconformance with the specification. The inch-pound units shall apply unless the “M” designation of this specification is specified in the order.
1.5 This international standard was developed in accordance with internationally recognized principles on standardization established in the Decision on Principles for the Development of International Standards, Guides and Recommendations issued by the World Trade Organization Technical Barriers to Trade (TBT) Committee.
General Information
- Status
- Published
- Publication Date
- 31-Aug-2018
- Technical Committee
- A01 - Steel, Stainless Steel and Related Alloys
- Drafting Committee
- A01.09 - Carbon Steel Tubular Products
Relations
- Effective Date
- 01-Sep-2018
- Effective Date
- 01-Nov-2023
- Effective Date
- 01-Sep-2018
- Effective Date
- 01-May-2015
- Effective Date
- 01-Mar-2014
- Effective Date
- 01-May-2010
- Effective Date
- 01-Oct-2009
- Effective Date
- 01-Oct-2008
- Effective Date
- 01-Nov-2007
- Effective Date
- 01-Jun-2007
- Effective Date
- 01-Apr-2007
- Effective Date
- 01-May-2006
- Effective Date
- 01-Oct-2004
- Effective Date
- 01-Mar-2004
- Effective Date
- 10-Sep-2003
Overview
ASTM A556/A556M-18 is the standard specification developed by ASTM International for seamless cold-drawn carbon steel tubes, specifically designed for use in tubular feedwater heaters commonly found in power generation and process industries. The standard outlines the requirements for minimum-wall-thickness steel tubing, including those bent into U-tube shapes, ensuring compatibility with demanding thermal and mechanical requirements.
Covering a range of tubing sizes (5/8 to 1 1/4 inches [15.9 to 31.8 mm] outside diameter) and minimum wall thicknesses (≥ 0.045 in. [1.1 mm]), this international standard ensures reliable mechanical properties, chemical composition, dimensional tolerances, and rigorous testing criteria to promote quality and performance in high-pressure feedwater heater applications.
Key Topics
- Material Requirements: Specifies seamless, cold-drawn carbon steel reducing the risk of leaks and enhancing tube integrity in high-pressure environments.
- Tubing Size and Dimension: Defines acceptable outside diameter and minimum wall thickness to ensure precise fit and durability.
- Heat Treatment: Requires final heat treatment at or above 1200°F [640°C] to ensure ductility and compliance with mechanical properties.
- Product Analysis and Mechanical Tests: Mandates product analysis for chemical composition, as well as tension, flattening, flaring, hardness, and hydrostatic tests to verify strength and formability.
- Nondestructive Testing: Each tube is subject to stringent nondestructive testing (including ultrasonic and eddy-current methods) to detect defects on the tube cross-section.
- Workmanship and Appearance: Enforces standards for finish, straightness, coating against corrosion, and the absence of surface imperfections.
- Supplementary Requirements: Offers optional, enhanced nondestructive testing procedures such as commercial-grade ultrasonic or eddy-current tests for further assurance of tube quality.
Applications
ASTM A556/A556M-18 is applied extensively in:
- Power Plant Feedwater Heaters: Essential for heating boiler feedwater through heat exchange processes, improving thermal efficiency and protecting boiler components.
- Steam Generators and Heat Exchangers: Used where heat and pressure cycling demand robust and defect-free tubular components.
- Industrial Process Equipment: Suitable for industries where critical heat transfer and mechanical integrity are required, such as petrochemical or chemical processing facilities.
- Custom Fabrication: Permits bending into precise U-tube configurations crucial for tight installation in compact heater bundles.
Reliable adherence to ASTM A556/A556M-18 ensures longevity, safety, and performance of feedwater heater systems by minimizing tube failures and avoiding costly unplanned shutdowns.
Related Standards
ASTM A556/A556M-18 references and aligns with the following complementary standards:
- ASTM A450/A450M: General requirements for carbon and low alloy steel tubes, covering broader aspects related to product marking, mechanical testing, and manufacturing processes.
- ASTM A751: Test methods and terminology for chemical analysis of steel products.
- ASME SA-556: Equivalent specification under the ASME Boiler & Pressure Vessel Code, Section II, widely used in code-stamped equipment manufacturing.
For professionals in boiler and pressure vessel fields, understanding and implementing ASTM A556/A556M-18 is key to ensuring compliance, safety, and efficient operation of critical heating equipment. This standard is indispensable for manufacturers, engineers, and procurement specialists engaged in the selection, specification, and quality control of carbon steel feedwater heater tubes.
Buy Documents
ASTM A556/A556M-18 - Standard Specification for Seamless Cold-Drawn Carbon Steel Feedwater Heater Tubes
REDLINE ASTM A556/A556M-18 - Standard Specification for Seamless Cold-Drawn Carbon Steel Feedwater Heater Tubes
Get Certified
Connect with accredited certification bodies for this standard

Institut za varilstvo d.o.o. (Welding Institute)
Slovenia's leading welding institute since 1952. ISO 3834, EN 1090, pressure equipment certification, NDT personnel, welder qualification. Only IIW Au
Sponsored listings
Frequently Asked Questions
ASTM A556/A556M-18 is a technical specification published by ASTM International. Its full title is "Standard Specification for Seamless Cold-Drawn Carbon Steel Feedwater Heater Tubes". This standard covers: ABSTRACT This specification covers minimum-wall-thickness, seamless cold-drawn carbon steel tubes including bending into the form of U-tubes for use in tubular feedwater heaters. Mechanical tests shall be made on specimens including: tension test; flattening test; flaring test; hardness test; and hydrostatic test. Each tube shall be tested after the finish heat treatment following the final cold-drawn pass by passing through a nondestructive tester capable of detecting defects on the entire cross section of the tube. SCOPE 1.1 This specification2 covers minimum-wall-thickness, seamless cold-drawn carbon steel tubes including bending into the form of U-tubes, if specified, for use in tubular feedwater heaters. 1.2 The tubing sizes covered shall be 5/8 to 11/4-in. [15.9 to 31.8-mm] outside diameter, inclusive, with minimum wall thicknesses equal to or greater than 0.045 in. [1.1 mm]. 1.3 Optional supplementary requirements are provided, and when desired, shall be stated in the order. 1.4 The values stated in either inch-pound units or SI units are to be regarded separately as the standard. Within the text, the SI units are shown in brackets. The values stated in each system are not exact equivalents; therefore, each system must be used independently of the other. Combining values from the two systems may result in nonconformance with the specification. The inch-pound units shall apply unless the “M” designation of this specification is specified in the order. 1.5 This international standard was developed in accordance with internationally recognized principles on standardization established in the Decision on Principles for the Development of International Standards, Guides and Recommendations issued by the World Trade Organization Technical Barriers to Trade (TBT) Committee.
ABSTRACT This specification covers minimum-wall-thickness, seamless cold-drawn carbon steel tubes including bending into the form of U-tubes for use in tubular feedwater heaters. Mechanical tests shall be made on specimens including: tension test; flattening test; flaring test; hardness test; and hydrostatic test. Each tube shall be tested after the finish heat treatment following the final cold-drawn pass by passing through a nondestructive tester capable of detecting defects on the entire cross section of the tube. SCOPE 1.1 This specification2 covers minimum-wall-thickness, seamless cold-drawn carbon steel tubes including bending into the form of U-tubes, if specified, for use in tubular feedwater heaters. 1.2 The tubing sizes covered shall be 5/8 to 11/4-in. [15.9 to 31.8-mm] outside diameter, inclusive, with minimum wall thicknesses equal to or greater than 0.045 in. [1.1 mm]. 1.3 Optional supplementary requirements are provided, and when desired, shall be stated in the order. 1.4 The values stated in either inch-pound units or SI units are to be regarded separately as the standard. Within the text, the SI units are shown in brackets. The values stated in each system are not exact equivalents; therefore, each system must be used independently of the other. Combining values from the two systems may result in nonconformance with the specification. The inch-pound units shall apply unless the “M” designation of this specification is specified in the order. 1.5 This international standard was developed in accordance with internationally recognized principles on standardization established in the Decision on Principles for the Development of International Standards, Guides and Recommendations issued by the World Trade Organization Technical Barriers to Trade (TBT) Committee.
ASTM A556/A556M-18 is classified under the following ICS (International Classification for Standards) categories: 23.040.10 - Iron and steel pipes. The ICS classification helps identify the subject area and facilitates finding related standards.
ASTM A556/A556M-18 has the following relationships with other standards: It is inter standard links to ASTM A556/A556M-96(2012), ASTM A450/A450M-23, ASTM A450/A450M-18, ASTM A450/A450M-15, ASTM A751-14, ASTM A450/A450M-10, ASTM A450/A450M-09, ASTM A751-08, ASTM A450/A450M-07, ASTM A751-07a, ASTM A751-07, ASTM A751-01(2006), ASTM A450/A450M-04a, ASTM A450/A450M-04, ASTM A450/A450M-03. Understanding these relationships helps ensure you are using the most current and applicable version of the standard.
ASTM A556/A556M-18 is available in PDF format for immediate download after purchase. The document can be added to your cart and obtained through the secure checkout process. Digital delivery ensures instant access to the complete standard document.
Standards Content (Sample)
This international standard was developed in accordance with internationally recognized principles on standardization established in the Decision on Principles for the
Development of International Standards, Guides and Recommendations issued by the World Trade Organization Technical Barriers to Trade (TBT) Committee.
Designation:A556/A556M −18
Standard Specification for
Seamless Cold-Drawn Carbon Steel Feedwater Heater
Tubes
This standard is issued under the fixed designationA556/A556M; the number immediately following the designation indicates the year
of original adoption or, in the case of revision, the year of last revision.Anumber in parentheses indicates the year of last reapproval.
A superscript epsilon (´) indicates an editorial change since the last revision or reapproval.
1. Scope* A751Test Methods, Practices, and Terminology for Chemi-
2 cal Analysis of Steel Products
1.1 This specification covers minimum-wall-thickness,
seamless cold-drawn carbon steel tubes including bending into
3. Ordering Information
the form of U-tubes, if specified, for use in tubular feedwater
heaters.
3.1 Orders for material under this specification should
include the following as required to describe the desired
5 1
1.2 The tubing sizes covered shall be ⁄8 to 1 ⁄4-in. [15.9 to
material adequately:
31.8-mm] outside diameter, inclusive, with minimum wall
3.1.1 Quantity (feet, metres, or number of pieces),
thicknesses equal to or greater than 0.045 in. [1.1 mm].
3.1.2 Name of material (seamless steel tubing),
1.3 Optional supplementary requirements are provided, and
3.1.3 Dimensions (outside diameter and minimum wall
when desired, shall be stated in the order.
thickness),
1.4 The values stated in either inch-pound units or SI units
3.1.4 Length (specific or random),
are to be regarded separately as the standard. Within the text,
3.1.5 Manufacture (cold drawn),
the SI units are shown in brackets. The values stated in each
3.1.6 Grade (chemical composition),
system are not exact equivalents; therefore, each system must
3.1.7 Optional requirements,
beusedindependentlyoftheother.Combiningvaluesfromthe
3.1.8 Bending Requirements—If order specifies tubes to be
two systems may result in nonconformance with the specifi-
bent, the design of the U-tubes shall accompany the order.
cation. The inch-pound units shall apply unless the “M”
Purchaser must specify if stress-relief anneal of the U-bends is
designation of this specification is specified in the order.
required,
3.1.9 Test report required (see Certification Section of
1.5 This international standard was developed in accor-
dance with internationally recognized principles on standard- Specification A450/A450M),
ization established in the Decision on Principles for the 3.1.10 Specification number, and
Development of International Standards, Guides and Recom- 3.1.11 Specialrequirementsandanysupplementaryrequire-
mendations issued by the World Trade Organization Technical
ments selected.
Barriers to Trade (TBT) Committee.
4. General Requirements
2. Referenced Documents
4.1 Material furnished to this specification shall conform to
2.1 ASTM Standards:
the applicable requirements of the current edition of the
A450/A450MSpecification for General Requirements for
Specification A450/A450M, unless otherwise provided herein.
Carbon and Low Alloy Steel Tubes
5. Manufacture
5.1 Manufacture—Tubes shall be made by the seamless
This specification is under the jurisdiction ofASTM Committee A01 on Steel,
process and shall be cold drawn.
Stainless Steel and RelatedAlloys and is the direct responsibility of Subcommittee
A01.09 on Carbon Steel Tubular Products. 5.2 Heat Treatment:
Current edition approved Sept. 1, 2018. Published September 2018. Originally
5.2.1 Cold-drawn tubes shall be heat treated after the final
approved in 1965. Last previous edition approved in 2012 as A556/A556M–96
cold-drawpassatatemperatureof1200°F[640°C]orhigherto
(2012). DOI: 10.1520/A0556_A0556M-18.
ensure ductility satisfactory for rolling into tube sheets and to
For ASME Boiler and Pressure Vessel Code applications see related Specifi-
cation SA-556 in Section II of that Code.
meet mechanical properties as specified.
For referenced ASTM standards, visit the ASTM website, www.astm.org, or
5.2.2 If stress-relief anneal of the U-bends is specified, the
contact ASTM Customer Service at service@astm.org. For Annual Book of ASTM
anneal shall consist of heating the bent portion within a range
Standards volume information, refer to the standard’s Document Summary page on
the ASTM website. of 1100 to 1200°F [585 to 640°C].
*A Summary of Changes section appears at the end of this standard
Copyright © ASTM International, 100 Barr Harbor Drive, PO Box C700, West Conshohocken, PA 19428-2959. United States
A556/A556M−18
TABLE 2 Tensile Requirements
6. Chemical Composition
Grade A2 Grade B2 Grade C2
6.1 The steel shall conform to one of the requirements as to
Tensile strength, min, ksi [MPa] 47 [320] 60 [410] 70 [480]
chemical composition as prescribed in Table 1.
Yield strength, min, ksi [MPa] 26 [180] 37 [260] 40 [280]
Elongation in 2 in. or 50 mm, 35 30 30
6.2 When a grade is ordered under this specification, sup-
min, % (longitudinal)
plying an alloy grade that specifically requires the addition of
any element other than those listed for the ordered grade in
Table 1 is not permitted.
TABLE 3 Hardness Requirements
Grade A2 72 HRBW
7. Product Analysis
Grade B2 79 HRBW
Grade C2 89 HRBW
7.1 When requested in the purchase order, a product analy-
sisshallbemadebythemanufacturerorsupplierfromonetube
or billet per heat.
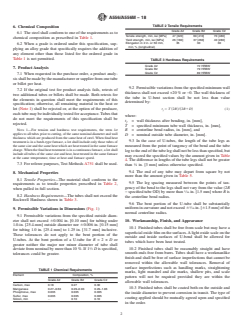
9.2 Permissible variations from the specified minimum wall
7.2 If the original test for product analysis fails, retests of
thickness shall not exceed +20% or −0. The wall thickness of
two additional tubes or billets shall be made. Both retests for
the tube in U-bent section shall be not less than value
the elements in question shall meet the requirements of this
determined by:
specification; otherwise, all remaining material in the heat or
t 5 T ~2R!/~2R1D! (1)
lot (Note 1) shall be rejected or, at the option of the producer,
f
eachtubemaybeindividuallytestedforacceptance.Tubesthat
where:
do not meet the requirements of this specification shall be
t = wall thickness after bending, in. [mm],
f
rejected.
T = specified minimum tube wall thickness, in. [mm],
R = centerline bend radius, in. [mm], and
NOTE 1—For tension and hardness test requirements, the term lot
appliestoalltubespriortocutting,ofthesamenominaldiameterandwall
D = nominal outside tube diameter, in. [mm].
thicknesswhichareproducedfromthesameheatofsteel.Whenfinalheat
9.3 In the case of U-tubes, the length of the tube legs as
treatmentisinabatch-typefurnace,alotshallincludeonlythosetubesof
measured from the point of tangency of the bend and the tube
thesamesizeandthesameheatwhichareheattreatedinthesamefurnace
charge.Whenthefinalheattreatmentisinacontinuousfurnace,alotshall
legtotheendofthetubelegshallnotbelessthanspecified,but
includealltubesofthesamesizeandheat,heattreatedinthesamefurnace
may exceed the specified values by the amount given in Table
at the same temperature, time at heat and furnace speed.
4.Thedifferenceinlengthsofthetubelegsshallnotbegreater
7.3 For referee purposes, Test Methods A751 shall be used.
than ⁄8 in. [3 mm] unless otherwise specified.
9.4 The end of any tube may depart from square by not
8. Mechanical Properties
more than the amount given in Table 5.
8.1 Tensile Properties—The material shall conform to the
9.5 The leg spacing measured between the points of tan-
requirements as to tensile properties prescribed in Table 2,
gency of the bend to the legs shall not vary from the value (2R
when pulled in full section.
− specified tube OD) by more than ⁄16 in. [1.5 mm] where R is
8.2 HardnessRequirements—Thetubesshallnotexceedthe
the centerline bend radius.
Rockwell Hardness shown in Table 3.
9.6 The bent portion of the U-tube shall be substantially
uniformincurvatureandnotexceed 6 ⁄16in.[61.5mm]ofthe
9. Permissible Variations in Dimensions (Fig. 1)
normal centerline radius.
9.1 Permissible variations from the specified outside diam-
eter shall not exceed 60.004 in. [0.10 mm] for tubing under
10. Workmanship, Finish, and Appearance
1.0-in. [25.4-mm] outside diameter nor 60.006 in. [0.15 mm]
10.1 Finished tubes shall be free from scale but may have a
for tubing 1.0 in. [25.4 mm] to 1.25 in. [31.7 mm] inclusive.
superficialoxidefilmonthesurfaces.Alightoxidescaleonthe
These tolerances do not apply to the bent portion of the
outside and inside surfaces of U-bend shall be allowed for
U-tubes. At the bent portion of a U-tube for R=2× D or
tubes which have been heat treated.
greater neither the major nor minor diameter of tube shall
10.2 Finished tubes shall be reasonably straight and have
deviatefromnominalbymorethan10%.If1 ⁄2Disspecified,
smooth ends free from burrs. Tubes shall have a workmanlike
tolerances could be greater.
finish and shall be free of surface imperfections that cannot be
removed within the allowable wall tolerances. Removal of
surface imperfections such as handling marks, straightening
TABLE 1 Chemical Requirements
marks, light mandrel and die marks, shallow pits, and scale
Element Composition, %
pattern will not be required provided they are within the
Grade A2 Grade B2 Grade C2
allowable wall tolerances.
Carbon, max 0.18 0.27 0.30
Manganese 0.27–0.63 0.29–0.93 0.29–1.06 10.3 Finished tubes shall be coated both on the outside and
Phosphorus, max 0.035 0.035 0.035
the inside diameter to prevent corrosion in transit. The type of
Sulfur, max 0.035 0.035 0.035
coating applied should be mutually agreed upon and specified
Silicon, min . 0.10 0.10
in the order.
A556/A556M−18
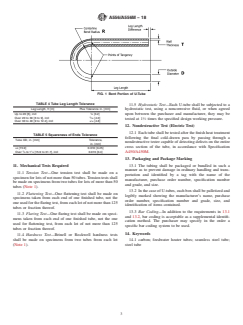
FIG. 1 Bent Portion of U-Tube
TABLE 4 Tube Leg Length Tolerance
11.5 Hydrostatic Test—Each U-tube shall be subjected to a
Leg Length, ft [m] Plus Tolerance in. [mm] hydrostatic test, using a noncorrosive fluid, or when agreed
Up to 20 [6], incl ⁄8 [3.2] upon between the purchaser and manufacturer, they may be
Over 20 to 30 [6 to 9], incl ⁄32 [4.0] 1
tested at 1 ⁄2 times the specified design working pressure.
Over 30 to 40 [9 to 12.2], incl ⁄16 [4.8]
12. Nondestructive Test (Electric Test)
12.1 Each tube shall be tested after the finish heat treatment
TABLE 5 Squareness of Ends Tolerance
following the final cold-drawn pass by passing through a
Tube OD, in. [mm] Tolerance,
nondestructive tester capable of detecting defects on the entire
in. [mm]
cross section of the tube, in accordance with Specification
⁄8 [15.9] 0.010 [0.25]
5 1
Over ⁄8 to 1 ⁄4 [15.9 to 31.7], incl 0.016 [0.4] A450/A450M.
13. Packaging and Package Marking
13.1 The tubing shall be packaged or bundled in such a
11. Mechanical Tests Required
manner as to prevent damage in ordinary handling and trans-
11.1 Tension Test—One tension test shall be made on a
portation and identified by a tag with the name of the
specimenforlotsofnotmorethan50tubes.Tensiontestsshall
manufacturer, purchase order number, specification number
be made on specimens from two tubes for lots of more than 50
and grade, and size.
tubes (Note 1).
13.2 InthecaseofU-tubes,eachboxshallbepalletizedand
11.2 Flattening Test—One flattening test shall be made on
legibly marked showing the manufacturer’s name, purchase
specimens taken from each end of one finished tube, not the
order number, specification number and grade, size, and
oneusedfortheflaringtest,fromeachlotofnotmorethan125
identification of items contained.
tubes or fraction thereof.
13.3 Bar Coding—In addition to the requirements in 13.1
11.3 Flaring Test—One flaring test shall be made on speci-
and 13.2, bar coding is accep
...
This document is not an ASTM standard and is intended only to provide the user of an ASTM standard an indication of what changes have been made to the previous version. Because
it may not be technically possible to adequately depict all changes accurately, ASTM recommends that users consult prior editions as appropriate. In all cases only the current version
of the standard as published by ASTM is to be considered the official document.
Designation: A556/A556M − 96 (Reapproved 2012) A556/A556M − 18
Standard Specification for
Seamless Cold-Drawn Carbon Steel Feedwater Heater
Tubes
This standard is issued under the fixed designation A556/A556M; the number immediately following the designation indicates the year
of original adoption or, in the case of revision, the year of last revision. A number in parentheses indicates the year of last reapproval.
A superscript epsilon (´) indicates an editorial change since the last revision or reapproval.
1. Scope Scope*
1.1 This specification covers minimum-wall-thickness, seamless cold-drawn carbon steel tubes including bending into the form
of U-tubes, if specified, for use in tubular feedwater heaters.
5 1
1.2 The tubing sizes covered shall be ⁄8 to 1 ⁄4-in. [15.9 to 31.8-mm] outside diameter, inclusive, with minimum wall
thicknesses equal to or greater than 0.045 in. [1.1 mm].
1.3 Optional supplementary requirements are provided, and when desired, shall be stated in the order.
1.4 The values stated in either inch-pound units or SI units are to be regarded separately as the standard. Within the text, the
SI units are shown in brackets. The values stated in each system are not exact equivalents; therefore, each system must be used
independently of the other. Combining values from the two systems may result in nonconformance with the specification. The
inch-pound units shall apply unless the “M” designation of this specification is specified in the order.
1.5 This international standard was developed in accordance with internationally recognized principles on standardization
established in the Decision on Principles for the Development of International Standards, Guides and Recommendations issued
by the World Trade Organization Technical Barriers to Trade (TBT) Committee.
2. Referenced Documents
2.1 ASTM Standards:
A450/A450M Specification for General Requirements for Carbon and Low Alloy Steel Tubes
E30A751 Test Methods Methods, Practices, and Terminology for Chemical Analysis of Steel, Cast Iron, Open-Hearth Iron, and
Wrought IronSteel Products (Withdrawn 1995)
3. Ordering Information
3.1 Orders for material under this specification should include the following as required to describe the desired material
adequately:
3.1.1 Quantity (feet, metres, or number of pieces),
3.1.2 Name of material (seamless steel tubing),
3.1.3 Dimensions (outside diameter and minimum wall thickness),
3.1.4 Length (specific or random),
3.1.5 Manufacture (cold drawn),
3.1.6 Grade (chemical composition),
3.1.7 Optional requirements,
3.1.8 Bending Requirements—If order specifies tubes to be bent, the design of the U-tubes shall accompany the order. Purchaser
must specify if stress-relief anneal of the U-bends is required,
3.1.9 Test report required (see Certification Section of Specification A450/A450M),
3.1.10 Specification number, and
3.1.11 Special requirements and any supplementary requirements selected.
This specification is under the jurisdiction of ASTM Committee A01 on Steel, Stainless Steel and Related Alloys and is the direct responsibility of Subcommittee A01.09
on Carbon Steel Tubular Products.
Current edition approved March 1, 2012Sept. 1, 2018. Published November 2012September 2018. Originally approved in 1965. Last previous edition approved in
20052012 as A556/A556M – 96 (2005).(2012). DOI: 10.1520/A0556_A0556M-96R12. 10.1520/A0556_A0556M-18.
For ASME Boiler and Pressure Vessel Code applications see related Specification SA-556 in Section II of that Code.
For referenced ASTM standards, visit the ASTM website, www.astm.org, or contact ASTM Customer Service at service@astm.org. For Annual Book of ASTM Standards
volume information, refer to the standard’s Document Summary page on the ASTM website.
*A Summary of Changes section appears at the end of this standard
Copyright © ASTM International, 100 Barr Harbor Drive, PO Box C700, West Conshohocken, PA 19428-2959. United States
A556/A556M − 18
4. General Requirements
4.1 Material furnished to this specification shall conform to the applicable requirements of the current edition of the
Specification A450/A450M, unless otherwise provided herein.
5. Manufacture
5.1 Manufacture—Tubes shall be made by the seamless process and shall be cold drawn.
5.2 Heat Treatment:
5.2.1 Cold-drawn tubes shall be heat treated after the final cold-draw pass at a temperature of 1200°F [640°C] or higher to
ensure ductility satisfactory for rolling into tube sheets and to meet mechanical properties as specified.
5.2.2 If stress-relief anneal of the U-bends is specified, the anneal shall consist of heating the bent portion within a range of 1100
to 1200°F [585 to 640°C].
6. Chemical Composition
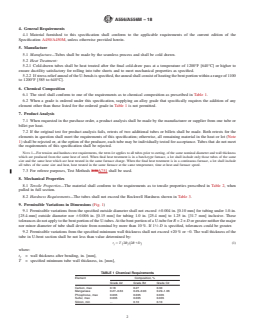
6.1 The steel shall conform to one of the requirements as to chemical composition as prescribed in Table 1.
6.2 When a grade is ordered under this specification, supplying an alloy grade that specifically requires the addition of any
element other than those listed for the ordered grade in Table 1 is not permitted.
7. Product Analysis
7.1 When requested in the purchase order, a product analysis shall be made by the manufacturer or supplier from one tube or
billet per heat.
7.2 If the original test for product analysis fails, retests of two additional tubes or billets shall be made. Both retests for the
elements in question shall meet the requirements of this specification; otherwise, all remaining material in the heat or lot (Note
1) shall be rejected or, at the option of the producer, each tube may be individually tested for acceptance. Tubes that do not meet
the requirements of this specification shall be rejected.
NOTE 1—For tension and hardness test requirements, the term lot applies to all tubes prior to cutting, of the same nominal diameter and wall thickness
which are produced from the same heat of steel. When final heat treatment is in a batch-type furnace, a lot shall include only those tubes of the same
size and the same heat which are heat treated in the same furnace charge. When the final heat treatment is in a continuous furnace, a lot shall include
all tubes of the same size and heat, heat treated in the same furnace at the same temperature, time at heat and furnace speed.
7.3 For referee purposes, Test Methods E30A751 shall be used.
8. Mechanical Properties
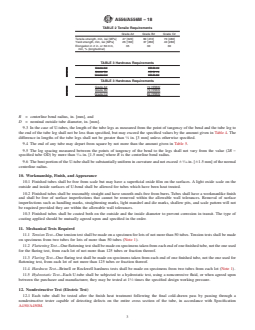
8.1 Tensile Properties—The material shall conform to the requirements as to tensile properties prescribed in Table 2, when
pulled in full section.
8.2 Hardness Requirements—The tubes shall not exceed the Rockwell Hardness shown in Table 3.
9. Permissible Variations in Dimensions (Fig. 1)
9.1 Permissible variations from the specified outside diameter shall not exceed 60.004 in. [0.10 mm] for tubing under 1.0-in.
[25.4-mm] outside diameter nor 60.006 in. [0.15 mm] for tubing 1.0 in. [25.4 mm] to 1.25 in. [31.7 mm] inclusive. These
tolerances do not apply to the bent portion of the U-tubes. At the bent portion of a U-tube for R = 2 × D or greater neither the major
nor minor diameter of tube shall deviate from nominal by more than 10 %. If 1 ⁄2 D is specified, tolerances could be greater.
9.2 Permissible variations from the specified minimum wall thickness shall not exceed +20 % or −0. The wall thickness of the
tube in U-bent section shall be not less than value determined by:
t 5 T 2R / 2R1D (1)
~ ! ~ !
f
where:
t = wall thickness after bending, in. [mm],
f
T = specified minimum tube wall thickness, in. [mm],
TABLE 1 Chemical Requirements
Element Composition, %
Grade A2 Grade B2 Grade C2
Carbon, max 0.18 0.27 0.30
Manganese 0.27–0.63 0.29–0.93 0.29–1.06
Phosphorus, max 0.035 0.035 0.035
Sulfur, max 0.035 0.035 0.035
Silicon, min . 0.10 0.10
A556/A556M − 18
TABLE 2 Tensile Requirements
Grade A2 Grade B2 Grade C2
Tensile strength, min, ksi [MPa] 47 [320] 60 [410] 70 [480]
Yield strength, min, ksi [MPa] 26 [180] 37 [260] 40 [280]
Elongation in 2 in. or 50 mm, 35 30 30
min, % (longitudinal)
TABLE 3 Hardness Requirements
Grade A2 HR B 72
Grade B2 HR B 79
Grade C2 HR B 89
TABLE 3 Hardness Requirements
Grade A2 72 HRBW
Grade B2 79 HRBW
Grade C2 89 HRBW
R = centerline bend radius, in. [mm], and
D = nominal outside tube diameter, in. [mm].
9.3 In the case of U-tubes, the length of the tube legs as measured from the point of tangency of the bend and the tube leg to
the end of the tube leg shall not be less than specified, but may exceed the specified values by the amount given in Table 4. The
difference in lengths of the tube legs shall not be greater than ⁄8 in. [3 mm] unless otherwise specified.
9.4 The end of any tube may depart from square by not more than the amount given in Table 5.
9.5 The leg spacing measured between the points of tangency of the bend to the legs shall not vary from the value (2R −
specified tube OD) by more than ⁄16 in. [1.5 mm] where R is the centerline bend radius.
9.6 The bent portion of the U-tube shall be substantially uniform in curvature and not exceed 6 ⁄16 in. [61.5 mm] of the normal
centerline radius.
10. Workmanship, Finish, and Appearance
10.1 Finished tubes shall be free from scale but may have a superficial oxide film on the surfaces. A light oxide scale on the
outside and inside surfaces of U-bend shall be allowed for tubes which have been heat treated.
10.2 Finished tubes shall be reasonably straight and have smooth ends free from burrs. Tubes shall have a workmanlike finish
and shall be free of surface imperfections that cannot be removed within the allowable wall tolerances. Removal of surface
imperfections such as handling marks, straightening marks, light mandrel and die marks, shallow pits, and scale pattern will not
be required provided they are within the allowable wall tolerances.
10.3 Finished tubes shall be coated both on the outside and the inside diameter to prevent corrosion in transit. The type of
coating applied should be mutually agreed upon and specified in the order.
11. Mechanical Tests Required
11.1 Tension Test—One tension test shall be made on a specimen for lots of not more than 50 tubes. Tension tests shall be made
on specimens from two tubes for lots of more than 50 tubes (Note 1).
11.2 Flattening Test—One flattening test shall be made on specimens taken from each end of one finished tube, not the one used
for the flaring test, from each lot of not more than 125 tubes or fraction thereof.
11.3 Flaring Test—One flaring test shall be made on specimens taken from each end of one finished tube, not the one used for
flattening test, from each lot of not more than 125 tubes or fraction thereof.
11.4 Hardness Test—Brinell or Rockwell hardness tests shall be made on specimens from two tubes from each lot (Note 1).
11.5 Hydrostatic Test—Each U-tube shall be subjected to a hydrostatic test, using a noncorrosive fluid, or when agreed upon
between the purchaser and manufacturer, they may be tested at 1 ⁄2 times the specified design working pressure.
12. Nondestructive Test (Electric Test)
12.1 Each tube shall be tested after the finish heat treatment following the final cold-drawn pass by passing through a
nondestructive tester capable of detecting defects on the entire cross section of the tube, in accordance with Specification
A450/A450M.
A556/A556M − 18
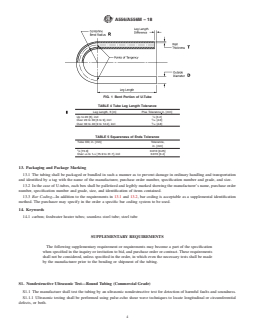
FIG. 1 Bent Portion of U-Tube
TABLE 4 Tube Leg Length Tolerance
Leg Length, ft [m] Plus Tolerance in. [mm]
Up to 20 [6], incl ⁄8 [3.2]
Over 20 to 30 [6 to 9], incl ⁄32 [4.0]
Over 30 to 40 [9 to 12.2], incl ⁄16 [4.8]
TABLE 5 Squareness of Ends Tolerance
Tube OD, in. [mm] Tolerance,
in. [mm]
⁄8 [15.9] 0.010 [0.25]
5 1
Over ⁄8 to 1 ⁄4 [15.9 to 31.7], incl 0.016 [0.4]
13. Packaging and Package Marking
13.1 The tubing shall be packaged or bundled in such
...
Questions, Comments and Discussion
Ask us and Technical Secretary will try to provide an answer. You can facilitate discussion about the standard in here.
Loading comments...