ASTM F1642/F1642M-17
(Test Method)Standard Test Method for Glazing and Glazing Systems Subject to Airblast Loadings
Standard Test Method for Glazing and Glazing Systems Subject to Airblast Loadings
SIGNIFICANCE AND USE
5.1 This test method provides a structured procedure to establish the hazard rating of glazing, glazing systems, and glazing retrofit systems subjected to an airblast loading. Knowing the hazard rating provides the ability to assess the risk of personal injury and facility damage.
5.2 The hazard rating for a glazing or glazing material does not imply that a single specimen will resist the specific airblast for which it is rated with a probability of 1.0. The probability that a single glazing or glazing construction specimen will resist the specific airblast for which it is rated increases proportionally with the number of test specimens that successfully resist the given level of airblast to the hazard level for which it is rated.
SCOPE
1.1 This test method sets forth procedures for the evaluation of hazards of glazing or glazing systems against airblast loadings. The specifying authority shall provide the airblast loading parameters. Glazing systems shall be as defined in Specification F2912.
1.2 The data obtained from testing under this method shall be used to determine the glazing, glazing system, or glazing retrofit system hazard rating using Specification F2912.
1.3 This test method allows for glazing to be tested and rated with or without framing systems.
1.4 This test method is designed to test and rate all glazing, glazing systems, and glazing retrofit systems including, but not limited to, those fabricated from glass, plastic, glass-clad plastics, laminated glass, glass/plastic glazing materials, organic coated glass, and other glazing retrofit systems not directly attached to the glazing or glazing system such as blast curtains, cables, shades, and architectural mesh.
1.5 Units—The values stated in either SI units or inch-pound units are to be regarded separately as standard. The values stated in each system may not be exact equivalents; therefore, each system shall be used independently of the other. Combining values from the two systems may result in nonconformance with the standard. For conversion of quantities in various systems of measurements to SI units, see Specification E699.
1.6 This standard does not purport to address all of the safety concerns, if any, associated with its use. It is the responsibility of the user of this standard to establish appropriate safety and health practices and determine the applicability of regulatory limitations prior to use. See Section 7 for specific hazards statements.
General Information
- Status
- Published
- Publication Date
- 28-Feb-2017
- Technical Committee
- F12 - Security Systems and Equipment
- Drafting Committee
- F12.10 - Systems Products and Services
Relations
- Replaces
ASTM F1642-12 - Standard Test Method for Glazing and Glazing Systems Subject to Airblast Loadings - Effective Date
- 01-Mar-2017
- Refers
ASTM F2912-17 - Standard Specification for Glazing and Glazing Systems Subject to Airblast Loadings - Effective Date
- 01-Mar-2017
- Effective Date
- 01-Aug-2016
- Effective Date
- 01-Jun-2014
- Effective Date
- 15-Apr-2012
- Effective Date
- 15-Nov-2011
- Refers
ASTM F2912-11 - Standard Specification for Glazing and Glazing Systems Subject to Airblast Loadings - Effective Date
- 01-Jul-2011
- Effective Date
- 01-Nov-2009
- Effective Date
- 01-Jan-2009
- Effective Date
- 01-May-2008
- Effective Date
- 10-Jun-2003
- Effective Date
- 10-Jan-2001
- Effective Date
- 10-Dec-1999
- Effective Date
- 01-Mar-2017
- Effective Date
- 01-Mar-2017
Overview
ASTM F1642/F1642M-17 - Standard Test Method for Glazing and Glazing Systems Subject to Airblast Loadings establishes a comprehensive method to evaluate the performance and hazard rating of glazing, glazing systems, and glazing retrofit systems under airblast (explosive) loading. Developed by ASTM International, this standard plays a crucial role in the security and safety assessment of building facades, helping designers and engineers determine the potential risks to people and property in the event of explosions, whether accidental or intentional.
By providing a structured test procedure, ASTM F1642/F1642M-17 offers a way to reliably assess the ability of various glazing materials, such as glass, laminated glass, plastics, and composite systems, as well as retrofit systems like blast curtains, to resist airblast pressures. The resulting hazard rating supports risk assessments for injury prevention and facility protection.
Key Topics
- Airblast Hazard Rating: The standard describes how to determine the hazard rating of glazing, glazing systems, or retrofits based on their performance under specified airblast loadings. This rating is useful in understanding the potential for injury from glazing fragments and extent of internal damage after blast events.
- Test Specimens: The method applies to all types of glazing materials and systems, both with and without framing, including products made of glass, plastic, laminates, coated glass, and other combinations, as well as retrofit solutions.
- Testing Procedure: Detailed steps are provided for preparing specimens, setting up test apparatus (such as shock tubes or open-air explosive testing), using instrumentation (pressure transducers, data acquisition, photographic equipment), and configuring witness panels to observe fragment dispersion.
- Reporting Requirements: The standard specifies mandatory reporting elements, including full documentation of the test setup, materials, environmental conditions, and precise results with photographic evidence.
- Safety and Compliance: Emphasis is placed on following appropriate safety practices, regulatory compliance for handling explosives, and using qualified/accredited testing laboratories.
Applications
ASTM F1642/F1642M-17 is widely used in a variety of contexts where the blast resistance of building facades or glazing is a safety concern:
- Architectural and Security Design: Used by architects, engineers, and security consultants for designing buildings in high-risk environments, such as government facilities, military bases, embassies, critical infrastructure, and public venues.
- Product Development and Certification: Manufacturers of glazing products, windows, facade systems, and retrofits employ this standard to certify their products' performance under airblast conditions, supporting claims of safety and compliance.
- Risk Assessment and Retrofitting: Facility managers and owners use the hazard ratings generated by this standard to identify vulnerabilities and select appropriate retrofit systems (like blast-resistant films or curtains) to mitigate risk.
- Regulatory and Contractual Specifications: The standard is often incorporated in project specifications and regulatory frameworks for new construction or upgrades in blast-prone regions.
Related Standards
- ASTM F2912 - Specification for Glazing and Glazing Systems Subject to Airblast Loadings. This standard provides the classification system referenced for determining hazard ratings in F1642/F1642M-17.
- ASTM E997 - Test Method for Evaluating Glass Breakage Probability Under Uniform Static Loads by Proof Load Testing.
- ASTM E699 - Specification for Agencies Involved in Testing, Quality Assurance, and Evaluating of Manufactured Building Components.
- ISO/IEC 17025 - General Requirements for the Competence of Testing and Calibration Laboratories, required for accredited test facilities.
- ANSI SI 10 - American National Standard for Use of the International System of Units (SI).
Practical Value
Implementing ASTM F1642/F1642M-17 in assessments and specifications ensures evidence-based decisions in the selection and installation of blast-resistant glazing systems. This reduces risks of injury and damage, supports regulatory compliance, and fosters confidence among stakeholders in high-security and safety-critical projects. By referencing this standard, organizations demonstrate due diligence in addressing airblast hazards for both new buildings and retrofitting existing structures.
Keywords: airblast hazard rating, glazing systems, blast-resistant glazing, explosion test method, facade safety, ASTM F1642, glazing retrofit, building security standards, blast mitigation.
Buy Documents
ASTM F1642/F1642M-17 - Standard Test Method for Glazing and Glazing Systems Subject to Airblast Loadings
REDLINE ASTM F1642/F1642M-17 - Standard Test Method for Glazing and Glazing Systems Subject to Airblast Loadings
Frequently Asked Questions
ASTM F1642/F1642M-17 is a standard published by ASTM International. Its full title is "Standard Test Method for Glazing and Glazing Systems Subject to Airblast Loadings". This standard covers: SIGNIFICANCE AND USE 5.1 This test method provides a structured procedure to establish the hazard rating of glazing, glazing systems, and glazing retrofit systems subjected to an airblast loading. Knowing the hazard rating provides the ability to assess the risk of personal injury and facility damage. 5.2 The hazard rating for a glazing or glazing material does not imply that a single specimen will resist the specific airblast for which it is rated with a probability of 1.0. The probability that a single glazing or glazing construction specimen will resist the specific airblast for which it is rated increases proportionally with the number of test specimens that successfully resist the given level of airblast to the hazard level for which it is rated. SCOPE 1.1 This test method sets forth procedures for the evaluation of hazards of glazing or glazing systems against airblast loadings. The specifying authority shall provide the airblast loading parameters. Glazing systems shall be as defined in Specification F2912. 1.2 The data obtained from testing under this method shall be used to determine the glazing, glazing system, or glazing retrofit system hazard rating using Specification F2912. 1.3 This test method allows for glazing to be tested and rated with or without framing systems. 1.4 This test method is designed to test and rate all glazing, glazing systems, and glazing retrofit systems including, but not limited to, those fabricated from glass, plastic, glass-clad plastics, laminated glass, glass/plastic glazing materials, organic coated glass, and other glazing retrofit systems not directly attached to the glazing or glazing system such as blast curtains, cables, shades, and architectural mesh. 1.5 Units—The values stated in either SI units or inch-pound units are to be regarded separately as standard. The values stated in each system may not be exact equivalents; therefore, each system shall be used independently of the other. Combining values from the two systems may result in nonconformance with the standard. For conversion of quantities in various systems of measurements to SI units, see Specification E699. 1.6 This standard does not purport to address all of the safety concerns, if any, associated with its use. It is the responsibility of the user of this standard to establish appropriate safety and health practices and determine the applicability of regulatory limitations prior to use. See Section 7 for specific hazards statements.
SIGNIFICANCE AND USE 5.1 This test method provides a structured procedure to establish the hazard rating of glazing, glazing systems, and glazing retrofit systems subjected to an airblast loading. Knowing the hazard rating provides the ability to assess the risk of personal injury and facility damage. 5.2 The hazard rating for a glazing or glazing material does not imply that a single specimen will resist the specific airblast for which it is rated with a probability of 1.0. The probability that a single glazing or glazing construction specimen will resist the specific airblast for which it is rated increases proportionally with the number of test specimens that successfully resist the given level of airblast to the hazard level for which it is rated. SCOPE 1.1 This test method sets forth procedures for the evaluation of hazards of glazing or glazing systems against airblast loadings. The specifying authority shall provide the airblast loading parameters. Glazing systems shall be as defined in Specification F2912. 1.2 The data obtained from testing under this method shall be used to determine the glazing, glazing system, or glazing retrofit system hazard rating using Specification F2912. 1.3 This test method allows for glazing to be tested and rated with or without framing systems. 1.4 This test method is designed to test and rate all glazing, glazing systems, and glazing retrofit systems including, but not limited to, those fabricated from glass, plastic, glass-clad plastics, laminated glass, glass/plastic glazing materials, organic coated glass, and other glazing retrofit systems not directly attached to the glazing or glazing system such as blast curtains, cables, shades, and architectural mesh. 1.5 Units—The values stated in either SI units or inch-pound units are to be regarded separately as standard. The values stated in each system may not be exact equivalents; therefore, each system shall be used independently of the other. Combining values from the two systems may result in nonconformance with the standard. For conversion of quantities in various systems of measurements to SI units, see Specification E699. 1.6 This standard does not purport to address all of the safety concerns, if any, associated with its use. It is the responsibility of the user of this standard to establish appropriate safety and health practices and determine the applicability of regulatory limitations prior to use. See Section 7 for specific hazards statements.
ASTM F1642/F1642M-17 is classified under the following ICS (International Classification for Standards) categories: 81.040.20 - Glass in building. The ICS classification helps identify the subject area and facilitates finding related standards.
ASTM F1642/F1642M-17 has the following relationships with other standards: It is inter standard links to ASTM F1642-12, ASTM F2912-17, ASTM E699-16, ASTM E997-14, ASTM E997-12, ASTM E997-11, ASTM F2912-11, ASTM E997-01(2009), ASTM E699-09, ASTM E699-03(2008), ASTM E699-03, ASTM E997-01, ASTM E699-99, ASTM E2813-18, ASTM F2248-19. Understanding these relationships helps ensure you are using the most current and applicable version of the standard.
ASTM F1642/F1642M-17 is available in PDF format for immediate download after purchase. The document can be added to your cart and obtained through the secure checkout process. Digital delivery ensures instant access to the complete standard document.
Standards Content (Sample)
This international standard was developed in accordance with internationally recognized principles on standardization established in the Decision on Principles for the
Development of International Standards, Guides and Recommendations issued by the World Trade Organization Technical Barriers to Trade (TBT) Committee.
Designation: F1642/F1642M − 17
Standard Test Method for
Glazing and Glazing Systems Subject to Airblast Loadings
ThisstandardisissuedunderthefixeddesignationF1642/F1642M;thenumberimmediatelyfollowingthedesignationindicatestheyear
of original adoption or, in the case of revision, the year of last revision. A number in parentheses indicates the year of last reapproval.
A superscript epsilon (´) indicates an editorial change since the last revision or reapproval.
INTRODUCTION
Historical records show that fragments from glazing that have failed as the result of intentional or
accidental explosions present a serious threat of personal injury. Glazing failure also allows blast
pressure to enter the interior of buildings thus resulting in additional threat of personal injury and
facilitydamage.Theserisksincreaseindirectproportiontotheamountofglazingusedonthebuilding
facade. This test method addresses only glazing and glazing systems. It assumes that the designer has
verified that other structural elements have been adequately designed to resist the anticipated airblast
pressures.
1. Scope 1.6 This standard does not purport to address all of the
safety concerns, if any, associated with its use. It is the
1.1 This test method sets forth procedures for the evaluation
responsibility of the user of this standard to establish appro-
of hazards of glazing or glazing systems against airblast
priate safety and health practices and determine the applica-
loadings. The specifying authority shall provide the airblast
bility of regulatory limitations prior to use. See Section 7 for
loading parameters. Glazing systems shall be as defined in
specific hazards statements.
Specification F2912.
1.2 The data obtained from testing under this method shall
2. Referenced Documents
be used to determine the glazing, glazing system, or glazing
2.1 ASTM Standards:
retrofit system hazard rating using Specification F2912.
E699 SpecificationforAgenciesInvolvedinTesting,Quality
1.3 This test method allows for glazing to be tested and
Assurance, and Evaluating of Manufactured Building
rated with or without framing systems.
Components
E997 Test Method for Evaluating Glass Breakage Probabil-
1.4 This test method is designed to test and rate all glazing,
ity Under the Influence of Uniform Static Loads by Proof
glazing systems, and glazing retrofit systems including, but not
Load Testing
limited to, those fabricated from glass, plastic, glass-clad
F2912 Specification for Glazing and Glazing Systems Sub-
plastics, laminated glass, glass/plastic glazing materials, or-
ject to Airblast Loadings
ganic coated glass, and other glazing retrofit systems not
2.2 ISO Standard:
directly attached to the glazing or glazing system such as blast
ISO/IEC International Standard 17025 General Require-
curtains, cables, shades, and architectural mesh.
ments for the Competence of Testing and Calibration
1.5 Units—The values stated in either SI units or inch-
Laboratories
pound units are to be regarded separately as standard. The
2.3 ANSI Standard:
values stated in each system may not be exact equivalents;
SI 10 American National Standard for Use of the Interna-
therefore,eachsystemshallbeusedindependentlyoftheother.
tional System of Units (SI): The Modern Metric System
Combining values from the two systems may result in noncon-
formance with the standard. For conversion of quantities in
3. Terminology
various systems of measurements to SI units, see Specification
3.1 Definitions:
E699.
3.1.1 airblast pressure, n—pressure increase that a surface
experiences due to the detonation of an explosive charge.
This test method is under the jurisdiction ofASTM Committee F12 on Security
Systems and Equipmentand is the direct responsibility of Subcommittee F12.10 on
Systems Products and Services. For referenced ASTM standards, visit the ASTM website, www.astm.org, or
Current edition approved March 1, 2017. Published March 2017. Originally contact ASTM Customer Service at service@astm.org. For Annual Book of ASTM
approved in 1995. Last previous edition approved in 2012 as F1642 – 12. DOI: Standards volume information, refer to the standard’s Document Summary page on
10.1520/F1642_F1642M-17. the ASTM website.
Copyright © ASTM International, 100 Barr Harbor Drive, PO Box C700, West Conshohocken, PA 19428-2959. United States
F1642/F1642M − 17
3.1.1.1 Discussion—The airblast pressure history, as mea- proportionally with the number of test specimens that success-
sured at a point on the surface, consists of two separate phases. fully resist the given level of airblast to the hazard level for
The positive phase is characterized by a nearly instantaneous which it is rated.
rise to a maximum pressure followed by an exponential decay
6. Apparatus
to ambient pressure. In the negative phase, which follows
immediately the positive phase, the pressure decreases below
6.1 Test Facility—Test facilities shall be accredited for this
ambient for a period of time before returning to ambient.
method to the requirements of ISO/IEC 17025 or qualified
according to Specification E699. The test facility shall consist
3.1.2 ambient temperature, n—24 6 11°C [75 6 20°F].
of either a shock tube or an open-air arena from which the
3.1.3 blast mat, n—steel or concrete pad upon which that an
airblast loading is generated. The test facility shall also consist
explosive may be detonated to reduce the incidence of ejecta.
of a test frame and witness area as described in the following.
3.1.4 effective positive phase duration, T, n—duration of an
The test director shall ensure that potential environmental
idealized triangular positive phase reflected airblast pressure
impact issues are determined and resolved before testing. The
history, having an instantaneous rise to the measured P, with a
test director shall ensure that testing is conducted with inboard
linear decay to ambient, such that the impulse of the idealized
and outboard surfaces of the test specimen at ambient tempera-
pressure history equals i of the measured positive phase
ture in accordance with 3.1.2.
reflected airblast history.
6.2 Airblast Load—Either a shock tube or an explosive
3.1.4.1 Discussion—The idealized triangular airblast wave
charge shall be used to generate the desired peak pressure and
is considered to provide a standard measure of the positive
thepositivephaseimpulseonthetestspecimen.Ifanexplosive
phase airblast intensity.
charge is used, the charge shall be hemispherical and detonated
3.1.5 hazard level, n—rating assigned to the performance of
either at ground level or elevated by placing the explosive on
theglazingsystembasedontheamountandlocationofintegral
a table. Elevation of the base of the explosive shall be between
materials expelled from the system under specific blast condi-
60 and 120 cm [24 and 48 in.] above the ground where the
tions of the test.
explosive will be detonated. Other explosive charge configu-
3.1.6 peak positive pressure, P, n—maximum measured
rations can be used.The effects of using other explosive charge
positive phase airblast pressure, kPa.
configurations must be accounted for and documented. See
Annex A1 for information to be used in calculating pressures,
3.1.7 positive phase impulse, i, n—integral of the measured
impulses, and durations and for accounting for different types
positive phase reflected airblast pressure history, kPa-ms [psi-
of explosives. Note that the procedures in Annex A1 account
ms] (more correctly called the specific positive phase impulse).
for loading from a hemispherical charge imparting load on a
3.1.8 simply supported glazing, n—glazing supported in
large facade and do not address the issues of clearing or other
accordance with Test Method E997 with the edges of the glass
explosive charge shapes.
extendingaminimumof3mm[0.125in.]beyondtheneoprene
supports. 6.3 Blast Mat—If there is a possibility of crater ejecta
interferingwiththetest,theexplosivechargeshallbeplacedon
3.1.9 test director, n—individual identified by the indepen-
a blast mat. The decision to use a blast mat shall be at the
dent testing laboratory as being responsible to complete the
discretion of the test director.
specified tests as required and to document the results in
accordance with this test method.
6.4 Test Frame—A test frame suitable for supporting glaz-
ing or glazing systems shall be part of the test facility. Glazing
4. Summary of Test Method
tested without a specific framing system shall be, as a
minimum, supported in a simple support subframe that is
4.1 This test method prescribes the apparatus, procedures,
attachedtothetestframe.Attherequestofatestsponsor,other
specimens, and other requirements necessary to execute a
subframe support conditions may be used. If a glazing system
physical test for the purpose of determining the hazard rating
is tested, the glazing system shall be mounted to the test frame
for a single test specimen, in accordance with Specification
in a manner that closely models the manner in which it will be
F2912, of a glazing or glazing system subjected to an airblast
mounted in the field. The test frame shall be capable of
loading.
resisting the airblast loads with deflections that do not exceed
5. Significance and Use L/360alonglinesofsupportforthesimplesupportsubframeor
the glazing system. The area immediately behind the test
5.1 This test method provides a structured procedure to
specimens shall be designated as the witness area. For arena
establish the hazard rating of glazing, glazing systems, and
testing, the witness area shall be enclosed to prevent airblast
glazing retrofit systems subjected to an airblast loading. Know-
pressure from wrapping behind the test specimens and shall be
ing the hazard rating provides the ability to assess the risk of
designed to resist the wrap around pressures.
personal injury and facility damage.
6.5 Simple Support Subframe—A subframe, attachable to
5.2 The hazard rating for a glazing or glazing material does
the test frame, to support glazing in accordance with Test
not imply that a single specimen will resist the specific airblast
Method E997.
for which it is rated with a probability of 1.0. The probability
that a single glazing or glazing construction specimen will 6.6 Witness Area—Thewitnessareashallhavethefollowing
resist the specific airblast for which it is rated increases dimensions. The floor shall be 500 6 50 mm [20 6 2 in.]
F1642/F1642M − 17
below the subframe opening used to receive the glazing or 6.7.4 Temperature Measuring Device (TMD)—ATMD shall
glazing system, unless the specifying authority dictates that the be used to accurately measure glazing surface temperatures.
glazing or glazing system shall be tested per its position in a
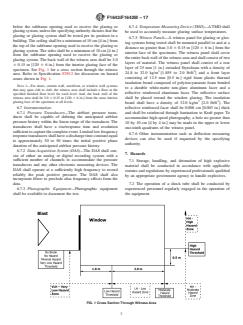
6.7.5 Witness Panels—A witness panel for glazing or glaz-
building.The ceiling shall be a minimum of 10 cm [4 in.] from
ing systems being tested shall be mounted parallel to and at a
the top of the subframe opening used to receive the glazing or
distance no greater than 3.0 6 0.15 m [120 6 6 in.] from the
glazing system. The sides shall be a minimum of 10 cm [4 in.]
interior face of the specimens. The witness panel shall cover
from the subframe opening used to receive the glazing or
the entire back wall of the witness area and shall consist of two
glazing system. The back wall of the witness area shall be 3.0
layers of material. The witness panel shall consist of a rear
6 0.15 m [120 6 6 in.] from the interior glazing face of the
layer of 25 mm [1 in.] extruded Styrofoam with a density of
specimen. See Fig. 1 for a cross section through the witness
3 3
24.8 to 32.0 kg/m [1.855 to 2.0 lb/ft ] and a front layer
area. Refer to Specification F2912 for discussion on hazard
consisting of 12.5 mm [0.5 in.] rigid foam plastic thermal
zones shown in Fig. 1.
insulation board composed of polyisocyanurate foam bonded
NOTE 1—For doors, curtain wall, storefront, or window wall systems
to a durable white-matte non-glare aluminum facer and a
that may span slab to slab, the witness area shall include a floor at the
reflective reinforced aluminum facer. The reflective surface
specified finished floor level for each level. And, the back wall of the
witness area shall be 3.0 6 0.15 m [120 6 6 in.] from the most interior shall be placed toward the window glazing. The insulation
3 3
glazing face of the specimen at all levels.
board shall have a density of 32.0 kg/m [2.0 lb/ft ]. The
6.7 Instrumentation: reflective reinforced facer shall be 0.008 cm [0.003 in.] thick
6.7.1 Pressure Transducers—The airblast pressure trans-
and shall be reinforced through lamination to Kraft paper. To
ducer shall be capable of defining the anticipated airblast
accommodate high-speed photography, a hole no greater than
pressure history within the linear range of the transducer. The
10 by 10 cm [4 by 4 in.] may be made in the upper or lower
transducers shall have a rise/response time and resolution
one-ninth quadrants of the witness panel.
sufficienttocapturethecompleteevent.Limitedlowfrequency
6.7.6 Other instrumentation such as deflection measuring
responsetransducersshallhaveadischargetimeconstantequal
devices can also be used if requested by the specifying
to approximately 30 to 50 times the initial positive phase
authority.
duration of the anticipated airblast pressure history.
6.7.2 Data Acquisition System (DAS)—The DAS shall con-
7. Hazards
sist of either an analog or digital recording system with a
sufficient number of channels to accommodate the pressure
7.1 Storage, handling, and detonation of high explosive
transducers and any other electronic measuring devices. The
material shall be conducted in accordance with applicable
DAS shall operate at a sufficiently high frequency to record
statutes and regulations by experienced professionals qualified
reliably the peak positive pressure. The DAS shall also
by an appropriate government agency to handle explosives.
incorporate filters to preclude alias frequency effects from the
7.2 The operation of a shock tube shall be conducted by
data.
6.7.3 Photographic Equipment—Photographic equipment experienced personnel regularly engaged in the operation of
shall be available to document the test. the equipment.
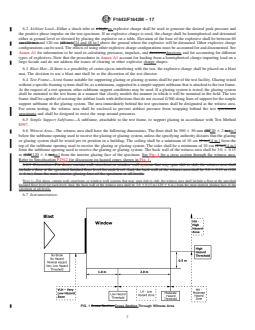
FIG. 1 Cross Section Through Witness Area
F1642/F1642M − 17
8. Specimens 9.2.2 Unless specified otherwise, the test frame shall be
placed so that the test specimens are oriented perpendicular to
8.1 The test sponsor shall provide the test specimens. In
a line from the detonation or air release point to the center of
addition, the test sponsor shall provide complete specimen
the test frame.
documentation, to include, but not be limited to, drawings and
9.3 Specimens:
material specifications. In addition, strength certifications for
9.3.1 The test director shall assign a number, and mark
each component used in the load path of the glazing product
shall be provided. accordingly, each test specimen.
9.3.2 Thickness measurements of the glazing material shall
8.2 The test director shall ensure that the test
...
This document is not an ASTM standard and is intended only to provide the user of an ASTM standard an indication of what changes have been made to the previous version. Because
it may not be technically possible to adequately depict all changes accurately, ASTM recommends that users consult prior editions as appropriate. In all cases only the current version
of the standard as published by ASTM is to be considered the official document.
Designation: F1642 − 12 F1642/F1642M − 17
Standard Test Method for
Glazing and Glazing Systems Subject to Airblast Loadings
This standard is issued under the fixed designation F1642;F1642/F1642M; the number immediately following the designation indicates
the year of original adoption or, in the case of revision, the year of last revision. A number in parentheses indicates the year of last
reapproval. A superscript epsilon (´) indicates an editorial change since the last revision or reapproval.
INTRODUCTION
Historical records show that fragments from glazing that hashave failed as the result of intentional
or accidental explosions present a serious threat of personal injury. Glazing failure also allows blast
pressure to enter the interior of buildings thus resulting in additional threat of personal injury and
facility damage. These risks increase in direct proportion to the amount of glazing used on the building
facade. This test method addresses only glazing and glazing systems. It assumes that the designer has
verified that other structural elements have been adequately designed to resist the anticipated airblast
pressures.
1. Scope
1.1 This test method sets forth procedures for the evaluation of hazards of glazing or glazing systems against airblast loadings.
The specifying authority shall provide the airblast loading parameters. Glazing systems shall be as defined in Specification F2912.
1.2 The data obtained from testing under this method shall be used to determine the glazing, glazing system, or glazing retrofit
system hazard rating using Specification F2912.
1.3 This test method allows for glazing to be tested and rated with or without framing systems.
1.4 This test method is designed to test and rate all glazing, glazing systems, and glazing retrofit systems including, but not
limited to, those fabricated from glass, plastic, glass-clad plastics, laminated glass, glass/plastic glazing materials, and film-backed
glass.organic coated glass, and other glazing retrofit systems not directly attached to the glazing or glazing system such as blast
curtains, cables, shades, and architectural mesh.
1.5 Units—The values stated in either SI units or inch-pound units are to be regarded as the standard. Values given in
parentheses are for information only. separately as standard. The values stated in each system may not be exact equivalents;
therefore, each system shall be used independently of the other. Combining values from the two systems may result in
nonconformance with the standard. For conversion of quantities in various systems of measurements to SI units, see Specification
E699.
1.6 This standard does not purport to address all of the safety concerns, if any, associated with its use. It is the responsibility
of the user of this standard to establish appropriate safety and health practices and determine the applicability of regulatory
limitations prior to use. See Section 7 for specific hazards statements.
2. Referenced Documents
2.1 ASTM Standards:
E699 Specification for Agencies Involved in Testing, Quality Assurance, and Evaluating of Manufactured Building Components
E997 Test Method for Evaluating Glass Breakage Probability Under the Influence of Uniform Static Loads by Proof Load
Testing
F2912 Specification for Glazing and Glazing Systems Subject to Airblast Loadings
2.2 ISO Standard:
ISO/IEC International Standard 17025 General Requirements for the Competence of Testing and Calibration Laboratories
This test method is under the jurisdiction of ASTM Committee F12 on Security Systems and Equipmentand is the direct responsibility of Subcommittee F12.10 on
Systems Products and Services.
Current edition approved Nov. 15, 2012March 1, 2017. Published January 2013March 2017. Originally approved in 1995. Last previous edition approved in 20102012
as F1642 – 04F1642 – 12.(2010). DOI: 10.1520/F1642-12.10.1520/F1642_F1642M-17.
For referenced ASTM standards, visit the ASTM website, www.astm.org, or contact ASTM Customer Service at service@astm.org. For Annual Book of ASTM Standards
volume information, refer to the standard’s Document Summary page on the ASTM website.
Copyright © ASTM International, 100 Barr Harbor Drive, PO Box C700, West Conshohocken, PA 19428-2959. United States
F1642/F1642M − 17
2.3 ANSI Standard:
SI 10 American National Standard for Use of the International System of Units (SI): The Modern Metric System
3. Terminology
3.1 Definitions:
3.1.1 airblast pressure—pressure, n—the pressure pressure increase that a surface experiences due to the detonation of a high
an explosive charge.
3.1.1.1 Discussion—
The airblast pressure history, as measured at a point on the surface, consists of two separate phases. The positive phase is
characterized by a nearly instantaneous rise to a maximum pressure followed by an exponential decay to ambient pressure. In the
negative phase, which follows immediately the positive phase, the pressure decreases below ambient for a period of time before
returning to ambient.
3.1.2 ambient temperature—temperature, n—24 6 11°C (75[75 6 20°F).20°F].
3.1.3 blast mat—mat, n—a steel or concrete pad upon which high that an explosive may be detonated to reduce the incidence
of ejecta.
3.1.4 effective positive phase duration (T)—duration, T, n—the duration of an idealized triangular positive phase reflected
airblast pressure history, having an instantaneous rise to the measured P, with a linear decay to ambient, such that the impulse of
the idealized pressure history equals i of the measured positive phase reflected airblast history.
3.1.4.1 Discussion—
The idealized triangular airblast wave is considered to provide a reliable standard measure of the positive phase airblast intensity.
3.1.5 hazard level—level, n—rating assigned to the performance of the glazing system based on the amount and location of
integral materials expelled from the system under specific blast conditions of the test.
3.1.6 peak positive pressure (P)—pressure, P, n—the maximum measured positive phase airblast pressure, kPa.
3.1.7 positive phase impulse (i)—impulse, i, n—the integral of the measured positive phase reflected airblast pressure history,
kPa-ms (psi-ms)[psi-ms] (more correctly called the specific positive phase impulse).
3.1.8 simply supported glazing—glazing, n—glazing supported in accordance with Test Method E997 with the edges of the glass
extending a minimum of 3-mm (0.125-in.) 3 mm [0.125 in.] beyond the neoprene supports.
3.1.9 test director—director, n—the individual identified by the independent testing laboratory as being responsible to complete
the specified tests as required and to document the results,results in accordance with this test method.
4. Summary of Test Method
4.1 4.1 This test method prescribes the apparatus, procedures, specimens, and other requirements necessary to execute a
physical test for the purpose of determining the hazard rating for a single test specimen, in accordance with Specification F2912,
of a glazing or glazing system subjected to an airblast loading.
5. Significance and Use
5.1 This test method provides a structured procedure to establish the hazard rating of glazing, glazing systems, and glazing
retrofit systems subjected to an airblast loading. Knowing the hazard rating provides the ability to assess the risk of personal injury
and facility damage.
5.2 The hazard rating for a glazing or glazing material does not imply that a single specimen will resist the specific airblast for
which it is rated with a probability of 1.0. The probability that a single glazing or glazing construction specimen will resist the
specific airblast for which it is rated increases proportionally with the number of test specimens that successfully resist the given
level of airblast to the hazard level for which it is rated.
6. Apparatus
6.1 Test Facility—Test facilities shall be accredited for this method to the requirements of ISO/IEC 17025 or qualified according
to PracticeSpecification E699. The test facility shall consist of either a shock tube or an open-air arena from which the airblast
loading is generated. The test facility shall also consist of a test frame and witness area as described below. in the following. The
test director shall ensure that potential environmental impact issues are determined and resolved prior to before testing. The test
director shall ensure that testing is conducted with inboard and outboard surfaces of the test specimen at ambient temperature in
accordance with 3.1.13.1.2.
F1642/F1642M − 17
6.2 Airblast Load—Either a shock tube or a high an explosive charge shall be used to generate the desired peak pressure and
the positive phase impulse on the test specimen. If an explosive charge is used, the charge shall be hemispherical and detonated
either at ground level or elevated by placing the explosive on a table. Elevation of the base of the explosive shall be between 60
cm (24 in.) and 120 cm (48 in.) [24 and 48 in.] above the ground where the explosive will be detonated. Other explosive charge
configurations can be used. The effects of using other explosive charge configurations must be accounted for and documented. See
Annex A1 for information to be used in calculating pressures, impulses, and durations,durations and for accounting for different
types of explosives. Note that the procedures in Annex A1 account for loading from a hemispherical charge imparting load on a
large facade and do not address the issues of clearing or other explosive charge shapes.
6.3 Blast Mat—If there is a possibility of crater ejecta interfering with the test, the explosive charge shall be placed on a blast
mat. The decision to use a blast mat shall be at the discretion of the test director.
6.4 Test Frame—A test frame suitable for supporting glazing or glazing systems shall be part of the test facility. Glazing tested
without a specific framing system shall be, as a minimum, supported in a simple support subframe that is attached to the test frame.
At the request of a test sponsor, other subframe support conditions may be used. If a glazing system is tested, the glazing system
shall be mounted to the test frame in a manner that closely models the manner in which it will be mounted in the field. The test
frame shall be capable of resisting the airblast loads with deflections that do not exceed L/360 along lines of support for the simple
support subframe or the glazing system. The area immediately behind the test specimens shall be designated as the witness area.
For arena testing, the witness area shall be enclosed to prevent airblast pressure from wrapping behind the test specimens,
specimens and shall be designed to resist the wrap around pressures.
6.5 Simple Support Subframe—A subframe, attachable to the test frame, to support glazing in accordance with Test Method
E997.
6.6 Witness Area—The witness area shall have the following dimensions. The floor shall be 500 6 50 mm (20[20 6 2 in.)in.]
below the subframe opening used to receive the glazing or glazing system, unless the specifying authority dictates that the glazing
or glazing system shall be tested per its position in a building. The ceiling shall be a minimum of 10 cm (4 in.)[4 in.] from the
top of the subframe opening used to receive the glazing or glazing system. The sides shall be a minimum of 10 cm (4 in.)[4 in.]
from the subframe opening used to receive the glazing or glazing system. The back wall of the witness area shall be 3.0 6 0.15
m (120[120 6 6 in.)in.] from the interior glazing face of the specimen. See Fig. 1 for a cross section through the witness area.
Refer to Specification F2912 for discussion on hazard zones shown in Fig. 1.
6.6.1 Discussion—For doors, curtain wall, storefront or window wall systems that may span slab to slab, the witness area shall
include a floor at the specified finished floor level for each level. And, the back wall of the witness area shall be 3.0 6 0.15 m (120
6 6 in.) from the most interior glazing face of the specimen at all levels.
NOTE 1—For doors, curtain wall, storefront, or window wall systems that may span slab to slab, the witness area shall include a floor at the specified
finished floor level for each level. And, the back wall of the witness area shall be 3.0 6 0.15 m [120 6 6 in.] from the most interior glazing face of the
specimen at all levels.
6.7 Instrumentation:
FIG. 1 Cross-Section Cross Section Through Witness Area
F1642/F1642M − 17
6.7.1 Pressure Transducers—The airblast pressure transducer shall be capable of defining the anticipated airblast pressure
history within the linear range of the transducer. The transducers shall have a rise/response time and resolution sufficient to capture
the complete event. Limited low frequency response transducers shall have a discharge time constant equal to approximately 30
to 50 times the initial positive phase duration of the anticipated airblast pressure history.
6.7.2 Data Acquisition System (DAS)—The DAS shall consist of either an analog or digital recording system with a sufficient
number of channels to accommodate the pressure transducers and any other electronic measuring devices. The DAS mustshall
operate at a sufficiently high frequency to record reliably the peak positive pressure. The DAS shall also incorporate filters to
preclude alias frequency effects from the data.
6.7.3 Photographic Equipment—Photographic equipment shall be available to document the test.
6.7.4 Temperature Measuring Device (TMD)—A TMD shall be used to accurately measure glazing surface temperatures.
6.7.5 Witness Panels—A witness panel for glazing or glazing systems being tested shall be mounted parallel to and at a distance
no greater than 3.0 6 0.15 m (120[120 6 6 in.)in.] from the interior face of the specimens. The witness panel shall cover the entire
back wall of the witness area and shall consist of two layers of material. The witness panel shall consist of a rear layer of 25-mm
3 3 3 3
(1-in.) 25 mm [1 in.] extruded Styrofoam with a density of 28.0 kg/m24.8 (1.8 lb/ft ) to 32.0 kg/m (2.0 [1.855 to 2.0 lb/ft )]
and a front layer consisting of 12.5-mm (0.5-in.) 12.5 mm [0.5 in.] rigid foam plastic thermal insulation board composed of
polyisocyanurate foam bonded to a durable white-matte non-glare aluminum facer and a reflective reinforced aluminum facer. The
reflective surface shall be placed toward the window glazing. The insulation board shall have a density of 32.0 kg/m (2.0[2.0
lb/ft ).]. The reflective reinforced facer shall be 0.008-cm (0.003-in.) 0.008 cm [0.003 in.] thick and shall be reinforced through
lamination to Kraft paper. To accommodate high-speed photography, a hole no greater than 10 by 10 cm (4[4 by 4 in.)in.] may
be made in the upper or lower one-ninth quadrants of the witness panel.
6.7.6 Other instrumentation such as deflection measuring devices can also be used if requested by the specifying authority.
7. Hazards
7.1 Storage, handling, and detonation of high explosive material or the operation of a shock tube shall be conducted in
accordance with applicable state and federal statutes and regulations by experienced professionals qualified by a U.S.an appropriate
government agency to handle explosives.
7.2 The operation of a shock tube shall be conducted by experienced personnel regularly engaged in the operation of the
equipment.
8. Specimens
8.1 The test sponsor shall provide the test specimens. In addition, the test sponsor shall provide complete specimen
documentation, to include, but not be limited to, drawings and material specifications. In addition, strength certifications for each
component used in the load path of the glazing product shall be provided.
8.2 The test director shall ensure that the test specimens are handled and stored in compliance with manufacturer’s instructions.
8.3 Each specimen shall be marked indelibly with the manufacturer’s model and serial numbers and the date of manufacture.
8.4 Each specimen shall be marked clearly to indicate its proper orientation to the explosive charge.
8.5 Glazing systems shall be installed p
...
Questions, Comments and Discussion
Ask us and Technical Secretary will try to provide an answer. You can facilitate discussion about the standard in here.
Loading comments...