Standard Specification for Alloy Steel Forgings for High-Strength Pressure Component Application

ABSTRACT
This specification covers the standard requirements for high-strength quenched and tempered alloy steel forgings for pressure vessels, isostatic presses, shock tubes, and similar components. These materials are not intended for welded construction. Three grades of nickel-chromium-molybdenum steels and six classes of increasing tensile strength are included. The strength class, section size, and configuration of the forging will largely dictate the applicable type of steel. Materials shall be manufactured by steel melting processes, rough machining, and final heat treatment, which shall consist of normalizing, reaustenitization, liquid quenching, and tempering. Conformance of the forging specimens to chemical composition requirements shall be analyzed by heat and product analyses. Proper sampling methods for mechanical properties testing shall be done by any of four possible ways, as judged appropriate. Steel specimens shall also undergo straight-beam and angle-beam ultrasonic examination, and magnetic particle examination procedures to evaluate nondestructive examination requirements. Repair welding of the forgings shall not be permitted.
SCOPE
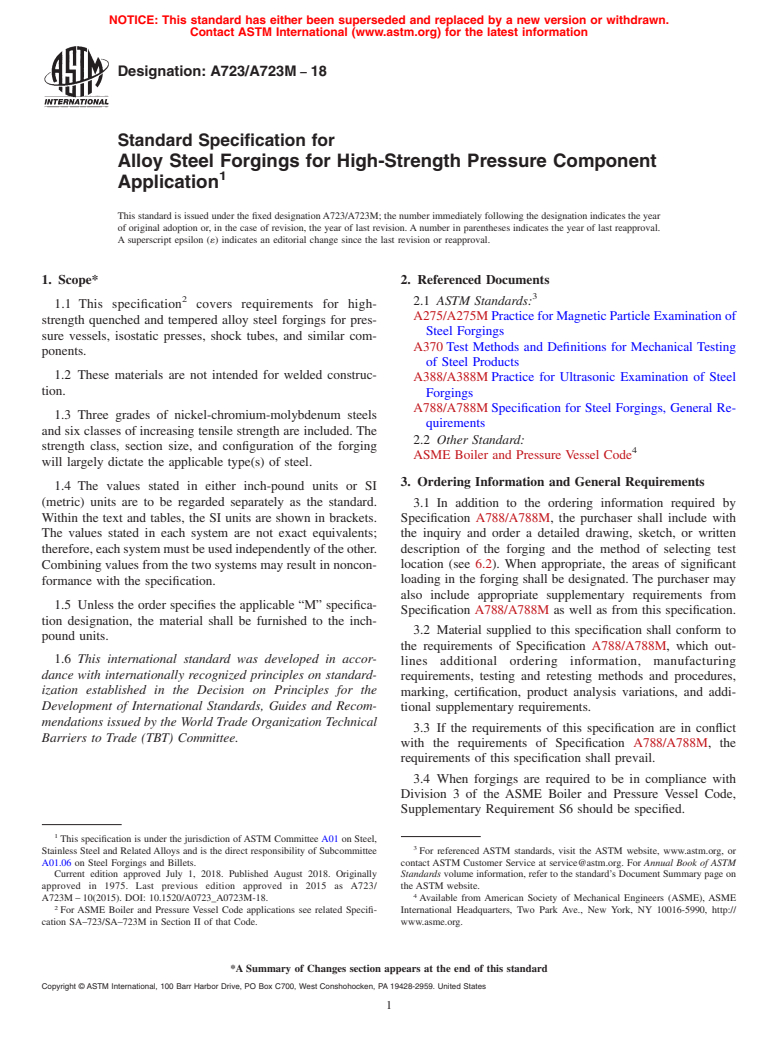
1.1 This specification2 covers requirements for high-strength quenched and tempered alloy steel forgings for pressure vessels, isostatic presses, shock tubes, and similar components.  
1.2 These materials are not intended for welded construction.  
1.3 Three grades of nickel-chromium-molybdenum steels and six classes of increasing tensile strength are included. The strength class, section size, and configuration of the forging will largely dictate the applicable type(s) of steel.  
1.4 The values stated in either inch-pound units or SI (metric) units are to be regarded separately as the standard. Within the text and tables, the SI units are shown in brackets. The values stated in each system are not exact equivalents; therefore, each system must be used independently of the other. Combining values from the two systems may result in nonconformance with the specification.  
1.5 Unless the order specifies the applicable “M” specification designation, the material shall be furnished to the inch-pound units.

General Information

Status
Historical
Publication Date
28-Feb-2015
Current Stage
Ref Project

Relations

Buy Standard

Technical specification
ASTM A723/A723M-10(2015) - Standard Specification for Alloy Steel Forgings for High-Strength Pressure Component Application
English language
5 pages
sale 15% off
Preview
sale 15% off
Preview
Technical specification
REDLINE ASTM A723/A723M-10(2015) - Standard Specification for Alloy Steel Forgings for High-Strength Pressure Component Application
English language
5 pages
sale 15% off
Preview
sale 15% off
Preview

Standards Content (Sample)


NOTICE: This standard has either been superseded and replaced by a new version or withdrawn.
Contact ASTM International (www.astm.org) for the latest information
Designation: A723/A723M −10 (Reapproved 2015)
Standard Specification for
Alloy Steel Forgings for High-Strength Pressure Component
Application
This standard is issued under the fixed designationA723/A723M; the number immediately following the designation indicates the year
of original adoption or, in the case of revision, the year of last revision. A number in parentheses indicates the year of last reapproval.
A superscript epsilon (´) indicates an editorial change since the last revision or reapproval.
1. Scope A788/A788M Specification for Steel Forgings, General Re-
2 quirements
1.1 This specification covers requirements for high-
2.2 Other Standards:
strength quenched and tempered alloy steel forgings for pres-
ASME Boiler and Pressure Vessel Code
sure vessels, isostatic presses, shock tubes, and similar com-
ponents.
3. Ordering Information and General Requirements
1.2 These materials are not intended for welded construc-
3.1 In addition to the ordering information required by
tion.
Specification A788/A788M, the purchaser shall include with
1.3 Three grades of nickel-chromium-molybdenum steels
the inquiry and order a detailed drawing, sketch, or written
and six classes of increasing tensile strength are included. The
description of the forging and the method of selecting test
strength class, section size, and configuration of the forging
location (see 6.2). When appropriate, the areas of significant
will largely dictate the applicable type(s) of steel.
loading in the forging shall be designated. The purchaser may
1.4 The values stated in either inch-pound units or SI
also include appropriate supplementary requirements from
(metric) units are to be regarded separately as the standard.
Specification A788/A788M as well as from this specification.
Within the text and tables, the SI units are shown in brackets.
3.2 Material supplied to this specification shall conform to
The values stated in each system are not exact equivalents;
the requirements of Specification A788/A788M, which out-
therefore,eachsystemmustbeusedindependentlyoftheother.
lines additional ordering information, manufacturing
Combining values from the two systems may result in noncon-
requirements, testing and retesting methods and procedures,
formance with the specification.
marking, certification, product analysis variations, and addi-
1.5 Unless the order specifies the applicable “M” specifica- tional supplementary requirements.
tion designation, the material shall be furnished to the inch-
3.3 If the requirements of this specification are in conflict
pound units.
with the requirements of Specification A788/A788M, the
requirements of this specification shall prevail.
2. Referenced Documents
3 3.4 When forgings are required to be in compliance with
2.1 ASTM Standards:
Division 3 of the ASME Boiler and Pressure Vessel Code,
A275/A275M Practice for Magnetic Particle Examination of
Supplementary Requirement S6 should be specified.
Steel Forgings
A370 Test Methods and Definitions for Mechanical Testing
4. Materials and Manufacture
of Steel Products
A388/A388M Practice for Ultrasonic Examination of Steel 4.1 Melting Practice—The steel melting procedures of
Specification A788/A788M shall apply except that the open-
Forgings
hearth process shall not be used, and that the steel shall be
vacuum degassed prior to or during the pouring of the ingot, in
This specification is under the jurisdiction of ASTM Committee A01 on Steel,
order to remove objectionable gases, particularly hydrogen.
Stainless Steel and Related Alloys and is the direct responsibility of Subcommittee
4.1.1 Use of secondary remelting or refining operations may
A01.06 on Steel Forgings and Billets.
Current edition approved March 1, 2015. Published March 2015. Originally
be considered for particularly demanding applications.
approved in 1975. Last previous edition approved in 2010 as A723/A723M – 10.
4.2 Discard—Sufficient discard shall be taken from each
DOI: 10.1520/A0723_A0723M-10R15.
For ASME Boiler and Pressure Vessel Code applications see related Specifi-
ingottosecurefreedomfrompipingandexcessivesegregation.
cation SA–723/SA–723M in Section II of that Code.
For referenced ASTM standards, visit the ASTM website, www.astm.org, or
contact ASTM Customer Service at service@astm.org. For Annual Book of ASTM
Standards volume information, refer to the standard’s Document Summary page on Available fromAmerican Society of Mechanical Engineers (ASME), Two Park
the ASTM website. Ave., New York, NY 10016-5990, http://www.asme.org.
*A Summary of Changes section appears at the end of this standard
Copyright © ASTM International, 100 Barr Harbor Drive, PO Box C700, West Conshohocken, PA 19428-2959. United States
A723/A723M − 10 (2015)
4.3 Heat Treatment: supplier and approved by the purchaser.Wherever practical, all
4.3.1 Forgings shall be rough-machined prior to final heat testing shall be from integral prolongations of the forging.
treatment if it is necessary to reduce the mass to ensure full
6.2.1 Method 1—This method shall always be used when
hardening or to meet the requirements of 6.2. The risk of
the maximum quenched thickness does not exceed 4 in. [100
cracking during heat treatment with high-hardenability steels
mm]. Datum points of the specimens, as described in 6.2, shall
of the type covered by this specification should be borne in
belocatedintheforgingortestforging(6.2.4)atmid-thickness
mind when deciding on the degree of surface preparation
and at least ⁄3 T (T is the maximum heat-treated thickness)
before heat treatment.
from the quenched end surface or nearest adjacent surfaces.
4.3.2 Heat Treatment for Mechanical Properties—Heat
6.2.2 Method 2—t by 2t, where t is the distance from the
treatment shall consist of normalizing (which may be part of
area of significant loading (3.1) to the nearest quenched
the preliminary treatment), reaustenitization, liquid quenching,
surface. However, the datum points of the specimens as
and tempering. The forgings shall be quenched in a suitable
described in 6.2 shall not be nearer to one quenched surface
liquid medium by spraying or immersion. Quenching shall be 3
than ⁄4 in. [20 mm] and to the second quenched surface than 1
followed by tempering at a minimum temperature of 1000°F 1
⁄2 in. [40 mm]. When this method of testing is employed,
[540°C]. The minimum time at tempering temperature shall be
forgings are usually manufactured in accordance with a
1 1
⁄2 h/in. [ ⁄2 h/25 mm] of maximum section thickness, unless
purchaser-approved drawing showing prequenched dimensions
otherwise agreed between supplier and purchaser.
and the location of mechanical test specimens. It is commonly
used for disk-type forgings such as tube sheets and covers.
5. Chemical Composition
6.2.3 Method 3—For maximum quenched thicknesses in
5.1 Heat Analysis—The heat analysis obtained from sam-
excess of 4 in. [100 mm] as heat treated. Where this method of
pling in accordance with Specification A788/A788M shall
testing is employed, the datum points of the test specimen, as
comply with Table 1. 1
described in 6.2, shall be removed ⁄4 T from the nearest
5.1.1 Temper Embrittlement Control—The purchaser’s at-
quenched surface and ⁄3 T from the quenched end surface or
tention is drawn to Supplementary Requirement S24 in Speci-
nearest adjacent surface.
fication A788/A788M for application of the J Factor which
6.2.4 Method 4—Test specimens shall be taken from a
may be of assistance in the control of temper embrittlement in
representative separate test forging made from the same heat of
forgings produced to Specification A723/A723M.
steel, which shall receive substantially the same reduction and
5.2 ProductAnalysis—The manufacturer shall use the prod- type of hot working, and have a cross section not less than the
production forgings which it represents. It shall be heat treated
uct analysis provision of Specification A788/A788M to obtain
a product analysis from a forging representing each heat or in the same furnace charge and under the same conditions as
the production forgings. The test specimen shall be removed
multiple heat. The purchaser may also make this determination
in accordance with Specification A788/A788M. using the Method 3 procedure.
6.3 Thermal Buffers:
6. Mechanical Properties
6.3.1 Thermal buffer rings, at leastT byT in cross section or
6.1 General Requirements—The forging shall conform to
sections of such a ring at least 3T in length, shall be welded to
the requirements of Table 2 and Table 3.The largest obtainable
the test end(s) of a forging prior to heat treatment for
tension test specimen as specified in Test Methods and Defi-
mechanical properties. The buffer material may be any weld-
nitions A370 (that is, standard round 0.500-in. [12.5-mm]
able carbon or low-alloy steel and shall be joined to the forging
diameter specimen) shall be used. Charpy V-notch Type A
with a partial penetration-type weld which completely seals the
impact specimens, as shown in Test Methods and Definitions
buffered surface. The test coupons shall be removed from the
A370, shall be used.
forging in the region buffered by the ring or ring segments. If
6.2 Sampling—The mid-point of the gage length of tension
the latter are used, the test coupons shall be removed from the
test specimens and the area under the notch of impact speci- forging in the area under the center ⁄3 of the buffer ring
mens shall be located in accordance with one of the following segment length. In either case, the test specimens shall be
methods as specified by the purchaser, or suggested by the
located at a minimum distance of ⁄2 in. [13 mm] from the
buffered surface of the forging and at least ⁄4 T from a
quenched surface of the forging. Buffered weld areas must be
TABLE 1 Chemical Requirements
at least 1 in. [25 mm] from any finished machining surface of
Composition, % the complete forging.
Grade 1 Grade 2 Grade 3
6.3.2 Bearing in mind the characteristics of the base mate-
Carbon, max 0.35 0.40 0.40
rials included in this specification, precautions should be taken,
Manganese, max 0.90 0.90 0.90
such as the use of pre- and post-weld heating and austenitic
Phosphorus, max 0.015 0.015 0.015
weld metal, to minimize the occurrence of crack-like defects.
Sulfur, max 0.015 0.015 0.015
Silicon, max 0.35 0.35 0.35
6.3.3 Approval of the purchaser should be obtained for the
Nickel 1.5 to 2.25 2.3 to 3.3 3.3 to 4.5
use of this method.
Chromium 0.80 to 2.00 0.80 to 2.00 0.80 to 2.00
Molybdenum 0.20 to 0.40 0.30 to 0.50 0.40 to 0.80
6.4 Samples shall be removed from the forgings after
Vanadium, max 0.20 0.20 0.20
quenching and tempering.
A723/A723M − 10 (2015)
TABLE 2 Tensile Requirements
A B C
Class 1 Class 2 Class 2a Class 3 Class 4 Class 5
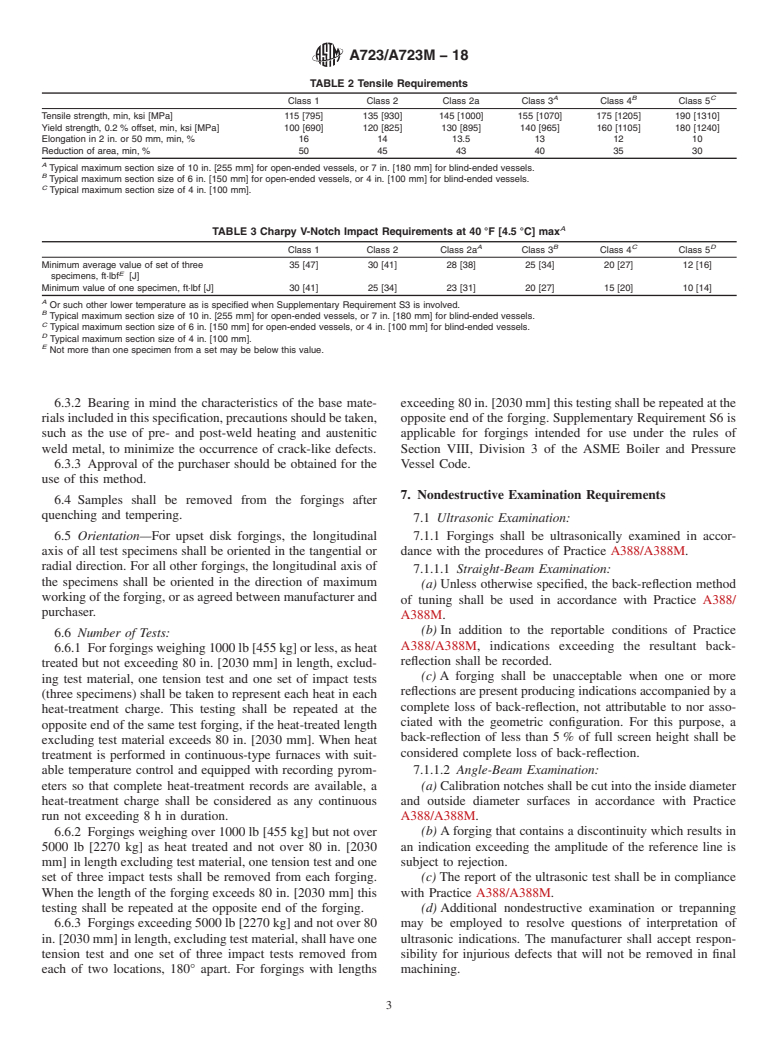
Tensile strength, min, ksi [MPa] 115 [795] 135 [930] 145
...


This document is not an ASTM standard and is intended only to provide the user of an ASTM standard an indication of what changes have been made to the previous version. Because
it may not be technically possible to adequately depict all changes accurately, ASTM recommends that users consult prior editions as appropriate. In all cases only the current version
of the standard as published by ASTM is to be considered the official document.
Designation: A723/A723M − 10 A723/A723M − 10 (Reapproved 2015)
Standard Specification for
Alloy Steel Forgings for High-Strength Pressure Component
Application
This standard is issued under the fixed designation A723/A723M; the number immediately following the designation indicates the year
of original adoption or, in the case of revision, the year of last revision. A number in parentheses indicates the year of last reapproval.
A superscript epsilon (´) indicates an editorial change since the last revision or reapproval.
1. Scope*Scope
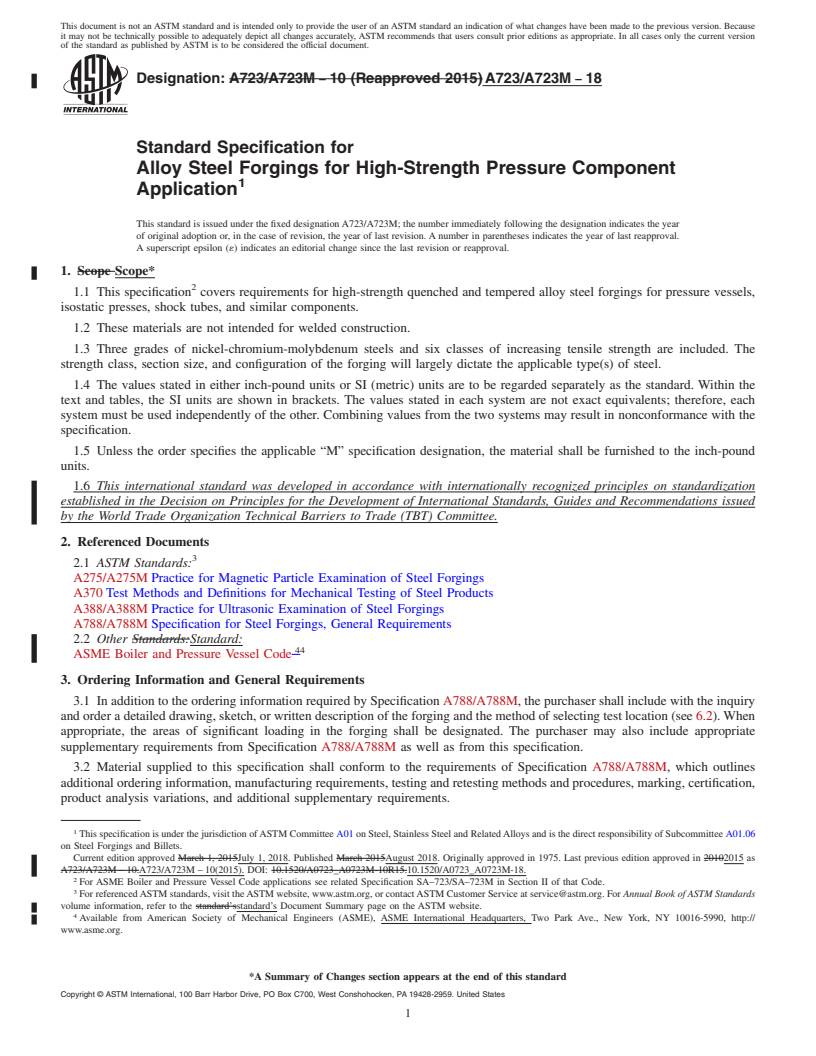
1.1 This specification covers requirements for high-strength quenched and tempered alloy steel forgings for pressure vessels,
isostatic presses, shock tubes, and similar components.
1.2 These materials are not intended for welded construction.
1.3 Three grades of nickel-chromium-molybdenum steels and six classes of increasing tensile strength are included. The
strength class, section size, and configuration of the forging will largely dictate the applicable type(s) of steel.
1.4 The values stated in either inch-pound units or SI (metric) units are to be regarded separately as the standard. Within the
text and tables, the SI units are shown in brackets. The values stated in each system are not exact equivalents; therefore, each
system must be used independently of the other. Combining values from the two systems may result in nonconformance with the
specification.
1.5 Unless the order specifies the applicable “M” specification designation, the material shall be furnished to the inch-pound
units.
2. Referenced Documents
2.1 ASTM Standards:
A275/A275M Practice for Magnetic Particle Examination of Steel Forgings
A370 Test Methods and Definitions for Mechanical Testing of Steel Products
A388/A388M Practice for Ultrasonic Examination of Steel Forgings
A788/A788M Specification for Steel Forgings, General Requirements
2.2 Other Standards:
ASME Boiler and Pressure Vessel Code
3. Ordering Information and General Requirements
3.1 In addition to the ordering information required by Specification A788/A788M, the purchaser shall include with the inquiry
and order a detailed drawing, sketch, or written description of the forging and the method of selecting test location (see 6.2). When
appropriate, the areas of significant loading in the forging shall be designated. The purchaser may also include appropriate
supplementary requirements from Specification A788/A788M as well as from this specification.
3.2 Material supplied to this specification shall conform to the requirements of Specification A788/A788M, which outlines
additional ordering information, manufacturing requirements, testing and retesting methods and procedures, marking, certification,
product analysis variations, and additional supplementary requirements.
3.3 If the requirements of this specification are in conflict with the requirements of Specification A788/A788M, the
requirements of this specification shall prevail.
This specification is under the jurisdiction of ASTM Committee A01 on Steel, Stainless Steel and Related Alloys and is the direct responsibility of Subcommittee A01.06
on Steel Forgings and Billets.
Current edition approved Nov. 1, 2010March 1, 2015. Published December 2010March 2015. Originally approved in 1975. Last previous edition approved in 20082010
as A723/A723M – 08.A723/A723M – 10. DOI: 10.1520/A0723_A0723M-10. 10.1520/A0723_A0723M-10R15.
For ASME Boiler and Pressure Vessel Code applications see related Specification SA–723/SA–723M in Section II of that Code.
For referenced ASTM standards, visit the ASTM website, www.astm.org, or contact ASTM Customer Service at service@astm.org. For Annual Book of ASTM Standards
volume information, refer to the standard’s Document Summary page on the ASTM website.
Available from American Society of Mechanical Engineers (ASME), ASME International Headquarters, Three Two Park Ave., New York, NY 10016-5990,
http://www.asme.org.
*A Summary of Changes section appears at the end of this standard
Copyright © ASTM International, 100 Barr Harbor Drive, PO Box C700, West Conshohocken, PA 19428-2959. United States
A723/A723M − 10 (2015)
3.4 When forgings are required to be in compliance with Division 3 of the ASME Boiler and Pressure Vessel Code,
Supplementary Requirement S6 should be specified.
4. Materials and Manufacture
4.1 Melting Practice—The steel melting procedures of Specification A788/A788M shall apply except that the open-hearth
process shall not be used, and that the steel shall be vacuum degassed prior to or during the pouring of the ingot, in order to remove
objectionable gases, particularly hydrogen.
4.1.1 Use of secondary remelting or refining operations may be considered for particularly demanding applications.
4.2 Discard—Sufficient discard shall be taken from each ingot to secure freedom from piping and excessive segregation.
4.3 Heat Treatment:
4.3.1 Forgings shall be rough-machined prior to final heat treatment if it is necessary to reduce the mass to ensure full hardening
or to meet the requirements of 6.2. The risk of cracking during heat treatment with high-hardenability steels of the type covered
by this specification should be borne in mind when deciding on the degree of surface preparation before heat treatment.
4.3.2 Heat Treatment for Mechanical Properties—Heat treatment shall consist of normalizing (which may be part of the
preliminary treatment), reaustenitization, liquid quenching, and tempering. The forgings shall be quenched in a suitable liquid
medium by spraying or immersion. Quenching shall be followed by tempering at a minimum temperature of 1000°F [540°C]. The
1 1
minimum time at tempering temperature shall be ⁄2 h/in. [ ⁄2 h/25h/25 mm] of maximum section thickness, unless otherwise
agreed between supplier and purchaser.
5. Chemical Composition
5.1 Heat Analysis—The heat analysis obtained from sampling in accordance with Specification A788/A788M shall comply with
Table 1.
5.1.1 Temper Embrittlement Control—The purchaser’s attention is drawn to Supplementary Requirement S24 in Specification
A788/A788M for application of the J Factor which may be of assistance in the control of temper embrittlement in forgings
produced to Specification A723/A723M.
5.2 Product Analysis—The manufacturer shall use the product analysis provision of Specification A788/A788M to obtain a
product analysis from a forging representing each heat or multiple heat. The purchaser may also make this determination in
accordance with Specification A788/A788M.
6. Mechanical Properties
6.1 General Requirements—The forging shall conform to the requirements of Table 2 and Table 3. The largest obtainable
tension test specimen as specified in Test Methods and Definitions A370 (that is, standard round 0.500-in. [12.5-mm] diameter
specimen) shall be used. Charpy V-notch Type A impact specimens, as shown in Test Methods and Definitions A370, shall be used.
6.2 Sampling—The mid-point of the gage length of tension test specimens and the area under the notch of impact specimens
shall be located in accordance with one of the following methods as specified by the purchaser, or suggested by the supplier and
approved by the purchaser. Wherever practical, all testing shall be from integral prolongations of the forging.
6.2.1 Method 1—This method shall always be used when the maximum quenched thickness does not exceed 4 in. [100 mm].
Datum points of the specimens, as described in 6.2, shall be located in the forging or test forging (6.2.4) at mid-thickness and at
least ⁄3 T (T is the maximum heat-treated thickness) from the quenched end surface or nearest adjacent surfaces.
6.2.2 Method 2—t by 2t, where t is the distance from the area of significant loading (3.1) to the nearest quenched surface.
However, the datum points of the specimens as described in 6.2 shall not be nearer to one quenched surface than ⁄4 in. [20 mm]
and to the second quenched surface than 1 ⁄2 in. [40 mm]. When this method of testing is employed, forgings are usually
manufactured in accordance with a purchaser-approved drawing showing prequenched dimensions and the location of mechanical
test specimens. It is commonly used for disk-type forgings such as tube sheets and covers.
TABLE 1 Chemical Requirements
Composition, %
Grade 1 Grade 2 Grade 3
Carbon, max 0.35 0.40 0.40
Manganese, max 0.90 0.90 0.90
Phosphorus, max 0.015 0.015 0.015
Sulfur, max 0.015 0.015 0.015
Silicon, max 0.35 0.35 0.35
Nickel 1.5 to 2.25 2.3 to 3.3 3.3 to 4.5
Chromium 0.80 to 2.00 0.80 to 2.00 0.80 to 2.00
Molybdenum 0.20 to 0.40 0.30 to 0.50 0.40 to 0.80
Vanadium, max 0.20 0.20 0.20
A723/A723M − 10 (2015)
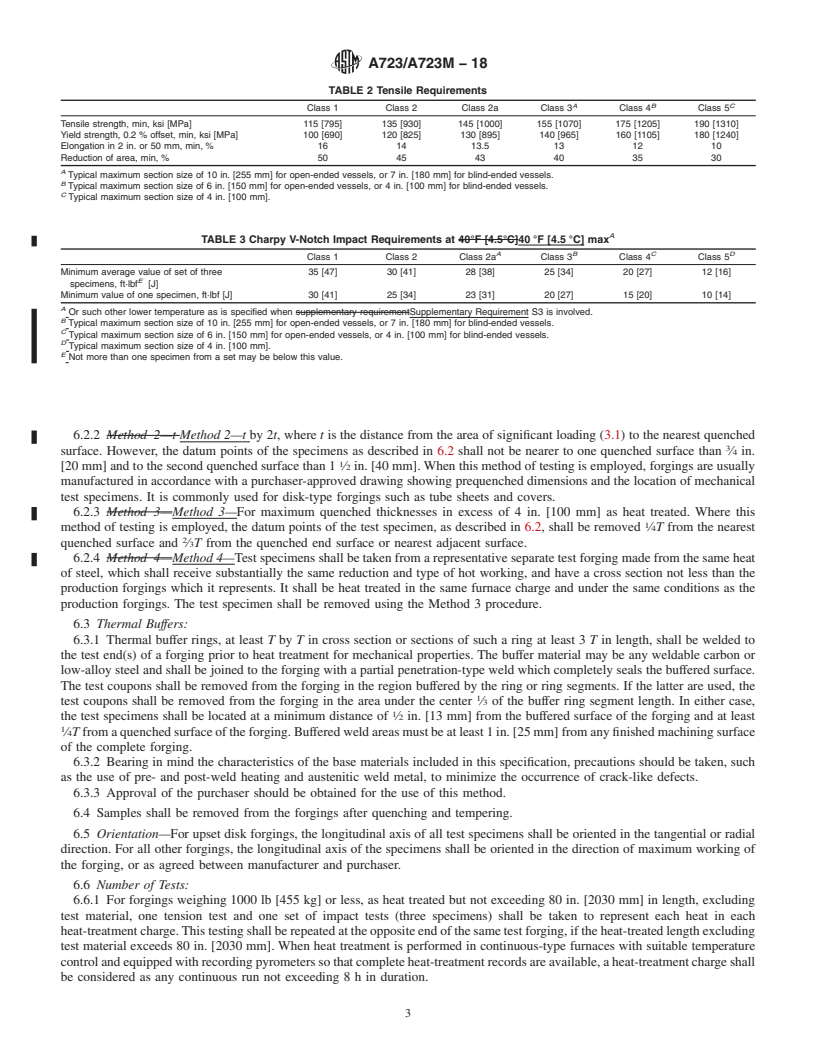
TABLE 2 Tensile Requirements
A B C
Class 1 Class 2 Class 2a Class 3 Class 4 Class 5
Tensile strength, min, ksi [MPa] 115 [795] 135 [930] 145 [1000] 155 [1070] 175 [1205] 190 [1310]
Yield strength, 0.2 % offset, min, ksi [MPa] 100 [690] 120 [825] 130 [895] 140 [965] 160 [1105] 180 [1240]
Elongation in 2 in. or 50 mm, min, % 16 14 13.5 13 12 10
Reduction of area, min, % 50 45 43 40 35 30
A
Typical maximum section size of 10 in. [255 mm] for open-ended vessels, or 7 in. [180 mm] for blind-ended vessels.
B
Typical maximum section size of 6 in. [150 mm] for open-ended vessels, or 4 in. [100 mm] for blind-ended vessels.
C
Typical maximum section size of 4 in. [100 mm].
A
TABLE 3 Charpy V-Notch Impact Requirements at 40°F [4.5°C] max
A B C D
Class 1 Class 2 Class 2a Class 3 Class 4 Class 5
Minimum average value of set of three 35 [47] 30 [41] 28 [38] 25 [34] 20 [27] 12 [16]
E
specimens, ft·lbf (J)
Minimum value of one specimen, ft·lbf (J) 30 [41] 25 [34] 23 [31] 20 [27] 15 [20] 10 [14]
A
TABLE 3 Charpy V-Notch Impact Requirements at 40°F [4.5°C] max
A B C D
Class 1 Class 2 Class 2a Class 3 Class 4 Class 5
Minimum average value of set of three 35 [47] 30 [41] 28 [38] 25 [34] 20 [27] 12 [16]
E
specimens, ft·lbf [J]
Minimum value of one specimen, ft·lbf [J] 30 [41] 25 [34] 23 [31] 20 [27] 15 [20] 10 [14]
A
Or such other lower temperature as is specified when supplementary requirement S3 is involved.
B
Typical maximum section size of 10 in. [255 mm] for open-ended vessels, or 7 in. [180 mm] for blind-ended vessels.
C
Typical maximum section size of 6 in. [150 mm] for open-ended vessels, or 4 in. [100 mm] for blind-ended vessels.
D
Typical maximum section size of 4 in. [100 mm].
E
Not more than one specimen from a set may be below this value.
6.2.3 Method 3—For maximum quenched thicknesses in excess of 4 in. [100 mm] as heat treated. Where this method of testing
is employed, the datum points of the test specimen, as described in 6.2, shall be removed ⁄4T from the nearest quenched surface
and ⁄3T from the quenched end surface or nearest adjacent surface.
6.2.4 Method 4—Test specimens shall be taken from a representative separate test forging made from the same heat of steel,
which shall receive substantially the same reduction and type of hot working, and have a cross section not less than the production
forgings which it represents. It shall be heat treated in the same furnace charge and under the same conditions as the production
forgings. The test specimen shall be removed using the Method 3 procedure.
6.3 Thermal Buffers:
6.3.1 Thermal buffer rings, at least T by T in cross section or sections of such a ring at least 3 T in length, shall be welded to
the test end(s) of a forging prior to heat treatment for mechanical properties. The buffer material may be any weldable carbon or
low-alloy steel and shall be joined to the forging with a partial penetration-type weld which completely seals the buffered surface.
The test coupons shall be removed from the forging in the region buffered by the ring or ring segments. If the latter are used, the
test coupons shall be removed from the forging in the area under the center ⁄3 of the buffer ring segment length. In either case,
the test specimens shall be located at a minimum distance of ⁄2 in. [13 mm] from the buffered surface of the forging and at least
⁄4T from a quenched surface of the forging. Buffered weld areas must be at least 1 in. [25 mm] from any finished machining surface
of the complete forging.
6.3.2 Bearing in mind the characteristics of the base materials included in this specification, precautions should be taken, such
as the use of pre- and post-weld heating and austenitic weld metal, to minimize the occurrence of crack-like defects.
6.3.3 Approval of the purchaser should be obtained for the use of this method.
6.4 Samples shall be removed from the forgings after quenching and tempering.
6.5 Orientation—For upset disk forgings, the longitudinal axis of all test specimens shall be oriented in the tangential or radial
direction. For all other forgings, the longitudinal axis of the specimens shall be oriented in the direction of maximum working of
the forging, or as agreed between manufacturer and purchaser.
6.6 Number of Tests:
6.6.1 For forgings weighing 1000 lb [455 kg] or less, as heat treated but not exceeding 80 in. [2030 mm] in length, excluding
test material, one tension test and one set of impact tests (three specimens) shall be taken to represent each heat in each
heat-treatment charge. This testing shall be repeated at the opposite end of the same test forging, if the heat-treated length excluding
test material exceeds 80 in. [2030 mm]. When heat treatment is performed in continuous-type furnaces with suitable temperature
control and equipped with recording pyrometers so that complete heat-treatment records are available, a heat-treatment charge shall
be considered as any continuous run not exceeding 8 h in duration.
A723/A723M − 10 (2015)
6.6.2 Forgings weighing over 1000 lb [455 kg] but not over 5000 lb [2270 kg] as heat treated and not over 80 in. [2030 mm]
in length excluding test material, one tension test and one set of three impact tests shall be removed from each forging. When the
length of the forging exceeds 80 in. [2030 mm] this testing shall be repeated at the opposite end of the forging.
6.6.3 Forgings exceeding 5000 lb [2270 kg] and not over 80 in. [2030 mm] in length, excluding test material, shall have one
tension test and one set of three impact tests removed from each of two locations, 180° apart. For forgings with lengths exceeding
80 in. [2030 mm] this testing shall be repeated at the opposite end of the forging. Supplementary Requirement S6 is applicable
for forgings intended fo
...

Questions, Comments and Discussion

Ask us and Technical Secretary will try to provide an answer. You can facilitate discussion about the standard in here.