ASTM D2202-00(2010)
(Test Method)Standard Test Method for Slump of Sealants
Standard Test Method for Slump of Sealants
SIGNIFICANCE AND USE
Excessive sealant slump or sag in a vertical joint may cause improper bead shape or inadequate sealant thickness in the completed joint. Slump measurements, as described in this test method, serve to evaluate only this application characteristic; they do not predict the performance capability of the sealant after installation.
SCOPE
1.1 This test method covers a laboratory procedure for the determination of the degree of slump of a sealant when used in a vertical joint in a structure.
1.2 The values stated in either inch-pound or SI (metric) units are to be separately regarded as the standard. Within the text, the inch-pound units are shown in parentheses.
1.3 This standard does not purport to address all of the safety concerns, if any, associated with its use. It is the responsibility of the user of this standard to establish appropriate safety and health practices and determine the applicability of regulatory limitations prior to use.
Note 1—A related ISO standard is ISO 7390. The user should compare to determine how it differs from this test method.
General Information
Relations
Standards Content (Sample)
NOTICE: This standard has either been superseded and replaced by a new version or withdrawn.
Contact ASTM International (www.astm.org) for the latest information
Designation: D2202 − 00 (Reapproved 2010)
StandardTest Method for
Slump of Sealants
This standard is issued under the fixed designation D2202; the number immediately following the designation indicates the year of
original adoption or, in the case of revision, the year of last revision. A number in parentheses indicates the year of last reapproval. A
superscript epsilon (´) indicates an editorial change since the last revision or reapproval.
1. Scope istic; they do not predict the performance capability of the
sealant after installation.
1.1 This test method covers a laboratory procedure for the
determination of the degree of slump of a sealant when used in
5. Apparatus
a vertical joint in a structure.
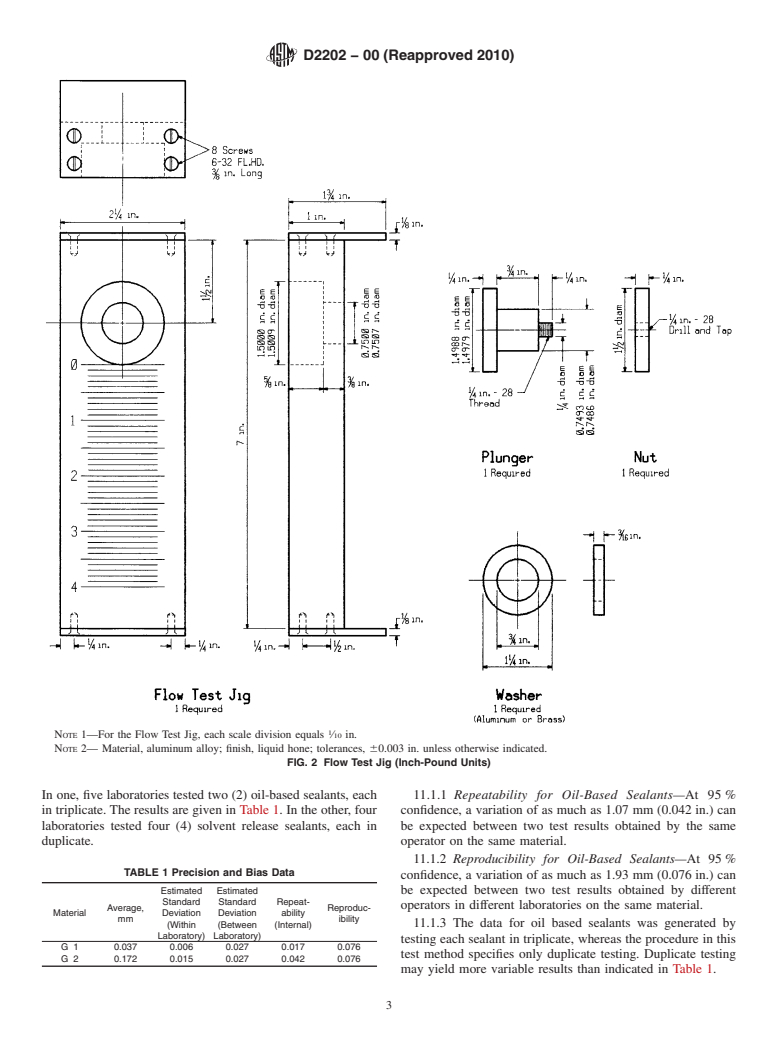
5.1 Flow Test Jig, constructed in accordance with Fig. 1 (SI
1.2 The values stated in either inch-pound or SI (metric)
units) or Fig. 2 (inch-pound units).
units are to be separately regarded as the standard. Within the
NOTE 2—Most existing flow test jigs have been constructed in inch-
text, the inch-pound units are shown in parentheses.
pound units. Preferred construction of new jigs is as described in Fig. 1 in
1.3 This standard does not purport to address all of the
SI units.
safety concerns, if any, associated with its use. It is the
5.2 Gravity Convection Oven, having a temperature con-
responsibility of the user of this standard to establish appro-
trolled at 50 6 2°C (122 6 3.6°F).
priate safety and health practices and determine the applica-
5.3 Steel Spatula:
bility of regulatory limitations prior to use.
5.4 Plastic Scraper, such as an ordinary 114 by 114-mm
NOTE 1—Arelated ISO standard is ISO 7390.The user should compare
1 1
(4 ⁄2 by 4 ⁄2-in.) plastic tile.
to determine how it differs from this test method.
2. Referenced Documents
6. Reagent
2.1 ASTM Standards:
6.1 Solvent, such as methyl ethyl ketone.
C717 Terminology of Building Seals and Sealants
7. Sampling
2.2 ISO Standards:
ISO 7390 Building Construction–Sealants–Determination of
7.1 Take test specimens from a previously unopened con-
Resistance to Flow
tainer and mix thoroughly before using, if required for homo-
geneity.
3. Terminology
8. Conditioning
3.1 Definitions—Refer to Terminology C717 for definitions
of the following terms found in this test method: bead, joint,
8.1 Condition both the test jig and the sealant to be tested
sealant.
for at least5hat23 6 2°C (73.4 6 3.6°F).
4. Significance and Use
9. Procedure
4.1 Excessive sealant slump or sag in a vertical joint may
9.1 Thoroughlycleanthetestjigwiththesolvent;thenplace
cause improper bead shape or inadequate sealant thickness in
it on a level table with the front face upward and the plunger
the completed joint. Slump measurements, as described in this
depressed to the limit of its travel.
test method, serve to evaluate only this application character-
9.2 Place the mixed, conditioned sealant in the jig cavity.
Level the sealant flush with the surface of the block, using one
ThistestmethodisunderthejurisdictionofASTMCommitteeC24onBuilding
gentle upward stroke of the plastic scraper held at a 45° angle.
Seals and Sealants and is the direct responsibility of Subcommittee C24.20 on
Avoid forming air pockets in the sealant, especially near the
General Test Methods.
surface of the plunger.
CurrenteditionapprovedJune1,2010.PublishedJuly2010.Originallyapproved
in 1963 as D2202 – 63 T. Last previous edition approved in 2006 as
9.3 Carefully clean the area around the cavity with the
D2202 – 00(2006). DOI: 10.1520/D2202-00R10.
plasticscraperandacloth;thenplacethejigimmediatelyonits
For referenced ASTM standards, visit the ASTM website, www.astm.org, or
contact ASTM Customer Service at service@astm.org. For Annual Book of ASTM
end and advance the plunger gently to one half its maximum
Standards volume information, refer to the standard’s Document Summary page on
travel, or 4.75 mm ( ⁄16 in.). This leaves a solid cylinder of
the ASTM website.
caulking or sealant 38.1 mm (1 ⁄2 in.) in diameter and 4.75 mm
Available from American National Standards Institute, 11 W. 42nd St., 13th
Floor, New York, NY 10036. ( ⁄16 in.) thick, ready to flow down the face of the instrument.
Copyright © ASTM International, 100 Barr Harbor Drive, PO Box C700, West Conshohocken, PA 19428-2959. United States
D2202 − 00 (Reapproved 2010)
NOTE 1—For the Flow Test Jig, each scale division
...


Questions, Comments and Discussion
Ask us and Technical Secretary will try to provide an answer. You can facilitate discussion about the standard in here.