ASTM D4555-01(2005)
(Test Method)Standard Test Method for Determining Deformability and Strength of Weak Rock by an In Situ Uniaxial Compressive Test
Standard Test Method for Determining Deformability and Strength of Weak Rock by an In Situ Uniaxial Compressive Test
SIGNIFICANCE AND USE
Since there is no reliable method of predicting the overall strength and deformation data of a rock mass from the results of laboratory tests on small specimens, in situ tests on large specimens are necessary. Such tests also have the advantage that the rock specimen is tested under similar environmental conditions as prevailing for the rock mass.
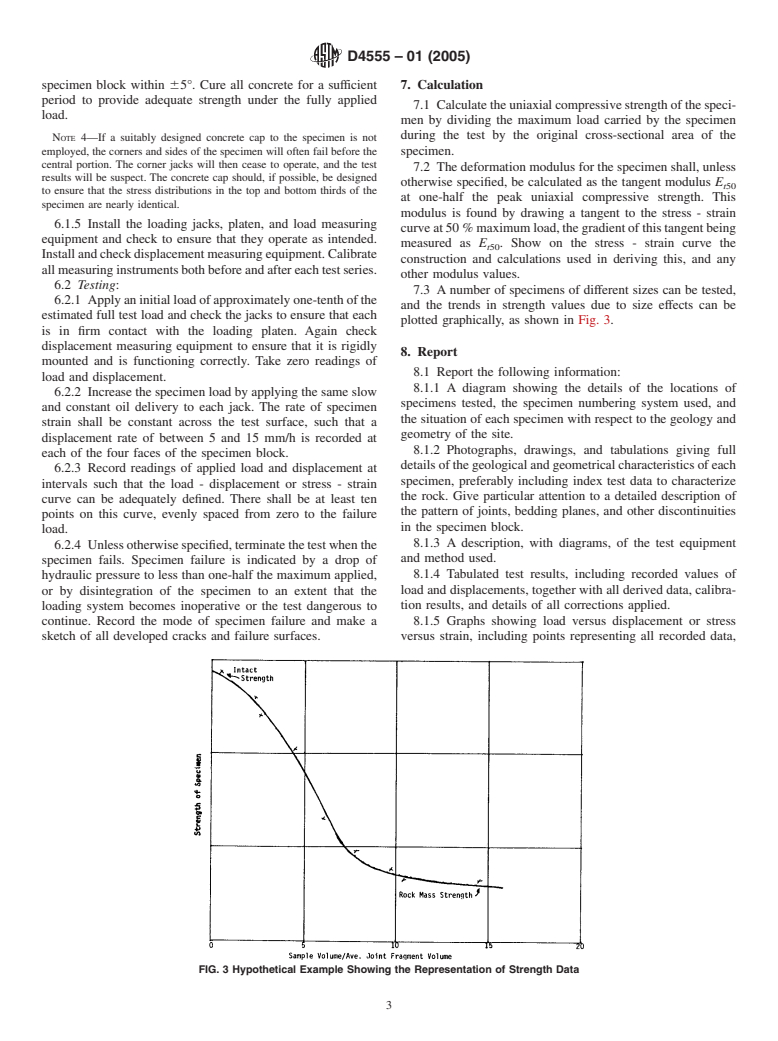
Since the strength of rock is dependent on the size of the test specimen, it is necessary to test several specimens (laboratory or field, or both) of progressively increasing size until an asymptotically constant strength value is found. This value is taken to represent the strength of the rock mass.3 ,4
Note 1—Notwithstanding the statements on precision and bias contained in this test method; the precision of this test method is dependent on the competence of the personnel performing it, and the suitability of the equipment and facilities used. Agencies that meet the criteria of Practice D 3740 are generally considered capable of competent and objective testing. Users of this test method are cautioned that compliance with Practice D 3740 does not in itself assure reliable testing. Reliable testing depends on many factors. Practice D 3740 provides a means of evaluating some of those factors.
SCOPE
1.1 This test method covers the measurement of the deformability and strength of large in situ specimens of weak rock by a uniaxial - compressive test. The test results take into account the effect of both intact material behavior and the behavior of discontinuities contained within the specimen block.
1.2 The values stated in SI units are to be regarded as the standard.
1.3 This standard does not purport to address all of the safety concerns, if any, associated with its use. It is the responsibility of the user of this standard to establish appropriate safety and health practices and determine the applicability of regulatory limitations prior to use.
General Information
Relations
Standards Content (Sample)
NOTICE: This standard has either been superseded and replaced by a new version or withdrawn.
Contact ASTM International (www.astm.org) for the latest information.
Designation:D4555–01 (Reapproved 2005)
Standard Test Method for
Determining Deformability and Strength of Weak Rock by an
In Situ Uniaxial Compressive Test
This standard is issued under the fixed designation D4555; the number immediately following the designation indicates the year of
original adoption or, in the case of revision, the year of last revision.Anumber in parentheses indicates the year of last reapproval.A
superscript epsilon (´) indicates an editorial change since the last revision or reapproval.
1. Scope* 4. Significance and Use
4.1 Since there is no reliable method of predicting the
1.1 Thistestmethodcoversthemeasurementofthedeform-
ability and strength of large in situ specimens of weak rock by overall strength and deformation data of a rock mass from the
a uniaxial - compressive test.The test results take into account results of laboratory tests on small specimens, in situ tests on
the effect of both intact material behavior and the behavior of large specimens are necessary. Such tests also have the
discontinuities contained within the specimen block. advantage that the rock specimen is tested under similar
1.2 The values stated in SI units are to be regarded as the environmental conditions as prevailing for the rock mass.
standard. 4.2 Sincethestrengthofrockisdependentonthesizeofthe
1.3 This standard does not purport to address all of the test specimen, it is necessary to test several specimens (labo-
safety concerns, if any, associated with its use. It is the ratoryorfield,orboth)ofprogressivelyincreasingsizeuntilan
responsibility of the user of this standard to establish appro- asymptotically constant strength value is found. This value is
,
priate safety and health practices and determine the applica- taken to represent the strength of the rock mass.
bility of regulatory limitations prior to use.
NOTE 1—Notwithstanding the statements on precision and bias con-
tained in this test method; the precision of this test method is dependent
2. Referenced Documents
onthecompetenceofthepersonnelperformingit,andthesuitabilityofthe
2.1 ASTM Standards:
equipment and facilities used. Agencies that meet the criteria of Practice
D3740 Practice for Minimum Requirements for Agencies D3740 are generally considered capable of competent and objective
testing. Users of this test method are cautioned that compliance with
Engaged in Testing and/or Inspection of Soil and Rock as
Practice D3740 does not in itself assure reliable testing. Reliable testing
Used in Engineering Design and Construction
depends on many factors. Practice D3740 provides a means of evaluating
some of those factors.
3. Terminology
3.1 Definitions of Terms Specific to This Standard:
5. Apparatus
3.1.1 rock quality designation, RQD—a method for quanti-
5.1 Preparation Equipment—Equipment is needed for cut-
tativelydescribingthenatureofarockmassfromcoreborings.
ting specimen blocks from existing underground exposed
RQD is obtained by measuring the total length of all unweath-
faces,forexample,acoalcuttingmachine,pneumaticchisel,or
ered pieces of core greater than or equal to 100 mm and
other hand tools. No explosives are permitted.
dividing the total by the length of the particular core run. This
5.2 Loading System:
quantityisexpressedasapercentandisusedtoclassifyinsitu
5.2.1 Hydraulic Jacks or Flatjacks—This equipment is
rock.
required to apply a uniformly distributed load to the complete
3.1.2 weak rock—rock containing numerous weathered
upper face of the specimen. The loading system shall be of
jointsspaced30to500mm,withgougefilling/wasterockwith
sufficient capacity and travel to load the system to failure.
fines. Weak rock has both rock and soil properties depending
Multiple hydraulic jacks fed by a common manifold should be
on condition of use. The compressive strength is less than 35
avoided.
MPa and the RQD is less than 50%.
5.2.2 Hydraulic Pumping System—Thissystemisneededto
supply oil at the required pressure to the jacks, the pressure
being controlled to give a constant rate of displacement or
This test method is under the jurisdiction of Committee D18 on Soil and Rock
strain, rather than a constant rate of stress increase.
and is the direct responsibility of Subcommittee D18.12 on Rock Mechanics.
Current edition approved July 1, 2005. Published November 2005. Originally
NOTE 2—Experience has shown that deformation-controlled loading is
approved in 1985. Last previous edition approved in 2001 as D4555–01. DOI:
10.1520/D4555-01R05.
2 3
For referenced ASTM standards, visit the ASTM website, www.astm.org, or Bieniawski,Z.T.,andVanHeerdan,W.L.,“TheSignificanceofLarge-ScaleIn
contact ASTM Customer Service at service@astm.org. For Annual Book of ASTM SituTests,” International Journal of Rock Mechanics Mining Sciences,Vol1,1975.
Standards volume information, refer to the standard’s Document Summary page on Heuze, F. E., “Scale Effects in the Determination of Rock Mass Strength and
the ASTM website. Deformability,” Rock Mechanics, Vol 12, 1980, pp 167–192.
*A Summary of Changes section appears at the end of this standard.
Copyright © ASTM International, 100 Barr Harbor Drive, PO Box C700, West Conshohocken, PA 19428-2959, United States.
D4555–01 (2005)
preferable to stress-controlled loading because it results in a more stable,
height-to-minimum-width dimension ratio of 2.0 to 2.5. The
and thus safer, test. This result is a consequence of the strain softening
ratio of the maximum width of the specimen to the minimum
nature of most rock or rock-like materials. A single stress level may
width shall be as near to 1.0 as practicable.
correspond to different values of strain during any test, with the level of
6.1.1.1 First, remove loose and damaged rock. Make verti-
strain continuing to increase throughout a test. One way to achieve
cal cuts as shown in Fig. 1 to form the vertical faces of the
uniform deformation of the specimen is to use a separate pump for each
jack and to set the oil delivery rate of each pump to the same value. specimen. Dimensional uniformity of each vertical face of the
Standard diesel fuel injection pumps have been found suitable and are
test specimen should not deviate by more than 20 mm. If there
capable of supplying pressures up to 100 MPa. The delivery rate of these
issuchdeviation,abandonthespecimen.Makeahorizontalcut
pumps can be set very accurately.
to form the top face of the specimen. Remove loose rock and
5.3 Equipment to Measure Applied Load and Strain in the
trim the specimen to final size using hand tools.
Specimen:
NOTE 3—Specimen dimensions cannot be specified because they de-
5.3.1 Load Measuring Equipment—This equipment, for
pendverymuchontherockproperties,forexample,thethicknessofstrata
example, electric, hydraulic, or mechanical load cells, permits
and the ease with which specimens can be prepared. It is recommended
the applied load to be measured with an accuracy better than
that a number of tests be done with a specimen with a width of about 0.5
65% of the maximum in the test.
m and that the size of subsequent specimens should be increased until an
asymptotically constant strength value is reached. It is probable that the
5.3.2 Dial Gage—A dial gage, or similar displacement
largest test specimen will have a minimum width at least 10 times greater
measuring devices, with robust fittings to enable the instru-
than the average dimension of the largest fragment defined by disconti-
ments to be mounted so that the strain in the central third of
nuities.
eachspecimenfaceismeasuredwithanaccuracybetterthan 6
−5
10 . Strain is to be measured in the direction of applied load 6.1.2 Clean and inspect the specimen. Record in detail the
and also in a perpendicular direction if Poisson’s ratio values
geological structure of the block and nature of the reaction
are to be determined. faces of the block. Measure specimen geometry, including the
5.4
...


Questions, Comments and Discussion
Ask us and Technical Secretary will try to provide an answer. You can facilitate discussion about the standard in here.