ASTM D7755-11
(Practice)Standard Practice for Determining the Wear Volume on Standard Test Pieces Used by High-Frequency, Linear-Oscillation (SRV) Test Machine
Standard Practice for Determining the Wear Volume on Standard Test Pieces Used by High-Frequency, Linear-Oscillation (SRV) Test Machine
SIGNIFICANCE AND USE
The determination of the wear volume becomes in tribological testing a key element, as it is more discriminative than the wear scar diameter, because an optically visible wear scar diameter may or may not indicate wear on the surface of the ball and the wear track as an irreversible loss of material. Users of this test method should determine whether results correlate with field performance or other applications.
Note 3—It is believed, that tactile stylus tip profilometer determines the most realistic figure and are more frequent in use, than it can be achieved by optical profilometers operating in a non-contacting mode.
SCOPE
1.1 This practice covers a procedure for determining the wear volume WV of wear scars and tracks on test pieces tribologically stresses under high-frequency, linear-oscillation motion using a SRV test machine by means of stylus tip profilometry.
1.2 The values stated in SI units are to be regarded as the standard. The values given in parentheses are for information only.
1.3 This standard does not purport to address all of the safety concerns, if any, associated with its use. It is the responsibility of the user of this standard to establish appropriate safety and health practices and determine the applicability of regulatory limitations prior to use.
General Information
Relations
Standards Content (Sample)
NOTICE: This standard has either been superseded and replaced by a new version or withdrawn.
Contact ASTM International (www.astm.org) for the latest information
Designation: D7755 − 11
Standard Practice for
Determining the Wear Volume on Standard Test Pieces Used
by High-Frequency, Linear-Oscillation (SRV) Test Machine
This standard is issued under the fixed designation D7755; the number immediately following the designation indicates the year of
original adoption or, in the case of revision, the year of last revision.Anumber in parentheses indicates the year of last reapproval.A
superscript epsilon (´) indicates an editorial change since the last revision or reapproval.
1. Scope Properties of Lubricating Greases Using a High-
Frequency, Linear-Oscillation (SRV) Test Machine
1.1 This practice covers a procedure for determining the
D5707Test Method for Measuring Friction and Wear Prop-
wear volume W of wear scars and tracks on test pieces
V
erties of Lubricating Grease Using a High-Frequency,
tribologically stresses under high-frequency, linear-oscillation
Linear-Oscillation (SRV) Test Machine
motion using a SRV test machine by means of stylus tip
D6425Test Method for Measuring Friction and Wear Prop-
profilometry.
erties of Extreme Pressure (EP) Lubricating Oils Using
1.2 The values stated in SI units are to be regarded as the
SRV Test Machine
standard. The values given in parentheses are for information 4
2.2 DIN Standards:
only.
DIN 51631:1999-04Special-boiling-point spirit — Require-
1.3 This standard does not purport to address all of the
ments and testing
safety concerns, if any, associated with its use. It is the
DIN 51834-3:2008-12Testing of lubricants – Tribological
responsibility of the user of this standard to establish appro-
test in translatory oscillation apparatus – Part 3: Determi-
priate safety and health practices and determine the applica-
nation of tribological behaviour of materials in co-
bility of regulatory limitations prior to use.
operation with lubricants
DIN EN ISO 13565-2:1998Geometrical Product Specifica-
2. Referenced Documents
tions (GPS) – Surface texture: Profile method; Surfaces
having stratified functional properties – Part 2: Height
2.1 ASTM Standards:
characterizationusinglinearmaterialratiocurve(replaces
D2714Test Method for Calibration and Operation of the
of DIN 4776:1990: Measurement of surface roughness;
Falex Block-on-Ring Friction and Wear Testing Machine
parameters R ,R ,R ,M ,M for the description of
D2782Test Method for Measurement of Extreme-Pressure K PK VK r1 r2
the material portion)
Properties of Lubricating Fluids (Timken Method)
D3702Test Method for Wear Rate and Coefficient of Fric-
3. Terminology
tion of Materials in Self-Lubricated Rubbing Contact
3.1 Definitions:
Using a Thrust Washer Testing Machine
3.1.1 Hertzian contact area, n—the apparent area of contact
D4175 Terminology Relating to Petroleum, Petroleum
betweentwonon-conformingsolidbodiespressedagainsteach
Products, and Lubricants
other.
D5620Test Method for Evaluating Thin Film Fluid Lubri-
cantsinaDrainandDryModeUsingaPinandVeeBlock
3.1.2 Hertzian contact pressure, n—magnitude of the pres-
Test Machine (Withdrawn 2010)
sure at any specified location in a Hertzian contact area, as
D5706Test Method for Determining Extreme Pressure
calculated from Hertz’s equations of elastic deformation. The
Hertzian contact pressure can also be calculated and reported
as maximum value P in the centre of the contact or as
max
This practice is under the jurisdiction ofASTM Committee D02 on Petroleum
P as average over the total contact area. D4175
average
Products, Liquid Fuels, and Lubricants and is the direct responsibility of Subcom-
3.1.3 seizure, n—localized fusion of metal between the
mittee D02.L0 on Industrial Lubricants and Engineering Sciences of High Perfor-
mance Fluids and Solids. rubbing surfaces of the test pieces. D5706
Current edition approved Oct. 1, 2011. Published November 2011. DOI:
3.1.3.1 Discussion—Seizure is usually indicated by a sharp
10.1520/D7755–11.
increase in coefficient of friction, wear, or unusual noise and
For referenced ASTM standards, visit the ASTM website, www.astm.org, or
vibration. In this test method, increase in coefficient of friction
contact ASTM Customer Service at service@astm.org. For Annual Book of ASTM
Standards volume information, refer to the standard’s Document Summary page on
the ASTM website.
3 4
The last approved version of this historical standard is referenced on Available from Deutsches Institut fur Normung e.V.(DIN), Beuth Verlag
www.astm.org. GmbH, Burggrafenstraße 6, D-10787 Berlin 30, Germany, http://www.din.de.
Copyright © ASTM International, 100 Barr Harbor Drive, PO Box C700, West Conshohocken, PA 19428-2959. United States
D7755 − 11
¯
NOTE 1—R is smaller than R. The wear volumes are marked in blue.
FIG. 2 Schematic Illustration of the Segmentation of the Wear
FIG. 1 Ball–Comparison of Iso-wear Scar Diameters with Wear Track
Volume in Relation to the Initial Radius R and the Radius in the
¯
Scar R at Test End
4.3 The wear scar diameter on the test ball is measured and
theshapeoftheweartrackonthediskisdeterminedbymeans
is displayed on the chart recorder as permanent rise in the
ofastylustipprofilometerinthecentreofthetracklength(see
coefficient of friction from a steady value.
Fig. 2) and this perpendicular to the sliding direction.
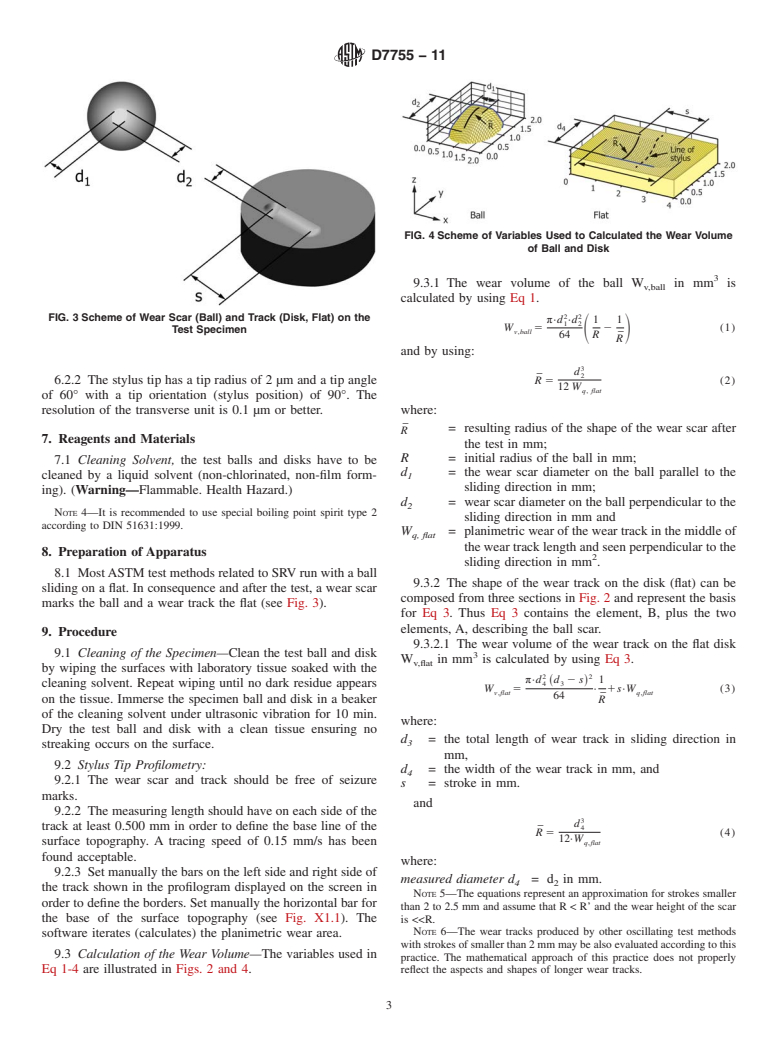
4.3.1 The worn or displaced volume (W ;W ) can be
3.1.4 wear, n—damage to a solid surface, generally involv-
v,ball v,flat
5-7
calculated by numerical methods from the stylus tip profile
ing progressive loss of material, due to the relative motion
data and assuming an ideal shape of the test specimen.
between that surface and a contacting substance or substances.
D2714, D2782, D5620
NOTE 2—In general, the wear volume is calculated by integrating a
multitudeofcrosssectionareatakenatdifferentlengthsoftheweartrack.
3.1.5 wear rate, n—the rate of material removal or dimen-
The wear volume in this practice is based only on one cross section area
sional change due to wear per unit of exposure parameter; for
(planimetric wear) in the centre of the wear track.
example, quantity of material removed (mass, volume, thick-
4.4 The planimetric wear W of the disk is derived from
ness) in unit distance of sliding or unit time. q,flat
a 2D-profilogram by using a stylus tip profilometer.
3.1.5.1 Discussion—Another term sometimes used synony-
mously is wear factor. D3702
5. Significance and Use
3.2 Definitions of Terms Specific to This Standard:
5.1 The determination of the wear volume becomes in
3.2.1 planimetric wear, Wq, n—seen in the center of the
tribological testing a key element, as it is more discriminative
wear track of the disk perpendicular to the sliding direction at
than the wear scar diameter, because an optically visible wear
test end and can be understood as cross section area of wear.
scar diameter may or may not indicate wear on the surface of
3.2.2 wear volume, Wv, n—theirreversiblelossofvolumeto
the ball and the wear track as an irreversible loss of material.
the ball or the disk (flat) at end of test. D5707, D6425
Users of this test method should determine whether results
3.3 Abbreviations:
correlate with field performance or other applications.
3.3.1 SRV, n—Schwingung,Reibung,Verschleiß,(German);
NOTE 3—It is believed, that tactile stylus tip profilometer determines
oscillating, friction, wear (English translation).
the most realistic figure and are more frequent in use, than it can be
achieved by optical profilometers operating in a non-contacting mode.
4. Summary of Practice
6. Apparatus
4.1 This practice applies to test pieces tribologically
stressed on a SRV test machine typically used in different
6.1 Microscope, equipped with a filar eyepiece graduated in
ASTM (and DIN) test methods and are a test ball oscillating
0.005-mm division or equipped with a micrometer stage
against a flat test disk. readable to 0.005-mm. Magnification should be sufficient to
allow for ease of measurement. One to 10 times magnification
4.2 As illustrated in Fig. 1, the same wear scar diameter on
has been found accept
...


Questions, Comments and Discussion
Ask us and Technical Secretary will try to provide an answer. You can facilitate discussion about the standard in here.