Standard Test Method for Fineness of Portland Cement by the Turbidimeter

SIGNIFICANCE AND USE
The purpose of this test method is to determine whether or not the hydraulic cement under test meets the Wagner turbidimetric fineness requirements of the applicable hydraulic cement specification for which the test is being made. Fineness of the cement component is only one of the many characteristics that influence the strength capabilities of concrete.
SCOPE
1.1 This test method covers determination of the fineness of portland cement as represented by a calculated measure of specific surface, expressed as square centimetres of total surface area per gram, or square metres of total surface area per kilogram, of cement, using the Wagner turbidimeter.
1.2 This standard does not purport to address all of the safety concerns, if any, associated with its use. It is the responsibility of the user of this standard to establish appropriate safety and health practices and determine the applicability of regulatory limitations prior to use.  
1.3 The values stated in SI units are to regarded as the standard. The inch-pound equivalents may be approximate.

General Information

Status
Historical
Publication Date
09-Jul-2003
Technical Committee
Drafting Committee
Current Stage
Ref Project

Relations

Buy Standard

Standard
ASTM C115-96a(2003) - Standard Test Method for Fineness of Portland Cement by the Turbidimeter
English language
7 pages
sale 15% off
Preview
sale 15% off
Preview

Standards Content (Sample)


NOTICE: This standard has either been superseded and replaced by a new version or withdrawn.
Contact ASTM International (www.astm.org) for the latest information.
Designation: C115 – 96a (Reapproved 2003)
Standard Test Method for
Fineness of Portland Cement by the Turbidimeter
This standard is issued under the fixed designation C115; the number immediately following the designation indicates the year of
original adoption or, in the case of revision, the year of last revision.Anumber in parentheses indicates the year of last reapproval.A
superscript epsilon (´) indicates an editorial change since the last revision or reapproval.
1. Scope of the cement component is only one of the many character-
istics that influence the strength capabilities of concrete.
1.1 This test method covers determination of the fineness of
portland cement as represented by a calculated measure of
4. Apparatus
specific surface, expressed as square centimetres of total
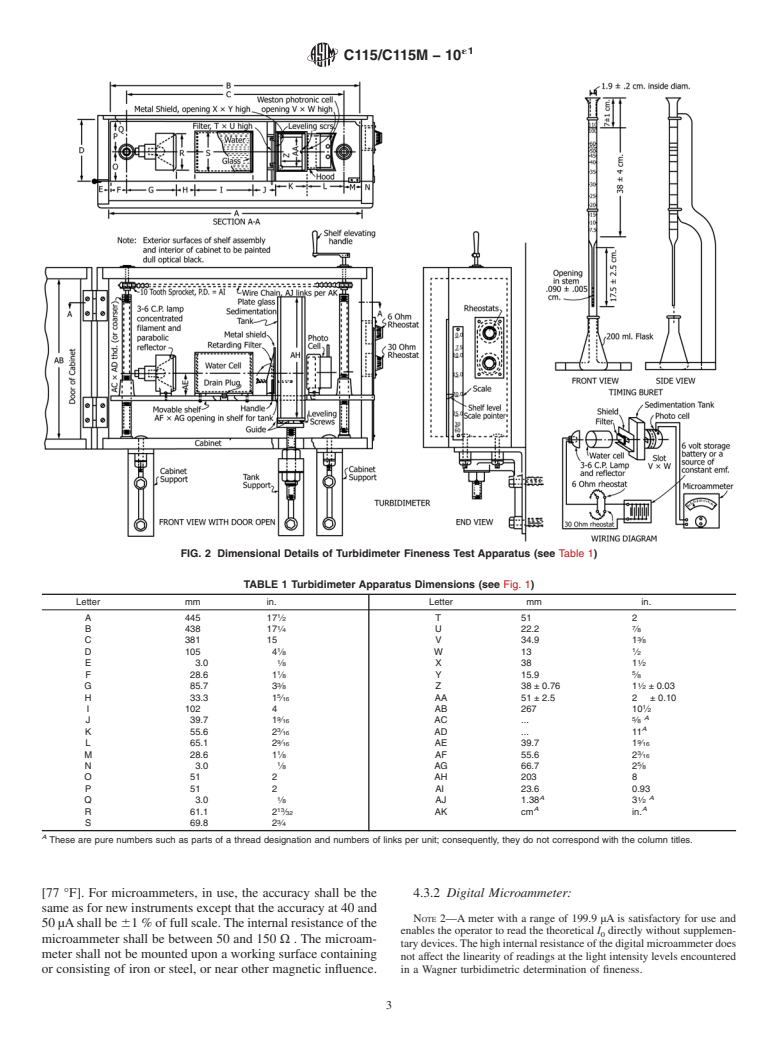
4.1 Nature of Apparatus—TheWagnerturbidimeterconsists
surfaceareapergram,orsquaremetresoftotalsurfaceareaper
2 essentially of a source of light maintained at constant intensity
kilogram, of cement, using the Wagner turbidimeter.
and adjusted so that approximately parallel rays of light pass
1.2 This standard does not purport to address all of the
through a suspension of the cement to be tested and impinge
safety concerns, if any, associated with its use. It is the
upon the sensitive plate of a photoelectric cell. The current
responsibility of the user of this standard to establish appro-
generated in the cell is measured by means of a microammeter
priate safety and health practices and determine the applica-
and the indicated reading is a measure of the turbidity of the
bility of regulatory limitations prior to use.
suspension. General considerations indicate that turbidity is in
1.3 The values stated in SI units are to regarded as the
turn a measure of the surface area of the suspended sample of
standard. The inch-pound equivalents may be approximate.
cement. The apparatus shall consist specifically of the parts
2. Referenced Documents described in 4.2-4.7 and shall be constructed in accordance
with the detailed design and dimensional requirements shown
2.1 ASTM Standards:
in Fig. 1 and Table 1, except that the case may be either of
C114 Test Methods for Chemical Analysis of Hydraulic
wood or of metal.
Cement
4.2 Turbidimeter, mounted in a suitable wood or metal case
C430 TestMethodforFinenessofHydraulicCementbythe
including the following features:
45-µm (No. 325) Sieve
4.2.1 Source of Light—The source of light (Fig. 1) shall
C670 Practice for Preparing Precision and Bias Statements
consist of a concentrated-filament electric lamp of between 3
for Test Methods for Construction Materials
and 6 cd operated by a source of constant emf. The lamp shall
3. Significance and Use be mounted rigidly in the socket. A clean, bright parabolic
metallic reflector shall be rigidly mounted behind the lamp,
3.1 The purpose of this test method is to determine whether
focused so that approximately parallel rays of light will pass
or not the hydraulic cement under test meets the Wagner
through the sedimentation tank and impinge upon the photo-
turbidimetric fineness requirements of the applicable hydraulic
electric cell. The light intensity shall be regulated by two
cementspecificationforwhichthetestisbeingmade.Fineness
rheostats of approximately 6 and 30 V, respectively, and they
shall possess such characteristics that uniform changes in light
ThistestmethodisunderthejurisdictionofASTMCommitteeC01onCement intensitymaybeobtainedoverthefullrangeofresistance.The
and is the direct responsibility of Subcommittee C01.25 on Fineness.
rheostats shall be mounted in parallel with each other and in
Current edition approved July 10, 2003. Published September 2003. Originally
series with the lamp.
approved in 1934. Last previous edition approved in 1996 as C115–96a. DOI:
4.2.2 Heat-Absorbing Device—The light shall pass through
10.1520/C0115-96AR03.
This turbidimeter was developed by L. A. Wagner, Research Associate of the
a suitable heat absorbing device before entering the sedimen-
Cement Reference Laboratory, National Institute of Standards and Technology,
tation tank in order that radiant heat from the beam shall be
Washington, DC. A description of the apparatus and the original mathematical
absorbed, the device being either (1) a water cell or (2)a
derivationsofformulasusedaregiveninthepaper:Wagner,L.A.,“ARapidMethod
specialheat-absorbingglassfilter.Thewatercellshallbemade
for the Determination of the Specific Surface of Portland Cement,” Proceedings,
ASTM, ASTEA, Vol 33, Part II, 1933, p. 553.
from 76-mm (3-in.) outside diameter seamless brass tubing,
For referenced ASTM standards, visit the ASTM website, www.astm.org, or
3-mm ( ⁄8-in.) thick wall, 102-mm (4 in.) in length with glass
contact ASTM Customer Service at service@astm.org. For Annual Book of ASTM
windows sealed in the ends. The cell shall contain a hole for
Standards volume information, refer to the standard’s Document Summary page on
the ASTM website. filling with distilled water. The hole shall be sealed with a
Copyright © ASTM International, 100 Barr Harbor Drive, PO Box C700, West Conshohocken, PA 19428-2959, United States.
C115 – 96a (2003)
4.2.6 Shield—Ametallicshieldhavingaslot16mm( ⁄8in.)
in height by 38 mm (1 ⁄2 in.) in width, as indicated in Fig. 1,
shall be placed between the heat absorbing device and the
sedimentation tank.
4.2.7 Elevating Device—The source of the light, the heat-
absorbingdevice,thephotoelectriccell,theretardingfilter,and
the shield shall be mounted on a movable shelf which may be
raised or lowered by two connected lead screws, and which
Microammeter Internal Resistance = 90 V
Shunt Equivalent Resistance:
may be readily and accurately adjusted so that the turbidity of
470 3 100
470 V in parallel with 100V5 5 82 V
the suspension may be determined at any desired depth. The
470 1 100
Meter & Shunt Equivalent + Resistance:
center of the light source, the heat absorbing device, the
90 3 82
90 V in parallel with 82V5 5 43 V
photocell, the center of the slots of the metal shield, and the
90 1 82
Series Resistance = 90 − 43 = 47 V
hood shall be on a straight line which is parallel to the shelf.
FIG. 1 Illustrated Example of D’Arsonval Meter Circuit for I
r
The sedimentation tank shall be mounted on a base which is
Determination
independentoftherestoftheapparatussothatthetankshallbe
free from vibration caused by moving the shelf. Care shall be
taken that the shelf shall be level at all points of elevation and
metalplug.Thecell,whenmountedonthemovableshelf,may
thatthetankshallbenormaltotheshelf.Thedistancebetween
have the plug in either the top or bottom position. The
thetankandtheedgesoftheopeningintheshelfshallvarynot
heat-absorbing device shall be so arranged that essentially all
more than ⁄64 in. (0.4 mm) between the “30–50” and “0”
rays of light entering the sedimentation tank shall first pass
positions. The level of the light beam with reference to the
through the heat-absorbing device.
surface of the suspension shall be indicated by a pointer which
4.2.3 Retarding Filter—A light-retarding glass or other
will travel along a scale mounted on the cabinet. The zero of
device shall be provided that will reduce the intensity of light
thescaleshallindicatethatpositionatwhichthecenterlinesof
fromthatcorrespondingto100µAtoareadingof20to30µA.
the slots for the light beam are at the same elevation as the
The light intensity shall be uniformly retarded over the entire
surface of the liquid in the tank when filled to the 335-mL
area of that portion of the cell which is exposed to light during
level. The lines on the scale to be marked 7.5, 10, 15, 20, 25,
a test. The retarding filter shall be mounted in a carrier on the
and 30–50, shall be located at distances from the zero mark
shieldandshallbecapableofbeingswungoutofthelightpath
equaltosuspensiondepthvalues, h,inTable2.Thescale,when
by means of a handle.
comparedwithastandardscaleaccuratetowithin0.1mmatall
4.2.4 Sedimentation Tank—The sedimentation tank shall be
points,shallnotshowadeviationatanypointgreaterthan0.25
3 1
either(1)constructedof5to6-mm( ⁄16to ⁄4-in.)plateglassor
mmandshallindicatethepositionsatwhichthepointershould
borosilicate glass cemented or sealed together to form a
be located when turbidity readings for these values of h are
rectangular tank, or (2) a molded glass tank having walls
taken. The interior of the turbidimeter cabinet and the exterior
approximately 5-mm ( ⁄16 in.) thick with plane surfaces. The
surfaces of the shelf, the parabolic reflector, the heat absorbing
insidedimensionsoftherectangulartankshallbe51mmby38
device, the shield, and the photoelectric cell hood shall be
mm by 203 mm (2 in. by 1 ⁄2 in. by 8 in.) in height. The
painted with a dull flat black paint.
permissiblevariationontheinsidedimensionsofthetankshall
be 62.5 mm (0.1 in.) in length and 60.76 mm (0.03 in.) in NOTE 1—The requirement of the 0 to 50 markings on the scale shall
apply only to new Wagner Turbidimeters and not to equipment in use
width.The 51-mm faces of the tank shall be equidistant within
which meets the other requirements of this method.
0.25 mm (0.1 in.) at all points. A mark shall be placed on the
side of the tank to indicate a volumetric content of 335 mL,
4.3 Microammeters:
which is the level to which the tank will be filled in a test. A
4.3.1 D’Arsonval-Type Microammeters shall have a range
tank filled to the mark with clear kerosine and placed in the
from 0 to 50 µA and shall be readable to 0.1 µA. New
turbidimeter light beam shall yield uniform microammeter
microammeters shall be accurate to 60.5% of full scale value
readings, within 60.1 µA, for the entire usable portion of the
at any part of the scale value at any part of the scale at 77°F
tank.
(25°C). For microammeters, in use, the accuracy shall be the
4.2.5 Photoelectric Cell—Themeansofmeasuringthelight
sameasfornewinstrumentsexceptthattheaccuracyat40and
intensity shall be a sensitive photoelectric cell connected
50µAshallbe 61%offullscale.Theinternalresistanceofthe
directly to a microammeter. A hood with a horizontal slot 13
microammeter shall be between 50 and 150 V . The microam-
1 3
mm ( ⁄2 in.) in height by 35 mm (1 ⁄8 in.) in width shall be
meter shall not be mounted upon a working surface containing
mountedoverthephotoelectriccell.Thefrontofthehoodshall
or consisting of iron or steel, or near other magnetic influence.
be 25 61mm(1 6 ⁄16 in.) in front of the face of the cell.The
4.3.2 Digital Microammeter:
face of the photocell shall be parallel to the tank faces within
0.5 mm (0.02 in.).
NOTE 2—A meter with a range of 199.9 µA is satisfactory for use and
enables the operator to read the theoretical I directly without supplemen-
tarydevices.Thehighinternalresistanceofthedigitalmicroammeterdoes
not affect the linearity of readings at the light intensity levels encountered
Weston Photronic type, Model 594YY is acceptable. in a Wagner turbidimetric determination of fineness.
C115 – 96a (2003)
FIG. 2 Dimensional Details of Turbidimeter Fineness Test Apparatus (see Table 1)
TABLE 1 Turbidimeter Apparatus Dimensions (see Fig. 1)
Letter mm in. Letter mm in.
A 445 17 ⁄2 T51 2
1 7
B 438 17 ⁄4 U 22.2 ⁄8
C 381 15 V 34.9 1 ⁄8
1 1
D 105 4 ⁄8 W13 ⁄2
1 1
E3.0 ⁄8 X38 1 ⁄2
1 5
F 28.6 1 ⁄8 Y 15.9 ⁄8
3 1
G 85.7 3 ⁄8 Z38 6 0.76 1 ⁄2 6 0.03
H 33.3 1 ⁄16 AA 51 6 2.5 2 6 0.10
I 102 4 AB 267 10 ⁄2
A
9 5
J 39.7 1 ⁄16 AC . ⁄8
A
K 55.6 2 ⁄16 AD . 11
9 9
L 65.1 2 ⁄16 AE 39.7 1 ⁄16
1 3
M 28.6 1 ⁄8 AF 55.6 2 ⁄16
1 5
N3.0 ⁄8 AG 66.7 2 ⁄8
O 51 2 AH 203 8
P 51 2 AI 23.6 0.93
A A
1 1
Q3.0 ⁄8 AJ 1.38 3 ⁄2
13 A A
R 61.1 2 ⁄32 AK cm in.
S 69.8 2 ⁄4
A
These are pure numbers such as parts of a thread designation and numbers of links per unit; consequently, they do not correspond with the column titles.
4.4 Source of Current—A 6-V automobile starting and 4.6 Stirring Apparatus—The stirring apparatus shall consist
lighting storage battery or a source of constant emf shall be ofeither(1)acylindricalbrush,19mm( ⁄4in.)indiameterand
used for supplying current to the lamp. about 45 mm (1 ⁄4 in.) in length, with an end approximately
4.5 Sieve—The sieve shall conform to the requirements of fitting the contour of the bottom of a 22-mm ( ⁄8-in.) diameter
Test Method C430. test tube, or (2) any other stirring device that will be equally
C115 – 96a (2003)
TABLE 2 Values of h, d, and h/d to be Used in Calibration of the
7.1.1.1 For calibration of the buret scale use a kerosine
Turbidimeter Apparatus
having a known viscosity and density for the temperature at
Particle Depth of h/d
which the calibration is to be made. Density and viscosity of
Diameter, d,µm Suspension, h,cm
the kerosine should be determined. Calculate the times of flow
50 15 0.00600
from the buret that correspond to the times of settling for the
45 15 0.00741
different sized particles, from the following equation:
40 15 0.00938
35 15 0.01224
t 5[1,837,000h/~r 2r !# 3 ~h/d ! (1)
1 2
30 15 0.01667
25 13.1 0.0210
where:
20 10 0.0250
15 6.6 0.0293
t = time of settling, or time of flow, s,
10 3.3 0.0330
h = viscosity of kerosine at the temperature of calibra-
7.5 2.1 0.0373
tion, P,
3 3
r = density of cement particles, Mg/m (g/cm )=3.15 for
portland cement (Note 4),
efficient in dispersion as measured by specific surface deter-
r = density of kerosine, Mg/m at the temperature of
minations on a standard sample. The stirring apparatus shall
calibration,
rotate at a speed of approximately 3500 r/min.
h = depth of suspension to level of light, cm, and
4.7 Timing Buret—The time of settling for the different-
d = diameter of particle, µm.
sized particles shall be obtained by use of a buret from which
Values of h/d are given in Table 2.
kerosine is allowed to flow. The buret shall consist of a glass
7.1.1.2 Fill the buret with kerosine at the calibrating tem-
tube having a capillary tube fused into the lower end. The
perature, start a timing clock at the instant the kerosine in the
upper end of the large tube shall be flared to serve as a funnel
buret drains past the zero line, and mark on the buret the levels
for introducing kerosine into the tube.The buret shall conform
reached by the draining kerosine for each of the time intervals,
to the limiting dimensions given in Table 3. The graduation
t, calculated as described above. At these marks, etch perma-
linesontheburetshallbecompletecircles.AfiltermadeofNo.
nent lines and numbers on the buret indicating the correspond-
325 (45-µm) wire cloth shall be used with the timing buret and
ing diameters (Note 5).The construction and the graduation of
a cover shall be placed over the top of the buret when it is not
theburetshallbesuchthata
...

Questions, Comments and Discussion

Ask us and Technical Secretary will try to provide an answer. You can facilitate discussion about the standard in here.