ASTM C1651-08
(Test Method)Standard Test Method for Measurement of Roll Wave Optical Distortion in Heat-Treated Flat Glass
Standard Test Method for Measurement of Roll Wave Optical Distortion in Heat-Treated Flat Glass
SIGNIFICANCE AND USE
This test method is a procedure for determining the peak-to-valley depth and the wavelength of roll wave in flat glass and then calculating the optical distortion resulting from that roll wave. Peak-to-valley measurements provide a means of monitoring the roll wave distortion in a heat processed glass product.
Measured peak-to-valley depth provides information required by some specifiers of heat-treated glass products.
5.3 Roll wave is inherent in flat glass which has been heat treated in a furnace in which rollers are used to convey the glass.
5.4 Consult Specifications C 1036 and C 1048 for additional glass characteristics and quality information.
SCOPE
1.1 This test method is applicable to the determination of the peak-to-valley depth and peak-to-peak distances of the out-of-plane deformation referred to as roll wave which occurs in flat, heat-treated architectural glass substrates processed in a heat processing continuous or oscillating conveyance oven.
1.2 The values stated in inch-pound units are to be regarded as standard. The values given in parentheses are mathematical conversions to SI units that are provided for information only and are not considered standard.
1.3 This test method does not address other flatness issues like edge kink, ream, pocket distortion, bow, or other distortions outside of roll wave as defined in this test method.
1.4 This standard does not purport to address all of the safety concerns, if any, associated with its use. It is the responsibility of the user of this standard to establish appropriate safety and health practices and determine the applicability of regulatory limitations prior to use.
General Information
Relations
Standards Content (Sample)
NOTICE: This standard has either been superseded and replaced by a new version or withdrawn.
Contact ASTM International (www.astm.org) for the latest information
Designation:C1651–08
Standard Test Method for
Measurement of Roll Wave Optical Distortion in Heat-
Treated Flat Glass
This standard is issued under the fixed designation C1651; the number immediately following the designation indicates the year of
original adoption or, in the case of revision, the year of last revision. A number in parentheses indicates the year of last reapproval. A
superscript epsilon (´) indicates an editorial change since the last revision or reapproval.
1. Scope 3. Terminology
1.1 This test method is applicable to the determination of 3.1 Definitions of Terms Specific to This Standard:
the peak-to-valley depth and peak-to-peak distances of the 3.1.1 peak-to-valley depth of roll wave—characteristic
out-of-plane deformation referred to as roll wave which occurs depth, W, of roll wave as illustrated in Fig. 1.
in flat, heat-treated architectural glass substrates processed in a 3.1.2 peak-to-peak wavelength of roll wave—characteristic
heat processing continuous or oscillating conveyance oven. length, L, of roll wave shown as a sine-wave representing the
1.2 The values stated in inch-pound units are to be regarded deformed surface section as illustrated in Fig. 1.
as standard. The values given in parentheses are mathematical 3.1.3 roll wave—A repetitive wave-like departure from
conversions to SI units that are provided for information only flatness in glass that results from heat treating the glass in a
and are not considered standard. horizontal roller hearth furnace. Roll wave excludes edge
1.3 This test method does not address other flatness issues effectssuchasedgekinkanddistortioninfluencedbyassembly
like edge kink, ream, pocket distortion, bow, or other distor- or installation.
tions outside of roll wave as defined in this test method. 3.1.4 roll wave optical distortion—visual distortion, D, that
1.4 This standard does not purport to address all of the results from roll wave and expressed as lens power as in Eq 1.
safety concerns, if any, associated with its use. It is the 3.1.5 valley-to-valley wavelength of roll wave—
responsibility of the user of this standard to establish appro- characteristic length, L, of roll wave shown as a sine-wave
priate safety and health practices and determine the applica- representing the deformed surface section as illustrated in Fig.
bility of regulatory limitations prior to use. 1.
2. Referenced Documents 4. Summary of Test Method
2.1 Reference to these documents shall be the latest issue 4.1 This test consists of moving an instrument across the
unless otherwise specified by the authority applying this test glass surface in a direction parallel to the direction that the
method. glass substrate traveled during heat processing.The instrument
2.2 ASTM Standards: will primarily measure the out-of-plane deformation of the
C162 Terminology of Glass and Glass Products glass surface which is characteristic of the glass and known as
C1036 Specification for Flat Glass “roll wave”. The peak-to-valley depths of the roll waves, W,
C1048 SpecificationforHeat-TreatedFlatGlass—KindHS, and the peak-to-peak distances, L, are measured. (See Fig. 1.)
Kind FT Coated and Uncoated Glass 4.1.1 Other out-of-plane deformations of the glass surface
may also be present which do not have the same peak and
valley wave character of the roll wave, but which also result in
This test method is under the jurisdiction of ASTM Committee C14 on Glass
the appearance of optical distortion in the glass.
and Glass Products and is the direct responsibility of Subcommittee C14.11 on
4.1.2 The optical distortion due to the out-of-plane defor-
Optical Properties.
mation of the surface is measured as an optical power, similar
Current edition approved Sept. 1, 2008. Published February 2009. DOI:
10.1520/C1651-08.
to the optical power of a cylindrical mirror or lens.
For referenced ASTM standards, visit the ASTM website, www.astm.org, or
4.1.3 For those deformations that do have a wave character,
contact ASTM Customer Service at service@astm.org. For Annual Book of ASTM
the distortion can be calculated using the following formula.
Standards volume information, refer to the standard’s Document Summary page on
the ASTM website. From the measured roll wave depth, W and the measured
Copyright © ASTM International, 100 Barr Harbor Drive, PO Box C700, West Conshohocken, PA 19428-2959, United States.
C1651–08
FIG. 1 Representative Roll Wave Showing “W” and “L”
peak-to-peakorvalleytovalleywavelengthoftherollwave, L, 6. Apparatus
the optical roll wave distortion D is:
6.1 Optical distortion in flat glass can be characterized by
2 2
D 5 4p W/L (1) determiningtheout-of-planedeformationoftheglassbyuseof
an instrument to measure the peak-to-valley depth of the
where W and L are in metres and D is in diopters. The
-1
deformations. Two such instruments are the so-called “Flat
dimensions of diopters (dpt) is m . The more usual unit of
Bottom” Gauge and the “Three Point Contact” Gauge. (As
optical distortion is millidiopters which are obtained by mul-
stated in 10.1 a Round Robin Interlaboratory Study (ILS) will
tiplying the value in diopters by 1 000.
becarriedouttoestablish,amongotherthings,thecomparative
4.2 Appendix X1 and references show the relationship
precision and bias of measurement made with the “Flat
between W, L, the measured radius of curvature R and the
Bottom” Gauge and the “Three Point Contact” Gauge.)
optical distortion of a reflecting surface, D.
6.2 The 9FlatBottom9Gaugeconsistsofaflatplatewhichis
5. Significance and Use
a minimum of 12 in. (305 mm) long. (The flat plate shall be
equal to or greater in length than the circumference of the
5.1 This test method is a procedure for determining the
furnace roller and less than twice the circumference of the
peak-to-valley depth and the wavelength of roll wave in flat
roller) It shall be no less than 2 in. (50.8 mm) wide, with a
glass and then calculating the optical distortion resulting from
smooth, low-coefficient of friction surface and have a depth
that roll wave. Peak-to-valley measurements provide a means
measuring gauge equipped with a dial indicator, digital mi-
of monitoring the roll wave distortion in a heat processed glass
crometer, or linear variable differential transformer (LVDT)
product.
with a protruding ball-end spring loaded plunger. This indica-
5.2 Measured peak-to-valley depth provides information
tor, micrometer, or LVDT is used to measure the out-of-plane
required by some specifiers of heat-treated glass products.
depth, W,ofvalleysandislocatedatthecenterofthebar.Such
5.3 Roll wave is inherent in flat glass which has been heat
a gauge is shown in Fig. 2.
treated in a furnace in which rollers are used to convey the
glass. 6.3 The “Three Point Contact” Gauge has three contact
5.4 Consult Specifications C1036 and C1048 for additional points, one at each end of the gauge and equally spaced from
glass characteristics and quality information. a center contact point at which position the depth of the roll
FIG. 2 “Flat Bottom” Roll Wave Gauge with Dial Indicator
C1651–08
wave is measured. The distance between the outboard contact 7.1.1 Prior to using the roll wave gauge for measurement,
points of the “Three Point Contact” Gauge must be adjustable place it on a rigid flat surface, such as a granite plate, or on a
to permit setting the outside contact points apart by a distance piece of annealed float glass which is greater than or equal to
equaltothewavelength, L,oftherollwaveasspecifiedinNote ⁄8 in. (10 mm) in thickness and which is larger than the gauge.
1. The center contact point is a depth measuring gauge which The depth of measuring plunger must be depressed by some
can be either a dial indicator, a digital micrometer, or a spring amountwhenthegaugeisrestingontheflatsurface.Adjustthe
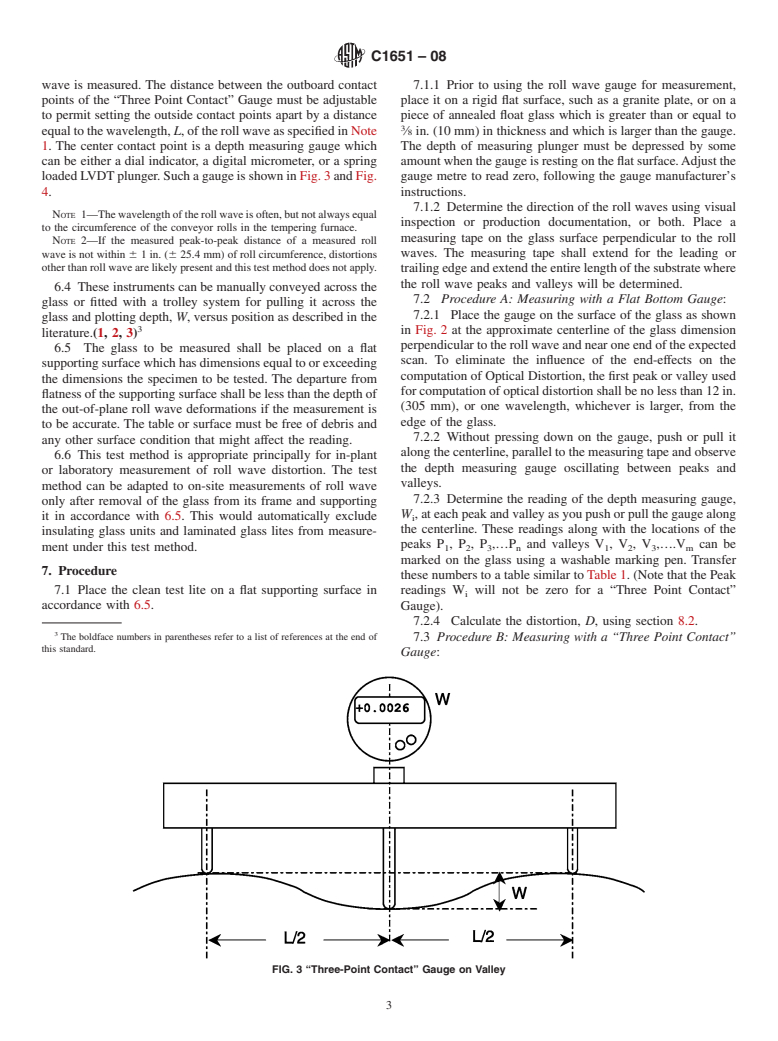
loadedLVDTplunger.SuchagaugeisshowninFig.3andFig. gauge metre to read zero, following the gauge manufacturer’s
4. instructions.
7.1.2 Determine the direction of the roll waves using visual
NOTE 1—Thewavelengthoftherollwaveisoften,butnotalwaysequal
inspection or production documentation, or both. Place a
to the circumference of the conveyor rolls in the tempering furnace.
measuring tape on the glass surface perpendicular to the roll
NOTE 2—If the measured peak-to-peak distance of a measured roll
wave is not within 6 1 in. (6 25.4 mm) of roll circumference, distortions waves. The measuring tape shall extend for the leading or
other than roll wave are likely present and this test method does not apply.
trailingedgeandextendtheentirelengthofthesubstratewhere
the roll wave peaks and valleys will be determined.
6.4 These instruments can be manually conveyed across the
7.2 Procedure A: Measuring with a Flat Bottom Gauge:
glass or fitted with a trolley system for pulling it across the
7.2.1 Place the gauge on the surface of the glass as shown
glass and plotting depth, W, versus position as described in the
in Fig. 2 at the approximate centerline of the glass dimension
literature.(1, 2, 3)
perpendiculartotherollwaveandnearoneendoftheexpected
6.5 The glass to be measured shall be placed on a flat
scan. To eliminate the influence of the end-effects on the
supportingsurfacewhichhasdimensionsequaltoorexceeding
computation of Optical Distortion, the first peak or valley used
the dimensions the specimen to be tested. The departure from
forcomputationofopticaldistortionshallbenolessthan12in.
flatnessofthesupportingsurfaceshallbelessthanthedepthof
(305 mm), or one wavelength, whichever is larger, from the
the out-of-plane roll wave deformations if the measurement is
edge of the glass.
to be accurate. The table or surface must be free of debris and
7.2.2 Without pressing down on the gauge, push or pull it
any other surface condition that might affect the reading.
along the centerline, parallel to the measuring tape and observe
6.6 This test method is appropriate principally for in-plant
the depth measuring gaug
...


Questions, Comments and Discussion
Ask us and Technical Secretary will try to provide an answer. You can facilitate discussion about the standard in here.