ASTM D2844-94
(Test Method)Standard Test Method for Resistance R-Value and Expansion Pressure of Compacted Soils
Standard Test Method for Resistance R-Value and Expansion Pressure of Compacted Soils
SCOPE
1.1 This test method covers the procedure for testing both treated and untreated laboratory compacted soils or aggregates with the stabilometer and expansion pressure devices to obtain results indicative of performance when placed in the base, subbase, or subgrade of a road subjected to traffic.
1.2 The values stated in inch-pound units are to be regarded as the standard.
1.3 This standard does not purport to address all of the safety concerns, if any, associated with its use. It is the responsibility of the user of this standard to establish appropriate safety and health practices and determine the applicability of regulatory limitations prior to use.
General Information
Relations
Standards Content (Sample)
NOTICE: This standard has either been superseded and replaced by a new version or discontinued.
Contact ASTM International (www.astm.org) for the latest information.
Designation: D 2844 – 94
Standard Test Method for
Resistance R-Value and Expansion Pressure of Compacted
Soils
This standard is issued under the fixed designation D 2844; the number immediately following the designation indicates the year of
original adoption or, in the case of revision, the year of last revision. A number in parentheses indicates the year of last reapproval. A
superscript epsilon (e) indicates an editorial change since the last revision or reapproval.
1. Scope
1.1 This test method covers the procedure for testing both
treated and untreated laboratory compacted soils or aggregates
with the stabilometer and expansion pressure devices to obtain
results indicative of performance when placed in the base,
subbase, or subgrade of a road subjected to traffic.
1.2 The values stated in inch-pound units are to be regarded
as the standard.
1.3 This standard does not purport to address all of the
safety concerns, if any, associated with its use. It is the
responsibility of the user of this standard to establish appro-
priate safety and health practices and determine the applica-
bility of regulatory limitations prior to use.
2. Referenced Documents
2.1 ASTM Standards:
C 670 Practice for Preparing Precision and Bias Statements
for Test Methods for Construction Materials
E 4 Practices for Force Verification of Testing Machines
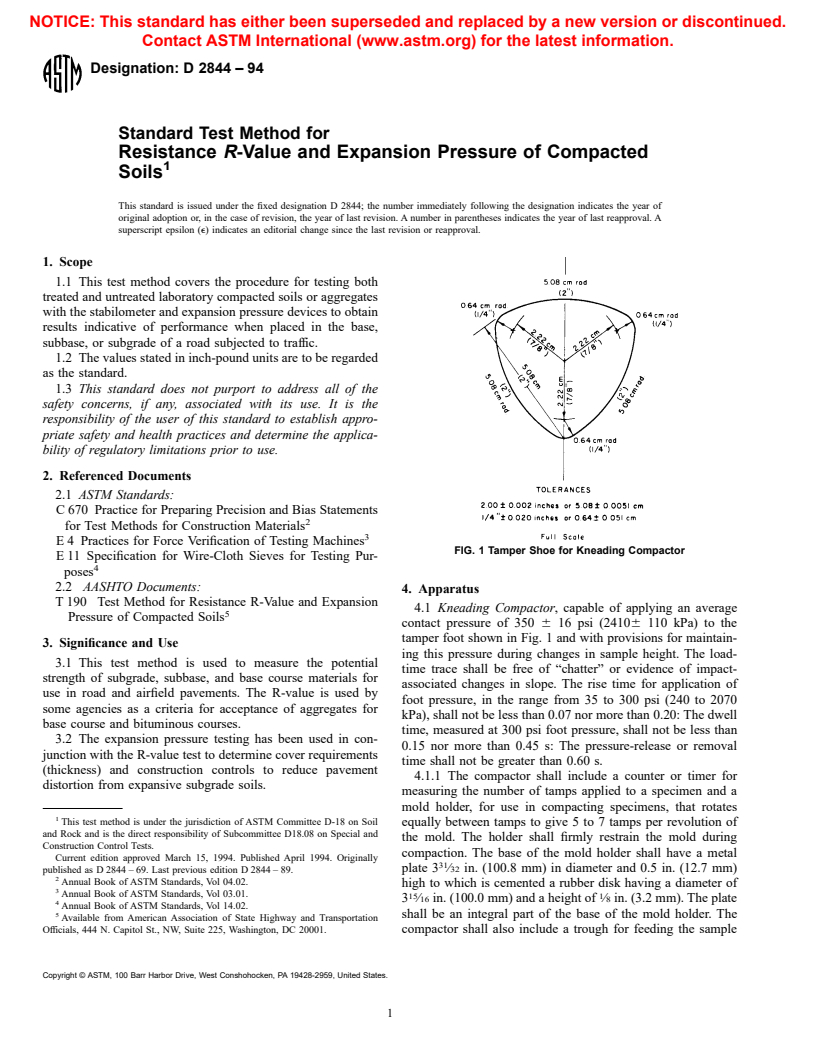
FIG. 1 Tamper Shoe for Kneading Compactor
E 11 Specification for Wire-Cloth Sieves for Testing Pur-
poses
2.2 AASHTO Documents:
4. Apparatus
T 190 Test Method for Resistance R-Value and Expansion
4.1 Kneading Compactor, capable of applying an average
Pressure of Compacted Soils
contact pressure of 350 6 16 psi (24106 110 kPa) to the
tamper foot shown in Fig. 1 and with provisions for maintain-
3. Significance and Use
ing this pressure during changes in sample height. The load-
3.1 This test method is used to measure the potential
time trace shall be free of “chatter” or evidence of impact-
strength of subgrade, subbase, and base course materials for
associated changes in slope. The rise time for application of
use in road and airfield pavements. The R-value is used by
foot pressure, in the range from 35 to 300 psi (240 to 2070
some agencies as a criteria for acceptance of aggregates for
kPa), shall not be less than 0.07 nor more than 0.20: The dwell
base course and bituminous courses.
time, measured at 300 psi foot pressure, shall not be less than
3.2 The expansion pressure testing has been used in con-
0.15 nor more than 0.45 s: The pressure-release or removal
junction with the R-value test to determine cover requirements
time shall not be greater than 0.60 s.
(thickness) and construction controls to reduce pavement
4.1.1 The compactor shall include a counter or timer for
distortion from expansive subgrade soils.
measuring the number of tamps applied to a specimen and a
mold holder, for use in compacting specimens, that rotates
This test method is under the jurisdiction of ASTM Committee D-18 on Soil equally between tamps to give 5 to 7 tamps per revolution of
and Rock and is the direct responsibility of Subcommittee D18.08 on Special and
the mold. The holder shall firmly restrain the mold during
Construction Control Tests.
compaction. The base of the mold holder shall have a metal
Current edition approved March 15, 1994. Published April 1994. Originally
plate 3 ⁄32 in. (100.8 mm) in diameter and 0.5 in. (12.7 mm)
published as D 2844 – 69. Last previous edition D 2844 – 89.
Annual Book of ASTM Standards, Vol 04.02.
high to which is cemented a rubber disk having a diameter of
Annual Book of ASTM Standards, Vol 03.01.
15 1
3 ⁄16 in. (100.0 mm) and a height of ⁄8 in. (3.2 mm). The plate
Annual Book of ASTM Standards, Vol 14.02.
shall be an integral part of the base of the mold holder. The
Available from American Association of State Highway and Transportation
Officials, 444 N. Capitol St., NW, Suite 225, Washington, DC 20001. compactor shall also include a trough for feeding the sample
Copyright © ASTM, 100 Barr Harbor Drive, West Conshohocken, PA 19428-2959, United States.
D 2844
into the mold in 20 increments (Fig. 2). Troughs with a mm) thick, creped surface, medium-fast filtering speed, me-
FIG. 2 Compactor with Sample Feed Trough
3 2
semicircular cross section of 6 in. (39 cm ) in area and 20 in. dium retention.
(50.8 cm) long have proven satisfactory. 4.10 Expansion-Pressure Device, with accessories as shown
4.2 Compression Testing Machine, with a minimum capac- in Fig. 6. There should be at least three of these devices for
ity of 10 000 lbf (45 kN) and satisfying the requirements of each sample to be tested within a day’s time.
Practices E 4.
4.11 Deflection Gage, with divisions of 0.0001 in. (0.002
4.3 Mold,4 6 0.002 in. (101.6 6 0.05 mm) inside diameter mm) and an allen wrench as shown in Fig. 6.
by 5 6 0.008 in. (127 6 0.20 mm) high. (See Fig. 3 for surface
4.12 Stabilometer, with accessories, as shown in Fig. 7 and
roughness.) Fig. 8.
15 1
4.4 Rubber Disks,3 ⁄16 in. (100 mm) in diameter by ⁄8 in.
4.13 Standard Metal Specimen, 4 in. (101.60 mm) in outside
(3 mm) thick and having a durometer hardness of 60 6 15.
diameter by 6 in. (152.2 mm) high as shown in Fig. 8.
4.5 Metal Follower, solid-walled, metal specimen follower
4.14 Balance, 5000-g capacity, accurate to 1 g.
3.95 6 0.005 in. (100.33 6 0.13 mm) in outside diameter by
4.15 Sieves, 1 in. (25.0 mm), ⁄4 in. (19.0 mm) and No. 4
5 in. (127 mm) long.
(4.75 mm) conforming to the requirements of Specification
4.6 Exudation Device, as shown in Fig. 4.
E11.
4.7 Phosphor Bronze Disk, as shown in Fig. 5.
4.16 Miscellaneous Equipment, including mixing pans,
4.8 Filter Paper, 100 mm in diameter and 0.006 in. (1.5
spoons, spatulas, and gallon cans with close-fitting lids.
mm) thick, smooth surface, medium filtering speed, medium
retention.
5. Soil Preparation
4.9 Filter Paper, 110 mm in diameter and 0.006 in. (1.5
5.1 Remove any coatings from coarse aggregate and break
clay lumps to pass the No. 4 (4.75-mm) sieve.
5.2 Adjust the soil graduation when some of the material is
Copies of detailed drawings of the apparatus shown in Figs. 4 (1 drawing), 6 (4
retained on the ⁄4-in. (19.0-mm) sieve. When 75 % or more
drawings), 7 and 8 (7 drawings) are available at a nominal cost from the ASTM
passes the ⁄4-in. sieve, use that part of the sample passing
Headquarters. Request Adjunct No. ADJD284401, ADJD284402, and
ADJD284403, respectively. the ⁄4-in. sieve. If less than 75 % of the sample passes the 1-in.
D 2844
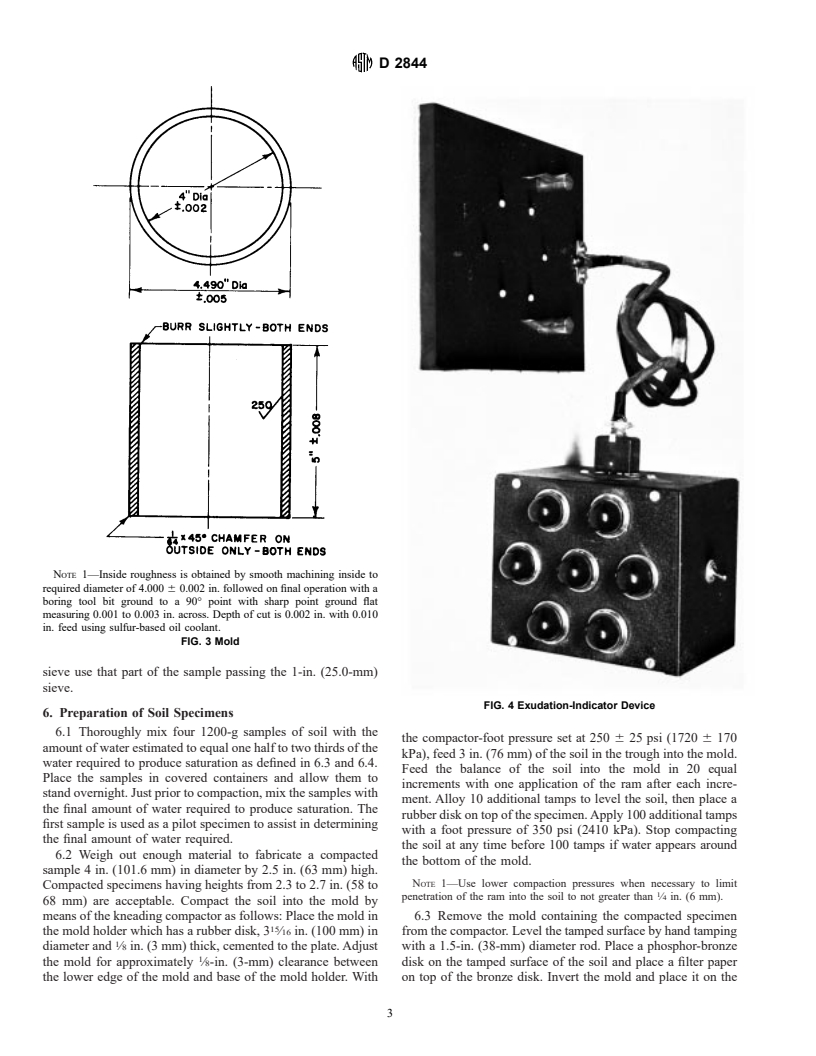
NOTE 1—Inside roughness is obtained by smooth machining inside to
required diameter of 4.000 6 0.002 in. followed on final operation with a
boring tool bit ground to a 90° point with sharp point ground flat
measuring 0.001 to 0.003 in. across. Depth of cut is 0.002 in. with 0.010
in. feed using sulfur-based oil coolant.
FIG. 3 Mold
sieve use that part of the sample passing the 1-in. (25.0-mm)
sieve.
FIG. 4 Exudation-Indicator Device
6. Preparation of Soil Specimens
6.1 Thoroughly mix four 1200-g samples of soil with the
the compactor-foot pressure set at 250 6 25 psi (1720 6 170
amount of water estimated to equal one half to two thirds of the
kPa), feed 3 in. (76 mm) of the soil in the trough into the mold.
water required to produce saturation as defined in 6.3 and 6.4.
Feed the balance of the soil into the mold in 20 equal
Place the samples in covered containers and allow them to
increments with one application of the ram after each incre-
stand overnight. Just prior to compaction, mix the samples with
ment. Alloy 10 additional tamps to level the soil, then place a
the final amount of water required to produce saturation. The
rubber disk on top of the specimen. Apply 100 additional tamps
first sample is used as a pilot specimen to assist in determining
with a foot pressure of 350 psi (2410 kPa). Stop compacting
the final amount of water required.
the soil at any time before 100 tamps if water appears around
6.2 Weigh out enough material to fabricate a compacted
the bottom of the mold.
sample 4 in. (101.6 mm) in diameter by 2.5 in. (63 mm) high.
NOTE 1—Use lower compaction pressures when necessary to limit
Compacted specimens having heights from 2.3 to 2.7 in. (58 to
penetration of the ram into the soil to not greater than ⁄4 in. (6 mm).
68 mm) are acceptable. Compact the soil into the mold by
means of the kneading compactor as follows: Place the mold in 6.3 Remove the mold containing the compacted specimen
the mold holder which has a rubber disk, 3 ⁄16 in. (100 mm) in from the compactor. Level the tamped surface by hand tamping
diameter and ⁄8 in. (3 mm) thick, cemented to the plate. Adjust with a 1.5-in. (38-mm) diameter rod. Place a phosphor-bronze
the mold for approximately ⁄8-in. (3-mm) clearance between disk on the tamped surface of the soil and place a filter paper
the lower edge of the mold and base of the mold holder. With on top of the bronze disk. Invert the mold and place it on the
D 2844
7.3 If the deflection gage does not check the above readings,
loosen the top frame bar and adjust the position of the shims,
between the frame and the spring steel bar, until the required
readings are obtained.
NOTE 3—Some models of the expansion-pressure apparat
...


Questions, Comments and Discussion
Ask us and Technical Secretary will try to provide an answer. You can facilitate discussion about the standard in here.