ASTM C1256-93(2008)
(Practice)Standard Practice for Interpreting Glass Fracture Surface Features
Standard Practice for Interpreting Glass Fracture Surface Features
SIGNIFICANCE AND USE
Fractography is often used to help identify the events that have resulted in the fracture of a glass object. This practice defines the appearance of various fracture surface features, as well as their method of formation. Thus, there can be a common understanding of their relationship to the fracture process as well as a common terminology.
SCOPE
1.1 Fracture features on the surface of a crack reflect the nature and course of the fracture event associated with the breakage of a glass object. This practice is a guide to the identification and interpretation of these fracture surface features.
1.2 The practice describes the various fracture surface features as to their appearance, the process of formation and their significance.
1.3 The practice does not provide the procedural information necessary for a complete fractographic analysis. Such information is available in the general literature. (See Glossary for suggested literature).
General Information
Relations
Buy Standard
Standards Content (Sample)
NOTICE: This standard has either been superseded and replaced by a new version or withdrawn.
Contact ASTM International (www.astm.org) for the latest information
Designation: C1256 − 93(Reapproved 2008)
Standard Practice for
Interpreting Glass Fracture Surface Features
This standard is issued under the fixed designation C1256; the number immediately following the designation indicates the year of
original adoption or, in the case of revision, the year of last revision.Anumber in parentheses indicates the year of last reapproval.A
superscript epsilon (´) indicates an editorial change since the last revision or reapproval.
1. Scope 3.1.5 fracture mirror radius—a dimension of the fracture
mirror as measured along the original specimen surface. It is
1.1 Fracture features on the surface of a crack reflect the
defined as the distance from the origin to the first detectable
nature and course of the fracture event associated with the
mist.
breakage of a glass object. This practice is a guide to the
identification and interpretation of these fracture surface fea- 3.1.6 fracture surface markings—features of the fracture
tures. surface produced during the fracture event which are useful in
determining the origin and the nature of the local stresses that
1.2 The practice describes the various fracture surface
produced the fracture.
features as to their appearance, the process of formation and
their significance. 3.1.7 fracture system—the fracture surfaces that have a
common cause or origin.
1.3 The practice does not provide the procedural informa-
tion necessary for a complete fractographic analysis. Such 3.1.8 terminal velocity—the uppermost limiting velocity at
information is available in the general literature. (See Glossary which a crack can propagate in a material, the approach to
for suggested literature). which is marked on the fracture generated surface by the
presence of mist. The terminal velocity is approximately one
2. Referenced Documents half the velocity of sound in the material.
2.1 ASTM Standards: 3.1.9 uniform stress—a state of stress that does not change
within the region of concern.
C162Terminology of Glass and Glass Products
3. Terminology 4. Summary
3.1 Definitions: 4.1 This practice is intended to aid in the identification of
3.1.1 bending stress—a continuously and linearly changing
fracturesurfacemarkingsaswellastoassistintheunderstand-
stress across the thickness of a glass body, varying from ing of their formation and significance.
compression on one surface to tension on the opposite surface.
5. Significance and Use
3.1.2 forking—amechanismwherebyapropagatingfracture
branches into two fractures, separated from each other by an
5.1 Fractography is often used to help identify the events
acute angle.
thathaveresultedinthefractureofaglassobject.Thispractice
3.1.3 forking angle—the angle subtended by two immedi- defines the appearance of various fracture surface features, as
well as their method of formation. Thus, there can be a
ately adjacent fractures which have just branched or forked.
common understanding of their relationship to the fracture
3.1.4 fracture mirror constant—a constant, characteristic of
process as well as a common terminology.
a given glass composition, which, when divided by the square
root of the fracture mirror radius, will yield the fracture stress.
6. Fracture Surface Markings
6.1 Origin:
6.1.1 Identification—The origin is almost always found at
ThispracticeisunderthejurisdictionofASTMCommitteeC14GlassandGlass
Products and is the direct responsibility of Subcommittee C14.04 on Physical and
the junction where the fracture-generated surface meets a free
Mechanical Properties
surface or a dissimilar material. Commonly, the origin is
Current edition approved April 1, 2008. Published December 2008. Originally
symmetrically located near the apex of the mirror and it is
approved in 1993. Last previous edition approved in 2003 as C1256–93 (2003)
DOI: 10.1520/C1256-93R08. usually small compared to the mirror. Fig. 1 shows typical
For referenced ASTM standards, visit the ASTM website, www.astm.org, or
origins and mirrors bounded by mist.
contact ASTM Customer Service at service@astm.org. For Annual Book of ASTM
6.1.2 Formation—The origin represents the single, unique
Standards volume information, refer to the standard’s Document Summary page on
the ASTM website. location at which every fracture system begins to form.
Copyright © ASTM International, 100 Barr Harbor Drive, PO Box C700, West Conshohocken, PA 19428-2959. United States
C1256 − 93 (2008)
6.3.1 Identification—The mirror is a smooth portion of the
fracture surface surrounding the origin (see Fig. 2). It is
commonly bounded by mist, but mist may not form when the
local stress at the fracture front diminishes as the crack
extends.
6.3.2 Formation—It represents the initial portion of the
propagating crack where the velocity is accelerating from the
origin to a value sufficient to induce turbulence at the crack
front, that is, approaching terminal velocity, where mist and
forking may appear.
6.3.3 Significance—It is often helpful in locating the origin.
The shape defined by the mist boundary is indicative of the
uniformityofthestressfieldatthetimeoffailure,forexample;
anopenmirror,definedbymistonlyalongtheoriginalsurface,
implies bending; a semicircular mirror implies uniform ten-
sion: (See Fig. 1) The mirror dimensions may be used to
calculate the stress at breakage, because the mirror radius is
FIG. 1 Origin Areas Produced Under Various Stress Functions
inverselyproportionaltothesquareofthestressatthetimethe
and Their Typical Fracture Features
mirror was formed. If the mirror is symmetrical, then use the
radius to the mist boundary.To calculate the stress at breakage
when the mirror is not symmetrical, the mirror radius is best
6.1.3 Significance—The origin defines the location where
determined by dividing the mirror diameter by two. A more
the fracture began. It may contain the stress concentrator or it
detailed description of the relationship between the mirror and
may be the stress concentrator.
the breaking strength for various glasses is found on p. 364 of
6.2 Mist Region:
(1) and in (2) and (3). Further discussion on quantitative
6.2.1 Identification—Under low power (5−50×) magnifi-
fracture analysis techniques is well summarized in (4).
cation, it has a misty appearance. Proceeding away from the
6.4 Wallner Lines:
origin,itbecomesmorefibrousinappearanceandelongatedin
6.4.1 Identification—Wallnerlines,alsocalledripplemarks,
the direction of crack spread. (See Fig. 2.)
are rib-shaped marks, frequently appearing as a series of
6.2.2 Formation—It is produced as the crack front breaks
curved lines resembling ripples created when an object is
into numerous segments, which then round into one another.
dropped into still water. (See Figs. 3-8.)
Theirpropagationabortsasthecrackfrontapproachesterminal
6.4.2 Formation—They are produced when the plane of the
velocity.
propagating crack front is temporarily altered by an elastic
6.2.3 Significance—It defines the limit of the mirror region
pulse.
and indicates that the crack has nearly reached terminal
6.4.3 Significance—The direction of local propagation is
velocity, or both.
perpendicular to the Wallner lines; it proceeds from the
6.3 Mirror:
concave to the convex side of the line. The shape of the line
indicatesthedirectionofstressesatvariouspointsonthecrack
front. The more advanced portions of the line generally
correspond to regions of higher tension.
6.5 Wallner Lines, Primary:
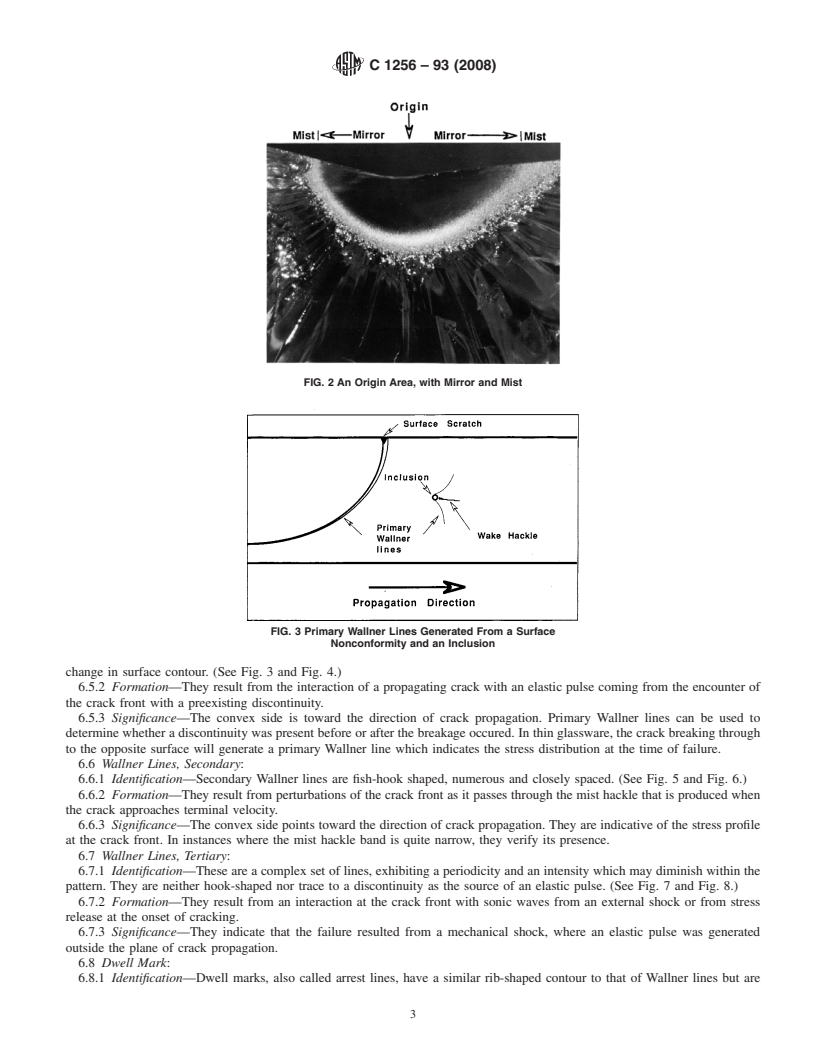
FIG. 3 Primary Wallner Lines Generated From a Surface Noncon-
FIG. 2 An Origin Area, with Mirror and Mist formity and an Inclusion
C1256 − 93 (2008)
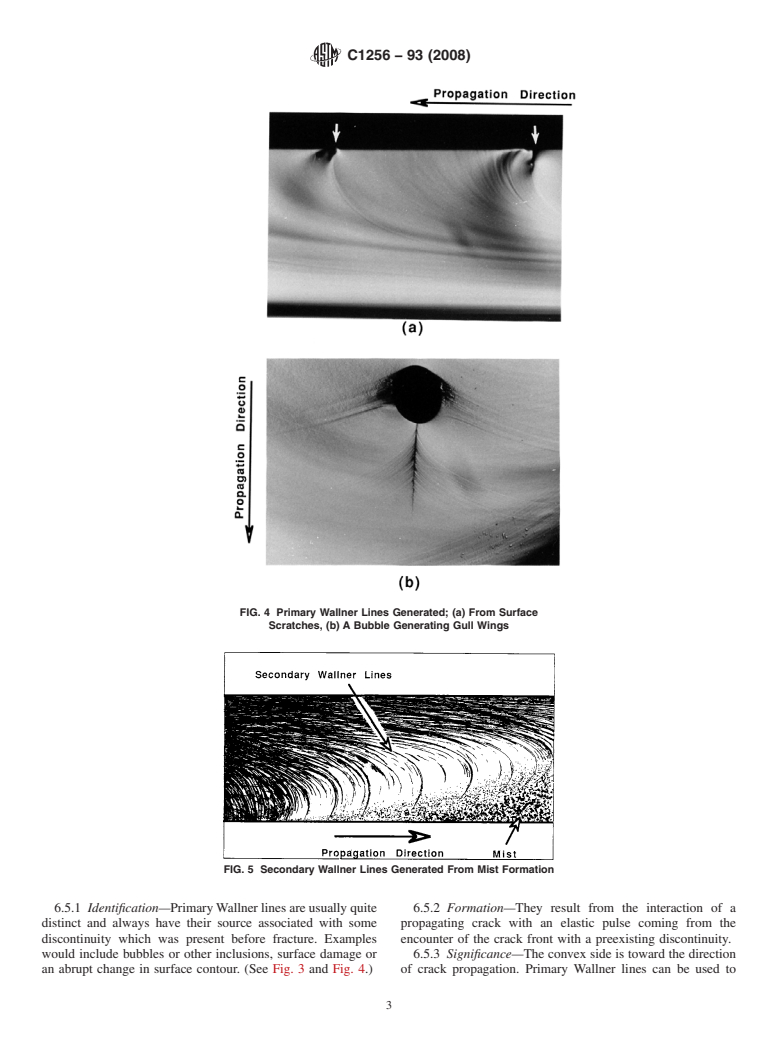
FIG. 4 Primary Wallner Lines Generated; (a) From Surface
Scratches, (b) A Bubble Generating Gull Wings
FIG. 5 Secondary Wallner Lines Generated From Mist Formation
6.5.1 Identification—PrimaryWallnerlinesareusuallyquite 6.5.2 Formation—They result from the interaction of a
distinct and always have their source associated with some propagating crack with an elastic pulse coming from the
discontinuity which was present before fracture. Examples encounter of the crack front with a preexisting discontinuity.
would include bubbles or other inclusions, surface damage or 6.5.3 Significance—The convex side is toward the direction
an abrupt change in surface contour. (See Fig. 3 and Fig. 4.) of crack propagation. Primary Wallner lines can be used to
C1256 − 93 (2008)
FIG. 6 Secondary Wallner Lines Generated From Mist Formation
FIG. 8 Tertiary Wallner Lines
6.7.2 Formation—They result from an interaction at the
crack front with sonic waves from an external shock or from
stress release at the onset of cracking.
6.7.3 Significance—They indicate that the failure resulted
fromamechanicalshock,whereanelasticpulsewasgenerated
outside the plane of crack propagation.
6.8 Dwell Mark:
6.8.1 Identification—Dwell marks, also called arrest lines,
have a similar rib-shaped contour to that of Wallner lines but
are distinctly sharper, often exhibiting a noticeable change in
fracture plane after the mark and may have twist hackle
associated. (See Fig. 9 and Fig. 10.)
6.8.2 Formation—They are formed when there is an abrupt
FIG. 7 Tertiary Wallner Lines Created by Sonic Pulses Produced
from Mechanical Shock Which Broke the Material
change in the direction of the stress field such as when the
crack stops and then is restarted by a different stress field.
determine whether a discontinuity was present before or after
6.8.3 Si
...
This document is not anASTM standard and is intended only to provide the user of anASTM standard an indication of what changes have been made to the previous version. Because
it may not be technically possible to adequately depict all changes accurately, ASTM recommends that users consult prior editions as appropriate. In all cases only the current version
of the standard as published by ASTM is to be considered the official document.
Designation:C1256–93 (Reapproved 2003) Designation:C1256–93 (Reapproved 2008)
Standard Practice for
Interpreting Glass Fracture Surface Features
This standard is issued under the fixed designation C1256; the number immediately following the designation indicates the year of
original adoption or, in the case of revision, the year of last revision.Anumber in parentheses indicates the year of last reapproval.A
superscript epsilon (´) indicates an editorial change since the last revision or reapproval.
1. Scope
1.1 Fracture features on the surface of a crack reflect the nature and course of the fracture event associated with the breakage
of a glass object. This practice is a guide to the identification and interpretation of these fracture surface features.
1.2 The practice describes the various fracture surface features as to their appearance, the process of formation and their
significance.
1.3 Thepracticedoesnotprovidetheproceduralinformationnecessaryforacompletefractographicanalysis.Suchinformation
is available in the general literature. (See Glossary for suggested literature).
2. Referenced Documents
2.1 ASTM Standards:
C162 Standard Terminology of Glass and Glass Products
3. Terminology
3.1 Definitions:
3.1.1 bending stress—a continuously and linearly changing stress across the thickness of a glass body, varying from
compression on one surface to tension on the opposite surface.
3.1.2 forking—amechanismwherebyapropagatingfracturebranchesintotwofractures,separatedfromeachotherbyanacute
angle.
3.1.3 forking angle—the angle subtended by two immediately adjacent fractures which have just branched or forked.
3.1.4 fracture mirror constant—a constant, characteristic of a given glass composition, which, when divided by the square root
of the fracture mirror radius, will yield the fracture stress.
3.1.5 fracture mirror radius—a dimension of the fracture mirror as measured along the original specimen surface. It is defined
as the distance from the origin to the first detectable mist.
3.1.6 fracture surface markings—features of the fracture surface produced during the fracture event which are useful in
determining the origin and the nature of the local stresses that produced the fracture.
3.1.7 fracture system—the fracture surfaces that have a common cause or origin.
3.1.8 terminal velocity—the uppermost limiting velocity at which a crack can propagate in a material, the approach to which
is marked on the fracture generated surface by the presence of mist. The terminal velocity is approximately one half the velocity
of sound in the material.
3.1.9 uniform stress—a state of stress that does not change within the region of concern.
4. Summary
4.1 This practice is intended to aid in the identification of fracture surface markings as well as to assist in the understanding
of their formation and significance.
5. Significance and Use
5.1 Fractographyisoftenusedtohelpidentifytheeventsthathaveresultedinthefractureofaglassobject.Thispracticedefines
the appearance of various fracture surface features, as well as their method of formation. Thus, there can be a common
This practice is under the jurisdiction of ASTM Committee C14 Glass and Glass Products and is the direct responsibility of Subcommittee C14.04 on Physical and
Mechanical Properties.
Current edition approved April 10, 2003. Published February 1994.
This practice is under the jurisdiction of ASTM Committee C14 Glass and Glass Products and is the direct responsibility of Subcommittee C14.04 on Physical and
Mechanical Properties
Current edition approved April 1, 2008. Published December 2008. Originally approved in 1993. Last previous edition approved in 2003 as C1256–93 (2003)
ForreferencedASTMstandards,visittheASTMwebsite,www.astm.org,orcontactASTMCustomerServiceatservice@astm.org.For Annual Book of ASTM Standards
, Vol 15.02.volume information, refer to the standard’s Document Summary page on the ASTM website.
Copyright © ASTM International, 100 Barr Harbor Drive, PO Box C700, West Conshohocken, PA 19428-2959, United States.
C1256–93 (2008)
understanding of their relationship to the fracture process as well as a common terminology.
6. Fracture Surface Markings
6.1 Origin:
6.1.1 Identification—Theoriginisalmostalwaysfoundatthejunctionwherethefracture-generatedsurfacemeetsafreesurface
oradissimilarmaterial.Commonly,theoriginissymmetricallylocatedneartheapexofthemirroranditisusuallysmallcompared
to the mirror. Fig. 1 shows typical origins and mirrors bounded by mist.
6.1.2 Formation—The origin represents the single, unique location at which every fracture system begins to form.
6.1.3 Significance—The origin defines the location where the fracture began. It may contain the stress concentrator or it may
be the stress concentrator.
6.2 Mist Region:
6.2.1 Identification—Under low power (5−50 3) magnification, it has a misty appearance. Proceeding away from the origin,
it becomes more fibrous in appearance and elongated in the direction of crack spread. (See Fig. 2.)
6.2.2 Formation—It is produced as the crack front breaks into numerous segments, which then round into one another. Their
propagation aborts as the crack front approaches terminal velocity.
6.2.3 Significance—It defines the limit of the mirror region and indicates that the crack has nearly reached terminal velocity,
or both.
6.3 Mirror:
6.3.1 Identification—The mirror is a smooth portion of the fracture surface surrounding the origin (see Fig. 2). It is commonly
bounded by mist, but mist may not form when the local stress at the fracture front diminishes as the crack extends.
6.3.2 Formation—It represents the initial portion of the propagating crack where the velocity is accelerating from the origin to
avaluesufficienttoinduceturbulenceatthecrackfront,thatis,approachingterminalvelocity,wheremistandforkingmayappear.
6.3.3 Significance—It is often helpful in locating the origin. The shape defined by the mist boundary is indicative of the
uniformity of the stress field at the time of failure, for example; an open mirror, defined by mist only along the original surface,
implies bending; a semicircular mirror implies uniform tension: (See Fig. 1) The mirror dimensions may be used to calculate the
stressatbreakage,becausethemirrorradiusisinverselyproportionaltothesquareofthestressatthetimethemirrorwasformed.
If the mirror is symmetrical, then use the radius to the mist boundary. To calculate the stress at breakage when the mirror is not
symmetrical, the mirror radius is best determined by dividing the mirror diameter by two. A more detailed description of the
relationship between the mirror and the breaking strength for various glasses is found on p. 364 of (1) and in (2) and (3). Further
discussion on quantitative fracture analysis techniques is well summarized in (4).
6.4 Wallner Lines:
6.4.1 Identification—Wallner lines, also called ripple marks, are rib-shaped marks, frequently appearing as a series of curved
lines resembling ripples created when an object is dropped into still water. (See Figs. 3-8.)
6.4.2 Formation—They are produced when the plane of the propagating crack front is temporarily altered by an elastic pulse.
6.4.3 Significance—ThedirectionoflocalpropagationisperpendiculartotheWallnerlines;itproceedsfromtheconcavetothe
convex side of the line. The shape of the line indicates the direction of stresses at various points on the crack front. The more
advanced portions of the line generally correspond to regions of higher tension.
6.5 Wallner Lines, Primary:
6.5.1 Identification—Primary Wallner lines are usually quite distinct and always have their source associated with some
discontinuitywhichwaspresentbeforefracture.Exampleswouldincludebubblesorotherinclusions,surfacedamageoranabrupt
FIG. 1 Origin Areas Produced Under Various Stress Functions
and Their Typical Fracture Features
C1256–93 (2008)
FIG. 2 An Origin Area, with Mirror and Mist
FIG. 3 Primary Wallner Lines Generated From a Surface
Nonconformity and an Inclusion
change in surface contour. (See Fig. 3 and Fig. 4.)
6.5.2 Formation—They result from the interaction of a propagating crack with an elastic pulse coming from the encounter of
the crack front with a preexisting discontinuity.
6.5.3 Significance—The convex side is toward the direction of crack propagation. Primary Wallner lines can be used to
determine whether a discontinuity was present before or after the breakage occured. In thin glassware, the crack breaking through
to the opposite surface will generate a primary Wallner line which indicates the stress distribution at the time of failure.
6.6 Wallner Lines, Secondary:
6.6.1 Identification—Secondary Wallner lines are fish-hook shaped, numerous and closely spaced. (See Fig. 5 and Fig. 6.)
6.6.2 Formation—They result from perturbations of the crack front as it passes through the mist hackle that is produced when
the crack approaches terminal velocity.
6.6.3 Significance—The convex side points toward the direction of crack propagation. They are indicative of the stress profile
at the crack front. In instances where the mist hackle band is quite narrow, they verify its presence.
6.7 Wallner Lines, Tertiary:
6.7.1 Identification—These are a complex set of lines, exhibiting a periodicity and an intensity which may diminish within the
pattern. They are neither hook-shaped nor trace to a discontinuity as the source of an elastic pu
...


Questions, Comments and Discussion
Ask us and Technical Secretary will try to provide an answer. You can facilitate discussion about the standard in here.