ASTM E1561-93(2014)
(Practice)Standard Practice for Analysis of Strain Gage Rosette Data
Standard Practice for Analysis of Strain Gage Rosette Data
ABSTRACT
This practice defines a reference axis for each of the two principal types of rosette configurations and the equations used for three-element strain gage rosette data analysis. The primary uses of this analysis procedure are to determine the directions and magnitudes of the principal surface strains, and to determine residual stresses. This is important for consistency in reporting results and for avoiding ambiguity in data analysis, especially when computers are used. There are several possible sets of equations, but the set presented herein is perhaps the most common.
SCOPE
1.1 The two primary uses of three-element strain gage rosettes are (a) to determine the directions and magnitudes of the principal surface strains and (b) to determine residual stresses. Residual stresses are treated in a separate ASTM standard, Test Method E837. This practice defines a reference axis for each of the two principal types of rosette configurations used and presents equations for data analysis. This is important for consistency in reporting results and for avoiding ambiguity in data analysis—especially when computers are used. There are several possible sets of equations, but the set presented here is perhaps the most common.
General Information
Buy Standard
Standards Content (Sample)
NOTICE: This standard has either been superseded and replaced by a new version or withdrawn.
Contact ASTM International (www.astm.org) for the latest information
Designation: E1561 − 93 (Reapproved 2014)
Standard Practice for
1
Analysis of Strain Gage Rosette Data
This standard is issued under the fixed designation E1561; the number immediately following the designation indicates the year of
original adoption or, in the case of revision, the year of last revision. A number in parentheses indicates the year of last reapproval. A
superscript epsilon (´) indicates an editorial change since the last revision or reapproval.
INTRODUCTION
There can be considerable confusion in interpreting and reporting the results of calculations
involving strain gage rosettes, particularly when data are exchanged between different laboratories.
Thus, it is necessary that users adopt a common convention for identifying the positions of the gages
and for analyzing the data.
1. Scope 3.3.1 a, b, c—the three-strain gages making up the rosette.
3.3.1.1 Discussion—For the 0° – 45° – 90° rosette (Fig. 1)
1.1 The two primary uses of three-element strain gage
the axis of the b gage is located 45° counterclockwise from the
rosettes are (a) to determine the directions and magnitudes of
a (reference line) axis and the c gage is located 90° counter-
the principal surface strains and (b) to determine residual
clockwise from the a axis. For the 0° – 60° – 120° rosette (Fig.
stresses. Residual stresses are treated in a separate ASTM
2) the axis of the b gage is located 60° counterclockwise from
standard, Test Method E837. This practice defines a reference
the a axis and the c axis is located 120° counterclockwise from
axis for each of the two principal types of rosette configura-
the a axis.
tions used and presents equations for data analysis. This is
3.3.2 ε , ε , ε —the strains measured by gages a, b, and c,
important for consistency in reporting results and for avoiding
a b c
respectively, positive in tension and negative in compression.
ambiguity in data analysis—especially when computers are
3.3.2.1 Discussion—After corrections for thermal effects
used. There are several possible sets of equations, but the set
and transverse sensitivity have been made, the measured
presented here is perhaps the most common.
strains represent the surface strains at the site of the rosette. It
2. Referenced Documents
is assumed here that the elastic modulus and thickness of the
2
test specimen are such that mechanical reinforcement by the
2.1 ASTM Standards:
rosette are negligible. For test objects subjected to unknown
E6 Terminology Relating to Methods of Mechanical Testing
combinations of bending and direct (membrane) stresses, the
E837 Test Method for Determining Residual Stresses by the
separate bending and membrane stresses can be obtained as
Hole-Drilling Strain-Gage Method
shown in 4.4.
3. Terminology ' ' '
3.3.3 ε ,ε , ε —reduced membrane strain components (4.4).
a b c
3.1 The terms in Terminology E6 apply. " " "
3.3.4 ε , ε , ε —reduced bending strain components (4.4).
a b c
3.2 Definitions of Terms Specific to This Standard:
3.3.5 ε —the calculated maximum (more tensile or less
1
3.2.1 reference line—the axis of the a gage.
compressive) principal strain.
3.3.6 ε —the calculated minimum (less tensile or more
3.3 Symbols:
2
compressive) principal strain.
3.3.7 γ —the calculated maximum shear strain.
1
M
This practice is under the jurisdiction ofASTM Committee E28 on Mechanical
Testing and is the direct responsibility of Subcommittee E28.01 on Calibration of 3.3.8 θ —the angle from the reference line to the direction
1
Mechanical Testing Machines and Apparatus.
of ε .
1
Current edition approved April 15, 2014. Published August 2014. Originally
3.3.8.1 Discussion—This angle is less than or equal to 180°
approvedin1993.Lastpreviouseditionapprovedin2009asE1561–93(2009).DOI:
in magnitude.
10.1520/E1561-93R14.
2
For referenced ASTM standards, visit the ASTM website, www.astm.org, or
3.3.9 C, R—values used in the calculations. C is the
contact ASTM Customer Service at service@astm.org. For Annual Book of ASTM
location, along the ε-axis, of the center of the Mohr’s circle for
Standards volume information, refer to the standard’s Document Summary page on
the ASTM website.
strain and R is the radius of that circle.
Copyright © ASTM International, 100 Barr Harbor Drive, PO Box C700, West Conshohocken, PA 19428-2959. United States
1
---------------------- Page: 1 ----------------------
E1561 − 93 (2014)
2 2
R 5 = ε 2 C 1 ε 2 C (2)
~ ! ~ !
a b
ε 5 C1R (3)
1
ε 5 C 2 R
2
γ 5 2R
M
tan 2θ 5 2 ε 2 C /ε 2 ε (4)
~ !
1 b a c
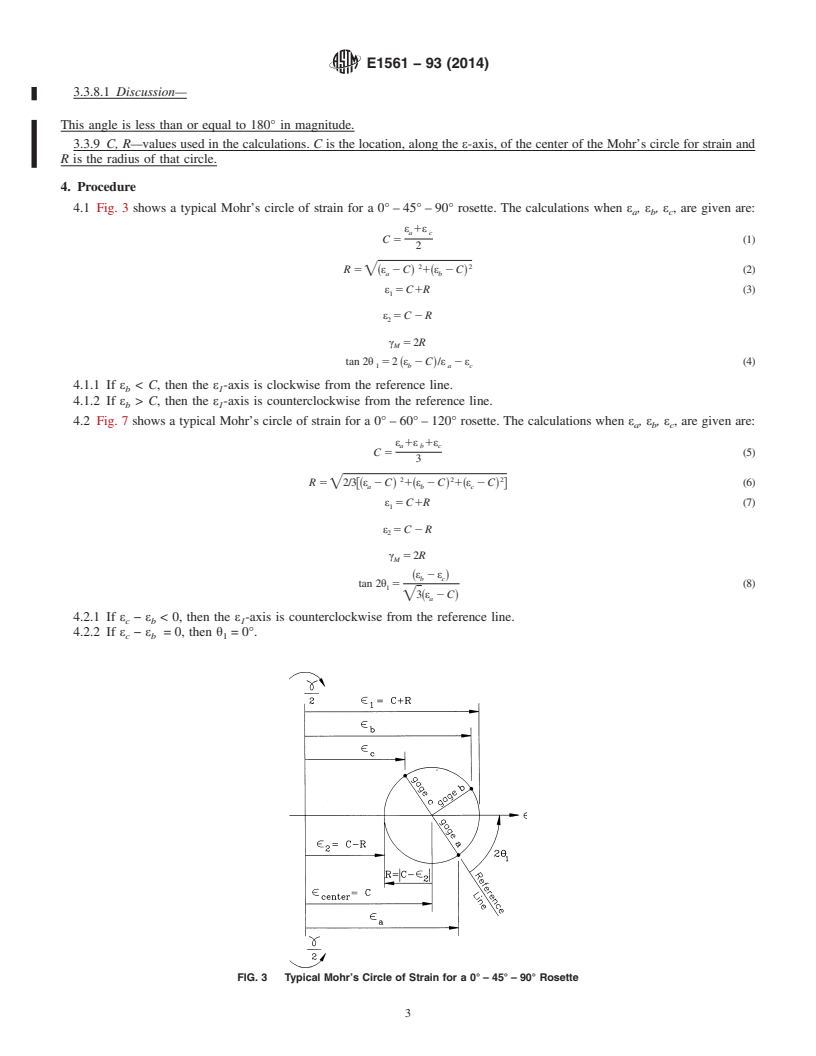
4.1.1 If ε
b 1
reference line.
4.1.2 If ε >C, then the ε -axis is counterclockwise from
b 1
the reference line.
FIG. 1 0° – 45° – 90° Rosette
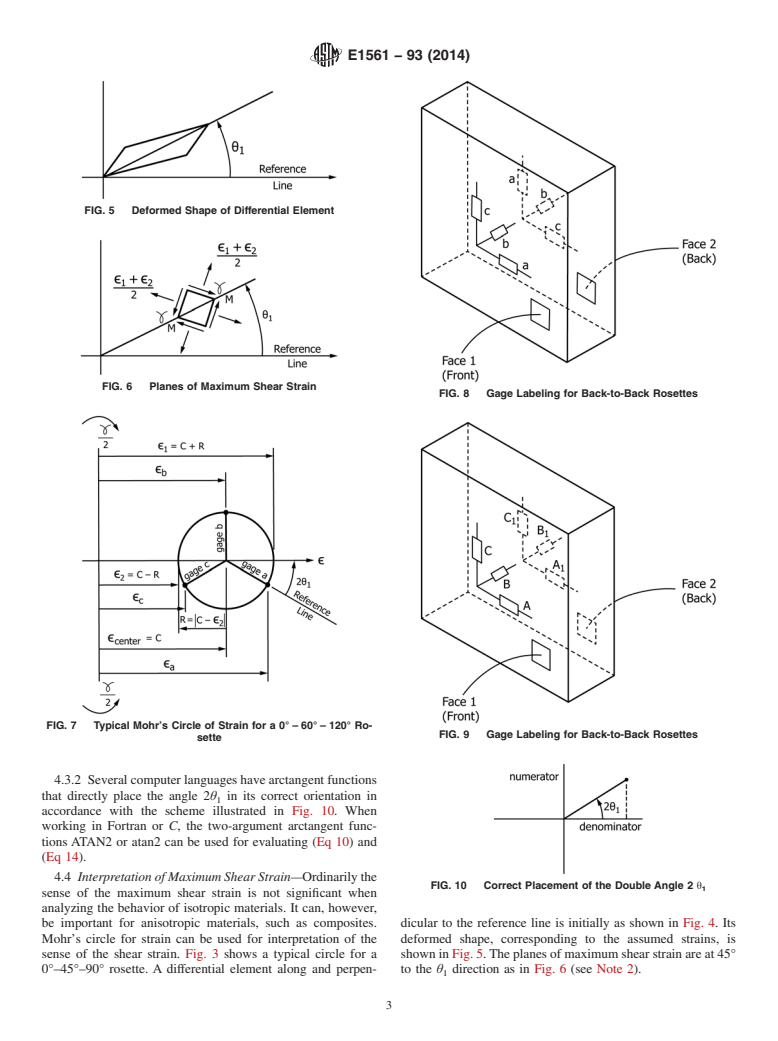
4.2 Fig. 7 shows a typical Mohr’s circle of strain for a
0° – 60° – 120° rosette. The calculations when ε , ε , ε , are
a b c
given are:
ε 1ε 1ε
a b c
C 5 (5)
3
2 2 2
...
This document is not an ASTM standard and is intended only to provide the user of an ASTM standard an indication of what changes have been made to the previous version. Because
it may not be technically possible to adequately depict all changes accurately, ASTM recommends that users consult prior editions as appropriate. In all cases only the current version
of the standard as published by ASTM is to be considered the official document.
Designation: E1561 − 93 (Reapproved 2009) E1561 − 93 (Reapproved 2014)
Standard Practice for
1
Analysis of Strain Gage Rosette Data
This standard is issued under the fixed designation E1561; the number immediately following the designation indicates the year of
original adoption or, in the case of revision, the year of last revision. A number in parentheses indicates the year of last reapproval. A
superscript epsilon (´) indicates an editorial change since the last revision or reapproval.
INTRODUCTION
There can be considerable confusion in interpreting and reporting the results of calculations
involving strain gage rosettes, particularly when data are exchanged between different laboratories.
Thus, it is necessary that users adopt a common convention for identifying the positions of the gages
and for analyzing the data.
1. Scope
1.1 The two primary uses of three-element strain gage rosettes are (a) to determine the directions and magnitudes of the
principal surface strains and (b) to determine residual stresses. Residual stresses are treated in a separate ASTM standard, Test
Method E837. This practice defines a reference axis for each of the two principal types of rosette configurations used and presents
equations for data analysis. This is important for consistency in reporting results and for avoiding ambiguity in data
analysis—especially when computers are used. There are several possible sets of equations, but the set presented here is perhaps
the most common.
2. Referenced Documents
2
2.1 ASTM Standards:
E6 Terminology Relating to Methods of Mechanical Testing
E837 Test Method for Determining Residual Stresses by the Hole-Drilling Strain-Gage Method
3. Terminology
3.1 The terms in Terminology E6 apply.
3.2 Additional terms and notation are as follows:
3.2.1 reference line—the axis of the a gage.
3.2.2 a, b, c—the three-strain gages making up the rosette. For the 0° – 45° – 90° rosette (Fig. 1) the axis of the b gage is located
45° counterclockwise from the a (reference line) axis and the c gage is located 90° counterclockwise from the a axis. For the
0° – 60° – 120° rosette (Fig. 2) the axis of the b gage is located 60° counterclockwise from the a axis and the c axis is located 120°
counterclockwise from the a axis.
3.2.3 ε , ε ,ε —the strains measured by gages a,b, and c, respectively, positive in tension and negative in compression. After
a b c
corrections for thermal effects and transverse sensitivity have been made, the measured strains represent the surface strains at the
site of the rosette. It is assumed here that the elastic modulus and thickness of the test specimen are such that mechanical
reinforcement by the rosette are negligible. For test objects subjected to unknown combinations of bending and direct (membrane)
stresses, the separate bending and membrane stresses can be obtained as shown in 4.4.
3.2.4 ε' , ε' , ε' —reduced membrane strain components (4.4).
a b c
3.2.5 ε" , ε" ,ε" —reduced bending strain components (4.4).
a b c
3.2.6 ε —the calculated maximum (more tensile or less compressive) principal strain.
1
3.2.7 ε —the calculated minimum (less tensile or more compressive) principal strain.
2
3.2.8 γ —the calculated maximum shear strain.
M
1
This practice is under the jurisdiction of ASTM Committee E28 on Mechanical Testing and is the direct responsibility of Subcommittee E28.01 on Calibration of
Mechanical Testing Machines and Apparatus.
Current edition approved Sept. 1, 2009April 15, 2014. Published September 2009August 2014. Originally approved in 1993. Last previous edition approved in 20032009
as E1561–93(2003).E1561–93(2009). DOI: 10.1520/E1561-93R09.10.1520/E1561-93R14.
2
For referenced ASTM standards, visit the ASTM website, www.astm.org, or contact ASTM Customer Service at service@astm.org. For Annual Book of ASTM Standards
volume information, refer to the standard’s Document Summary page on the ASTM website.
Copyright © ASTM International, 100 Barr Harbor Drive, PO Box C700, West Conshohocken, PA 19428-2959. United States
1
---------------------- Page: 1 ----------------------
E1561 − 93 (2014)
FIG. 1 0° – 45° – 90° Rosette
FIG. 2 0° – 60° – 120° Rosette
3.2.9 θ —the angle from the reference line to the direction of ε . This angle is less than or equal to 180° in magnitude.
1 1
3.2.10 C, R—values used in the calculations. C is the location, along the ε-axis, of the center of the Mohr’s circle for strain and
R is the radius of that circle.
3.2 Definitions of Terms Specific to This Standard:
3.2.1 reference line—the axis of the a gage.
3.3 Sy
...


Questions, Comments and Discussion
Ask us and Technical Secretary will try to provide an answer. You can facilitate discussion about the standard in here.