ASTM C1253-93(1998)
(Test Method)Standard Test Method for Determining the Outgassing Potential of Sealant Backing
Standard Test Method for Determining the Outgassing Potential of Sealant Backing
SCOPE
1.1 This test method provides a procedure for determining the outgassing potential of a sealant backing when it is punctured during or after installation, with the puncture occurring before the sealant cures.
1.2 The values stated in SI units are to be regarded as the standard. The values given in parentheses are for information only.
1.3 This standard does not purport to address all of the safety concerns, if any, associated with its use. It is the responsibility of the user of this standard to establish appropriate safety and health practices and determine the applicability of regulatory limitations prior to use.
General Information
Relations
Standards Content (Sample)
NOTICE: This standard has either been superseded and replaced by a new version or withdrawn.
Contact ASTM International (www.astm.org) for the latest information
Designation:C1253–93 (Reapproved 1998)
Standard Test Method for
Determining the Outgassing Potential of Sealant Backing
This standard is issued under the fixed designation C 1253; the number immediately following the designation indicates the year of
original adoption or, in the case of revision, the year of last revision. A number in parentheses indicates the year of last reapproval. A
superscript epsilon (e) indicates an editorial change since the last revision or reapproval.
1. Scope hour in the oven and compressed another 12 ⁄2 % and returned
to the oven, where it remains for another 2 h. The specimen is
1.1 This test method provides a procedure for determining
removed from the oven, and the sealant is allowed to finish
the outgassing potential of a sealant backing when it is
curingatroomtemperature,whileinthecompressedcondition.
punctured during or after installation, with the puncture occur-
The sealant is then removed from the specimen, and the back
ring before the sealant cures.
face (the face against the sealant backing) is examined. The
1.2 The values stated in SI units are to be regarded as the
sealant is slit in half along its length and the size of any voids
standard. The values given in parentheses are for information
estimated.
only.
1.3 This standard does not purport to address all of the
5. Significance and Use
safety concerns, if any, associated with its use. It is the
5.1 This test method is an indicator of a potential sealing
responsibility of the user of this standard to establish appro-
problem that could occur if a sealant backing is flawed in
priate safety and health practices and determine the applica-
manufacture or transportation to the job site, or abused during
bility of regulatory limitations prior to use.
the installation. If flawed, some sealant backing materials, in
2. Referenced Documents combination with certain environmental conditions, can out-
gas, generating voids in the applied sealant before the sealant
2.1 ASTM Standards:
cures, thereby potentially compromising the cured sealant’s
C 717 Terminology of Building Seals and Sealants
intended performance.
C 1193 Guide for Use of Joint Sealants
5.2 Voids are also known to be caused by other means and
3. Terminology
under certain conditions such as air entrapment during sealant
application, trapped air in the substrate releasing into the
3.1 Definitions—Refer to Terminology C 717 for the fol-
uncured sealant, incompatibility of the sealant with the sealant
lowing terms used in this test method: sealant, cure, sealant
backing or substrate, or inhospitable installation conditions in
backing, joint, substrate, non-sag sealant, tooling, and outgas-
the field. This test method is limited to identifying the
sing.
outgassing potential of a punctured sealant backing by forma-
4. Summary of Test Method
tion of a void in the soft uncured sealant under conditions of
heat and compression.
4.1 A sample of sealant backing material is placed between
nonporous substrates in a compressed condition, simulating the
6. Apparatus
placing of sealant backing on a job site. The sealant backing is
6.1 Air Circulating Oven, capable of maintaining a tempera-
then punctured at intervals along its exposed face. A sealant is
ture of 122°F (50°C).
applied immediately after puncture, and it is tooled to make a
6.2 Test Frame and Stylus, as described in Annex A1.
typical butt joint as described in Guide C 1193. After tooling,
the specimen is placed in an air circulating oven at elevated
7. Test Specimens
temperature for 1 h and then removed. The specimen is
1 7.1 Sealant backing should be 307.8-mm (12-in.) long and
compressed12 ⁄2 %ofitsdiameterandinthecompressedstate
of a width appropriate for use in 12.7-mm ( ⁄2-in.) wide joints.
returned to the oven. The specimen is removed after another
The proper width will be as specified by the sealant backing
manufacturer.
ThistestmethodisunderthejurisdictionofASTMCommitteeC24onBuilding
NOTE 1—The test method is specifically for 12.7-mm ( ⁄2-in.) wide
Seals and Sealants and is the direct responsibility of Subcommittee C24.20 on
joints and sealant backings used in such joints. The procedure is adapted
General Test Methods.
Current edition approved Nov. 15, 1993. Published February 1994.
Annual Book of ASTM Standards, Vol 04.07.
Copyright © ASTM International, 100 Barr Harbor Drive, PO Box C700, West Conshohocken, PA 19428-2959, United States.
C1253–93 (1998)
easily to either wider or narrower joints if all compression is considered
9.8.1 If properly performed, the slit will pass through any
as a percent of the joint width.
voids that have formed. Cut the sealant away from the edge of
the substrate (a knife generally works better than a razor).
8. Conditioning
Remove the two sealant halves from the joint and examine the
8.1 Condition all sealant backing and sealants at standard
size of the voids.
conditions for a minimum of 12 h prior to testing. Standard
conditions for this procedure are 23 6 2°C (73.4 6 3.6°F) and
10. Report
50 6 5 % relative humidity.
10.1 Report the test results and observations on the form
shown in Fig. 1.
9. Procedure
9.1 Prepare the test specimen by placing the sealant backing
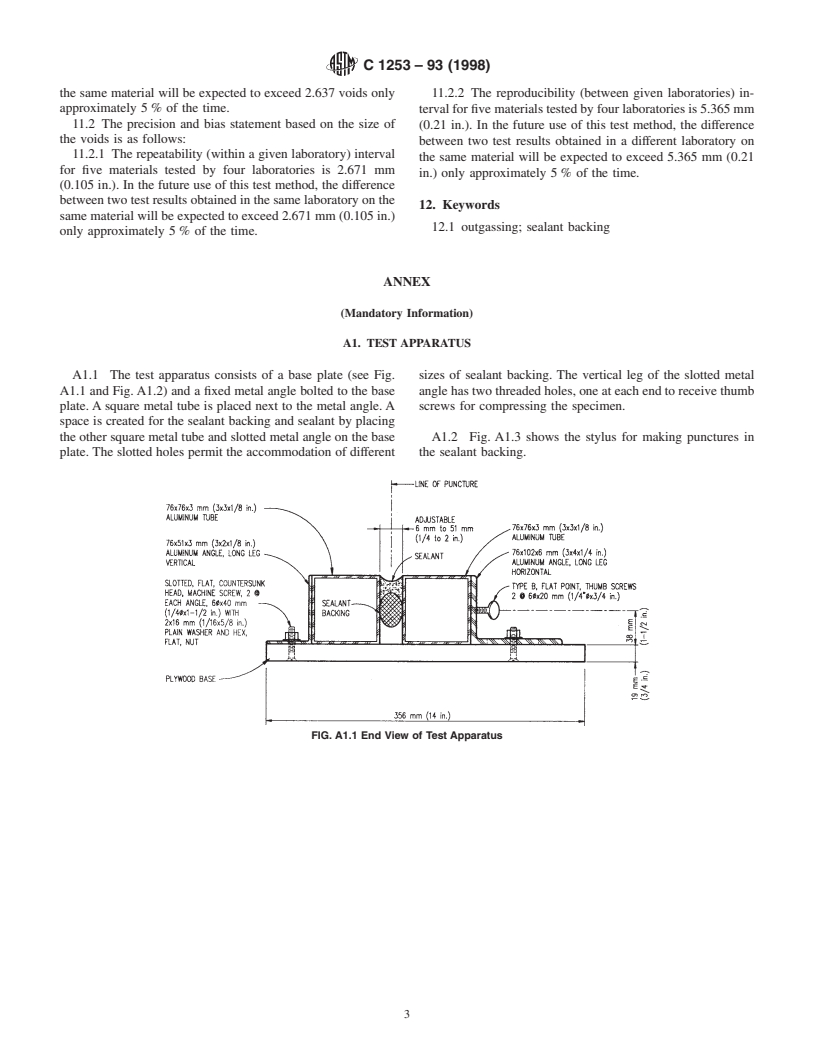
in the simulated joint apparatus (Fig. A1.1 and Fig. A1.2),
which has been adjusted to a 12.7-mm ( ⁄2-in.) wide opening.
Exercise care not to abuse or puncture the sealant backing
during installation.
9.2 Use the stylus (Fig. A1.3) to form six 9.5-mm ( ⁄8-in.)
deep punctures starting 38-mm (1 ⁄2-in.) from the end, spaced
25.4-mm (1-in.) apart, and centered on the width of the sealant
backing. The marks on the channel, used to form the joint, aid
in locating the quick, even placement of the punctures.
9.2.1 If the sealant backing has a tendency to slip down in
the joint during the puncturing, slip a temporary solid form
(such as a length of wood) beneath the backing to hold it in
place. Remove this when the puncturing is complete.
9.2.2 Time is a critical factor, so make all six punctures in 1
min or less.
9.3 Apply sealant over the sealant back
...


Questions, Comments and Discussion
Ask us and Technical Secretary will try to provide an answer. You can facilitate discussion about the standard in here.