ASTM F2273-03
(Test Method)Standard Test Methods for Bicycle Forks
Standard Test Methods for Bicycle Forks
SIGNIFICANCE AND USE
These tests are used to determine the performance of a bicycle fork.
SCOPE
1.1 These test methods describe mechanical tests for determining the following performance properties:
1.1.1 Compression Load,
1.1.2 Bending Load,
1.1.3 Impact Resistance, and
1.1.4 Fatigue Life.
1.2 The values stated in SI units are to be regarded as standard.
1.3 This standard does not purport to address all of the safety concerns, if any, associated with its use. It is the responsibility of the user of this standard to establish appropriate safety and health practices and determine the applicability of regulatory limitations prior to use.
General Information
Relations
Standards Content (Sample)
NOTICE: This standard has either been superseded and replaced by a new version or withdrawn.
Contact ASTM International (www.astm.org) for the latest information
An American National Standard
Designation:F2273–03
Standard Test Methods for
Bicycle Forks
This standard is issued under the fixed designation F2273; the number immediately following the designation indicates the year of
original adoption or, in the case of revision, the year of last revision.Anumber in parentheses indicates the year of last reapproval.A
superscript epsilon (´) indicates an editorial change since the last revision or reapproval.
1. Scope 3.1.4 lower triple clamp—See fork crown.Thelowercrown
of a two-crown suspension fork.
1.1 These test methods describe mechanical tests for deter-
3.1.5 upper triple clamp—the secondary structural fork
mining the following performance properties:
component responsible for connecting the steerer tube to the
1.1.1 Compression Load,
upper tube(s).
1.1.2 Bending Load,
3.1.6 dropout—the fork component used to support the
1.1.3 Impact Resistance, and
front wheel(s) at the axle(s).
1.1.4 Fatigue Life.
3.1.7 dropout centerline—the front hub mounting axis that
1.2 The values stated in SI units are to be regarded as
passes through both right and left dropouts.
standard.
3.1.8 tire clearance—the distance between the top surface
1.3 This standard does not purport to address all of the
of the tire and the bottom surface of the fork crown with no
safety concerns, if any, associated with its use. It is the
compressive force applied to the fork.
responsibility of the user of this standard to establish appro-
3.1.9 crown-to-axle clearance—the distance between the
priate safety and health practices and determine the applica-
fork axle centerline and the bottom surface of the crown with
bility of regulatory limitations prior to use.
no compressive load applied to the fork.
2. Referenced Documents 3.1.10 head set—the bearing cup, cones, and other support-
ing components for allowing rotation of the fork about the
2.1 ASTM Standards:
steering axis.
E4 Practices for Force Verification of Testing Machines
3.1.11 limit trip or stop—a deflection of the fork, which
F2043 Classification for Bicycle Usage
exceeds the allowable displacement values and causes the
3. Terminology
machine to stop running.
3.1 Definitions of Terms Specific to This Standard:
4. Summary of Test Methods
3.1.1 bicycle fork (fork)—the mechanism between the head
4.1 Compression Load Test—This test method compresses
tubeandthefrontaxle,includingthesteerertube,crown,triple
the fork.The distance from the bottom surface of the crown to
clamps, shock absorbers, lower tubes, and upper tubes.
the axle centerline is measured.
3.1.2 steerer tube—the structural fork component typically
4.2 Bending Load Test—Thistestmethodrestrainsaforkby
housed inside the bicycle head tube, connected to the fork
the steerer tube and applies a load perpendicular to the steerer
crown.Thesteerertubetransmitssteeringinputsfromtherider
tube axis at the point on the dropout centerline centered
totheforkandconnectstheforktothebicycleframebymeans
between the two dropouts. The deflection at the dropout
of headset bearings.
centerline perpendicular to the steerer tube axis is measured.
3.1.3 fork crown (crown)—the primary structural fork com-
4.3 Impact Resistance Test—This test method restrains a
ponent responsible for connecting the steerer tube to the fork
fork by the steerer tube in horizontal orientation; a weight is
upper tube(s) or fork blades.
dropped from a prescribed height onto a fixture attached to the
fork dropouts in line with the dropout centerline. Permanent
deflection at the dropout centerline perpendicular to the steerer
These test methods are under the jurisdiction of ASTM Committee F08 on
tube axis is measured. The ability of the connection between
Sports Equipment and Facilities and is the direct responsibility of Subcommittee
the steerer tube and crown to support torque applied about the
F08.10 on Bicycles.
axis of the steerer tube is also checked.
Current edition approved July 10, 2003. Published July 2003. DOI: 10.1520/
F2273-03.
4.4 Fatigue Test—This test method restrains a fork by the
For referenced ASTM standards, visit the ASTM website, www.astm.org, or
steerer tube and applies a fully reversed load perpendicular to
contact ASTM Customer Service at service@astm.org. For Annual Book of ASTM
the steerer tube axis at the point on the dropout centerline
Standards volume information, refer to the standard’s Document Summary page on
centeredbetweenthetwodropouts.Thetestisstoppedeitherat
the ASTM website.
Copyright © ASTM International, 100 Barr Harbor Drive, PO Box C700, West Conshohocken, PA 19428-2959, United States.
F2273–03
failure as defined by the criteria below or at 250000 cycles, 6.2.1 A fixture similar to that shown in Fig. 2 will be
whichever come first. The number of cycles is recorded. required to position a fork such that the steerer tube axis is
horizontal and such that the fork is restrained by the steerer
5. Significance and Use
tube using bearings.
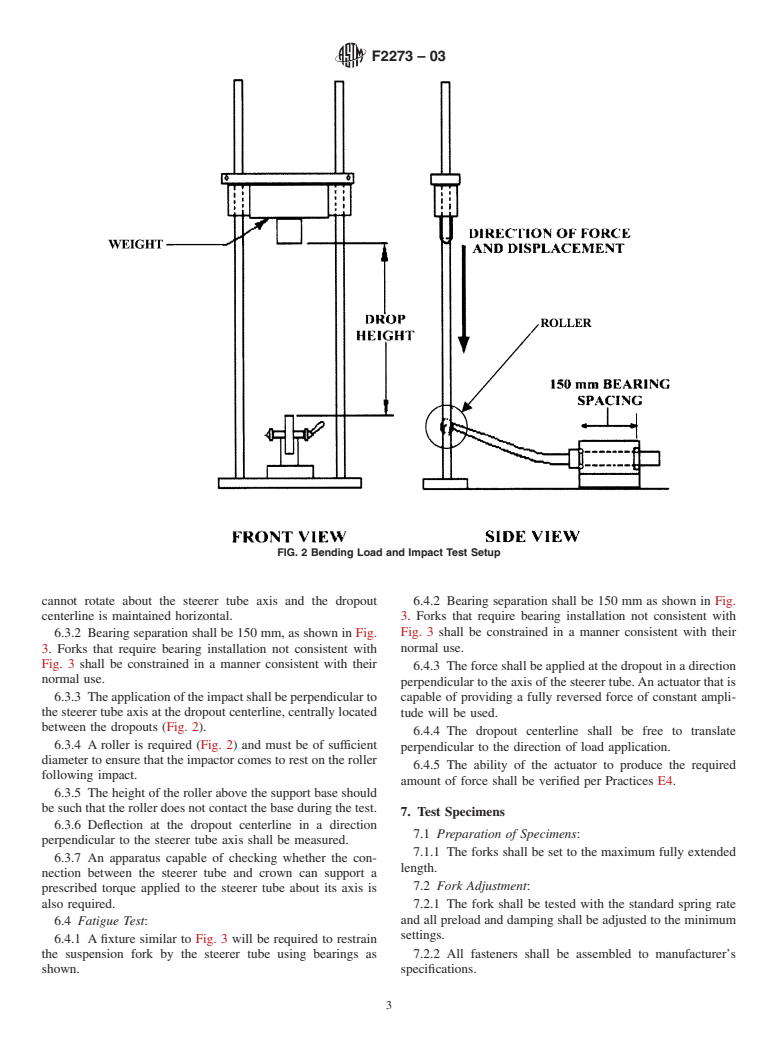
6.2.2 Bearing separation shall be 150 mm as shown in Fig.
5.1 These tests are used to determine the performance of a
2. Forks that require bearing installation not consistent with
bicycle fork.
Fig. 2 shall be constrained in a manner consistent with their
normal use.
6. Apparatus
6.2.3 The load shall be applied at the dropout centerline in
6.1 Compression Load Test:
a direction perpendicular to the steerer (Fig. 2).
6.1.1 A fixture similar to Fig. 1 will be required.
6.2.4 The dropout centerline shall be free to translate
6.1.2 The application of the load shall be applied to the top
parallel to the steerer tube with either a roller or linkage
of the crown and along the centerline of the steerer tube (Fig.
system.
1).
6.2.5 Deflection at the dropout centerline shall be measured
6.1.3 If necessary, then either a roller or linkage system
perpendicular to the steerer tube.
shallbeusedtoallowtranslationofthedropoutswhilethefork
is compressed. 6.3 Impact Resistance Test:
6.1.4 Thedistancefromthedropoutcenterlinetothenearest
6.3.1 A fixture similar to that shown in Fig. 2 will be
surface of the crown on steerer tube centerline shall be
required to position a fork such that the steered tube axis is
measured (Fig. 1).
horizontal and such that the fork is restrained by the steerer
6.2 Bending Load Test: tube using bearings. The fork shall be constrained so that it
NOTE—For some fork designs, a dropout support that allows translation may be required.
FIG. 1 Typical Compression Test Apparatus
F2273–03
FIG. 2 Bending Load and Impact Test Setup
cannot rotate about the steerer tube axis and the dropout 6.4.2 Bearing separation shall be 150 mm as shown in Fig.
centerline is maintained horizontal. 3. Forks that require bearing installation not consistent with
Fig. 3 shall be constrained in a manner consistent with their
6.3.2 Bearing separation shall be 150 mm, as shown in Fig.
3. Forks that require bearing installation not consistent with normal use.
Fig. 3 shall be constrained in a manner consistent with their
6.4.3 Theforceshallbeappliedatthedropoutinadirection
normal use.
perpendiculartotheaxisofthesteerertube.Anactuatorthatis
6.3.3 Theapplicationoftheimpactshallbeperpendicularto
capable of providing a fully reversed force of constant ampli-
the steerer tube axis at the dropout centerline, centrally located
tude will be used.
between the dropouts (Fig. 2).
6.4.4 The dropout centerline shall be free to translate
6.3.4 A roller is required (Fig. 2) and must be of sufficient
perpendicular to the direction of load application.
diameter to ensure that the impactor comes to rest on the roller
6.4.5 The ability of the actuator to produce the required
following impact.
amount of force shall be verified per Practices E4.
6.3.5 The height of the roller above the support base should
besuchthattherollerdoesnotcontactthebaseduringthetest.
7. Test Specimens
6.3.6 Deflection at the dropout centerline in a direction
7.1 Preparation of Specimens:
perpendicular to the steerer tube axis shall be measured.
7.1.1 The forks shall be set to the maximum fully extended
6.3.7 An apparatus capable of checking whether the con-
length.
nection between the steerer tube and crown can support a
7.2 Fork Adjustment:
prescribed torque applied to the steerer tube about its axis is
also required. 7.2.1 The fork shall be tested with the standard spring rate
and all preload and damping shall be adjusted to the minimum
6.4 Fatigue Test:
settings.
6.4.1 A fixture similar to Fig. 3 will be required to restrain
7.2.2 All fasteners shall be assembled to manufacturer’s
the suspension fork by the steerer tube using bearings as
shown. specifications.
F2273–03
FIG. 3 Fatigue Test Setup
8. Calibration and Standardization 10.2.4 Apply an increasing load at a rate not to exceed 100
N/s until a specified bending load is obtained. If manual
8.1 The direction of load application shall be within 62°.
loading is used, then the weight must be applied in at least ten
8.2 Theaccuracyofloadapplicationshallbewithin−0%to
equal increments.
+5% of the specified value unless specified otherwise.
10.2.5 Measure the deflection at the dropout centerline
8.3 The accuracy of all distance and displacement measure-
between 60 to 90 s after the specified bending load is applied.
ments shall be within 61 mm unless specified otherwise.
10.2.6 Remove the load until a load of 100 N is obtained.
10.2.7 Measureandrecordtheforkdeflectionatthedropout
9. Conditioning
c
...


Questions, Comments and Discussion
Ask us and Technical Secretary will try to provide an answer. You can facilitate discussion about the standard in here.