ASTM F429-00
(Test Method)Standard Test Method for Shock-Attenuation Characteristics of Protective Headgear for Football
Standard Test Method for Shock-Attenuation Characteristics of Protective Headgear for Football
SCOPE
1.1 This test method covers the determination of the shock-attenuation characteristics of protective headgear for football.
1.2 This standard does not purport to address all of the safety problems, if any, associated with its use. It is the responsibility of the user of this standard to establish appropriate safety and health practices and determine the applicability of regulatory limitations prior to use.
General Information
Relations
Standards Content (Sample)
NOTICE: This standard has either been superseded and replaced by a new version or discontinued.
Contact ASTM International (www.astm.org) for the latest information.
Designation: F 429 – 00
Standard Test Method for
Shock-Attenuation Characteristics of Protective Headgear
for Football
This standard is issued under the fixed designation F 429; the number immediately following the designation indicates the year of
original adoption or, in the case of revision, the year of last revision. A number in parentheses indicates the year of last reapproval. A
superscript epsilon (e) indicates an editorial change since the last revision or reapproval.
1. Scope
1.1 This test method covers the determination of the shock-
attenuation characteristics of protective headgear for football.
1.2 This standard does not purport to address all of the
safety concerns, if any, associated with its use. It is the
responsibility of the user of this standard to establish appro-
priate safety and health practices and determine the applica-
bility of regulatory limitations prior to use.
2. Referenced Documents
2.1 ASTM Standards:
F 717 Specification for Football Helmets
2.2 SAE Document:
J221 JUN 80 Instrumentation for Impact Tests, Require-
ments for Channel Class 1000
2.3 ISO Standard:
ISO/DIS 6220 Headforms For Use in the Testing of Protec-
tive Helmets
3. Terminology
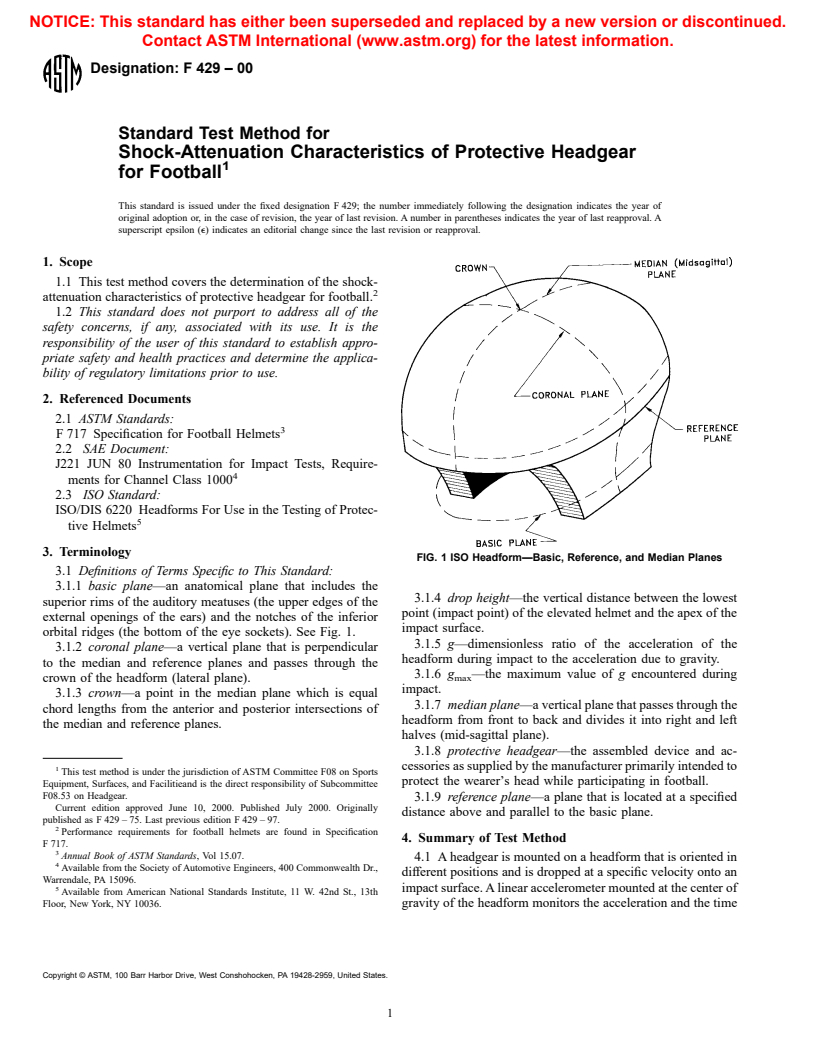
FIG. 1 ISO Headform—Basic, Reference, and Median Planes
3.1 Definitions of Terms Specific to This Standard:
3.1.1 basic plane—an anatomical plane that includes the
3.1.4 drop height—the vertical distance between the lowest
superior rims of the auditory meatuses (the upper edges of the
point (impact point) of the elevated helmet and the apex of the
external openings of the ears) and the notches of the inferior
impact surface.
orbital ridges (the bottom of the eye sockets). See Fig. 1.
3.1.5 g—dimensionless ratio of the acceleration of the
3.1.2 coronal plane—a vertical plane that is perpendicular
headform during impact to the acceleration due to gravity.
to the median and reference planes and passes through the
3.1.6 g —the maximum value of g encountered during
max
crown of the headform (lateral plane).
impact.
3.1.3 crown—a point in the median plane which is equal
3.1.7 median plane—a vertical plane that passes through the
chord lengths from the anterior and posterior intersections of
headform from front to back and divides it into right and left
the median and reference planes.
halves (mid-sagittal plane).
3.1.8 protective headgear—the assembled device and ac-
cessories as supplied by the manufacturer primarily intended to
This test method is under the jurisdiction of ASTM Committee F08 on Sports
protect the wearer’s head while participating in football.
Equipment, Surfaces, and Facilitieand is the direct responsibility of Subcommittee
F08.53 on Headgear.
3.1.9 reference plane—a plane that is located at a specified
Current edition approved June 10, 2000. Published July 2000. Originally
distance above and parallel to the basic plane.
published as F 429 – 75. Last previous edition F 429 – 97.
Performance requirements for football helmets are found in Specification
4. Summary of Test Method
F 717.
Annual Book of ASTM Standards, Vol 15.07.
4.1 A headgear is mounted on a headform that is oriented in
Available from the Society of Automotive Engineers, 400 Commonwealth Dr.,
different positions and is dropped at a specific velocity onto an
Warrendale, PA 15096.
5 impact surface. A linear accelerometer mounted at the center of
Available from American National Standards Institute, 11 W. 42nd St., 13th
Floor, New York, NY 10036. gravity of the headform monitors the acceleration and the time
Copyright © ASTM, 100 Barr Harbor Drive, West Conshohocken, PA 19428-2959, United States.
F 429
history of impact which are recorded with appropriate instru- 6.2.1 Acceleration Transducer—The acceleration trans-
mentation.) ducer is mounted at the center of gravity of the combined test
headform and carriage assembly with the sensitive axis aligned
to within 5° of the vertical when the helmet and headform are
in the impact position. The acceleration data channel complies
with SAE Recommended Practice J211 JUN 80 (a low pass
filter having a 4-pole Butterworth transfer function and a
corner frequency of 1650 Hz meets this requirement). Digital
filtering at 1650 Hz can be substituted.
6.2.2 System Accuracy—The impact recording system shall
be capable of measuring shocks of up to 500- g peak
acceleration with an accuracy of 6 5%.
6.2.3 Impact Recording—The impact shall be recorded on
single- or dual-trace storage oscilloscope with 0.1-mV to 20-V
deflection factor, 1 to 5-ms sweep speed-division, and 500-kHz
bandwidth.
6.2.4 Headforms—Standard headforms as described in 12.4
will be used for helmet impact testing.
6.2.5 Height Measuring Rod—A metal rod accurate to 6
0.10 in. (6 2.5 mm) shall be used for measuring drop heights.
6.2.6 Impact Surfaces—The impact surface for the instru-
ment system check (see Section 10) shall be a flat, Modular
Elastomer Programmer (MEP), 152 mm in diameter and 25
mm in thickness. The MEP shall have a durometer of 60 6 2
Shore “A.” The MEP is mounted on an aluminum mounting
plate with a minimum thickness of 0.220 in. after grinding. The
MEP (including aluminum mounting plate) shall be firmly
affixed to the top surface of a flat metal anvil. The base shall
consist of a rigid slab weighing at least 136 kg. For helmet
impacts, the instrument system check MEP is replaced with a
MEP 13 mm in thickness, 152 mm in diameter, and a
durometer of 38 6 5 Shore “A.”
6.2.7 Spherical Impactor — A device having a spherical
striking surface of 2.875 in. (73 mm) radius and having a mass,
NOTE 1—Rail-guided drop assemblies are also permissible.
FIG. 2 Schematic of Typical Drop Assembly
when mounted to the ball-arm connector and drop assembly, of
5 6 0.1 kg. The impactor is used for systems check of the
electronic equipment (see Section 10). The impactor shall be
5. Significance and Use
constructed so as to duplicate the system check results of a
5.1 Maximum acceleration and time duration data obtained
machined 5.75 in. diameter aluminum sphere.
by the specified procedures are intended to determine the shock
7. Sampling
attenuation characteristics of a headgear.
7.1 Submit at least three specimen helmets, one for test
NOTE 1—These data can be used at a later date to assess the protection
under the various conditions as described in Section 11.
afforded to the head when blows are delivered to the helmet.
8. Test Specimen
6. Apparatus
8.1 At least three specimen helmets of each size to be tested
6.1 Guide Assembly —The headform shall be attached to
as offered for sale on the open market shall be obtained for
the free-fall drop assembly carriage by an adjustable mounting
testing. These helmets shall be tested without accessories.
which will allow impacts to be delivered to any prescribed
9. Preparation of Apparatus
point on the helmet (see Fig. 2). The carriage shall be free to
slide on vertical guides. If wires are used they must be placed
9.1 Turn on all electronic equipment and allow to warm up
under at least 190-lbf (845-N) tension (see 12.4 for guide
for at least 30 min or as recommended by the manufacturer,
assembly specifications and allowable weight of drop assem-
whichever time is greater, prior to any testing.
bly).
10. Instrumentation System Check
6.2 Recording Equipment —The recording equipment shall
10.1 The instrumentation of the entire system shall be
meet the following criteria:
The MEP impact surface and the spherical impactor, required for the instrument
Available from the Research & Testing Co., 1415 Park Ave., Hoboken, NJ system check, are available from the Research & Testing Co., 1415 Park Ave.,
07030. Hoboken, NJ 07030.
F 429
checked before and after each series of tests, by dropping the
spherical impactor, without a helmet, onto the MEP pad at a
velocity of 5.44 m/s 6 0.04 m/s. This should produce a g of
max
389 6 4 g.
10.2 Record at least three impacts as described in 10.1
immediately prior to and following each series of tests, and
record on the report form.
10.3 If the maximum g readings are not within the tolerance
limits
...


Questions, Comments and Discussion
Ask us and Technical Secretary will try to provide an answer. You can facilitate discussion about the standard in here.