ASTM F2824-10(2015)
(Test Method)Standard Test Method for Mechanical Seal Strength Testing for Round Cups and Bowl Containers with Flexible Peelable Lids
Standard Test Method for Mechanical Seal Strength Testing for Round Cups and Bowl Containers with Flexible Peelable Lids
SIGNIFICANCE AND USE
5.1 Test Method F88 has been the standard for the mechanical peel strength testing of peelable seals since the 1960s. Normally the testing is run on a portion of the seal. The result is an actual seal strength picture of that portion of the seal. This test method is different in that the entire package seal is peeled open and data collected for the entire sealed area.
5.2 This test method is a tool for quality assurance use as well as performance evaluation of a seal during separation.
5.3 With appropriate software, data is collected depicting the seal strength of the entire length of the seal. As a result, it is possible to see seal strength variations, as the seal is peeled apart, thereby evaluating the consistency and uniformity of the seal (see Fig. 1).
SCOPE
1.1 This test method describes a method for the measurement of mechanical seal strength while separating the entire lid (cover/membrane) from a rigid or semi-rigid round container.
1.2 This test method differs from Test Method F88. Test Method F88 tests a portion of the seal where as this test method tests the force required to separate the entire lid (cover/membrane) from the container.
1.3 This test method is used to determine the continuous and maximum forces required to separate the lid (cover/membrane) from the container.
1.4 This test method uses an angle of pull of 45°, however other angles of pull may be used provided results are documented noting the used angle of pull and said procedure is validated.
1.5 Typical examples of container shapes that could be tested using this or a similar method include oval, rectangular, and circular with single or multiple cavities having a sealed lid (cover/membrane). Examples of products packaged in these types of containers are: ready meals, creamers, coffee, yogurts, household fresheners, chemical and pharmaceutical products, and numerous others not mentioned. However, this test method, described within, is specifically for round containers.
1.6 The values stated in inch-pound units are to be regarded as standard. The values given in parentheses are mathematical conversions to SI units that are provided for information only and are not considered standard.
1.7 This standard does not purport to address all of the safety concerns, if any, associated with its use. It is the responsibility of the user of this standard to establish appropriate safety and health practices and determine the applicability of regulatory limitations prior to use.
General Information
Relations
Buy Standard
Standards Content (Sample)
NOTICE: This standard has either been superseded and replaced by a new version or withdrawn.
Contact ASTM International (www.astm.org) for the latest information
Designation: F2824 − 10 (Reapproved 2015)
Standard Test Method for
Mechanical Seal Strength Testing for Round Cups and Bowl
Containers with Flexible Peelable Lids
This standard is issued under the fixed designation F2824; the number immediately following the designation indicates the year of
original adoption or, in the case of revision, the year of last revision.Anumber in parentheses indicates the year of last reapproval.A
superscript epsilon (´) indicates an editorial change since the last revision or reapproval.
1. Scope 2. Referenced Documents
2.1 ASTM Standards:
1.1 This test method describes a method for the measure-
D4332Practice for Conditioning Containers, Packages, or
mentofmechanicalsealstrengthwhileseparatingtheentirelid
Packaging Components for Testing
(cover/membrane) from a rigid or semi-rigid round container.
E177Practice for Use of the Terms Precision and Bias in
1.2 This test method differs from Test Method F88. Test
ASTM Test Methods
MethodF88testsaportionofthesealwhereasthistestmethod
E691Practice for Conducting an Interlaboratory Study to
tests the force required to separate the entire lid (cover/
Determine the Precision of a Test Method
membrane) from the container.
F17Terminology Relating to Flexible Barrier Packaging
F88Test Method for Seal Strength of Flexible Barrier
1.3 Thistestmethodisusedtodeterminethecontinuousand
Materials
maximumforcesrequiredtoseparatethelid(cover/membrane)
2.2 Other Standard:
from the container.
ANSI/AAMI/ISO 11607–1Packaging for Terminally Steril-
1.4 This test method uses an angle of pull of 45°, however
ized Medical Devices—Part 1: Requirements for
other angles of pull may be used provided results are docu-
Materials, Sterile Barrier Systems, and Packaging Sys-
mented noting the used angle of pull and said procedure is
tems
validated.
3. Terminology
1.5 Typical examples of container shapes that could be
tested using this or a similar method include oval, rectangular,
3.1 Definitions of Terms Specific to This Standard:
andcircularwithsingleormultiplecavitieshavingasealedlid
3.1.1 average seal strength—the sum of the individual
(cover/membrane). Examples of products packaged in these
forces recorded divided by the total number of those measure-
typesofcontainersare:readymeals,creamers,coffee,yogurts,
ments. The calculation can be expressed as the average
household fresheners, chemical and pharmaceutical products,
between the peaks or within the peaks (see Fig. 1).
and numerous others not mentioned. However, this test
3.1.2 flexible—See Terminology F17.
method, described within, is specifically for round containers.
3.1.3 grip separation rate—a function of the test equipment
1.6 Thevaluesstatedininch-poundunitsaretoberegarded
design and angle of peel to achieve the correct peel rate. It is
as standard. The values given in parentheses are mathematical
the actual peel rate of separating the lid (cover/membrane)
conversions to SI units that are provided for information only
from the container. For this test method, the actual separation
and are not considered standard.
rate is 12 in./min (300 mm/min).
1.7 This standard does not purport to address all of the 3.1.4 maximum seal strength—the maximum force mea-
safety concerns, if any, associated with its use. It is the sured when separating progressively, under the conditions of
responsibility of the user of this standard to establish appro- the test.
priate safety and health practices and determine the applica-
3.1.5 peel angle—the angle of the lid (cover/membrane)
bility of regulatory limitations prior to use.
relative to the container seal surface at all points of removal of
1 2
ThistestmethodisunderthejurisdictionofASTMCommitteeF02onFlexible For referenced ASTM standards, visit the ASTM website, www.astm.org, or
Barrier Packaging and is the direct responsibility of Subcommittee F02.20 on contact ASTM Customer Service at service@astm.org. For Annual Book of ASTM
Physical Properties. Standards volume information, refer to the standard’s Document Summary page on
Current edition approved April 1, 2015. Published May 2015. Originally the ASTM website.
ε1 3
approved in 2010. Last previous edition approved in 2010 as F2824–10 . DOI: Available fromAmerican National Standards Institute (ANSI), 25 W. 43rd St.,
10.1520/F2824–10R15. 4th Floor, New York, NY 10036, http://www.ansi.org.
Copyright © ASTM International, 100 Barr Harbor Drive, PO Box C700, West Conshohocken, PA 19428-2959. United States
F2824 − 10 (2015)
FIG. 1 Average Seal Strength
the lid (cover/membrane) from the container seal surface. The membrane) is peeled from the container at a constant rate of
preferred angle for this test method is 45° (Fig. 2) but other speed along the peel line of the container and at a 45° angle
angles can be used. (otheranglesarepermittedbutmustbenotedandreportedwith
test results) measured from the sealed surface of the container
3.1.6 peel line—thelineofdirectionofpeel,normally90°to
and lid (cover/membrane). Forces measured during the test are
the line beginning at the starting peel point and bisects the
recorded and plotted for analysis and reporting.
container area evenly (see Fig. 2).
3.1.7 seal area—the total area of the container which is
5. Significance and Use
sealed to the lid (cover/membrane) and requires a force to
5.1 TestMethodF88hasbeenthestandardforthemechani-
separate them.
cal peel strength testing of peelable seals since the 1960s.
3.1.8 starting peel point—the extended tab provided by the
Normally the testing is run on a portion of the seal. The result
design of the lid (cover/membrane).
isanactualsealstrengthpictureofthatportionoftheseal.This
3.1.9 work—the energy required to separate the lid (cover/
testmethodisdifferentinthattheentirepackagesealispeeled
membrane) from the test container. Typically, this calculation
open and data collected for the entire sealed area.
is made by the computer software or can be calculated as the
5.2 This test method is a tool for quality assurance use as
area under the force-displacement curve.
well as performance evaluation of a seal during separation.
4. Summary of Test Method
5.3 With appropriate software, data is collected depicting
4.1 The test sample (container) is fastened securely to the the seal strength of the entire length of the seal.As a result, it
test fixture with the starting peel point (extended tab if is possible to see seal strength variations, as the seal is peeled
provided) of the lid (cover/membrane) attached to the grip of apart, thereby evaluating the consistency and uniformity of the
the force measuring device (load cell). The lid (cover/ seal (see Fig. 1).
F2824 − 10 (2015)
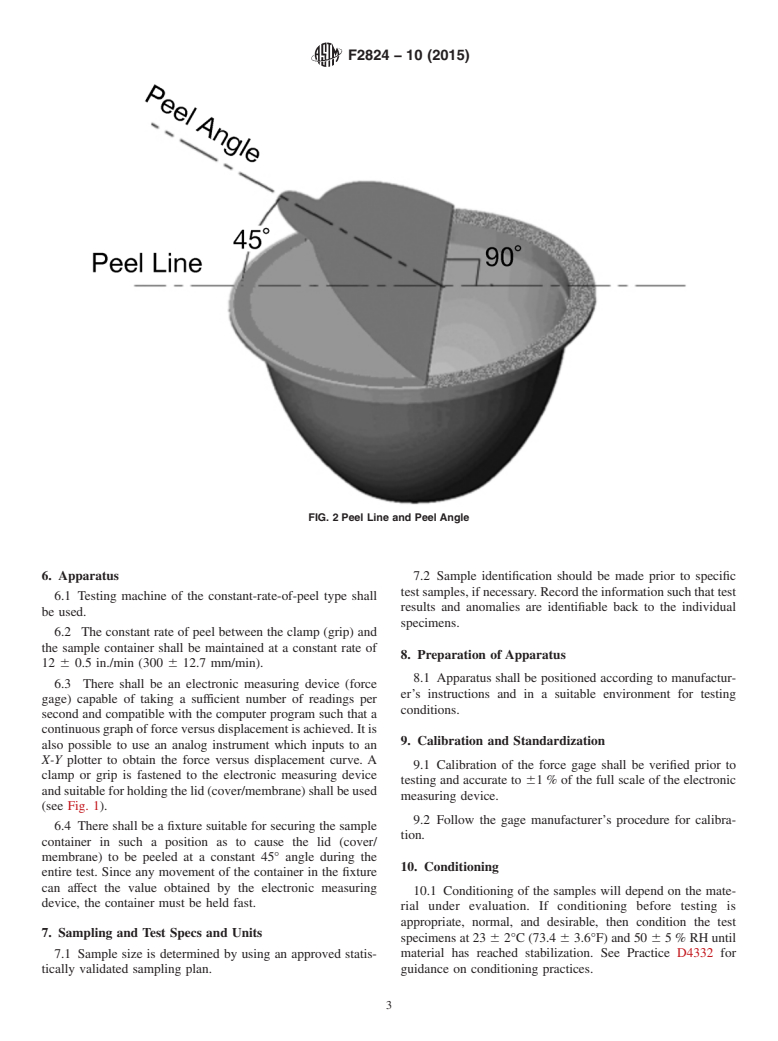
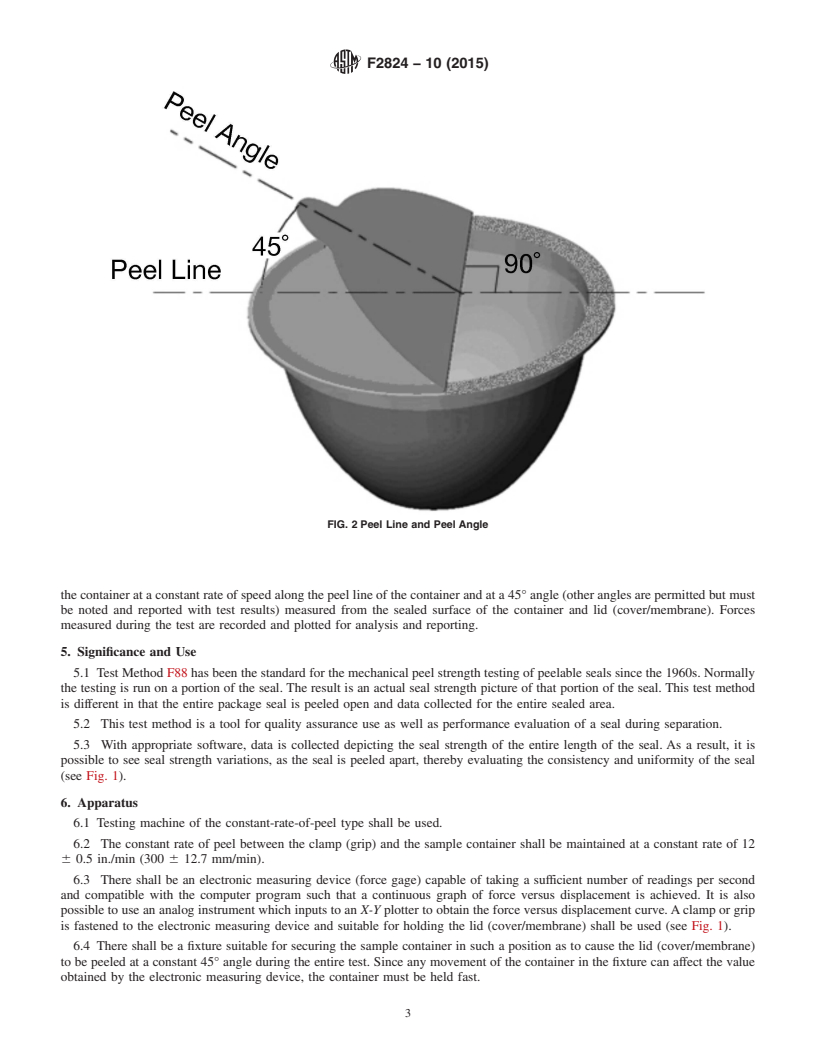
FIG. 2 Peel Line and Peel Angle
6. Apparatus 7.2 Sample identification should be made prior to specific
testsamples,ifnecessary.Recordtheinformationsuchthattest
6.1 Testing machine of the constant-rate-of-peel type shall
results and anomalies are identifiable back to the individual
be used.
specimens.
6.2 The constant rate of peel between the clamp (grip) and
the sample container shall be maintained at a constant rate of
8. Preparation of Apparatus
12 6 0.5 in./min (300 6 12.7 mm/min).
8.1 Apparatus shall be positioned according to manufactur-
6.3 There shall be an electronic measuring device (force
er’s instructions and in a suitable environment for testing
gage) capable of taking a sufficient number of readings per
conditions.
second and compatible with the computer program such that a
continuousgraphofforceversusdisplacementisachieved.Itis
9. Calibration and Standardization
also possible to use an analog instrument which inputs to an
X-Y plotter to obtain the force versus displacement curve. A
9.1 Calibration of the force gage shall be verified prior to
clamp or grip is fastened to the electronic measuring device
testing and accurate to 61% of the full scale of the electronic
andsuitableforholdingthelid(cover/membrane)shallbeused
measuring device.
(see Fig. 1).
9.2 Follow the gage manufacturer’s procedure for calibra-
6.4 There shall be a fixture suitable for securing the sample
tion.
container in such a position as to cause the lid (cover/
membrane) to be peeled at a constant 45° angle during the
10. Conditioning
entire test. Since any movement of the container in the fixture
can affect the value obtained by the electronic measuring
10.1 Conditioning of the samples will depend on the mate-
device, the container must be held fast.
rial under evaluation. If conditioning before testing is
appropriate, normal, and desirable, then condition the test
7. Sampling and Test Specs and Units
specimensat23 62°C(73.4 63.6°F)and50 65%RHuntil
material has reached stabilization. See Practice D4332 for
7.1 Sample size is determined by using an approved statis-
tically validated sampling plan. guidance on conditioning practices.
F2824 − 10 (2015)
11. Procedure 13.1.1 Repeatability Limit (r)—Two test results obtained
within one laboratory shall be judged not equivalent if they
11.1 Verify calibration of the force-measuring device prior
...
This document is not an ASTM standard and is intended only to provide the user of an ASTM standard an indication of what changes have been made to the previous version. Because
it may not be technically possible to adequately depict all changes accurately, ASTM recommends that users consult prior editions as appropriate. In all cases only the current version
of the standard as published by ASTM is to be considered the official document.
´1
Designation: F2824 − 10 F2824 − 10 (Reapproved 2015)
Standard Test Method for
Mechanical Seal Strength Testing for Round Cups and Bowl
Containers with Flexible Peelable Lids
This standard is issued under the fixed designation F2824; the number immediately following the designation indicates the year of
original adoption or, in the case of revision, the year of last revision. A number in parentheses indicates the year of last reapproval. A
superscript epsilon (´) indicates an editorial change since the last revision or reapproval.
ε NOTE—Fig. X1.1 was added editorially in April 2011.
1. Scope
1.1 This test method describes a method for the measurement of mechanical seal strength while separating the entire lid
(cover/membrane) from a rigid or semi-rigid round container.
1.2 This test method differs from Test Method F88. Test Method F88 tests a portion of the seal where as this test method tests
the force required to separate the entire lid (cover/membrane) from the container.
1.3 This test method is used to determine the continuous and maximum forces required to separate the lid (cover/membrane)
from the container.
1.4 This test method uses an angle of pull of 45°, however other angles of pull may be used provided results are documented
noting the used angle of pull and said procedure is validated.
1.5 Typical examples of container shapes that could be tested using this or a similar method include oval, rectangular, and
circular with single or multiple cavities having a sealed lid (cover/membrane). Examples of products packaged in these types of
containers are: ready meals, creamers, coffee, yogurts, household fresheners, chemical and pharmaceutical products, and numerous
others not mentioned. However, this test method, described within, is specifically for round containers.
1.6 The values stated in inch-pound units are to be regarded as standard. The values given in parentheses are mathematical
conversions to SI units that are provided for information only and are not considered standard.
1.7 This standard does not purport to address all of the safety concerns, if any, associated with its use. It is the responsibility
of the user of this standard to establish appropriate safety and health practices and determine the applicability of regulatory
limitations prior to use.
2. Referenced Documents
2.1 ASTM Standards:
D4332 Practice for Conditioning Containers, Packages, or Packaging Components for Testing
E177 Practice for Use of the Terms Precision and Bias in ASTM Test Methods
E691 Practice for Conducting an Interlaboratory Study to Determine the Precision of a Test Method
F17 Terminology Relating to Flexible Barrier Packaging
F88 Test Method for Seal Strength of Flexible Barrier Materials
2.2 Other Standard:
ANSI/AAMI/ISO 11607–1 Packaging for Terminally Sterilized Medical Devices—Part 1: Requirements for Materials, Sterile
Barrier Systems, and Packaging Systems
3. Terminology
3.1 Definitions of Terms Specific to This Standard:
This test method is under the jurisdiction of ASTM Committee F02 on Flexible Barrier Packaging and is the direct responsibility of Subcommittee F02.20 on Physical
Properties.
ε1
Current edition approved May 1, 2010April 1, 2015. Published June 2010May 2015. Originally approved in 2010. Last previous edition approved in 2010 as F2824–10 .
DOI: 10.1520/F2824–10E01.10.1520/F2824–10R15.
For referenced ASTM standards, visit the ASTM website, www.astm.org, or contact ASTM Customer Service at service@astm.org. For Annual Book of ASTM Standards
volume information, refer to the standard’sstandard’s Document Summary page on the ASTM website.
Available from American National Standards Institute (ANSI), 25 W. 43rd St., 4th Floor, New York, NY 10036, http://www.ansi.org.
Copyright © ASTM International, 100 Barr Harbor Drive, PO Box C700, West Conshohocken, PA 19428-2959. United States
F2824 − 10 (2015)
3.1.1 average seal strength—the sum of the individual forces recorded divided by the total number of those measurements. The
calculation can be expressed as the average between the peaks or within the peaks (see Fig. 1).
3.1.2 flexible—See Terminology F17.
3.1.3 grip separation rate—a function of the test equipment design and angle of peel to achieve the correct peel rate. It is the
actual peel rate of separating the lid (cover/membrane) from the container. For this test method, the actual separation rate is 12
in./min (300 mm/min).
3.1.4 maximum seal strength—the maximum force measured when separating progressively, under the conditions of the test.
3.1.5 peel angle—the angle of the lid (cover/membrane) relative to the container seal surface at all points of removal of the lid
(cover/membrane) from the container seal surface. The preferred angle for this test method is 45° (Fig. 2) but other angles can be
used.
3.1.6 peel line—the line of direction of peel, normally 90° to the line beginning at the starting peel point and bisects the
container area evenly (see Fig. 2).
3.1.7 seal area—the total area of the container which is sealed to the lid (cover/membrane) and requires a force to separate them.
3.1.8 starting peel point—the extended tab provided by the design of the lid (cover/membrane).
3.1.9 work—the energy required to separate the lid (cover/membrane) from the test container. Typically, this calculation is made
by the computer software or can be calculated as the area under the force-displacement curve.
4. Summary of Test Method
4.1 The test sample (container) is fastened securely to the test fixture with the starting peel point (extended tab if provided) of
the lid (cover/membrane) attached to the grip of the force measuring device (load cell). The lid (cover/membrane) is peeled from
FIG. 1 Average Seal Strength
F2824 − 10 (2015)
FIG. 2 Peel Line and Peel Angle
the container at a constant rate of speed along the peel line of the container and at a 45° angle (other angles are permitted but must
be noted and reported with test results) measured from the sealed surface of the container and lid (cover/membrane). Forces
measured during the test are recorded and plotted for analysis and reporting.
5. Significance and Use
5.1 Test Method F88 has been the standard for the mechanical peel strength testing of peelable seals since the 1960s. Normally
the testing is run on a portion of the seal. The result is an actual seal strength picture of that portion of the seal. This test method
is different in that the entire package seal is peeled open and data collected for the entire sealed area.
5.2 This test method is a tool for quality assurance use as well as performance evaluation of a seal during separation.
5.3 With appropriate software, data is collected depicting the seal strength of the entire length of the seal. As a result, it is
possible to see seal strength variations, as the seal is peeled apart, thereby evaluating the consistency and uniformity of the seal
(see Fig. 1).
6. Apparatus
6.1 Testing machine of the constant-rate-of-peel type shall be used.
6.2 The constant rate of peel between the clamp (grip) and the sample container shall be maintained at a constant rate of 12
6 0.5 in./min (300 6 12.7 mm/min).
6.3 There shall be an electronic measuring device (force gage) capable of taking a sufficient number of readings per second
and compatible with the computer program such that a continuous graph of force versus displacement is achieved. It is also
possible to use an analog instrument which inputs to an X-Y plotter to obtain the force versus displacement curve. A clamp or grip
is fastened to the electronic measuring device and suitable for holding the lid (cover/membrane) shall be used (see Fig. 1).
6.4 There shall be a fixture suitable for securing the sample container in such a position as to cause the lid (cover/membrane)
to be peeled at a constant 45° angle during the entire test. Since any movement of the container in the fixture can affect the value
obtained by the electronic measuring device, the container must be held fast.
F2824 − 10 (2015)
7. Sampling and Test Specs and Units
7.1 Sample size is determined by using an approved statistically validated sampling plan.
7.2 Sample identification should be made prior to specific test samples, if necessary. Record the information such that test results
and anomalies are identifiable back to the individual specimens.
8. Preparation of Apparatus
8.1 Apparatus shall be positioned according to manufacturer’s instructions and in a suitable environment for testing conditions.
9. Calibration and Standardization
9.1 Calibration of the force gage shall be verified prior to testing and accurate to 61 % of the full scale of the electronic
measuring device.
9.2 Follow the gage manufacturer’s procedure for calibration.
10. Conditioning
10.1 Conditioning of the samples will depend on the material under evaluation. If conditioning before testing is appropriate,
normal, and desirable, then condition the test specimens at 23 6 2°C (73.4 6 3.6°F) and 50 6 5 % RH until material has reached
stabilization. See Practice D4332 for guidance on conditioning practices.
11. Procedure
11.1
...


Questions, Comments and Discussion
Ask us and Technical Secretary will try to provide an answer. You can facilitate discussion about the standard in here.