ASTM D3336-05(2015)
(Test Method)Standard Test Method for Life of Lubricating Greases in Ball Bearings at Elevated Temperatures
Standard Test Method for Life of Lubricating Greases in Ball Bearings at Elevated Temperatures
SIGNIFICANCE AND USE
4.1 This test method can be used to evaluate the ability of grease to provide adequate lubrication for extended periods of ball bearings operating under light loads at high speeds and elevated temperatures.
SCOPE
1.1 This test method covers the evaluation of the performance of lubricating greases in ball bearings operating under light loads at high speeds and elevated temperatures.
1.2 The values stated in inch-pound units are to be regarded as standard. The values given in parentheses are mathematical conversions to SI units that are provided for information only and are not considered standard.
1.3 This standard does not purport to address all of the safety concerns, if any, associated with its use. It is the responsibility of the user of this standard to establish appropriate safety and health practices and determine the applicability of regulatory limitations prior to use. For specific warning statements, see 8.1.
General Information
Relations
Buy Standard
Standards Content (Sample)
NOTICE: This standard has either been superseded and replaced by a new version or withdrawn.
Contact ASTM International (www.astm.org) for the latest information
Designation: D3336 − 05 (Reapproved 2015)
Standard Test Method for
Life of Lubricating Greases in Ball Bearings at Elevated
Temperatures
This standard is issued under the fixed designation D3336; the number immediately following the designation indicates the year of
original adoption or, in the case of revision, the year of last revision. A number in parentheses indicates the year of last reapproval. A
superscript epsilon (´) indicates an editorial change since the last revision or reapproval.
This standard has been approved for use by agencies of the U.S. Department of Defense.
1. Scope temperature. Tests are continued until failure or completion of
a specified number of hours of running time.
1.1 This test method covers the evaluation of the perfor-
mance of lubricating greases in ball bearings operating under
4. Significance and Use
light loads at high speeds and elevated temperatures.
4.1 This test method can be used to evaluate the ability of
1.2 The values stated in inch-pound units are to be regarded
grease to provide adequate lubrication for extended periods of
as standard. The values given in parentheses are mathematical
ball bearings operating under light loads at high speeds and
conversions to SI units that are provided for information only
elevated temperatures.
and are not considered standard.
5,6
5. Apparatus
1.3 This standard does not purport to address all of the
safety concerns, if any, associated with its use. It is the
5.1 Test Spindle (see Figs. 1-4 ), capable of operating at
responsibility of the user of this standard to establish appro-
speeds of 10 000 r⁄min and temperatures as high as 371 °C
priate safety and health practices and determine the applica-
(700 °F).The test bearing seat dimension shall be 19.99 mm to
bility of regulatory limitations prior to use. For specific
20.00 mm (0.7870 in. to 0.7874 in.). For spindles having the
warning statements, see 8.1.
test bearing and the support bearing in the same housing (CRC
Type, Figs. 1-3)(Note 2) the internal construction of the
2. Referenced Documents
spindle shall be such that the outboard support bearing, or both
bearings are free to float axially in the housing. In designs
2.1 ASTM Standards:
A600 Specification for Tool Steel High Speed where both bearings are free to float, the spindle shaft shall
havea0.508 mmto0.762 mm(0.020 in.to0.030 in.)freeaxial
2.2 ABMA Standard:
movement or end play. The outboard bearing seat dimension
Standard 4, Tolerance Definitions and Gaging Practices for
should be 19.99 mm to 20.00 mm (0.7870 in. to 0.7874 in.).
Ball and Roller Bearings
5.1.1 The test unit design (Fig. 1 and Fig. 2) should be such
2.3 ASTM Adjuncts:
4 that a finger spring washer produces a 22 N to 67 N (5 lbf to
Standard Ball Bearings (set of five)
8,6
15 lbf) thrust load on the floating outboard support bearing.
3. Summary of Test Method
5.2 Bearing Housing:
5.2.1 For CRC Type Spindles—The bearing housing diam-
3.1 A grease lubricated SAE No. 204 size ball bearing is
eter shall be 47.005 mm to 47.021 mm (1.8506 in. to
rotated at 10 000 r/min under light load at a specified elevated
1.8512 in.)togiveproperbearingmounting.Constructionshall
be such that the test bearing is equipped with flush spacers or
This test method is under the jurisdiction of ASTM Committee D02 on shields to confine the grease to the bearing. The spacers or
Petroleum Products, Liquid Fuels, and Lubricants and is the direct responsibility of
Subcommittee D02.G0.05 on Functional Tests - Temperature.
Current edition approved Oct. 1, 2015. Published December 2015. Originally Complete apparatus is available from Falex Corp., 1020 Airpark Dr., Sugar
approved in 1975. Last previous edition approved in 2010 as D3336 – 05 (2010). Grove, IL 60554.
DOI: 10.1520/D3336-05R15. If you are aware of alternative suppliers, please provide this information to
For referenced ASTM standards, visit the ASTM website, www.astm.org, or ASTM International Headquarters. Your comments will receive careful consider-
contact ASTM Customer Service at service@astm.org. For Annual Book of ASTM ation at a meeting of the responsible technical committee, which you may attend.
Standards volume information, refer to the standard’s Document Summary page on Pope Machinery Corporation GreaseTest Spindles No. P-1911 or P-6301A-HT
the ASTM website. (Fig. 1) and No. P-7605-B (Fig. 2); and Falex Corp. spindles of the type shown in
Available fromAmerican Bearing ManufacturersAssoc., 2025 M St., NW, Ste Fig. 1 and Fig. 2 have been found satisfactory for this purpose.
800, Washington, DC 20036. The sole source of supply of the apparatus known to the committee at this time
Available from ASTM International Headquarters. Order Adjunct No. is Falex Part No. 643-187-070, Falex Corp. 1020 Airpark Dr., Sugar Grove, IL
ADJD3336. Original adjunct produced in 1984. 60554.
Copyright © ASTM International, 100 Barr Harbor Drive, PO Box C700, West Conshohocken, PA 19428-2959. United States
D3336 − 05 (2015)
FIG. 1 Test Spindle (Both Bearings Floating)
FIG. 2 Test Spindle (with Radial Load)
shields shall have a clearance between the inside diameter and shall be made for insertion in the housing of one or two small
the shaft of 0.127 mm to 0.178 mm (0.005 in. to 0.007 in.) per
thermocouples which shall lightly press on and be in continual
side.
contact with the outer race of the test bearing. The housing
shall be fitted with lugs to accommodate a yoke and added
NOTE 1—This type of spindle is described in CRC Research Technique
weight so that a radial load may be applied to the test bearing.
for the Determination of Performance Characteristics of Lubricating
Grease in Antifriction Bearings at Elevated Temperature (CRC Designa-
Athrust load of 22 N 6 2 N (5 lbf 6 0.55 lbf) shall be applied
tions L-35-54 and CRC L-35-62).
to the outer race of the bearing by means of a helical spring
5.2.2 For Navy Type Spindles (Test Bearing Mounted Out-
calibrated at room temperature.
side Spindle Housing)—The bearing housing shall be con-
5.3 Motor Drive Assembly—Spindle bracket and constant
structed of material similar to that of the test bearing and shall
belt tension motor drive assembly capable of providing spindle
be tempered to retain dimensional stability at temperatures up
speeds up to 10 000 r⁄min 6 200 r⁄min by means of an
to 371 °C (700 °F). Internal diameter shall be 47.005 mm to
47.021 mm (1.8506 in. to 1.8512 in.). The housing cover shall
be flush fitting to confine the grease to the bearing. Provision
D3336 − 05 (2015)
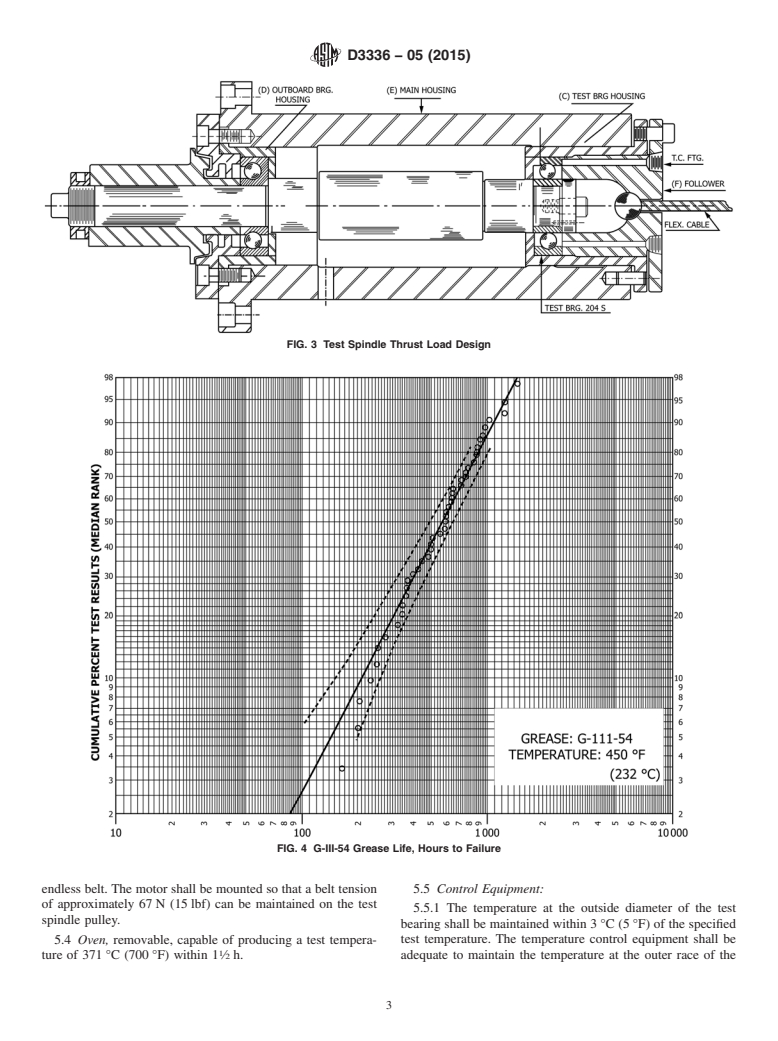
FIG. 3 Test Spindle Thrust Load Design
FIG. 4 G-III-54 Grease Life, Hours to Failure
endless belt. The motor shall be mounted so that a belt tension 5.5 Control Equipment:
of approximately 67 N (15 lbf) can be maintained on the test
5.5.1 The temperature at the outside diameter of the test
spindle pulley.
bearing shall be maintained within 3 °C (5 °F) of the specified
5.4 Oven, removable, capable of producing a test tempera- test temperature. The temperature control equipment shall be
ture of 371 °C (700 °F) within 1 ⁄2 h. adequate to maintain the temperature at the outer race of the
D3336 − 05 (2015)
test bearing within the limits specified by control of the oven can also be measured by volume and applied to the bearing by
temperature. The oven temperature shall be controlled by means of a syringe. The grease shall be worked uniformly into
means of a thermocouple placed in the oven cavity. both sides of the bearings, using a narrow blade spatula,
5.5.2 Suitable equipment such as adjustable reset relay and makingsurethatthegreasedoesnotextendbeyondthefacetof
overload device for shutting off oven heaters and drive motor the races. For CRC Type spindles the support bearing shall be
and other accessory equipment (timer, recorder, etc.) shall be packed full.
provided. Oven temperature as well as bearing temperature
8.3 Assemblethetestbearing,supportbearing,andZ-spring
should be recorded.
(see Fig. 1 and Fig. 2) on the spindle and fix the thermocouples
into position so that it is in contact with the outer race of the
6. Materials
test bearing (CRC Type spindles). For tests at 232 °C (450 °F)
6.1 Test Bearing, SAE No. 204 size, fabricated from heat-
and above, replace the finger spring washer for each test. For
resistant steel, suitable for temperatures as high as 371 °C
Navy Type spindles insert the test bearing into the housing and
(700 °F). The bearing shall be manufactured to ABEC-3
pressthebearingontothespindlebyapplicationofalightforce
quality, having a radial clearance of from 0.025 mm to
on the inner race. Place the cover plate in position, fix the
0.031 mm (0.0010 in. to 0.0012 in.). See Annex A1 which
thermocouples into position, and apply the radial and thrust
describesABMA’s standard method of measuring radial inter-
loads.
nal clearances of ball bearings. The bearing shall be equipped
with a ball retainer fabricated from suitable material capable of
9. Procedure
withstanding temperatures as high as 371 °C (700 °F). Support
9.1 Rotate the bearing by hand for approximately 100
bearings of CRC Type spindles shall be identical to the test
revolutions in each direction at a speed not exceeding
bearings.
200 r⁄min.Startthedrivemotorandheatersimultaneouslyand
NOTE 2—Bearings fabricated from 18-4-1 high speed or M-50 (Speci-
adjust the temperature controller to raise the bearing to test
fication A600) tool steel with retainers fabricated from heat-treated
temperature within 1 ⁄2 h. After 2 h of test operation at sp
...
This document is not an ASTM standard and is intended only to provide the user of an ASTM standard an indication of what changes have been made to the previous version. Because
it may not be technically possible to adequately depict all changes accurately, ASTM recommends that users consult prior editions as appropriate. In all cases only the current version
of the standard as published by ASTM is to be considered the official document.
Designation: D3336 − 05 (Reapproved 2010) D3336 − 05 (Reapproved 2015)
Standard Test Method for
Life of Lubricating Greases in Ball Bearings at Elevated
Temperatures
This standard is issued under the fixed designation D3336; the number immediately following the designation indicates the year of
original adoption or, in the case of revision, the year of last revision. A number in parentheses indicates the year of last reapproval. A
superscript epsilon (´) indicates an editorial change since the last revision or reapproval.
This standard has been approved for use by agencies of the U.S. Department of Defense.
1. Scope
1.1 This test method covers the evaluation of the performance of lubricating greases in ball bearings operating under light loads
at high speeds and elevated temperatures.
1.2 The values stated in inch-pound units are to be regarded as standard. The values given in parentheses are mathematical
conversions to SI units that are provided for information only and are not considered standard.
1.3 This standard does not purport to address all of the safety concerns, if any, associated with its use. It is the responsibility
of the user of this standard to establish appropriate safety and health practices and determine the applicability of regulatory
limitations prior to use. For specific warning statements, see 8.1.
2. Referenced Documents
2.1 ASTM Standards:
A600 Specification for Tool Steel High Speed
2.2 ABMA Standard:
Standard 4, Tolerance Definitions and Gaging Practices for Ball and Roller Bearings
2.3 ASTM Adjuncts:
Standard Ball Bearings (set of five)
3. Summary of Test Method
3.1 A grease lubricated SAE No. 204 size ball bearing is rotated at 10 000 rpm10 000 r/min under light load at a specified
elevated temperature. Tests are continued until failure or completion of a specified number of hours of running time.
4. Significance and Use
4.1 This test method can be used to evaluate the ability of grease to provide adequate lubrication for extended periods of ball
bearings operating under light loads at high speeds and elevated temperatures.
5,6
5. Apparatus
5.1 Test Spindle (see Figs. 1-4 ), capable of operating at speeds of 10 00010 000 r ⁄ rpm min and temperatures as high as 371°C
(700°F).371 °C (700 °F). The test bearing seat dimension shall be 19.99 to 20.00 mm (0.7870 to 0.7874 in.). 19.99 mm to
20.00 mm (0.7870 in. to 0.7874 in.). For spindles having the test bearing and the support bearing in the same housing (CRC Type,
This test method is under the jurisdiction of ASTM Committee D02 on Petroleum Products, Liquid Fuels, and Lubricants and is the direct responsibility of Subcommittee
D02.G0.05 on Functional Tests - Temperature.
Current edition approved Oct. 1, 2010Oct. 1, 2015. Published November 2010December 2015. Originally approved in 1975. Last previous edition approved in 20052010
ε1
as D3336D3336 – 05 (2010).–05 . DOI: 10.1520/D3336-05R10.10.1520/D3336-05R15.
For referenced ASTM standards, visit the ASTM website, www.astm.org, or contact ASTM Customer Service at service@astm.org. For Annual Book of ASTM Standards
volume information, refer to the standard’s Document Summary page on the ASTM website.
Available from American Bearing Manufacturers Assoc., 2025 M St., NW, Ste 800, Washington, DC 20036.
Available from ASTM International Headquarters. Order Adjunct No. ADJD3336. Original adjunct produced in 1984.
Complete apparatus is available from Falex Corp., 1020 Airpark Dr., Sugar Grove, IL 60554.
If you are aware of alternative suppliers, please provide this information to ASTM International Headquarters. Your comments will receive careful consideration at a
meeting of the responsible technical committee, which you may attend.
Pope Machinery Corporation Grease Test Spindles No. P-1911 or P-6301A-HT (Fig. 1) and No. P-7605-B (Fig. 2); and Falex Corp. spindles of the type shown in Fig.
1 and Fig. 2 have been found satisfactory for this purpose.
Copyright © ASTM International, 100 Barr Harbor Drive, PO Box C700, West Conshohocken, PA 19428-2959. United States
D3336 − 05 (2015)
FIG. 1 Test Spindle (Both Bearings Floating)
FIG. 2 Test Spindle (with Radial Load)
Figs. 1-3) (Note 2) the internal construction of the spindle shall be such that the outboard support bearing, or both bearings are
free to float axially in the housing. In designs where both bearings are free to float, the spindle shaft shall have a 0.508 to 0.762
mm (0.020 to 0.030 in.) 0.508 mm to 0.762 mm (0.020 in. to 0.030 in.) free axial movement or end play. The outboard bearing
seat dimension should be 19.99 to 20.00 mm (0.7870 to 0.7874 in.).19.99 mm to 20.00 mm (0.7870 in. to 0.7874 in.).
5.1.1 The test unit design (Fig. 1 and Fig. 2) should be such that a finger spring washer produces a 22 to 67 N (5 to 15 lbf) 22 N
8,6
to 67 N (5 lbf to 15 lbf) thrust load on the floating outboard support bearing.
5.2 Bearing Housing:
5.2.1 For CRC Type Spindles—The bearing housing diameter shall be 47.005 to 47.021 mm (1.8506 to 1.8512 in.) 47.005 mm
to 47.021 mm (1.8506 in. to 1.8512 in.) to give proper bearing mounting. Construction shall be such that the test bearing is
equipped with flush spacers or shields to confine the grease to the bearing. The spacers or shields shall have a clearance between
the inside diameter and the shaft of 0.127 to 0.178 mm (0.005 to 0.007 in.) 0.127 mm to 0.178 mm (0.005 in. to 0.007 in.) per side.
NOTE 1—This type of spindle is described in CRC Research Technique for the Determination of Performance Characteristics of Lubricating Grease
The sole source of supply of the apparatus known to the committee at this time is Falex Part No. 643-187-070, Falex Corp. 1020 Airpark Dr., Sugar Grove, IL 60554.
D3336 − 05 (2015)
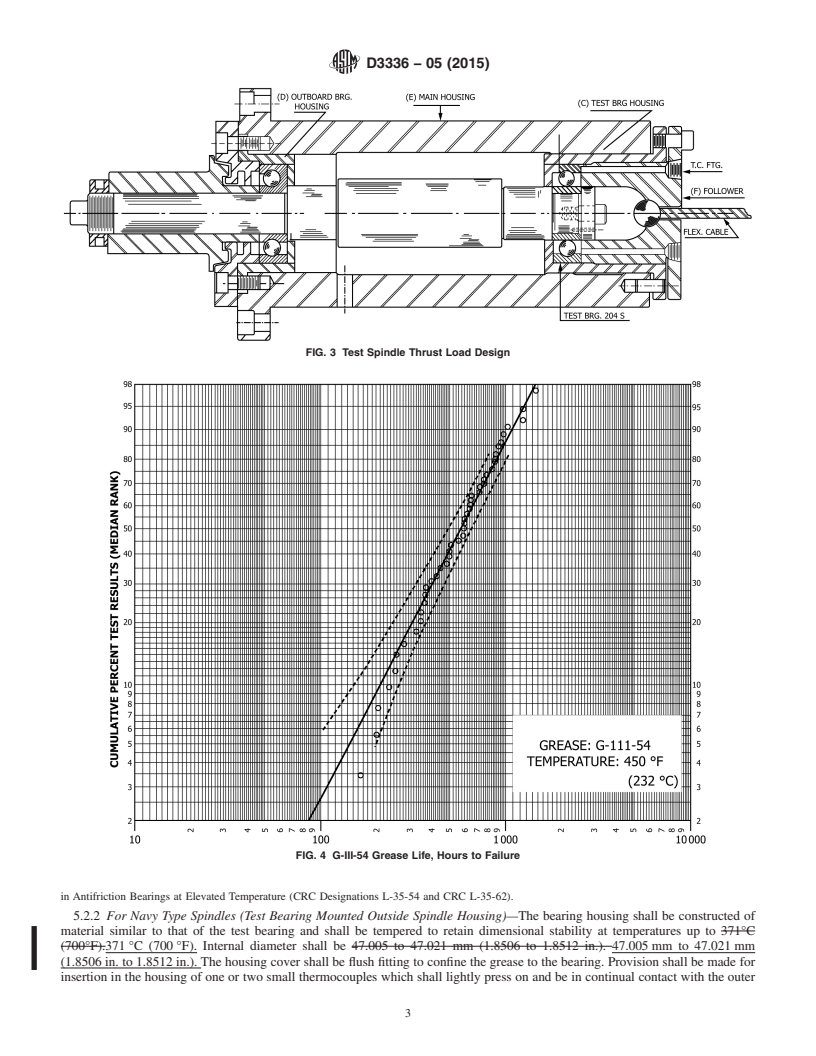
FIG. 3 Test Spindle Thrust Load Design
FIG. 4 G-III-54 Grease Life, Hours to Failure
in Antifriction Bearings at Elevated Temperature (CRC Designations L-35-54 and CRC L-35-62).
5.2.2 For Navy Type Spindles (Test Bearing Mounted Outside Spindle Housing)—The bearing housing shall be constructed of
material similar to that of the test bearing and shall be tempered to retain dimensional stability at temperatures up to 371°C
(700°F).371 °C (700 °F). Internal diameter shall be 47.005 to 47.021 mm (1.8506 to 1.8512 in.). 47.005 mm to 47.021 mm
(1.8506 in. to 1.8512 in.). The housing cover shall be flush fitting to confine the grease to the bearing. Provision shall be made for
insertion in the housing of one or two small thermocouples which shall lightly press on and be in continual contact with the outer
D3336 − 05 (2015)
race of the test bearing. The housing shall be fitted with lugs to accommodate a yoke and added weight so that a radial load may
be applied to the test bearing. A thrust load of 22 6 2 N (5 6 0.55 lbf) 22 N 6 2 N (5 lbf 6 0.55 lbf) shall be applied to the outer
race of the bearing by means of a helical spring calibrated at room temperature.
5.3 Motor Drive Assembly—Spindle bracket and constant belt tension motor drive assembly capable of providing spindle speeds
up to 10 00010 000 r ⁄min 6 200200 r ⁄ rpm min by means of an endless belt. The motor shall be mounted so that a belt tension
of approximately 67 N (15 lbf) 67 N (15 lbf) can be maintained on the test spindle pulley.
5.4 Oven, removable, capable of producing a test temperature of 371°C (700°F)371 °C (700 °F) within 1 ⁄2 h. h.
5.5 Control Equipment:
5.5.1 The temperature at the outside diameter of the test bearing shall be maintained within 3°C (5°F)3 °C (5 °F) of the specified
test temperature. The temperature control equipment shall be adequate to maintain the temperature at the outer race of the test
bearing within the limits specified by control of the oven temperature. The oven temperature shall be controlled by means of a
thermocouple placed in the oven cavity.
5.5.2 Suitable equipment such as adjustable reset relay and overload device for shutting off oven heaters and drive motor and
other accessory equipment (timer, recorder, etc.) shall be provided. Oven temperature as well as bearing temperature should be
recorded.
6. Materials
6.1 Test Bearing, SAE No. 204 size, fabricated from heat-resistant steel, suitable for temperatures as high as 371°C
(700°F).371 °C (700 °F). The bearing shall be manufactured to ABEC-3 quality, having a radial clearance of from 0.025 to 0.031
mm (0.0010 to 0.0012 in.). 0.025 mm to 0.031 mm (0.0010 in. to 0.0012 in.). See Annex A1 which describes ABMA’s standard
method of measuring radial internal clearances of ball bearings. The bearing shall be equipped with a ball retainer fabricated from
suitable material capable of withstanding temperatures as high as 371°C (700°F).371 °C (700 °F). Support bearings of CRC Type
spindles shall be identical to the test bearings.
NOTE 2—Bearings fabricated from 18-4-1 high speed or M-50 (Specification A600) tool steel with retainers fabricated from heat-treated silver-plated
beryllium copper have been found satisfactory for this purpose. Alternatively, for testing at temperatures of 149°C (300°F)149 °C (300 °F) and below,
ASTM Test Bearings Size 6204 (PCN 12-433360-12) ABEC-3 has been found satisfactory. This bearing is fabricated from AISI 52100 steel, with a
retainer fabricated from AISI C1010 steel and with an internal clearance range of 0.021 to 0.028 mm (0.0008 to 0.0011 in.).0.021 mm to 0.028 mm
(0.0008 in. to 0.0011 in.).
6.2 ASTM n-Heptane.
6.3 Mineral Spirits, reagent grade.
7. Test Conditions
7.1 Temperature—As specified up to 371°C (700°F).371 °C (700 °F).
7.2 Speed—10 00010 000 r ⁄min 6 200 200 r rpm.⁄min.
7.3 Test Cycle:
7.3.1 Twenty-one and one-half hours running at temperatures of 149°C (300°F)149 °C (300 °F) and below—2 ⁄2 h shutdown
without applied heat.
7.3.2 Twenty hours running at temperatures of above 149°C (300°F)—4 h 149 °C (300 °F)—4 h shutdown without applied heat.
8. Preparation of Apparatus
...


Questions, Comments and Discussion
Ask us and Technical Secretary will try to provide an answer. You can facilitate discussion about the standard in here.