ASTM B754-10(2015)e1
(Test Method)Standard Test Method for Measuring and Recording the Deviations from Flatness in Copper and Copper Alloy Strip
Standard Test Method for Measuring and Recording the Deviations from Flatness in Copper and Copper Alloy Strip
SIGNIFICANCE AND USE
5.1 This test method is intended for measuring distortion in strip used for making close tolerance parts. Since distortion in this strip would influence the shape of the part being produced and cause difficulties in feeding through close-fitting dies and other manufacturing equipment, it is important that this material be flat.
5.2 This test method provides a universal procedure for measuring the irregularities that cause the deviation from flatness.
5.3 This test method allows the purchaser and manufacturer to inspect strip with a standard technique to a mutually agreed upon and acceptable percentage deviation from flatness.
SCOPE
1.1 This test method establishes a procedure for the measurement of distortions in thin metal strip and the application of these measurements to an equation that will indicate the deviation from flatness.
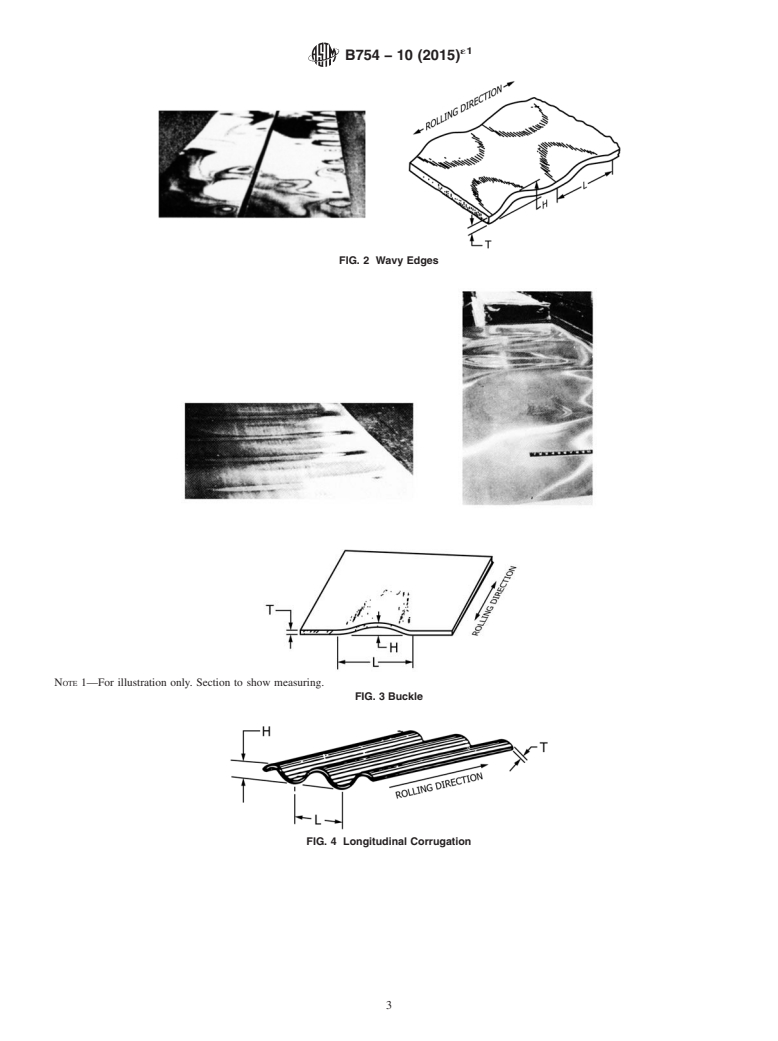
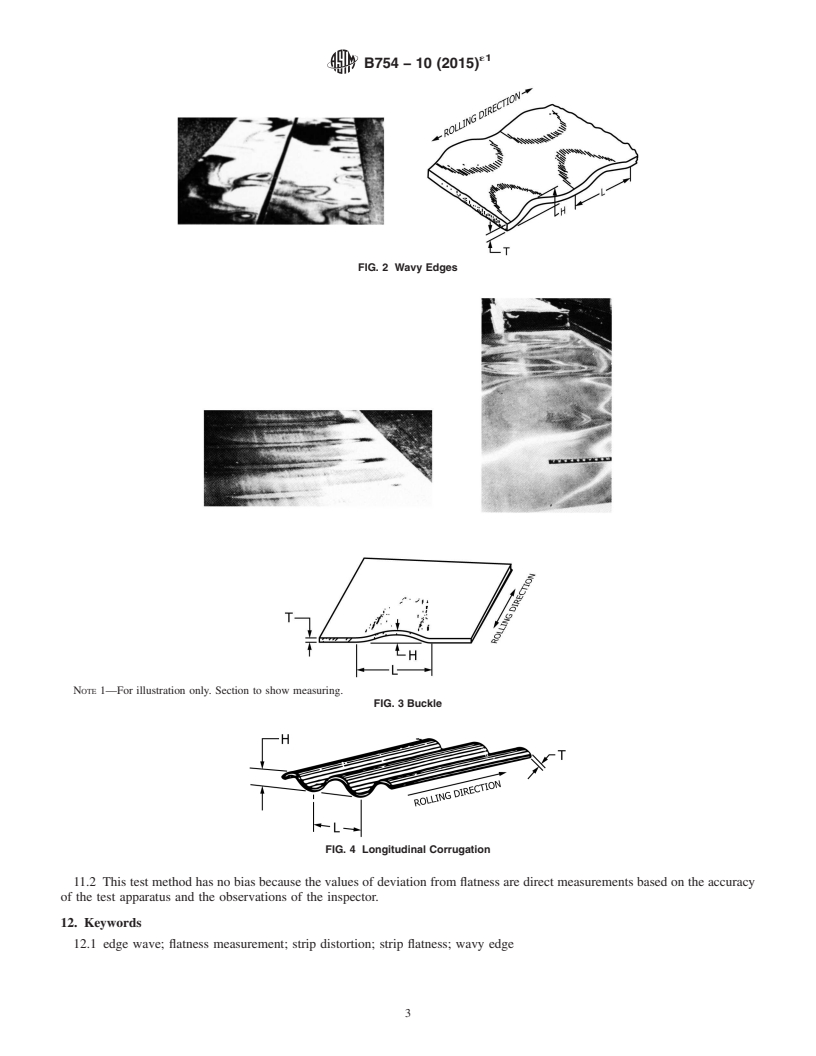
1.2 The distortions to be measured in this test method are dish, wavy edges, buckle, longitudinal corrugation, and herringbone.
1.3 This test method is not intended to include the measurement of coil set or longitudinal curl, camber or edgewise curvature, or twist.
1.4 This test method is limited to metal strip 0.003 to 0.020 in. (0.08 to 0.50 mm) thick and not more than 6.0 in. (150.0 mm) wide.
1.5 Units—The values stated in inch-pound units are to be regarded as standard. The values given in parentheses are mathematical conversions to SI units which are provided for information only and are not considered standard.
1.6 The following safety hazard caveat pertains only to the test method(s) described in this test method. This standard does not purport to address all of the safety concerns, if any, associated with its use. It is the responsibility of the user of this standard to establish appropriate safety and health practices and determine the applicability of regulatory limitations prior to use.
General Information
Relations
Buy Standard
Standards Content (Sample)
NOTICE: This standard has either been superseded and replaced by a new version or withdrawn.
Contact ASTM International (www.astm.org) for the latest information
´1
Designation: B754 − 10 (Reapproved 2015)
Standard Test Method for
Measuring and Recording the Deviations from Flatness in
Copper and Copper Alloy Strip
This standard is issued under the fixed designation B754; the number immediately following the designation indicates the year of
original adoption or, in the case of revision, the year of last revision. A number in parentheses indicates the year of last reapproval. A
superscript epsilon (´) indicates an editorial change since the last revision or reapproval.
ε NOTE—Editorial changes were made in 1.1, 1.5 and 2.1 in May 2015.
1. Scope* B950 Guide for Editorial Procedures and Form of Product
Specifications for Copper and Copper Alloys
1.1 This test method establishes a procedure for the mea-
surementofdistortionsinthinmetalstripandtheapplicationof
3. Terminology
these measurements to an equation that will indicate the
3.1 Fordeterminationoftermsrelatingtocopperandcopper
deviation from flatness.
alloys, refer to Terminology B846.
1.2 The distortions to be measured in this test method are
3.2 Definitions of Terms Specific to This Standard:
dish, wavy edges, buckle, longitudinal corrugation, and her-
3.2.1 edge wave (see wavy edge), n—acontinuouspatternof
ringbone.
waves or wrinkles along the edges of the strip, with a relatively
1.3 This test method is not intended to include the measure-
flat center portion.
ment of coil set or longitudinal curl, camber or edgewise
curvature, or twist.
4. Summary of Test Method
1.4 This test method is limited to metal strip 0.003 to 0.020
4.1 A prepared test specimen of a specific wrought copper
in. (0.08 to 0.50 mm) thick and not more than 6.0 in. (150.0
or copper alloy sheet or strip of a predetermined thickness is
mm) wide.
placed on a surface plate. The relative flatness of the sample is
1.5 Units—The values stated in inch-pound units are to be determined by measuring length and height of the irregularity
regarded as standard. The values given in parentheses are and calculating percent of deviation.
mathematical conversions to SI units which are provided for
5. Significance and Use
information only and are not considered standard.
1.6 The following safety hazard caveat pertains only to the 5.1 This test method is intended for measuring distortion in
strip used for making close tolerance parts. Since distortion in
testmethod(s)describedinthistestmethod. This standard does
not purport to address all of the safety concerns, if any, this strip would influence the shape of the part being produced
and cause difficulties in feeding through close-fitting dies and
associated with its use. It is the responsibility of the user of this
standard to establish appropriate safety and health practices other manufacturing equipment, it is important that this mate-
rial be flat.
and determine the applicability of regulatory limitations prior
to use.
5.2 This test method provides a universal procedure for
measuring the irregularities that cause the deviation from
2. Referenced Documents
flatness.
2.1 ASTM Standards:
5.3 This test method allows the purchaser and manufacturer
B846 Terminology for Copper and Copper Alloys
to inspect strip with a standard technique to a mutually agreed
upon and acceptable percentage deviation from flatness.
This test method is under the jurisdiction ofASTM Committee B05 on Copper
6. Apparatus
and Copper Alloys and is the direct responsibility of Subcommittee B05.06 on
Methods of Test.
6.1 Surface Plate,tobeusedasareferenceflat.Itmusthave
Current edition approved May 1, 2015. Published May 2015. Originally
alargeenoughsurfaceareatoaccommodatethemaximumsize
approved in 1986. Last previous edition approved 2010 as B754 – 10. DOI:
test specimen. It shall be flat within 0.0002 in. (0.005 mm) per
10.1520/B0754-10R15E01.
For referenced ASTM standards, visit the ASTM website, www.astm.org, or 1 in. (25 mm).
contact ASTM Customer Service at service@astm.org. For Annual Book of ASTM
6.2 Micrometer, for measuring metal thickness. It shall be
Standards volume information, refer to the standard’s Document Summary page on
the ASTM website. graduated in 0.0001-in. (0.0025-mm) increments.
*A Summary of Changes section appears at the end of this standard
Copyright © ASTM International, 100 Barr Harbor Drive, PO Box C700, West Conshohocken, PA 19428-2959. United States
´1
B754 − 10 (2015)
6.3 Height Gage, for measuring the height of irregularities. 8.5 Repeat this procedure as often as necessary to satisfy
Thearmofthisgagemustbelongenoughtoextendbeyondthe quality level requiremen
...
This document is not an ASTM standard and is intended only to provide the user of an ASTM standard an indication of what changes have been made to the previous version. Because
it may not be technically possible to adequately depict all changes accurately, ASTM recommends that users consult prior editions as appropriate. In all cases only the current version
of the standard as published by ASTM is to be considered the official document.
´1
Designation: B754 − 10 B754 − 10 (Reapproved 2015)
Standard Test Method for
Measuring and Recording the Deviations from Flatness in
Copper and Copper Alloy Strip
This standard is issued under the fixed designation B754; the number immediately following the designation indicates the year of
original adoption or, in the case of revision, the year of last revision. A number in parentheses indicates the year of last reapproval. A
superscript epsilon (´) indicates an editorial change since the last revision or reapproval.
ε NOTE—Editorial changes were made in 1.1, 1.5 and 2.1 in May 2015.
1. Scope*
1.1 This test method describesestablishes a procedure for the measurement of distortions in thin metal strip and the application
of these measurements to an equation that will indicate the deviation from flatness.
1.2 The distortions to be measured in this test method are dish, wavy edges, buckle, longitudinal corrugation, and herringbone.
1.3 This test method is not intended to include the measurement of coil set or longitudinal curl, camber or edgewise curvature,
or twist.
1.4 This test method is limited to metal strip 0.003 to 0.020 in. (0.08 to 0.50 mm) thick and not more than 6.0 in. (150.0 mm)
wide.
1.5 Units—The values stated in inch-pound units are to be regarded as standard. The values given in parentheses are
mathematical conversions to SI units thatwhich are provided for information only and are not considered standard.
1.6 The following safety hazard caveat pertains only to the test method(s) described in this test method. This standard does not
purport to address all of the safety concerns, if any, associated with its use. It is the responsibility of the user of this standard to
establish appropriate safety and health practices and determine the applicability of regulatory limitations prior to use.
2. Referenced Documents
2.1 ASTM Standards:
B846 Terminology for Copper and Copper Alloys
B950 Guide for Editorial Procedures and Form of Product Specifications for Copper and Copper Alloys
3. Terminology
3.1 For determination of terms relating to copper and copper alloys, refer to Terminology B846.
3.2 Definitions of Terms Specific to This Standard:
3.2.1 edge wave (see wavy edge), n—a continuous pattern of waves or wrinkles along the edges of the strip, with a relatively
flat center portion.
4. Summary of Test Method
4.1 A prepared test specimen of a specific wrought copper or copper alloy sheet or strip of a predetermined thickness is placed
on a surface plate. The relative flatness of the sample is determined by measuring length and height of the irregularity and
calculating percent of deviation.
5. Significance and Use
5.1 This test method is intended for measuring distortion in strip used for making close tolerance parts. Since distortion in this
strip would influence the shape of the part being produced and cause difficulties in feeding through close-fitting dies and other
manufacturing equipment, it is important that this material be flat.
This test method is under the jurisdiction of ASTM Committee B05 on Copper and Copper Alloys and is the direct responsibility of Subcommittee B05.06 on Methods
of Test.
Current edition approved Oct. 1, 2010May 1, 2015. Published November 2010May 2015. Originally approved in 1986. Last previous edition approved 20052010 as
B754 – 89B754 – 10. (2005). DOI: 10.1520/B0754-10.10.1520/B0754-10R15E01.
For referenced ASTM standards, visit the ASTM website, www.astm.org, or contact ASTM Customer Service at service@astm.org. For Annual Book of ASTM Standards
volume information, refer to the standard’s Document Summary page on the ASTM website.
*A Summary of Changes section appears at the end of this standard
Copyright © ASTM International, 100 Barr Harbor Drive, PO Box C700, West Conshohocken, PA 19428-2959. United States
´1
B754 − 10 (2015)
5.2 This test method provides a universal procedure for measuring the irregularities that cause the deviation from flatness.
5.3 This test method allows the purchaser and manufacturer to inspect strip with a standard technique to a mutually agreed upon
and acceptable percentage deviation from flatness.
6. Apparatus
6.1 Surface Plate, to be used as a reference flat. It must have a large enough surface area to accommodate the maximum size
test specimen. It shall be flat within 0.0002 in. (0.005 mm) per 1 in. (25 mm).
6.2 Micrometer, for measuring metal thickness. It shall be graduated in 0.0001-in. (0.0025-mm) increments.
6.3 Height Gage, for measuring the height of irregularities. The arm of this gage must be long enough to extend beyond the
ce
...


Questions, Comments and Discussion
Ask us and Technical Secretary will try to provide an answer. You can facilitate discussion about the standard in here.