ASTM B223-08(2013)
(Test Method)Standard Test Method for Modulus of Elasticity of Thermostat Metals (Cantilever Beam Method)
Standard Test Method for Modulus of Elasticity of Thermostat Metals (Cantilever Beam Method)
ABSTRACT
This test method covers the determination of the modulus of elasticity of thermostat metals within a particular temperature range. The test is done by mounting the specimen as a cantilever and measuring its deflection when subjected to a mechanical load. Each test specimen should be finished to size by careful machining or filing after being roughly cut, slit, or sheared from the samples. Then the specimen is preformed into a shape approximating the segment of a circle and subsequently heat treated to relieve all internal stresses. To permit maximum sensitivity, any oxide and other foreign substances must be carefully removed from all surfaces of the test specimen which directly affect the electrical resistance of the electronic indicator circuit through the testing apparatus. Extra care should be taken so that the load does not overstress the specimen beyond its elastic limit, if this happens, a new specimen shall be substituted and a lighter load should be used. The modulus of elasticity of each test material is computed using the specimen size and the average deflection for a known load.
SCOPE
1.1 This test method covers the determination of the modulus of elasticity of thermostat metals at any temperature between −300 and +1000°F (−185 and 540°C) by mounting the specimen as a cantilever beam and measuring the deflection when subjected to a mechanical load.
1.2 The values stated in inch-pound units are to be regarded as standard. The values given in parentheses are mathematical conversions to SI units that are provided for information only and are not considered standard.
1.3 This standard does not purport to address all of the safety concerns, if any, associated with its use. It is the responsibility of the user of this standard to become familiar with all hazards including those identified in the appropriate Material Safety Data Sheet (MSDS) for this product/material as provided by the manufacturer, to establish appropriate safety and health practices, and determine the applicability of regulatory limitations prior to use.
General Information
Relations
Standards Content (Sample)
NOTICE: This standard has either been superseded and replaced by a new version or withdrawn.
Contact ASTM International (www.astm.org) for the latest information
Designation: B223 − 08 (Reapproved 2013)
Standard Test Method for
Modulus of Elasticity of Thermostat Metals (Cantilever
Beam Method)
This standard is issued under the fixed designation B223; the number immediately following the designation indicates the year of
original adoption or, in the case of revision, the year of last revision.Anumber in parentheses indicates the year of last reapproval.A
superscript epsilon (´) indicates an editorial change since the last revision or reapproval.
1. Scope method the modulus of elasticity is calculated from the
expression for the deflection of a cantilever beam under
1.1 This test method covers the determination of the modu-
mechanical load which is transposed to read as follows:
lus of elasticity of thermostat metals at any temperature
3 3
between−300and+1000°F(−185and540°C)bymountingthe E 5 4Pl /dbt
specimen as a cantilever beam and measuring the deflection
where:
when subjected to a mechanical load.
E = modulus of elasticity, psi or MPa,
1.2 The values stated in inch-pound units are to be regarded
P = load, lbf or N,
as standard. The values given in parentheses are mathematical
l = gage length, in. or mm,
conversions to SI units that are provided for information only
d = specimen deflection, in. or mm,
and are not considered standard.
b = specimen width, in. or mm, and
t = specimen thickness, in. or mm.
1.3 This standard does not purport to address all of the
safety concerns, if any, associated with its use. It is the
4. Apparatus (Figs. 1-3)
responsibility of the user of this standard to become familiar
with all hazards including those identified in the appropriate
4.1 Specimen Holder for securely clamping the test speci-
Material Safety Data Sheet (MSDS) for this product/material
men in a horizontal position as a cantilever beam when
as provided by the manufacturer, to establish appropriate
immersed in a bath at the desired temperature. It shall carry a
safety and health practices, and determine the applicability of
micrometer depth gage for reading the deflection of the
regulatory limitations prior to use.
specimen and a loading rod for loading the specimen. Both of
theseshallextendsufficientlyabovetheliquidlevelofthebath
2. Referenced Documents
to permit the operator to perform the test at the higher test
2.1 ASTM Standards:
temperatures.
B388Specification for Thermostat Metal Sheet and Strip
4.1.1 Specimen holder to be made sufficiently rigid to allow
normal handling without distortion.
3. Terminology
4.2 Loading Rod, ⁄8 in. (3.2 mm) or less in diameter, for
3.1 Definitions:
carrying the load and transmitting its weight vertically to the
3.1.1 thermostat metal, n—a composite material, usually in
free end of the cantilever specimen. It shall be made of a low
the form of sheet or strip, comprising two or more materials of
expansion material; the mounting clamp and tube shall be
any appropriate nature, metallic or otherwise, which, by virtue
madeofthesamematerialasthespecimenmountingclampsin
of the differing expansivities of the components, tends to alter
order to prevent a difference in expansion rates from affecting
its curvature when its temperature is changed.
the deflection readings. The bottom end shall be conically
3.1.2 modulus of elasticity, n—the ratio, within the elastic
shaped and shall rest in the conical punch mark at the free end
limit of a material, of stress to corresponding strain. In this test
ofthespecimen.Anysupportsshallpermitfreemovementwith
specimendeflectionandshallprovideelectricalinsulationfrom
the micrometer depth gage. Near the top shall be a holder for
This test method is under the jurisdiction of ASTM Committee B02 on
supporting the load. The weight of the loading rod and holder
Nonferrous Metals and Alloys and is the direct responsibility of Subcommittee
B02.10 on Thermostat Metals and Electrical Resistance Heating Materials.
shall be no greater than 1 oz (28 g).
Current edition approved Aug. 1, 2013. Published August 2013. Originally
4.3 Micrometer Depth Gage,formeasuringthedeflectionof
approved in 1948. Last previous edition approved in 2008 as B223– 08. DOI:
10.1520/B0223-08R13.
the specimen to the nearest 0.0001 in. (0.002 mm). It shall be
For referenced ASTM standards, visit the ASTM website, www.astm.org, or
mounted directly over the loading rod. The micrometer shaft
contact ASTM Customer Service at service@astm.org. For Annual Book of ASTM
shall be in the same vertical line as the loading rod, so that
Standards volume information, refer to the standard’s Document Summary page on
the ASTM website. readings can be taken of the top of the loading rod for no-load
Copyright © ASTM International, 100 Barr Harbor Drive, PO Box C700, West Conshohocken, PA 19428-2959. United States
B223 − 08 (2013)
FIG. 1 Testing Machine for Determining Modulus of Elasticity of Thermostat Metal
nienceintakingno-loadandfull-loadreadingsandshallnotbe
of sufficient weight to deflect the specimen more than 0.30 in.
(7.6 mm).
4.5 Bath—A stirred liquid so that the temperature shall be
substantially constant during the test.
4.6 Electronic Indicator, sensitive, low-current, to give a
signal when the micrometer depth gage shaft completes the
electrical circuit across the indicator terminals by touching the
top of the loading rod. The indicator sensitivity shall be such
thatloadingrodpositionscanbedeterminedwithaprecisionof
60.0001 in. (0.002 mm).
4.7 All metallic components of apparatus, excluding mi-
crometer and loads, should be made of very low coefficient of
thermal expansion materials. The recommended material is
invar.
5. Precautions
5.1 Load and no-load readings of the various trials will not
FIG. 2 Specimen Mounting Clamp Assembly
approximately duplicate each other in the event the load is
sufficiently great to overstress the specimen beyond its elastic
and full-load positions.The gage shall be insulated electrically limit. In this case a new specimen shall be substituted and a
from the specimen holder and the loading rod. lighter load used which will not overstress the material.
4.4 Load, constructed so that when placed in the holder, its 5.2 Modulus of elasticity measurements to be within the
center of gravity will coincide with the center of the loading maximum recommended temperatures as stated in Specifica-
rod. It shall be readily detachable for the operator’s conve- tion B388.
B223 − 08 (2013)
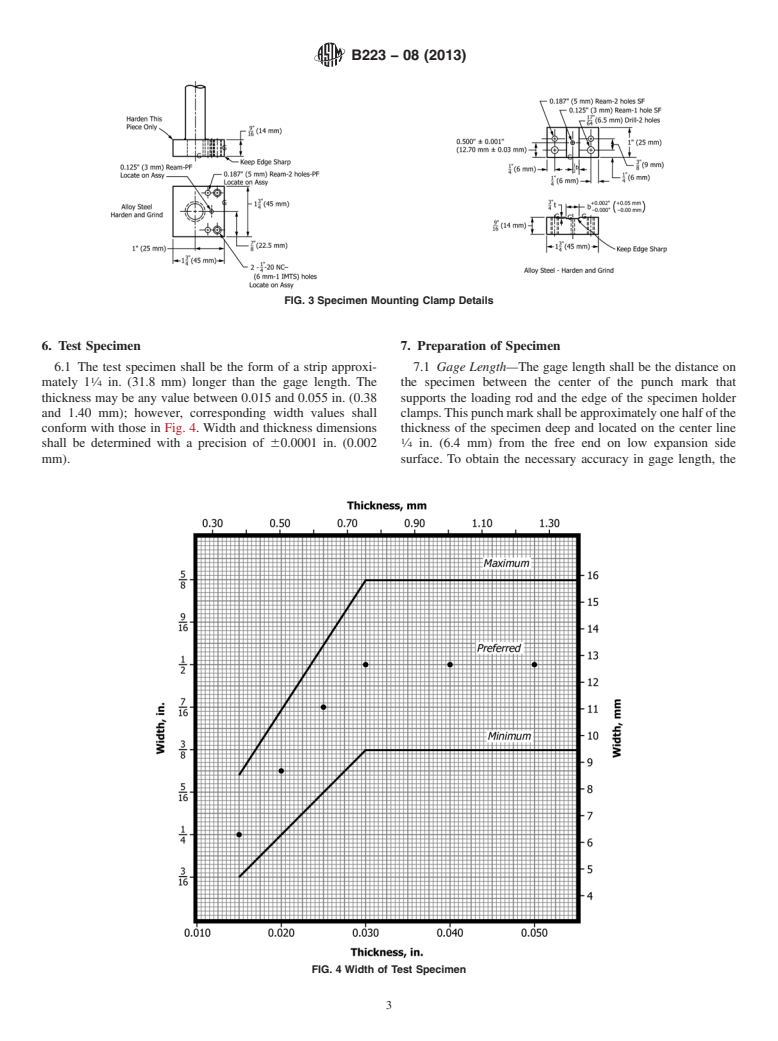
FIG. 3 Specimen Mounting Clamp Details
6. Test Specimen 7. Preparation of Specimen
6.1 The test specimen shall be the form of a strip approxi- 7.1 Gage Length—The gage length shall be the distance on
mately 1 ⁄4 in. (31.8 mm) longer than the gage length. The the specimen between the center of the punch mark that
thick
...


Questions, Comments and Discussion
Ask us and Technical Secretary will try to provide an answer. You can facilitate discussion about the standard in here.