ASTM D2202-00(2019)
(Test Method)Standard Test Method for Slump of Sealants
Standard Test Method for Slump of Sealants
SIGNIFICANCE AND USE
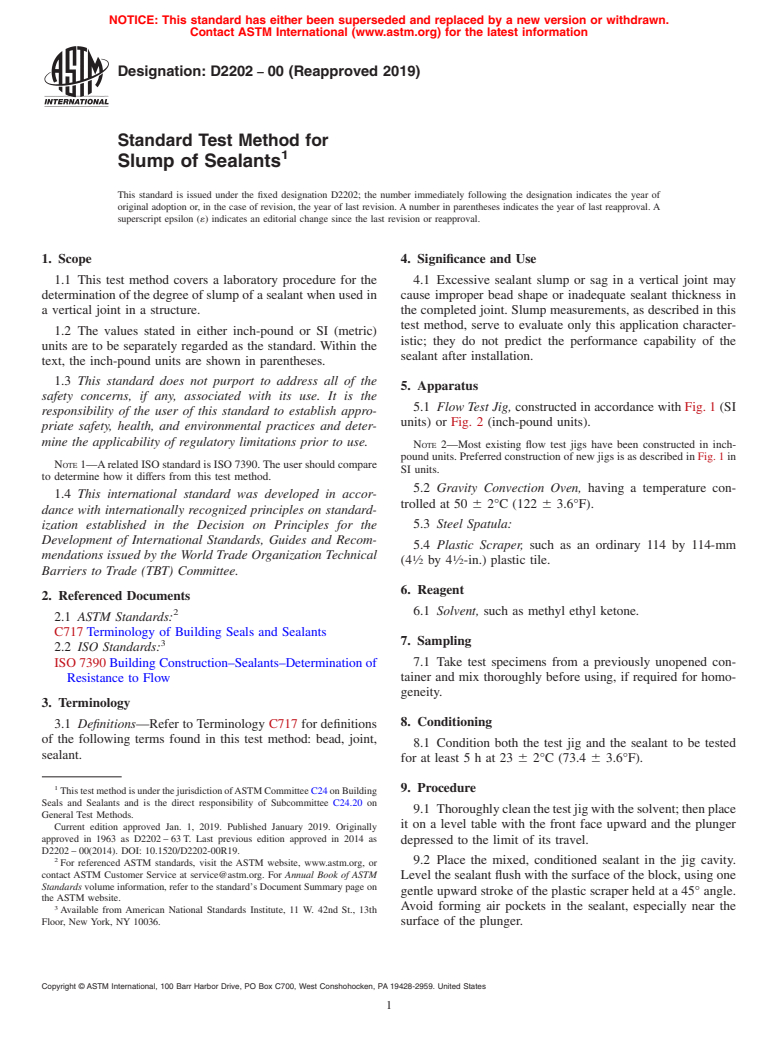
4.1 Excessive sealant slump or sag in a vertical joint may cause improper bead shape or inadequate sealant thickness in the completed joint. Slump measurements, as described in this test method, serve to evaluate only this application characteristic; they do not predict the performance capability of the sealant after installation.
SCOPE
1.1 This test method covers a laboratory procedure for the determination of the degree of slump of a sealant when used in a vertical joint in a structure.
1.2 The values stated in either inch-pound or SI (metric) units are to be separately regarded as the standard. Within the text, the inch-pound units are shown in parentheses.
1.3 This standard does not purport to address all of the safety concerns, if any, associated with its use. It is the responsibility of the user of this standard to establish appropriate safety, health, and environmental practices and determine the applicability of regulatory limitations prior to use.
Note 1: A related ISO standard is ISO 7390. The user should compare to determine how it differs from this test method.
1.4 This international standard was developed in accordance with internationally recognized principles on standardization established in the Decision on Principles for the Development of International Standards, Guides and Recommendations issued by the World Trade Organization Technical Barriers to Trade (TBT) Committee.
General Information
Standards Content (Sample)
NOTICE: This standard has either been superseded and replaced by a new version or withdrawn.
Contact ASTM International (www.astm.org) for the latest information
Designation: D2202 − 00 (Reapproved 2019)
Standard Test Method for
1
Slump of Sealants
This standard is issued under the fixed designation D2202; the number immediately following the designation indicates the year of
original adoption or, in the case of revision, the year of last revision. A number in parentheses indicates the year of last reapproval. A
superscript epsilon (´) indicates an editorial change since the last revision or reapproval.
1. Scope 4. Significance and Use
1.1 This test method covers a laboratory procedure for the 4.1 Excessive sealant slump or sag in a vertical joint may
determination of the degree of slump of a sealant when used in cause improper bead shape or inadequate sealant thickness in
a vertical joint in a structure. the completed joint. Slump measurements, as described in this
test method, serve to evaluate only this application character-
1.2 The values stated in either inch-pound or SI (metric)
istic; they do not predict the performance capability of the
units are to be separately regarded as the standard. Within the
sealant after installation.
text, the inch-pound units are shown in parentheses.
1.3 This standard does not purport to address all of the
5. Apparatus
safety concerns, if any, associated with its use. It is the
5.1 Flow Test Jig, constructed in accordance with Fig. 1 (SI
responsibility of the user of this standard to establish appro-
units) or Fig. 2 (inch-pound units).
priate safety, health, and environmental practices and deter-
mine the applicability of regulatory limitations prior to use.
NOTE 2—Most existing flow test jigs have been constructed in inch-
pound units. Preferred construction of new jigs is as described in Fig. 1 in
NOTE 1—A related ISO standard is ISO 7390. The user should compare
SI units.
to determine how it differs from this test method.
5.2 Gravity Convection Oven, having a temperature con-
1.4 This international standard was developed in accor-
trolled at 50 6 2°C (122 6 3.6°F).
dance with internationally recognized principles on standard-
ization established in the Decision on Principles for the 5.3 Steel Spatula:
Development of International Standards, Guides and Recom-
5.4 Plastic Scraper, such as an ordinary 114 by 114-mm
mendations issued by the World Trade Organization Technical
1 1
(4 ⁄2 by 4 ⁄2-in.) plastic tile.
Barriers to Trade (TBT) Committee.
6. Reagent
2. Referenced Documents
2 6.1 Solvent, such as methyl ethyl ketone.
2.1 ASTM Standards:
C717 Terminology of Building Seals and Sealants
7. Sampling
3
2.2 ISO Standards:
7.1 Take test specimens from a previously unopened con-
ISO 7390 Building Construction–Sealants–Determination of
tainer and mix thoroughly before using, if required for homo-
Resistance to Flow
geneity.
3. Terminology
8. Conditioning
3.1 Definitions—Refer to Terminology C717 for definitions
of the following terms found in this test method: bead, joint,
8.1 Condition both the test jig and the sealant to be tested
sealant.
for at least 5 h at 23 6 2°C (73.4 6 3.6°F).
1
9. Procedure
This test method is under the jurisdiction of ASTM Committee C24 on Building
Seals and Sealants and is the direct responsibility of Subcommittee C24.20 on
9.1 Thoroughly clean the test jig with the solvent; then place
General Test Methods.
it on a level table with the front face upward and the plunger
Current edition approved Jan. 1, 2019. Published January 2019. Originally
approved in 1963 as D2202 – 63 T. Last previous edition approved in 2014 as
depressed to the limit of its travel.
D2202 – 00(2014). DOI: 10.1520/D2202-00R19.
2
9.2 Place the mixed, conditioned sealant in the jig cavity.
For referenced ASTM standards, visit the ASTM website, www.astm.org, or
contact ASTM Customer Service at service@astm.org. For Annual Book of ASTM
Level the sealant flush with the surface of the block, using one
Standards volume information, refer to the standard’s Document Summary page on
gentle upward stroke of the plastic scraper held at a 45° angle.
the ASTM website.
3 Avoid forming air pockets in the sealant, especially near the
Available from American National Standards Institute, 11 W. 42nd St., 13th
Floor, New York, NY 10036. surface of the plunger.
Copyright © ASTM International, 100 Barr Harbor Drive, PO Box C700, West Conshohocken, PA 19428-2959. United States
1
---------------------- Page: 1 ----------------------
D2202 − 00 (2019)
NOTE 1—For the Flow Test Jig, each scale division equals 2 mm.
NOTE 2— Material, aluminum alloy; finish, liquid hone; tolerances, (0.08 mm) unless otherwise indicated.
FIG. 1 Flow Test Jig (SI Units)
9.3 Carefully clean the area around the cavity with the 9.5 At the conclusion of the 30-min period, take a reading,
plastic scraper and a cloth; then place the jig immediately on its to the nearest 0.2 mm (0.01 in.) of the maximum point of flow
end an
...
This document is not an ASTM standard and is intended only to provide the user of an ASTM standard an indication of what changes have been made to the previous version. Because
it may not be technically possible to adequately depict all changes accurately, ASTM recommends that users consult prior editions as appropriate. In all cases only the current version
of the standard as published by ASTM is to be considered the official document.
Designation: D2202 − 00 (Reapproved 2014) D2202 − 00 (Reapproved 2019)
Standard Test Method for
1
Slump of Sealants
This standard is issued under the fixed designation D2202; the number immediately following the designation indicates the year of
original adoption or, in the case of revision, the year of last revision. A number in parentheses indicates the year of last reapproval. A
superscript epsilon (´) indicates an editorial change since the last revision or reapproval.
1. Scope
1.1 This test method covers a laboratory procedure for the determination of the degree of slump of a sealant when used in a
vertical joint in a structure.
1.2 The values stated in either inch-pound or SI (metric) units are to be separately regarded as the standard. Within the text, the
inch-pound units are shown in parentheses.
1.3 This standard does not purport to address all of the safety concerns, if any, associated with its use. It is the responsibility
of the user of this standard to establish appropriate safety safety, health, and healthenvironmental practices and determine the
applicability of regulatory limitations prior to use.
NOTE 1—A related ISO standard is ISO 7390. The user should compare to determine how it differs from this test method.
NOTE 1—A related ISO standard is ISO 7390. The user should compare to determine how it differs from this test method.
1.4 This international standard was developed in accordance with internationally recognized principles on standardization
established in the Decision on Principles for the Development of International Standards, Guides and Recommendations issued
by the World Trade Organization Technical Barriers to Trade (TBT) Committee.
2. Referenced Documents
2
2.1 ASTM Standards:
C717 Terminology of Building Seals and Sealants
3
2.2 ISO Standards:
ISO 7390 Building Construction–Sealants–Determination of Resistance to Flow
3. Terminology
3.1 Definitions—Refer to Terminology C717 for definitions of the following terms found in this test method: bead, joint, sealant.
4. Significance and Use
4.1 Excessive sealant slump or sag in a vertical joint may cause improper bead shape or inadequate sealant thickness in the
completed joint. Slump measurements, as described in this test method, serve to evaluate only this application characteristic; they
do not predict the performance capability of the sealant after installation.
5. Apparatus
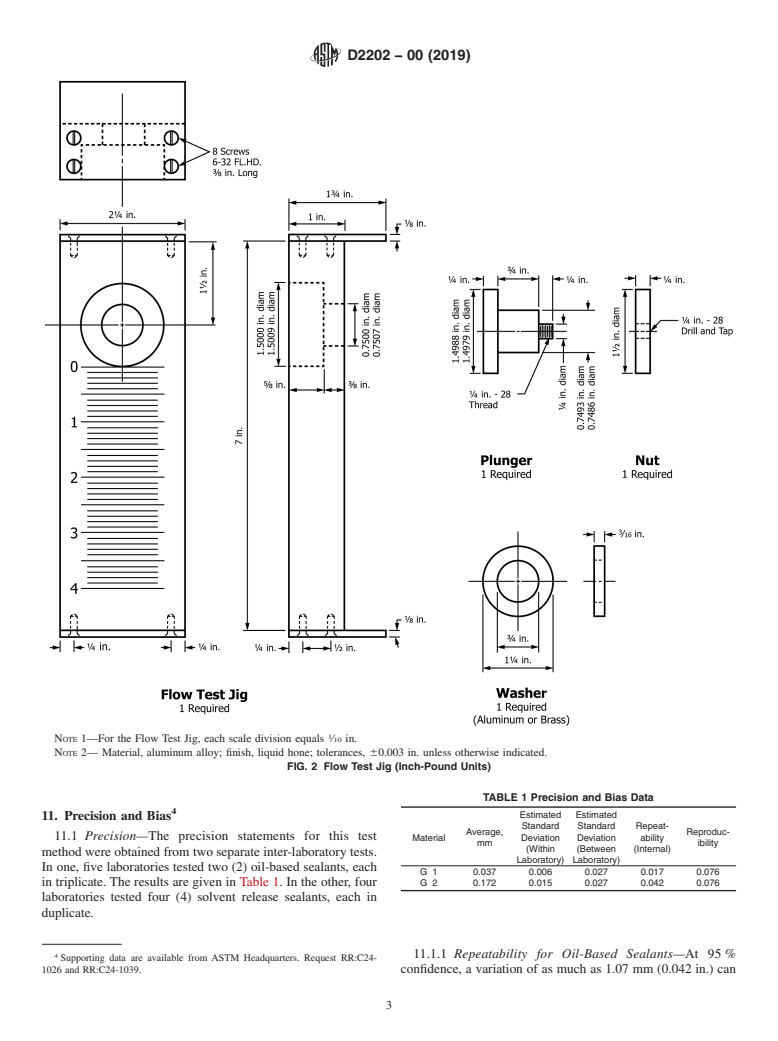
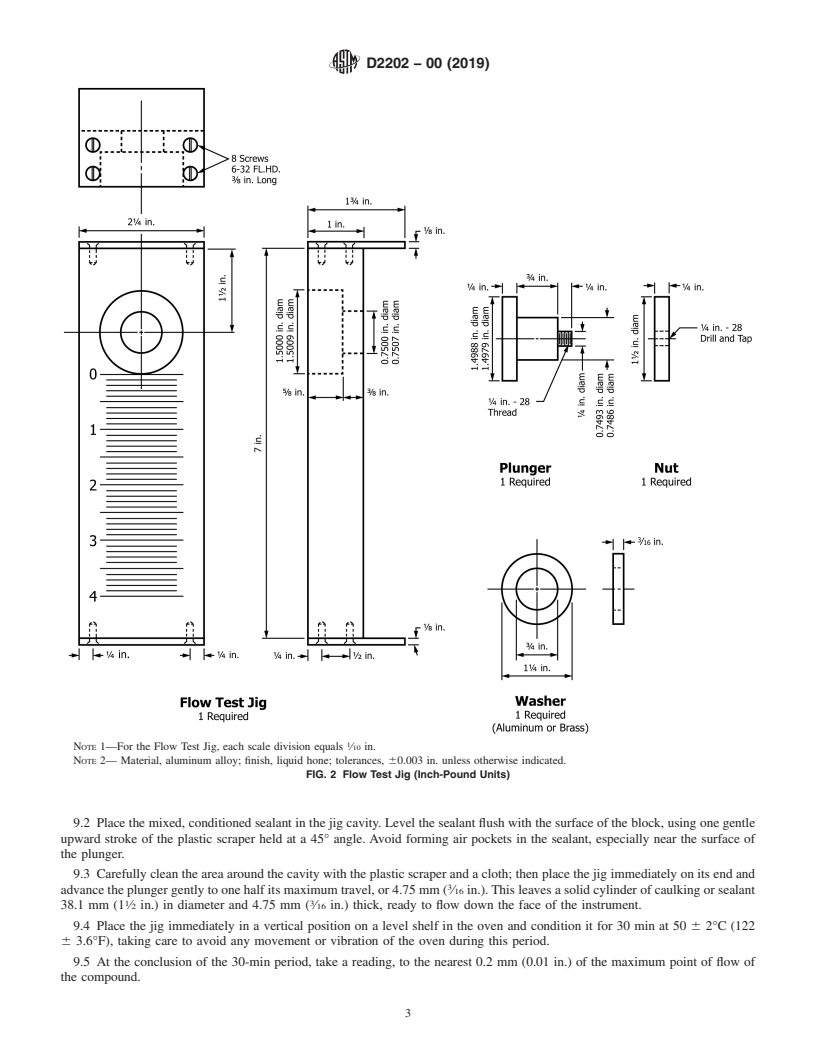
5.1 Flow Test Jig, constructed in accordance with Fig. 1 (SI units) or Fig. 2 (inch-pound units).
NOTE 2—Most existing flow test jigs have been constructed in inch-pound units. Preferred construction of new jigs is as described in Fig. 1 in SI units.
5.2 Gravity Convection Oven, having a temperature controlled at 50 6 2°C (122 6 3.6°F).
5.3 Steel Spatula:
1 1
5.4 Plastic Scraper, such as an ordinary 114 by 114-mm (4 ⁄2 by 4 ⁄2-in.) plastic tile.
1
This test method is under the jurisdiction of ASTM Committee C24 on Building Seals and Sealants and is the direct responsibility of Subcommittee C24.20 on General
Test Methods.
Current edition approved Dec. 1, 2014Jan. 1, 2019. Published December 2014January 2019. Originally approved in 1963 as D2202 – 63 T. Last previous edition approved
in 20102014 as D2202 – 00(2010).(2014). DOI: 10.1520/D2202-00R14.10.1520/D2202-00R19.
2
For referenced ASTM standards, visit the ASTM website, www.astm.org, or contact ASTM Customer Service at service@astm.org. For Annual Book of ASTM Standards
volume information, refer to the standard’s Document Summary page on the ASTM website.
3
Available from American National Standards Institute, 11 W. 42nd St., 13th Floor, New York, NY 10036.
Copyright © ASTM International, 100 Barr Harbor Drive, PO Box C700, West Conshohocken, PA 19428-2959. United States
1
---------------------- Page: 1 ----------------------
D2202 − 00 (2019)
NOTE 1—For the Flow Test Jig, each scale division equals 2 mm.
NOTE 2— Material, aluminum alloy; finish, liquid hone; tolerances, (0.08 mm) unless otherwise indicated.
FIG. 1 Flow Test Jig (SI Units)
6. Reagent
6.1 Solvent, such as methyl ethyl ketone.
7. Sampling
7.1 Take test specimens from a previously unopened container and mix thoroughly before using, if required for homogeneity.
8. Conditioning
8.1 Condition both the test jig and the sealant to be tested for at least 5 h at 23 6 2°C (73.4 6 3.6°F).
9. Procedure
9.1 Thoroughly clean the test jig with the solvent; then place it on a level table with the front face upward and the plunger
depressed to the limit of its travel.
2
---------------------- Page: 2 ---------------------
...


Questions, Comments and Discussion
Ask us and Technical Secretary will try to provide an answer. You can facilitate discussion about the standard in here.