ASTM F548-19
(Test Method)Standard Test Method for Intensity of Scratches on Aerospace Transparent Plastics
Standard Test Method for Intensity of Scratches on Aerospace Transparent Plastics
SIGNIFICANCE AND USE
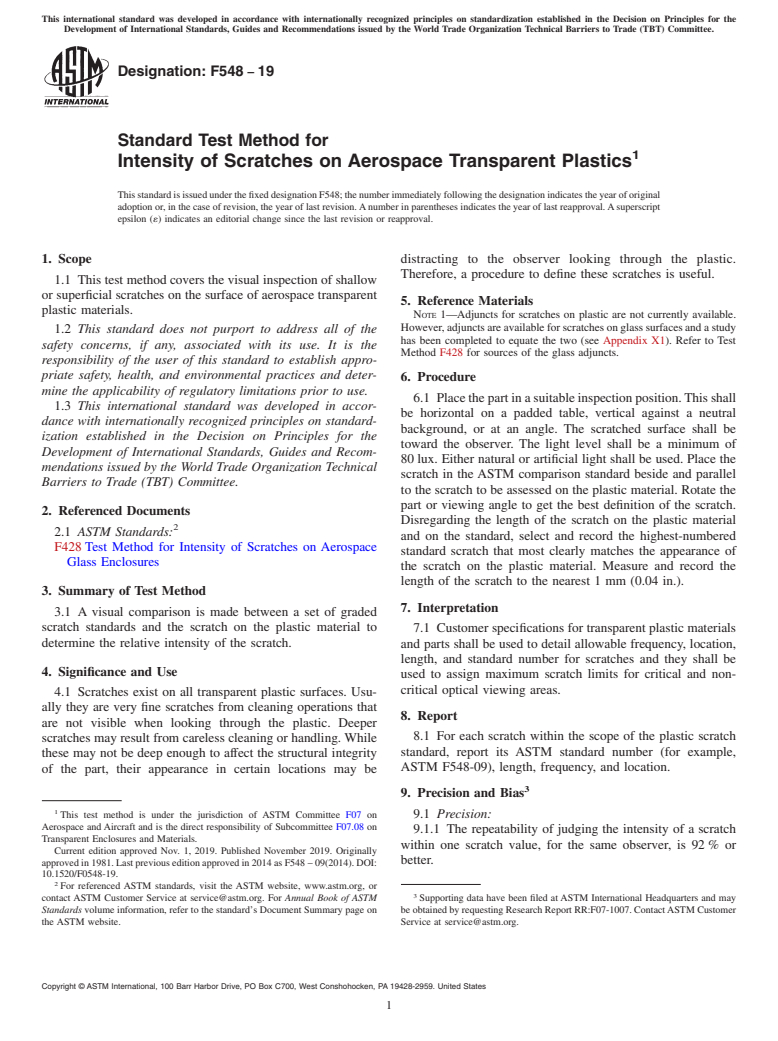
4.1 Scratches exist on all transparent plastic surfaces. Usually they are very fine scratches from cleaning operations that are not visible when looking through the plastic. Deeper scratches may result from careless cleaning or handling. While these may not be deep enough to affect the structural integrity of the part, their appearance in certain locations may be distracting to the observer looking through the plastic. Therefore, a procedure to define these scratches is useful.
SCOPE
1.1 This test method covers the visual inspection of shallow or superficial scratches on the surface of aerospace transparent plastic materials.
1.2 This standard does not purport to address all of the safety concerns, if any, associated with its use. It is the responsibility of the user of this standard to establish appropriate safety, health, and environmental practices and determine the applicability of regulatory limitations prior to use.
1.3 This international standard was developed in accordance with internationally recognized principles on standardization established in the Decision on Principles for the Development of International Standards, Guides and Recommendations issued by the World Trade Organization Technical Barriers to Trade (TBT) Committee.
General Information
Relations
Buy Standard
Standards Content (Sample)
This international standard was developed in accordance with internationally recognized principles on standardization established in the Decision on Principles for the
Development of International Standards, Guides and Recommendations issued by the World Trade Organization Technical Barriers to Trade (TBT) Committee.
Designation: F548 − 19
Standard Test Method for
1
Intensity of Scratches on Aerospace Transparent Plastics
ThisstandardisissuedunderthefixeddesignationF548;thenumberimmediatelyfollowingthedesignationindicatestheyearoforiginal
adoption or, in the case of revision, the year of last revision.Anumber in parentheses indicates the year of last reapproval.Asuperscript
epsilon (´) indicates an editorial change since the last revision or reapproval.
1. Scope distracting to the observer looking through the plastic.
Therefore, a procedure to define these scratches is useful.
1.1 This test method covers the visual inspection of shallow
or superficial scratches on the surface of aerospace transparent
5. Reference Materials
plastic materials.
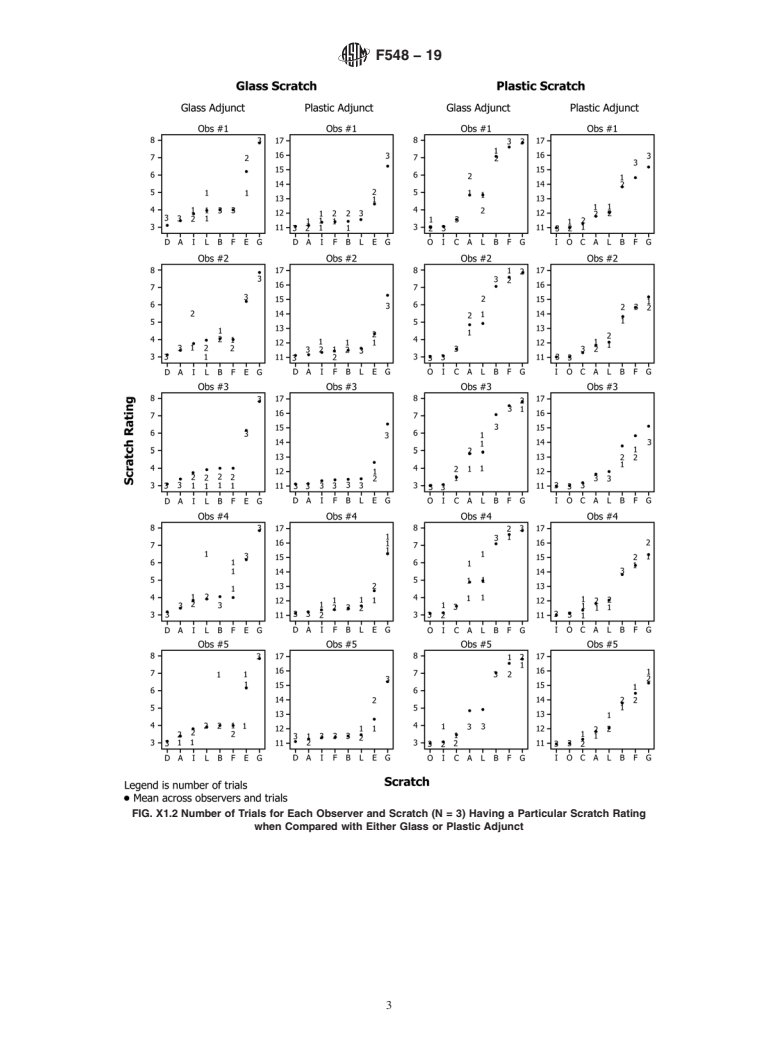
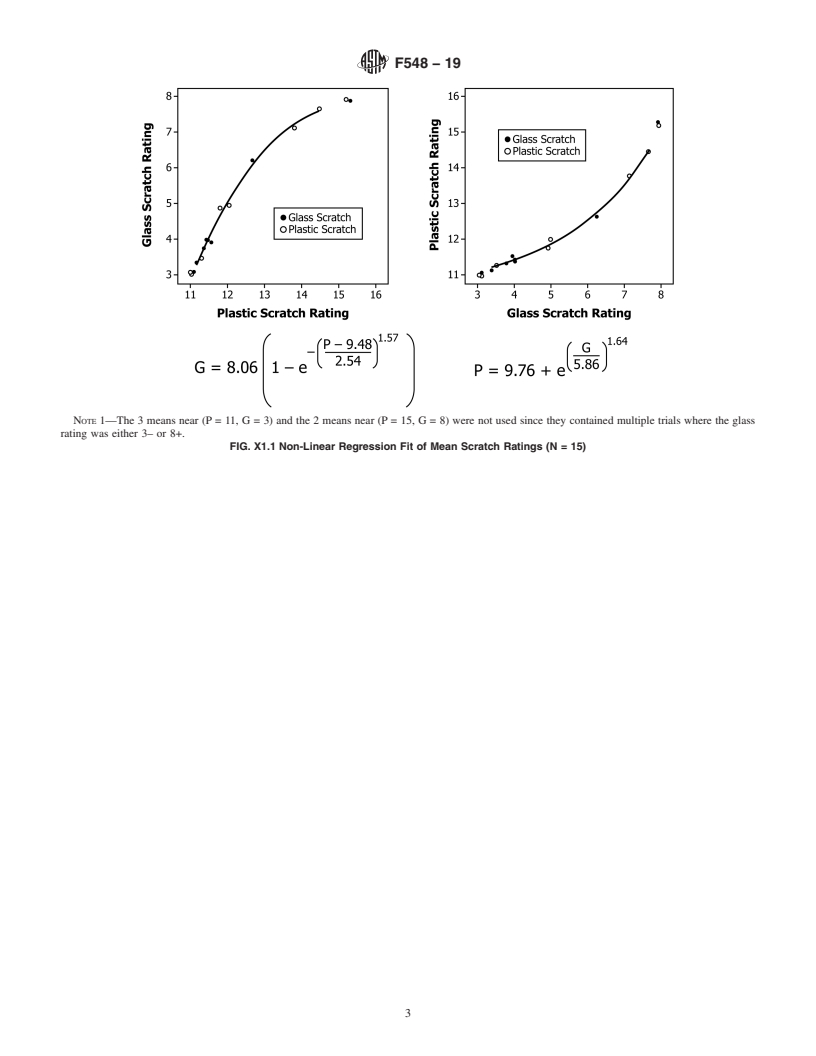
NOTE 1—Adjuncts for scratches on plastic are not currently available.
However,adjunctsareavailableforscratchesonglasssurfacesandastudy
1.2 This standard does not purport to address all of the
has been completed to equate the two (see Appendix X1). Refer to Test
safety concerns, if any, associated with its use. It is the
Method F428 for sources of the glass adjuncts.
responsibility of the user of this standard to establish appro-
priate safety, health, and environmental practices and deter-
6. Procedure
mine the applicability of regulatory limitations prior to use.
6.1 Placethepartinasuitableinspectionposition.Thisshall
1.3 This international standard was developed in accor-
be horizontal on a padded table, vertical against a neutral
dance with internationally recognized principles on standard-
background, or at an angle. The scratched surface shall be
ization established in the Decision on Principles for the
toward the observer. The light level shall be a minimum of
Development of International Standards, Guides and Recom-
80 lux. Either natural or artificial light shall be used. Place the
mendations issued by the World Trade Organization Technical
scratch in the ASTM comparison standard beside and parallel
Barriers to Trade (TBT) Committee.
to the scratch to be assessed on the plastic material. Rotate the
part or viewing angle to get the best definition of the scratch.
2. Referenced Documents
Disregarding the length of the scratch on the plastic material
2
2.1 ASTM Standards:
and on the standard, select and record the highest-numbered
F428 Test Method for Intensity of Scratches on Aerospace
standard scratch that most clearly matches the appearance of
Glass Enclosures
the scratch on the plastic material. Measure and record the
length of the scratch to the nearest 1 mm (0.04 in.).
3. Summary of Test Method
7. Interpretation
3.1 A visual comparison is made between a set of graded
scratch standards and the scratch on the plastic material to 7.1 Customer specifications for transparent plastic materials
determine the relative intensity of the scratch.
and parts shall be used to detail allowable frequency, location,
length, and standard number for scratches and they shall be
4. Significance and Use
used to assign maximum scratch limits for critical and non-
critical optical viewing areas.
4.1 Scratches exist on all transparent plastic surfaces. Usu-
ally they are very fine scratches from cleaning operations that
8. Report
are not visible when looking through the plastic. Deeper
8.1 For each scratch within the scope of the plastic scratch
scratches may result from careless cleaning or handling. While
standard, report its ASTM standard number (for example,
these may not be deep enough to affect the structural integrity
ASTM F548-09), length, frequency, and location.
of the part, their appearance in certain locations may be
3
9. Precision and Bias
1
This test method is under the jurisdiction of ASTM Committee F07 on
9.1 Precision:
Aerospace and Aircraft and is the direct responsibility of Subcommittee F07.08 on
9.1.1 The repeatability of judging the intensity of a scratch
Transparent Enclosures and Materials.
within one scratch value, for the same observer, is 92 % or
Current edition approved Nov. 1, 2019. Published November 2019. Originally
better.
approvedin1981.Lastpreviouseditionapprovedin2014asF548 – 09(2014).DOI:
10.1520/F0548-19.
2
For referenced ASTM standards, visit the ASTM website, www.astm.org, or
3
contact ASTM Customer Service at service@astm.org. For Annual Book of ASTM Supporting data have been filed at ASTM International Headquarters and may
Standards volume information, refer to the standard’s Document Summary page on be obtained by requesting Research Report RR:F07-1007. ContactASTM Customer
the ASTM website. Service at service@astm.org.
Copyright © ASTM International, 100 Barr Harbor Drive, PO Box C700, West Conshohocken, PA 19428-2959. United States
1
-----------
...
This document is not an ASTM standard and is intended only to provide the user of an ASTM standard an indication of what changes have been made to the previous version. Because
it may not be technically possible to adequately depict all changes accurately, ASTM recommends that users consult prior editions as appropriate. In all cases only the current version
of the standard as published by ASTM is to be considered the official document.
Designation: F548 − 09 (Reapproved 2014) F548 − 19
Standard Test Method for
1
Intensity of Scratches on Aerospace Transparent Plastics
This standard is issued under the fixed designation F548; the number immediately following the designation indicates the year of original
adoption or, in the case of revision, the year of last revision. A number in parentheses indicates the year of last reapproval. A superscript
epsilon (´) indicates an editorial change since the last revision or reapproval.
1. Scope
1.1 This test method covers the visual inspection of shallow or superficial scratches on the surface of aerospace transparent
plastic materials.
1.2 This standard does not purport to address all of the safety concerns, if any, associated with its use. It is the responsibility
of the user of this standard to establish appropriate safety safety, health, and healthenvironmental practices and determine the
applicability of regulatory limitations prior to use.
1.3 This international standard was developed in accordance with internationally recognized principles on standardization
established in the Decision on Principles for the Development of International Standards, Guides and Recommendations issued
by the World Trade Organization Technical Barriers to Trade (TBT) Committee.
2. Referenced Documents
2
2.1 ASTM Standards:
F428 Test Method for Intensity of Scratches on Aerospace Glass Enclosures
3. Summary of Test Method
3.1 A visual comparison is made between a set of graded scratch standards and the scratch on the plastic material to determine
the relative intensity of the scratch.
4. Significance and Use
4.1 Scratches exist on all transparent plastic surfaces. Usually they are very fine scratches from cleaning operations that are not
visible when looking through the plastic. Deeper scratches may result from careless cleaning or handling. While these may not be
deep enough to affect the structural integrity of the part, their appearance in certain locations may be distracting to the observer
looking through the plastic. Therefore, a procedure to define these scratches is useful.
5. Reference Materials
NOTE 1—Adjuncts for scratches on plastic are not currently available. However, adjuncts are available for scratches on glass surfaces and a study has
been donecompleted to equate the two (see Appendix X1the Appendix). ). Refer to Test Method F428 for sources of the glass adjuncts.
6. Procedure
6.1 Place the part in a suitable inspection position. This mayshall be horizontal on a padded table, vertical against a neutral
background, or at an angle. The scratched surface shall be toward the observer. The light level shall be a minimum of 80 lux.
80 lux. Either natural or artificial light mayshall be used. Place the scratch in the ASTM comparison standard beside and parallel
to the scratch to be assessed on the plastic material. Rotate the part or viewing angle to get the best definition of the scratch.
Disregarding the length of the scratch on the plastic material and on the standard, select and record the highest-numbered standard
scratch that most clearly matches the appearance of the scratch on the plastic material. Measure and record the length of the scratch
to the nearest 1 mm (0.04 in.).
1
This test method is under the jurisdiction of ASTM Committee F07 on Aerospace and Aircraft and is the direct responsibility of Subcommittee F07.08 on Transparent
Enclosures and Materials.
Current edition approved Dec. 1, 2014Nov. 1, 2019. Published December 2014November 2019. Originally publishedapproved in 1981. Last previous edition approved in
20092014 as F548 – 09.F548 – 09(2014). DOI: 10.1520/F0548-09R14.10.1520/F0548-19.
2
For referenced ASTM standards, visit the ASTM website, www.astm.org, or contact ASTM Customer Service at service@astm.org. For Annual Book of ASTM Standards
volume information, refer to the standard’s Document Summary page on the ASTM website.
Copyright © ASTM International, 100 Barr Harbor Drive, PO Box C700, West Conshohocken, PA 19428-2959. United States
1
---------------------- Page: 1 ----------------------
F548 − 19
7. Interpretation
7.1 Customer specifications for transparent plastic materials and parts may shall be used to detail allowable frequency, location,
length, and standard number for scratches and they may shall be used to assign maximum scratch limits for critical and noncritical
optical viewing areas.
8. Report
8.1 For each scratch within the scope of the plastic scratch standard, report its ASTM standard number (for example, ASTM
F548-09), length, frequency
...


Questions, Comments and Discussion
Ask us and Technical Secretary will try to provide an answer. You can facilitate discussion about the standard in here.