ASTM A944-10
(Test Method)Standard Test Method for Comparing Bond Strength of Steel Reinforcing Bars to Concrete Using Beam-End Specimens
Standard Test Method for Comparing Bond Strength of Steel Reinforcing Bars to Concrete Using Beam-End Specimens
ABSTRACT
This test method deals with the standard procedures for establishing the relative bond strength of steel reinforcing bars in concrete using beam-end specimens. This test method shall determine the effects of surface preparation or condition (such as bar coatings) on the bond strength of deformed steel reinforcing bars to concrete. The bond strengths obtained using this test method shall not be directly applicable to the design of reinforced concrete members. The beam-end test specimen shall be fabricated by casting, and conditioned by curing prior to tensile load test. The test system shall consist of the loading system, compression reaction plate, and bar displacement measurement device.
SCOPE
1.1 This test method describes procedures to establish the relative bond strength of steel reinforcing bars in concrete.
1.2 This test method is intended to determine the effects of surface preparation or condition (such as bar coatings) on the bond strength of deformed steel reinforcing bars (of sizes ranging from No. 10 to No. 36 [No. 3 to No. 11]) to concrete.
1.3 The bond strengths obtained using this test method are not directly applicable to the design of reinforced concrete members.
Note 1—The bond strengths obtained using this test method are generally higher than obtained in development or splice tests using beams with the same embedment lengths. The results obtained using this test method should only be used for comparisons with results for other reinforcing bars tested using this method.
1.4 The values stated in inch-pound units are to be regarded as standard. The values given in brackets are mathematical conversions to SI units that are provided for information only and are not considered standard.
1.5 This standard does not purport to address all of the safety concerns, if any, associated with its use. It is the responsibility of the user of this standard to establish appropriate safety and health practices and determine the applicability of regulatory limitations prior to use.
General Information
Relations
Buy Standard
Standards Content (Sample)
NOTICE: This standard has either been superseded and replaced by a new version or withdrawn.
Contact ASTM International (www.astm.org) for the latest information
Designation: A944 − 10
StandardTest Method for
Comparing Bond Strength of Steel Reinforcing Bars to
1
Concrete Using Beam-End Specimens
This standard is issued under the fixed designation A944; the number immediately following the designation indicates the year of
original adoption or, in the case of revision, the year of last revision. A number in parentheses indicates the year of last reapproval. A
superscript epsilon (´) indicates an editorial change since the last revision or reapproval.
1. Scope* E575 Practice for Reporting Data from Structural Tests of
Building Constructions, Elements, Connections, and As-
1.1 This test method describes procedures to establish the
semblies
relative bond strength of steel reinforcing bars in concrete.
1.2 This test method is intended to determine the effects of 3. Terminology
surface preparation or condition (such as bar coatings) on the
3.1 Definitions of Terms Specific to This Standard:
bond strength of deformed steel reinforcing bars (of sizes
3.1.1 bond strength, n—maximum measured load in a ten-
ranging from No. 10 to No. 36 [No. 3 to No. 11]) to concrete.
sile bond test of a steel reinforcing bar.
1.3 The bond strengths obtained using this test method are
3.1.2 bonded length, n—the length of the test bar that is in
not directly applicable to the design of reinforced concrete
contact with concrete.
members.
3.1.3 concrete cover, n—minimum distance between the
NOTE 1—The bond strengths obtained using this test method are surface of the test bar and the top or bottom of the test
generally higher than obtained in development or splice tests using beams
specimen.
with the same embedment lengths. The results obtained using this test
3.1.4 embedment length, n—the distance from the surface of
method should only be used for comparisons with results for other
the concrete test specimen to the installed end of the steel
reinforcing bars tested using this method.
reinforcing bar. This equals the sum of the lead length and the
1.4 The values stated in inch-pound units are to be regarded
bonded length.
as standard. The values given in brackets are mathematical
conversions to SI units that are provided for information only 3.1.5 lead length, n—the length of the test bar that is not in
contact with concrete but is between the surface of the concrete
and are not considered standard.
test specimen and the bonded length.
1.5 This standard does not purport to address all of the
safety concerns, if any, associated with its use. It is the 3.1.6 relative rib area, n—ratio of the projected rib area
responsibility of the user of this standard to establish appro- normal to bar axis to the product of the nominal bar perimeter
priate safety and health practices and determine the applica- and the center-to-center rib spacing.
bility of regulatory limitations prior to use.
3.2 Symbols:
C = Concrete cover, mm [in.].
b
2. Referenced Documents
d = Nominal diameter of reinforcing bar, mm [in.].
b
2
2.1 ASTM Standards:
l = Embedment length, mm [in.].
e
A775/A775M Specification for Epoxy-Coated Steel Rein-
4. Apparatus
forcing Bars
C192/C192M Practice for Making and Curing Concrete Test
4.1 Equipment—A schematic of a suitable testing system is
Specimens in the Laboratory
shown in Fig. 1. The loading system shall be capable of
E4 Practices for Force Verification of Testing Machines
measuring the forces to an accuracy within 62 % of the
applied load, when calibrated in accordance with Practices E4.
The test system shall have sufficient capacity to prevent
1
This test method is under the jurisdiction of ASTM Committee A01 on Steel,
yielding of its various components and shall ensure that the
Stainless Steel and Related Alloys and is the direct responsibility of Subcommittee
A01.05 on Steel Reinforcement.
applied tensile load remains parallel to the axis of the steel
Current edition approved Nov. 1, 2010. Published December 2010. Originally
reinforcing bar during testing.
approved in 1995. Last previous edition approved in 2005 as A944 – 05. DOI:
10.1520/A0944-10.
4.2 Compression Reaction Plate—The compression reac-
2
For referenced ASTM standards, visit the ASTM website, www.astm.org, or
tionplateshallbeplacedaminimumcleardistanceequalto0.9
contact ASTM Customer Service at service@astm.org. For Annual Book of ASTM
l measured from the center of the test bar to the edge of the
Standards volume information, refer to the standard’s Document Summary page on e
the ASTM website. reaction plate.
*A Summary of Changes section appears at the end of this standard
Copyright © ASTM International, 100 Barr Harbor Drive, PO Box C700, West Conshohocken, PA 19428-2959. United States
1
---------------------- Page: 1 ----------------------
A944 − 10
FIG. 1 Schematic of Test Apparatus
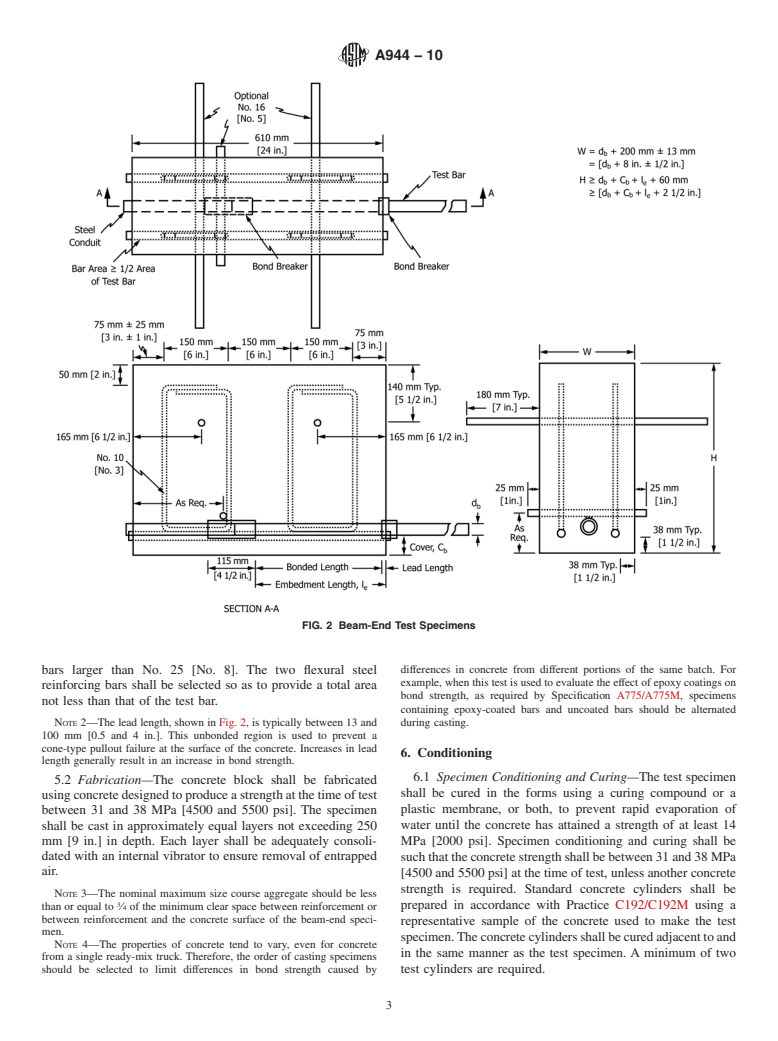
4.3 Bar Displacement Measurements—Displacementsofthe reinforcing bars parallel
...
This document is not an ASTM standard and is intended only to provide the user of an ASTM standard an indication of what changes have been made to the previous version. Because
it may not be technically possible to adequately depict all changes accurately, ASTM recommends that users consult prior editions as appropriate. In all cases only the current version
of the standard as published by ASTM is to be considered the official document.
Designation:A944–05 Designation:A944–10
Standard Test Method for
Comparing Bond Strength of Steel Reinforcing Bars to
1
Concrete Using Beam-End Specimens
This standard is issued under the fixed designation A944; the number immediately following the designation indicates the year of
original adoption or, in the case of revision, the year of last revision. A number in parentheses indicates the year of last reapproval. A
superscript epsilon (´) indicates an editorial change since the last revision or reapproval.
1. Scope*
1.1 This test method describes procedures to establish the relative bond strength of steel reinforcing bars in concrete.
1.2 This test method is intended to determine the effects of surface preparation or condition (such as bar coatings) on the bond
strength of deformed steel reinforcing bars (of sizes ranging from No. 10 to No. 36 [No. 3 to No. 11]) to concrete.
1.3The1.3 The bond strengths obtained using this test method are not directly applicable to the design of reinforced concrete
members.
NOTE 1—The bond strengths obtained using this test method are generally higher than obtained in development or splice tests using beams with the
same embedment lengths. The results obtained using this test method should only be used for comparisons with results for other reinforcing bars tested
using this method.
1.4The values stated in SI units are to be regarded as the standard. The values given in brackets are for information only.
1.4 The values stated in inch-pound units are to be regarded as standard. The values given in brackets are mathematical
conversions to SI units that are provided for information only and are not considered standard.
1.5 This standard does not purport to address all of the safety concerns, if any, associated with its use. It is the responsibility
of the user of this standard to establish appropriate safety and health practices and determine the applicability of regulatory
limitations prior to use.
2. Referenced Documents
2
2.1 ASTM Standards:
A775/A775M Specification for Epoxy-Coated Steel Reinforcing Bars
C192/C192M Practice for Making and Curing Concrete Test Specimens in the Laboratory
E4 Practices for Force Verification of Testing Machines
E575 Practice for Reporting Data from Structural Tests of Building Constructions, Elements, Connections, and Assemblies
3. Terminology
3.1 Definitions of Terms Specific to This Standard:
3.1.1 bond strength, n—maximum measured load in a tensile bond test of a steel reinforcing bar.
3.1.2 bonded length, n—the length of the test bar that is in contact with concrete.
3.1.3 concrete cover, n—minimum distance between the surface of the test bar and the top or bottom of the test specimen.
3.1.4 embedment length, n—the distance from the surface of the concrete test specimen to the installed end of the steel
reinforcing bar. This equals the sum of the lead length and the bonded length.
3.1.5 lead length, n—the length of the test bar that is not in contact with concrete but is between the surface of the concrete
test specimen and the bonded length.
3.1.6 relative rib area, n—ratio of the projected rib area normal to bar axis to the product of the nominal bar perimeter and the
center-to-center rib spacing.
3.2 Symbols:
C = Concrete cover, mm [in.].
b
1
This test method is under the jurisdiction of ASTM Committee A01 on Steel, Stainless Steel,Steel and Related Alloys and is the direct responsibility of Subcommittee
A01.05 on Steel Reinforcement.
Current edition approved Oct. 1, 2005. Published October 2005. Originally approved in 1995. Last previous edition approved in 2004 as A944–99 (2004). DOI:
10.1520/A0944-05.
Current edition approved Nov. 1, 2010. Published December 2010. Originally approved in 1995. Last previous edition approved in 2005 as A944 – 05. DOI:
10.1520/A0944-10.
2
For referencedASTM standards, visit theASTM website, www.astm.org, or contactASTM Customer Service at service@astm.org. For Annual Book of ASTM Standards
volume information, refer to the standard’s Document Summary page on the ASTM website.
*ASummary of Changes section appears at the end of this standard.
Copyright © ASTM International, 100 Barr Harbor Drive, PO Box C700, West Conshohocken, PA 19428-2959, United States.
1
---------------------- Page: 1 ----------------------
A944–10
d = Nominal diameter of reinforcing bar, mm [in.].
b
l = Embedment length, mm [in.].
e
4. Apparatus
4.1 Equipment—Aschematic of a suitable testing system is shown in Fig. 1. The loading system shall be capable of measuring
the forces to an accuracy withi
...


Questions, Comments and Discussion
Ask us and Technical Secretary will try to provide an answer. You can facilitate discussion about the standard in here.