ASTM C657-19
(Test Method)Standard Test Method for D-C Volume Resistivity of Glass
Standard Test Method for D-C Volume Resistivity of Glass
SIGNIFICANCE AND USE
4.1 This experimental procedure yields meaningful data for the dc volume resistivity of glass. It is designed to minimize space charge, buildup polarization effects, and surface conductances. The temperature range is limited to room temperature to the annealing point of the specimen glass.
SCOPE
1.1 This test method covers the determination of the dc volume resistivity of a smooth, preferably polished, glass by measuring the resistance to passage of a small amount of direct current through the glass at a voltage high enough to assure adequate sensitivity. This current must be measured under steady-state conditions that is neither a charging current nor a space-charge, buildup polarization current.
1.2 This test method is intended for the determination of resistivities less than 1016 Ω·cm in the temperature range from 25 °C to the annealing point of the glass.
1.3 This standard does not purport to address all of the safety concerns, if any, associated with its use. It is the responsibility of the user of this standard to establish appropriate safety, health, and environmental practices and determine the applicability of regulatory limitations prior to use. For specific hazard statements, see Section 5.
1.4 This international standard was developed in accordance with internationally recognized principles on standardization established in the Decision on Principles for the Development of International Standards, Guides and Recommendations issued by the World Trade Organization Technical Barriers to Trade (TBT) Committee.
General Information
- Status
- Published
- Publication Date
- 31-Oct-2019
- Technical Committee
- C14 - Glass and Glass Products
- Drafting Committee
- C14.04 - Physical and Mechanical Properties
Relations
- Effective Date
- 01-Nov-2019
- Effective Date
- 01-Mar-2024
- Effective Date
- 01-Oct-2023
- Effective Date
- 01-Nov-2015
- Effective Date
- 01-Nov-2014
- Effective Date
- 01-May-2014
- Effective Date
- 01-Nov-2013
- Effective Date
- 01-Aug-2011
- Effective Date
- 01-May-2008
- Effective Date
- 15-May-2007
- Refers
ASTM D257-99(2005) - Standard Test Methods for DC Resistance or Conductance of Insulating Materials - Effective Date
- 01-Sep-2005
- Effective Date
- 10-Mar-2002
- Effective Date
- 10-Oct-1999
- Effective Date
- 10-Oct-1999
- Effective Date
- 10-Oct-1999
Overview
ASTM C657-19: Standard Test Method for D-C Volume Resistivity of Glass is an internationally recognized method for determining the direct current (DC) volume resistivity of glass materials. Developed by ASTM International, this standard ensures precise measurement of glass resistivity under controlled temperature conditions, minimizing issues such as space charge, polarization effects, and surface conductance. This method is applicable across resistivity ranges less than 10¹⁶ Ω·cm, spanning from room temperature (25 °C) up to the annealing point of the glass specimen. Accurate volume resistivity measurements are essential for glass used in electrical, electronic, and high-performance technical applications.
Key Topics
DC Volume Resistivity Measurement: The method measures electrical resistance through smooth, preferably polished glass using a high enough direct current voltage to achieve adequate sensitivity, ensuring readings are based on steady-state current only.
Controlled Environment and Sample Preparation:
- Measurements are performed in a temperature-controlled chamber to ensure stability.
- Surfaces are typically polished and meticulously cleaned to prevent errors from contaminants or surface irregularities.
- Electrodes of preferred materials, such as gold, are applied to prevent issues like ion migration.
Minimization of Measurement Error:
- Space charge buildup and polarization currents are minimized through careful experimental design.
- The use of guarding electrodes reduces the influence of surface conductance, contributing to precise results.
- Proper connection techniques, including use of similar metals and avoidance of thermal electromotive forces, enhance reliability.
Data Reporting and Interpretation:
- Resistivity data should be plotted as a function of temperature for clear analysis.
- Only the straight-line portion of the resistivity versus temperature plot under DC conditions is considered reliable.
Temperature Range:
- Valid for measurements between 25 °C and the glass’s annealing point.
- Not suitable for resistivities above 10¹⁶ Ω·cm.
Applications
- Glass Selection for Electrical Insulation: Essential for evaluating glasses used in high-voltage insulation, electronic substrates, and other applications requiring predictable electrical resistivity.
- Quality Control in Manufacturing: Enables manufacturers to verify the consistency and suitability of glass materials, supporting regulatory and industry standards compliance.
- Research and Product Development: Facilitates the characterization of new glass compositions or treatments, ensuring materials meet specified electrical properties for advanced technologies.
- Performance Validation: Critical for applications in electronics, optics, and energy where precise control over electrical conduction is required, such as in display technology or capacitive devices.
Related Standards
- ASTM D257: Test Methods for DC Resistance or Conductance of Insulating Materials - foundational for resistance measurement methodology.
- ASTM D374: Test Methods for Thickness of Solid Electrical Insulation - relevant for preparing properly dimensioned test specimens.
- ASTM D1711: Terminology Relating to Electrical Insulation - provides standardized terminology for clarity.
- ASTM D1829: (Withdrawn) Test Method for Electrical Resistance of Ceramic Materials at Elevated Temperatures - referenced for measurement procedures in similar contexts.
For more details or to download the official ASTM C657-19 standard, visit ASTM International’s website.
Keywords: ASTM C657-19, DC volume resistivity of glass, glass resistivity test method, electrical insulation, volume resistance measurement, standard test method, polished glass resistivity, glass electrical properties, ASTM International, glass testing standard.
Buy Documents
ASTM C657-19 - Standard Test Method for D-C Volume Resistivity of Glass
REDLINE ASTM C657-19 - Standard Test Method for D-C Volume Resistivity of Glass
Frequently Asked Questions
ASTM C657-19 is a standard published by ASTM International. Its full title is "Standard Test Method for D-C Volume Resistivity of Glass". This standard covers: SIGNIFICANCE AND USE 4.1 This experimental procedure yields meaningful data for the dc volume resistivity of glass. It is designed to minimize space charge, buildup polarization effects, and surface conductances. The temperature range is limited to room temperature to the annealing point of the specimen glass. SCOPE 1.1 This test method covers the determination of the dc volume resistivity of a smooth, preferably polished, glass by measuring the resistance to passage of a small amount of direct current through the glass at a voltage high enough to assure adequate sensitivity. This current must be measured under steady-state conditions that is neither a charging current nor a space-charge, buildup polarization current. 1.2 This test method is intended for the determination of resistivities less than 1016 Ω·cm in the temperature range from 25 °C to the annealing point of the glass. 1.3 This standard does not purport to address all of the safety concerns, if any, associated with its use. It is the responsibility of the user of this standard to establish appropriate safety, health, and environmental practices and determine the applicability of regulatory limitations prior to use. For specific hazard statements, see Section 5. 1.4 This international standard was developed in accordance with internationally recognized principles on standardization established in the Decision on Principles for the Development of International Standards, Guides and Recommendations issued by the World Trade Organization Technical Barriers to Trade (TBT) Committee.
SIGNIFICANCE AND USE 4.1 This experimental procedure yields meaningful data for the dc volume resistivity of glass. It is designed to minimize space charge, buildup polarization effects, and surface conductances. The temperature range is limited to room temperature to the annealing point of the specimen glass. SCOPE 1.1 This test method covers the determination of the dc volume resistivity of a smooth, preferably polished, glass by measuring the resistance to passage of a small amount of direct current through the glass at a voltage high enough to assure adequate sensitivity. This current must be measured under steady-state conditions that is neither a charging current nor a space-charge, buildup polarization current. 1.2 This test method is intended for the determination of resistivities less than 1016 Ω·cm in the temperature range from 25 °C to the annealing point of the glass. 1.3 This standard does not purport to address all of the safety concerns, if any, associated with its use. It is the responsibility of the user of this standard to establish appropriate safety, health, and environmental practices and determine the applicability of regulatory limitations prior to use. For specific hazard statements, see Section 5. 1.4 This international standard was developed in accordance with internationally recognized principles on standardization established in the Decision on Principles for the Development of International Standards, Guides and Recommendations issued by the World Trade Organization Technical Barriers to Trade (TBT) Committee.
ASTM C657-19 is classified under the following ICS (International Classification for Standards) categories: 81.040.10 - Raw materials and raw glass. The ICS classification helps identify the subject area and facilitates finding related standards.
ASTM C657-19 has the following relationships with other standards: It is inter standard links to ASTM C657-93(2013), ASTM D1711-24, ASTM D374/D374M-23, ASTM D1711-15, ASTM D1711-14a, ASTM D1711-14, ASTM D1711-13, ASTM D1711-11a, ASTM D1711-08, ASTM D257-07, ASTM D257-99(2005), ASTM D1711-02, ASTM D1711-99, ASTM D257-99, ASTM D1829-90(1999). Understanding these relationships helps ensure you are using the most current and applicable version of the standard.
ASTM C657-19 is available in PDF format for immediate download after purchase. The document can be added to your cart and obtained through the secure checkout process. Digital delivery ensures instant access to the complete standard document.
Standards Content (Sample)
This international standard was developed in accordance with internationally recognized principles on standardization established in the Decision on Principles for the
Development of International Standards, Guides and Recommendations issued by the World Trade Organization Technical Barriers to Trade (TBT) Committee.
Designation: C657 − 19
Standard Test Method for
D-C Volume Resistivity of Glass
This standard is issued under the fixed designation C657; the number immediately following the designation indicates the year of
original adoption or, in the case of revision, the year of last revision. A number in parentheses indicates the year of last reapproval. A
superscript epsilon (´) indicates an editorial change since the last revision or reapproval.
1. Scope Materials at Elevated Temperatures (Withdrawn 2001)
1.1 This test method covers the determination of the dc
3. Summary of Test Method
volume resistivity of a smooth, preferably polished, glass by
3.1 The dc volume resistance is measured in accordance
measuring the resistance to passage of a small amount of direct
with Test Methods D257, with the specimen located in a
current through the glass at a voltage high enough to assure
heating chamber with adequate temperature control, electrical
adequate sensitivity. This current must be measured under
shielding and insulation of the sample leads as described in
steady-state conditions that is neither a charging current nor a
Test Method D1829.
space-charge, buildup polarization current.
1.2 This test method is intended for the determination of
4. Significance and Use
resistivities less than 10 Ω·cm in the temperature range from
4.1 This experimental procedure yields meaningful data for
25 °C to the annealing point of the glass.
the dc volume resistivity of glass. It is designed to minimize
1.3 This standard does not purport to address all of the space charge, buildup polarization effects, and surface conduc-
safety concerns, if any, associated with its use. It is the tances. The temperature range is limited to room temperature
responsibility of the user of this standard to establish appro- to the annealing point of the specimen glass.
priate safety, health, and environmental practices and deter-
5. Cautions
mine the applicability of regulatory limitations prior to use.
For specific hazard statements, see Section 5.
5.1 Thermal emfs should be avoided. Connections involv-
1.4 This international standard was developed in accor- ing dissimilar metals can cause measurement difficulties. Even
dance with internationally recognized principles on standard- copper-copper oxide junctions can produce high thermal emfs.
ization established in the Decision on Principles for the Clean, similar metals should be used for electrical junctions.
Development of International Standards, Guides and Recom-
Platinum is recommended. Welded or crimped connections
mendations issued by the World Trade Organization Technical rather than soldered joints avoid difficulties. Specimen elec-
Barriers to Trade (TBT) Committee.
trodes shall have sufficient cross section for adequate electrical
conductance.
2. Referenced Documents
6. Apparatus
2.1 ASTM Standards:
6.1 Resistance-Measuring Devices, and the possible prob-
D257 Test Methods for DC Resistance or Conductance of
lems associated with them are discussed thoroughly in Section
Insulating Materials
7 and Appendixes X1 and X3 of Test Methods D257. Further
D374/D374M Test Methods for Thickness of Solid Electri-
discussion of electrometer circuitry is covered in AnnexA1 to
cal Insulation
this test method.
D1711 Terminology Relating to Electrical Insulation
D1829 Test Method for Electrical Resistance of Ceramic
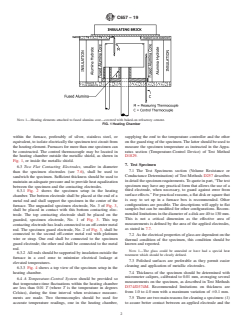
6.2 Heating Chamber (Fig. 1)—For heating the specimen, a
suitable electric furnace shall be used. The construction of the
furnace shall be such that the specimen is subjected to a
uniform heat application with a minimum of temperature
This test method is under the jurisdiction of ASTM Committee C14 on Glass
fluctuation. An adequate muffle should be provided to shield
and Glass Products and is the direct responsibility of Subcommittee C14.04 on
Physical and Mechanical Properties.
the specimen from direct radiation by the heating elements.
Current edition approved Nov. 1, 2019. Published December 2019. Originally
This may be made of a ceramic such as aluminum oxide or
approved in 1970. Last previous edition approved in 2013 as C657 – 93 (2013).
equivalent. A grounded metallic shield shall also be provided
DOI: 10.1520/C0657-19.
For referenced ASTM standards, visit the ASTM website, www.astm.org, or
contact ASTM Customer Service at service@astm.org. For Annual Book of ASTM
Standards volume information, refer to the standard’s Document Summary page on The last approved version of this historical standard is referenced on
the ASTM website. www.astm.org.
Copyright © ASTM International, 100 Barr Harbor Drive, PO Box C700, West Conshohocken, PA 19428-2959. United States
C657 − 19
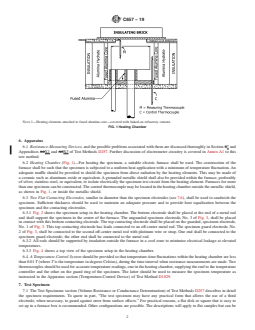
NOTE 1—Heating elements attached to fused alumina core—covered with baked-on refractory cement.
FIG. 1 Heating Chamber
within the furnace, preferably of silver, stainless steel, or supplying the emf to the temperature controller and the other
equivalent, to isolate electrically the specimen test circuit from on the guard ring of the specimen. The latter should be used to
the heating element. Furnaces for more than one specimen can measure the specimen temperature as instructed in the Appa-
be constructed. The control thermocouple may be located in ratus section (Temperature-Control Device) of Test Method
the heating chamber outside the metallic shield, as shown in D1829.
Fig. 1, or inside the metallic shield.
7. Test Specimen
6.3 Two Flat Contacting Electrodes, smaller in diameter
7.1 The Test Specimens section (Volume Resistance or
than the specimen electrodes (see 7.6), shall be used to
Conductance Determination) of Test Methods D257 describes
sandwich the specimen. Sufficient thickness should be used to
in detail the specimen requirements.To quote in part, “The test
maintain an adequate pressure and to provide heat equalization
specimen may have any practical form that allows the use of a
between the specimen and the contacting electrodes.
third electrode, when necessary, to guard against error from
6.3.1 Fig. 2 shows the specimen setup in the heating
surface effects.” For practical reasons, a flat disk or square that
chamber. The bottom electrode shall be placed at the end of a
is easy to set up in a furnace box is recommended. Other
metal rod and shall support the specimen in the center of the
configurations are possible. The descriptions will apply to flat
furnace. The unguarded specimen electrode, No. 3 of Fig. 3,
samples but can be modified for other configurations. Recom-
shall be placed in contact with this bottom contacting elec-
mended limitations in the diameter of a disk are 40 to 130 mm.
trode. The top contacting electrode shall be placed on the
This is not a critical dimension as the effective area of
guarded, specimen electrode, No. 1 of Fig. 3. This top
measurements is defined by the area of the applied electrodes,
contacting electrode has leads connected to an off-center metal
as stated in 7.7.
rod. The specimen guard electrode, No. 2 of Fig. 3, shall be
connected to the second off-center metal rod with platinum
7.2 Astheelectricalpropertiesofglassaredependentonthe
wire or strap. One end shall be connected to the specimen
thermal condition of the specimen, this condition should be
guard electrode; the other end shall be connected to the metal
known and reported.
rod.
NOTE 1—The glass could be annealed or have had a special heat
6.3.2 All rods should be supported by insulation outside the
treatment which should be clearly defined.
furnace in a cool zone to minimize electrical leakage at
7.3 Polished surfaces are preferable as they permit easier
elevated temperatures.
cleaning and application of metallic electrodes.
6.3.3 Fig. 4 shows a top view of the specimen setup in the
heating chamber. 7.4 Thickness of the specimen should be determined with
micrometer calipers, calibrated to 0.01 mm, averaging several
6.4 A Temperature-Control System should be provided so
measurements on the specimen, as described in Test Methods
that temperature-time fluctuations within the heating chamber
D374/D374M. Recommended limitations on thickness are
are less than 0.01 T (where T is the temperature in degrees
from 1.0 to 4.0 mm with a maximum variation of 60.1 mm.
Celsius), during the time interval when resistance measure-
ments are made. Two thermocouples should be used for 7.5 There are two main reasons for cleaning a specimen:(1)
accurate temperature readings, one in the heating chamber, to assure better contact between an applied electrode and the
C657 − 19
FIG. 2 Specimen Setup for Heating Chamber
durability, or the desire to include the effect of surface
treatment require modification or elimination of the cleaning
procedure.
7.6 Specimen Electrodes, preferably of gold (vacuum-
...
This document is not an ASTM standard and is intended only to provide the user of an ASTM standard an indication of what changes have been made to the previous version. Because
it may not be technically possible to adequately depict all changes accurately, ASTM recommends that users consult prior editions as appropriate. In all cases only the current version
of the standard as published by ASTM is to be considered the official document.
Designation: C657 − 93 (Reapproved 2013) C657 − 19
Standard Test Method for
D-C Volume Resistivity of Glass
This standard is issued under the fixed designation C657; the number immediately following the designation indicates the year of
original adoption or, in the case of revision, the year of last revision. A number in parentheses indicates the year of last reapproval. A
superscript epsilon (´) indicates an editorial change since the last revision or reapproval.
1. Scope
1.1 This test method covers the determination of the dc volume resistivity of a smooth, preferably polished, glass by measuring
the resistance to passage of a small amount of direct current through the glass at a voltage high enough to assure adequate
sensitivity. This current must be measured under steady-state conditions that is neither a charging current nor a space-charge,
buildup polarization current.
1.2 This test method is intended for the determination of resistivities less than 10 Ω·cm in the temperature range from
25°C25 °C to the annealing point of the glass.
1.3 This standard does not purport to address all of the safety concerns, if any, associated with its use. It is the responsibility
of the user of this standard to establish appropriate safety safety, health, and healthenvironmental practices and determine the
applicability of regulatory limitations prior to use. For specific hazard statements, see Section 5.
1.4 This international standard was developed in accordance with internationally recognized principles on standardization
established in the Decision on Principles for the Development of International Standards, Guides and Recommendations issued
by the World Trade Organization Technical Barriers to Trade (TBT) Committee.
2. Referenced Documents
2.1 ASTM Standards:
D257 Test Methods for DC Resistance or Conductance of Insulating Materials
D374 Test Methods for Thickness of Solid Electrical Insulation (Metric) D0374_D0374M
D1711 Terminology Relating to Electrical Insulation
D1829 Test Method for Electrical Resistance of Ceramic Materials at Elevated Temperatures (Withdrawn 2001)
3. Summary of Test Method
3.1 The dc volume resistance is measured in accordance with Test Methods D257, with the specimen located in a heating
chamber with adequate temperature control, electrical shielding and insulation of the sample leads as described in Test Method
D1829.
4. Significance and Use
4.1 This experimental procedure yields meaningful data for the dc volume resistivity of glass. It is designed to minimize space
charge, buildup polarization effects, and surface conductances. The temperature range is limited to room temperature to the
annealing point of the specimen glass.
5. Cautions
5.1 Thermal emfs should be avoided. Connections involving dissimilar metals can cause measurement difficulties. Even
copper-copper oxide junctions can produce high thermal emfs. Clean, similar metals should be used for electrical junctions.
Platinum is recommended. Welded or crimped connections rather than soldered joints avoid difficulties. Specimen electrodes shall
have sufficient cross section for adequate electrical conductance.
This test method is under the jurisdiction of ASTM Committee C14 on Glass and Glass Products and is the direct responsibility of Subcommittee C14.04 on Physical
and Mechanical Properties.
Current edition approved Oct. 1, 2013Nov. 1, 2019. Published October 2013December 2019. Originally approved in 1970. Last previous edition approved in 20082013
as C657 – 93 (2008).(2013). DOI: 10.1520/C0657-93R13.10.1520/C0657-19.
For referenced ASTM standards, visit the ASTM website, www.astm.org, or contact ASTM Customer Service at service@astm.org. For Annual Book of ASTM Standards
volume information, refer to the standard’s Document Summary page on the ASTM website.
The last approved version of this historical standard is referenced on www.astm.org.
Copyright © ASTM International, 100 Barr Harbor Drive, PO Box C700, West Conshohocken, PA 19428-2959. United States
C657 − 19
NOTE 1—Heating elements attached to fused alumina core—covered with baked-on refractory cement.
FIG. 1 Heating Chamber
6. Apparatus
6.1 Resistance-Measuring Devices, and the possible problems associated with them are discussed thoroughly in Section 97 and
Appendixes A1X1 and A3X3 of Test Methods D257. Further discussion of electrometer circuitry is covered in Annex A1 to this
test method.
6.2 Heating Chamber (Fig. 1)—For heating the specimen, a suitable electric furnace shall be used. The construction of the
furnace shall be such that the specimen is subjected to a uniform heat application with a minimum of temperature fluctuation. An
adequate muffle should be provided to shield the specimen from direct radiation by the heating elements. This may be made of
a ceramic such as aluminum oxide or equivalent. A grounded metallic shield shall also be provided within the furnace, preferably
of silver, stainless steel, or equivalent, to isolate electrically the specimen test circuit from the heating element. Furnaces for more
than one specimen can be constructed. The control thermocouple may be located in the heating chamber outside the metallic shield,
as shown in Fig. 1, or inside the metallic shield.
6.3 Two Flat Contacting Electrodes, smaller in diameter than the specimen electrodes (see 7.6), shall be used to sandwich the
specimen. Sufficient thickness should be used to maintain an adequate pressure and to provide heat equalization between the
specimen and the contacting electrodes.
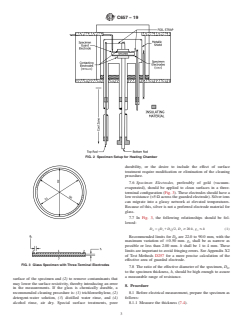
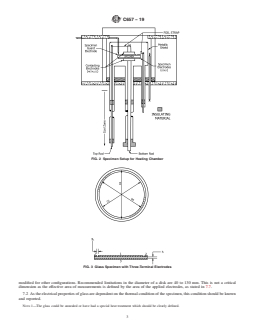
6.3.1 Fig. 2 shows the specimen setup in the heating chamber. The bottom electrode shall be placed at the end of a metal rod
and shall support the specimen in the center of the furnace. The unguarded specimen electrode, No. 3 of Fig. 3, shall be placed
in contact with this bottom contacting electrode. The top contacting electrode shall be placed on the guarded, specimen electrode,
No. 1 of Fig. 3. This top contacting electrode has leads connected to an off-center metal rod. The specimen guard electrode, No.
2 of Fig. 3, shall be connected to the second off-center metal rod with platinum wire or strap. One end shall be connected to the
specimen guard electrode; the other end shall be connected to the metal rod.
6.3.2 All rods should be supported by insulation outside the furnace in a cool zone to minimize electrical leakage at elevated
temperatures.
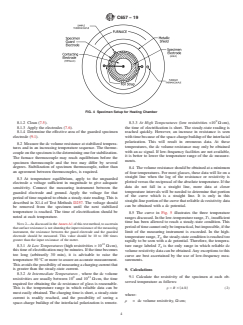
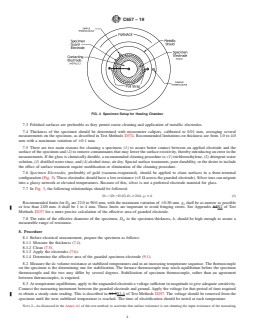
6.3.3 Fig. 4 shows a top view of the specimen setup in the heating chamber.
6.4 A Temperature-Control System should be provided so that temperature-time fluctuations within the heating chamber are less
than 0.01 T (where T is the temperature in degrees Celsius), during the time interval when resistance measurements are made. Two
thermocouples should be used for accurate temperature readings, one in the heating chamber, supplying the emf to the temperature
controller and the other on the guard ring of the specimen. The latter should be used to measure the specimen temperature as
instructed in the Apparatus section (Temperature-Control Device) of Test Method D1829.
7. Test Specimen
7.1 The Test Specimens section (Volume Resistance or Conductance Determination) of Test Methods D257 describes in detail
the specimen requirements. To quote in part, “The test specimen may have any practical form that allows the use of a third
electrode, when necessary, to guard against error from surface effects.” For practical reasons, a flat disk or square that is easy to
set up in a furnace box is recommended. Other configurations are possible. The descriptions will apply to flat samples but can be
C657 − 19
FIG. 2 Specimen Setup for Heating Chamber
FIG. 3 Glass Specimen with Three-Terminal Electrodes
modified for other configurations. Recommended limitations in the diameter of a disk are 40 to 130 mm. This is not a critical
dimension as the effective area of measurements is defined by the area of the applied electrodes, as stated in 7.7.
7.2 As the electrical properties of glass are dependent on the thermal condition of the specimen, this condition should be known
and reported.
NOTE 1—The glass could be annealed or have had a special heat treatment which should be clearly defined.
C657 − 19
FIG. 4 Specimen Setup for Heating Chamber
7.3 Polished surfaces are preferable as they permit easier cleaning and application of metallic electrodes.
7.4 Thickness of the specimen should be determined with micrometer calipers, calibrated to 0.01 mm, averaging several
measurements on the specimen, as described in Test Methods D374. Recommended limitations on thickness are from 1.0 to 4.0
mm with a maximum variation of 60.1 mm.
7.5 There are two main reasons for cleaning a specimen: (1) to assure better contact between an applied ele
...
Questions, Comments and Discussion
Ask us and Technical Secretary will try to provide an answer. You can facilitate discussion about the standard in here.
Loading comments...