ASTM A456/A456M-99(2003)
(Specification)Standard Specification for Magnetic Particle Examination of Large Crankshaft Forgings
Standard Specification for Magnetic Particle Examination of Large Crankshaft Forgings
ABSTRACT
This test method deals with the acceptance criteria for the magnetic particle examination of forged steel crankshafts and forgings having large main bearing journal or crankpin diameters. Covered here are three classes of forgings, which shall be evaluated under two areas of inspection, namely: major critical areas, and minor critical areas. During inspection, magnetic particle indications shall be classified as: surface indications, which include nonmetallic inclusions or stringers, open or twist cracks, flakes, or pipes; open or pinpoint indications; and non-open indications. Procedures for dimpling, depressing, inspection, and product marking are also mentioned.
SCOPE
1.1 This is an acceptance specification for the magnetic particle inspection of forged steel crankshafts having main bearing journals or crankpins 4 in. [200 mm] or larger in diameter.
1.2 There are three classes, with acceptance standards of increasing severity:
1.2.1 Class 1.
1.2.2 Class 2 (originally the sole acceptance standard of Specification A 456).
1.2.3 Class 3 (formerly covered in Supplementary Requirement S1 of Specification A 456-64 (1970)).
1.3 This specification is not intended to cover continuous grain flow crankshafts, however, Test Method A 983/A 983M may be used for this purpose.
Note 1—Specification A 668/A 688M is a product specification which may be used for crankshaft forgings.
1.4 The values stated in either inches or SI (metric) units are to be regarded separately as the standard. Within the text and figures, the SI units are shown in brackets. The values stated in each system are not exact equivalents; therefore each system shall be used independently of the other. Combining values from the two systems may result in nonconformance with the specification.
1.5 Unless the order specifies the applicable "M" specification designation, the material shall be furnished to the inch units.
General Information
Relations
Standards Content (Sample)
NOTICE: This standard has either been superseded and replaced by a new version or withdrawn.
Contact ASTM International (www.astm.org) for the latest information
Designation: A 456/A 456M – 99 (Reapproved 2003)
Standard Specification for
Magnetic Particle Examination of Large Crankshaft
Forgings
This standard is issued under the fixed designationA 456/A 456M; the number immediately following the designation indicates the year
of original adoption or, in the case of revision, the year of last revision. A number in parentheses indicates the year of last reapproval.
A superscript epsilon (e) indicates an editorial change since the last revision or reapproval.
1. Scope A 668/A 668M Specification for Steel Forgings, Carbon
and Alloy, for General Industrial Use
1.1 This is an acceptance specification for the magnetic
A 966/A 966M Test Method for Magnetic Particle Exami-
particle inspection of forged steel crankshafts having main
nation of Steel Forgings Using Alternating Current
bearing journals or crankpins 4 in. [200 mm] or larger in
A 983/A 983M Specification for Continuous Grain Flow
diameter.
Forged Carbon and Alloy Steel Crankshafts for Medium
1.2 There are three classes, with acceptance standards of
Speed Diesel Engines
increasing severity:
E 1417 Practice for Liquid Penetrant Examination
1.2.1 Class 1.
1.2.2 Class 2 (originally the sole acceptance standard of
3. Classification of Indications
Specification A 456).
3.1 Magnetic particle indications on the surface of the
1.2.3 Class 3 (formerly covered in Supplementary Require-
crankshaft shall be classified as follows:
ment S1 of Specification A 456–64 (1970)).
3.1.1 Open cracks, flake, or pipe.
1.3 This specification is not intended to cover continuous
3.1.2 Nonmetallic inclusions or stringers occurring in a
grain flow crankshafts, however, Test Method A 983/A 983M
longitudinal direction.
may be used for this purpose.
3.1.3 Twist cracks or nonmetallic inclusions usually occur-
NOTE 1—Specification A 668/A 688M is a product specification which
ring at 45 to 70° from the axis of the journal.
may be used for crankshaft forgings.
3.2 They shall also be classified as follows:
1.4 The values stated in either inches or SI (metric) units are
3.2.1 Open indications are visible after removal of the
to be regarded separately as the standard. Within the text and
magnetic particles or can be detected by the use of contrast dye
figures, the SI units are shown in brackets. The values stated in
penetrant, as described in Type II of Practice E 1417.
each system are not exact equivalents; therefore each system
3.2.1.1 Pinpoint indications are open indications ⁄16 in.
shall be used independently of the other. Combining values
[1.5mm]inmaximumdimension,asdetectedbyapplicationof
from the two systems may result in nonconformance with the
Type II of Practice E 1417.
specification.
3.2.2 Non-open indications are indications which are not
1.5 Unless the order specifies the applicable “M” specifica-
visually detectable as described in 3.2.1.
tion designation, the material shall be furnished to the inch
4. Ordering Information
units.
4.1 The inquiry and purchase agreement shall contain a
2. Referenced Documents
statement that the crankshaft(s) is (are) to be subject to
2.1 ASTM Standards:
acceptance according to this specification. If reference to class
A 275/A 275M Test Method for Magnetic Particle Exami-
is omitted, Class 2 shall apply.
nation of Steel Forgings
4.2 The use of Supplementary Requirements S1 and S2
should be specified if required.
This specification is under the jurisdiction of ASTM Committee A01 on Steel,
5. Procedure
StainlessSteel,andRelatedAlloys,andisthedirectresponsibilityofSubcommittee
A01.06 on Steel Forgings and Billets. 5.1 Magnetic particle inspection shall be conducted accord-
Current edition approved Oct. 1, 2003. Published November 2003. Originally
ing to Test Method A 966/A 966M, except when Supplemen-
approved in 1999. Last previous edition approved in 1999 as A 456–99.
tary Requirement S1 is to be used. The use of prod type
For referenced ASTM standards, visit the ASTM website, www.astm.org, or
contacts is not permitted on finished crankshafts. Magnetic
contact ASTM Customer Service at service@astm.org. For Annual Book of ASTM
Standards volume information, refer to the standard’s Document Summary page on
the ASTM website.
Copyright © ASTM International, 100 Barr Harbor Drive, PO Box C700, West Conshohocken, PA 19428-2959, United States.
A 456/A 456M – 99 (2003)
leeches may only be used on noncritical parts of the crankshaft 7.1.1.2 Pinpoint indications are permissible, except in clus-
1 1
when Supplementary Requirement S2 is utilized. ters of more than 5 in any ⁄4 by ⁄4-in. [6 by 6-mm] area, in
whichcasetheymustbedimpledtoadepthofnomorethan ⁄16
6. Areas of Inspection in. [5 mm]. If they do not open or increase in number they are
acceptable and need not be removed.
6.1 Major Critical Areas:
7.1.1.3 Non-open indications are acceptable up to and
6.1.1 Thecriticalareaofanycrankpinshallbethatareaplus
including ⁄2 in.[13mm]inlength.Ifnon-openindicationsare
or minus 60° from the 6 o’clock position of the pin extending
3 5 over ⁄2 in., depress, and if they are not open or are worsening,
⁄8 in. [10 mm] above the thrust collar around the fillet, and ⁄8
accept them. Otherwise remove by dimpling to a maximum
in. [16 mm] into the pin along its axis measured from
depth of ⁄16 in. [5 mm].
approximately the blend of the pin surface and fillet, as shown
7.1.1.4 The total area of dimples shall be limited as in
in Fig. 1 and Fig. 2.
7.2.1.3.
6.1.2 The critical areas of any main bearing journal shall be
7.1.2 Minor Critical Areas:
that area plus or minus 60° from the 12 o’clock position on top
of the journal extending ⁄8 in. [9.5 mm] above the thrust 7.1.2.1 Open indications oriented at an angle in excess of
collar around the fillet and ⁄8 in. [15.9 mm] into the journal 30° to the longitudinal axis must be removed to a depth not
along its axis measured from approximately the blend of the exceeding ⁄16 in. [5 mm], by dimpling.
journal surface and the fillet, as shown in Fig. 1 and Fig. 2.
7.1.2.2 Open indications longer than 1 ⁄2 in. [35 mm]
6.1.3 The critical area of any crankpin or main journal also individually or more than 3 in. [75 mm] of total length per
includes that surface area closer than ⁄4 in. [6 mm] to the
bearing journal, that are parallel to the longitudinal axis within
junction of the radius blend and the journal surface of any oil 30°, must be removed by dimpling to a depth no greater than
hole.
⁄16 in. [5 mm]. Intermittent open indications in a line, spaced
6.2 Minor Critical Areas—Minor critical areas include all
less than ⁄4 in. [6 mm] apart, shall be considered continuous
machined fillets, thrust bearing, and bearing surfaces not
or as one indication.
1 1
specified as major critical areas.
7.1.2.3 Open indications ⁄8 in. [3 mm] to 1 ⁄2 in. [35 mm]
long, with the exception of those referred to in 7.1.2.1, shall be
7. Acceptance Standards
depressed 0.003 to 0.010 in. [0.05 to 0.25 mm] below the
surface but need not be removed.
7.1 Class 1:
7.1.1 Major Critical Areas: 7.1.2.4 Open indications less than ⁄8 in. [3 mm] long need
not be depressed, dimpled, or removed.
7.1.1.1 Open indications over ⁄4 in. [6 mm] in length shall
be removed by dimpling to a depth no greater than ⁄16 in. [5 7.1.2.5 A cluster of open indications, with the exception of
1 1
mm]. Open indications over ⁄16 to ⁄4 in. [1.5 to 6 mm] in those referred to in 7.1.2.1, having a total length not exceeding
length shall be depressed as in 7.2.2.3. 2 ⁄2 in. [65 mm] in any 1 by 1-in. [25 by 25-mm] square area
Metric Equivalents
3 5
⁄8 in. = [10 mm] ⁄8 in. = [16 mm]
FIG. 1 Critical Surface Areas of Crankpin and Main Bearing Journal
A 456/A 456M – 99 (2003)
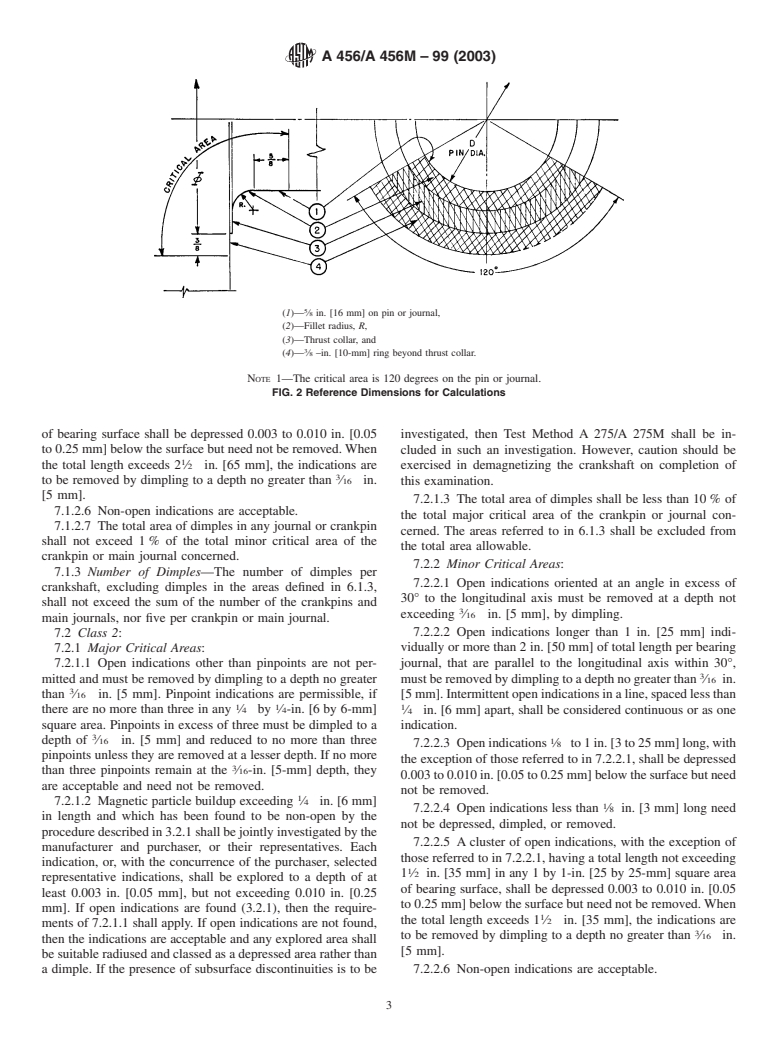
(1)— ⁄8 in. [16 mm] on pin or journal,
(2)—Fillet radius, R,
(3)—Thrust collar, and
(4)— ⁄8 –in. [10-mm] ring beyond thrust collar.
NOTE 1—The critical area is 120 degrees on the pin or journal.
FIG. 2 Reference Dimensions for Calculations
of bearing surface shall be depressed 0.003 to 0.010 in. [0.05 investigated, then Test Method A 275/A 275M shall be in-
to 0.25 mm] below the surface but need not be removed.When cluded in such an investigation.
...


Questions, Comments and Discussion
Ask us and Technical Secretary will try to provide an answer. You can facilitate discussion about the standard in here.