ASTM D5179-16(2021)
(Test Method)Standard Test Method for Measuring Adhesion of Organic Coatings in the Laboratory by Direct Tensile Method
Standard Test Method for Measuring Adhesion of Organic Coatings in the Laboratory by Direct Tensile Method
SIGNIFICANCE AND USE
4.1 The pull-off strength (commonly referred to as adhesion) of a coating is an important performance property that has been used in specifications. This test method serves as a means for uniformly preparing and testing organic coatings on plastic or other substrates.4 Further information may be found in Appendix X1.
SCOPE
1.1 This test method covers the laboratory determination of organic coating adhesion to plastic substrates by mounting and removing a metal stud from the surface of the coating and measuring the force required to break the coating/substrate bond with a tensile tester. This test method may also be applied to substrates other than plastic.
1.2 This test method requires that the metal stud be adhered directly to the surface of a coated, cured panel (Fig. 1).
FIG. 1 Direct Tensile Model
1.3 This test method is used to compare the adhesion of coatings to plastic or other substrates, thus allowing for a quantitative comparison of various coating/substrate combinations in laboratory conditions.
1.4 Other tensile test methods are Test Methods D4541, D7234, D7522, and ISO 4624 (but are not technically equivalent).
1.5 The values stated in SI units are to be regarded as standard. The values given in parentheses are mathematical conversions to inch-pound units that are provided for information only and are not considered standard.
1.6 This standard does not purport to address all of the safety concerns, if any, associated with its use. It is the responsibility of the user of this standard to establish appropriate safety, health, and environmental practices and determine the applicability of regulatory limitations prior to use.
1.7 This international standard was developed in accordance with internationally recognized principles on standardization established in the Decision on Principles for the Development of International Standards, Guides and Recommendations issued by the World Trade Organization Technical Barriers to Trade (TBT) Committee.
General Information
- Status
- Published
- Publication Date
- 31-Oct-2021
- Technical Committee
- D01 - Paint and Related Coatings, Materials, and Applications
- Drafting Committee
- D01.23 - Physical Properties of Applied Paint Films
Relations
- Effective Date
- 01-Jul-2012
- Effective Date
- 01-Feb-2009
- Effective Date
- 01-Dec-2005
- Effective Date
- 10-Feb-2002
- Effective Date
- 10-Feb-2002
Overview
ASTM D5179-16(2021) - Standard Test Method for Measuring Adhesion of Organic Coatings in the Laboratory by Direct Tensile Method is a widely recognized laboratory method developed by ASTM International. This test method provides a uniform and reliable way to determine the adhesion, or pull-off strength, of organic coatings applied to plastic and other substrates. Accurate adhesion measurement is crucial for assessing the performance and durability of coated products in various industries, ensuring that coatings will maintain their protective or decorative properties during service.
Key Topics
- Purpose and Scope: The standard describes the procedure for quantifying the adhesion strength of organic coatings to a variety of substrates, with a primary focus on plastics. The test involves bonding a metal stud directly to the coated surface and using a tensile tester to measure the force required to pull the stud off, thereby breaking the coating/substrate bond.
- Sample Preparation: Proper preparation includes sanding and cleaning the metal stud, conditioning both the specimen and the environment, and curing the adhesive according to manufacturer recommendations.
- Testing Procedure: The coated specimen is secured in a restraining device, and force is applied perpendicularly through a calibrated tensile tester at a controlled speed until adhesion failure occurs. The nature and location of the failure (adhesive, cohesive, or a combination) are then assessed and reported.
- Significance: This method delivers quantitative results that enable comparison of various coating and substrate combinations. It is valuable for research, quality assurance, and verifying compliance with industry specifications.
- Precision and Reproducibility: The method’s accuracy depends on careful alignment, sample preparation, and adherence to the specified testing parameters. Interlaboratory studies have demonstrated robust repeatability when conducted by trained operators.
Applications
ASTM D5179 is applied throughout industries where the adhesion of organic coatings must be rigorously tested and validated, such as:
- Automotive: Ensuring that coatings on plastic components, trims, and interiors adhere properly for safety, longevity, and aesthetics.
- Consumer Electronics: Validating the paint or EMI/RFI shielding coatings on plastic housings and device enclosures.
- Construction Materials: Evaluating coatings on plastic panels, pipes, and fixtures to confirm durability under service conditions.
- Research and Development: Comparing new coating formulations or surface preparation methods for improved adhesion performance.
- Quality Control: Routine testing during manufacturing to ensure coatings meet contractual or regulatory requirements.
Testing may also extend to non-plastic substrates using this method, providing broad utility across material types.
Related Standards
ASTM D5179 references and complements several other industry standards for adhesion testing, including:
- ASTM D4541: Pull-Off Strength of Coatings Using Portable Adhesion Testers - often used for field testing on a variety of substrates.
- ASTM D7234: Pull-Off Adhesion Strength of Coatings on Concrete - suitable for concrete substrates.
- ASTM D7522: Pull-Off Strength for FRP Laminate Systems Bonded to Concrete or Masonry Substrates.
- ISO 4624: Paints and Varnishes - Pull-off test for adhesion.
These related standards offer alternative test methods for different substrates and end-use scenarios.
Keywords: ASTM D5179, adhesion test, organic coatings, pull-off strength, tensile tester, plastic substrates, coating adhesion, laboratory test method, coating performance, adhesion measurement.
By following ASTM D5179, laboratories and manufacturers worldwide can achieve reliable, reproducible measurements of organic coating adhesion, supporting the development and delivery of high-performance coated products.
Buy Documents
ASTM D5179-16(2021) - Standard Test Method for Measuring Adhesion of Organic Coatings in the Laboratory by Direct Tensile Method
Get Certified
Connect with accredited certification bodies for this standard

National Aerospace and Defense Contractors Accreditation Program (NADCAP)
Global cooperative program for special process quality in aerospace.

CARES (UK Certification Authority for Reinforcing Steels)
UK certification for reinforcing steels and construction.

DVS-ZERT GmbH
German welding certification society.
Sponsored listings
Frequently Asked Questions
ASTM D5179-16(2021) is a standard published by ASTM International. Its full title is "Standard Test Method for Measuring Adhesion of Organic Coatings in the Laboratory by Direct Tensile Method". This standard covers: SIGNIFICANCE AND USE 4.1 The pull-off strength (commonly referred to as adhesion) of a coating is an important performance property that has been used in specifications. This test method serves as a means for uniformly preparing and testing organic coatings on plastic or other substrates.4 Further information may be found in Appendix X1. SCOPE 1.1 This test method covers the laboratory determination of organic coating adhesion to plastic substrates by mounting and removing a metal stud from the surface of the coating and measuring the force required to break the coating/substrate bond with a tensile tester. This test method may also be applied to substrates other than plastic. 1.2 This test method requires that the metal stud be adhered directly to the surface of a coated, cured panel (Fig. 1). FIG. 1 Direct Tensile Model 1.3 This test method is used to compare the adhesion of coatings to plastic or other substrates, thus allowing for a quantitative comparison of various coating/substrate combinations in laboratory conditions. 1.4 Other tensile test methods are Test Methods D4541, D7234, D7522, and ISO 4624 (but are not technically equivalent). 1.5 The values stated in SI units are to be regarded as standard. The values given in parentheses are mathematical conversions to inch-pound units that are provided for information only and are not considered standard. 1.6 This standard does not purport to address all of the safety concerns, if any, associated with its use. It is the responsibility of the user of this standard to establish appropriate safety, health, and environmental practices and determine the applicability of regulatory limitations prior to use. 1.7 This international standard was developed in accordance with internationally recognized principles on standardization established in the Decision on Principles for the Development of International Standards, Guides and Recommendations issued by the World Trade Organization Technical Barriers to Trade (TBT) Committee.
SIGNIFICANCE AND USE 4.1 The pull-off strength (commonly referred to as adhesion) of a coating is an important performance property that has been used in specifications. This test method serves as a means for uniformly preparing and testing organic coatings on plastic or other substrates.4 Further information may be found in Appendix X1. SCOPE 1.1 This test method covers the laboratory determination of organic coating adhesion to plastic substrates by mounting and removing a metal stud from the surface of the coating and measuring the force required to break the coating/substrate bond with a tensile tester. This test method may also be applied to substrates other than plastic. 1.2 This test method requires that the metal stud be adhered directly to the surface of a coated, cured panel (Fig. 1). FIG. 1 Direct Tensile Model 1.3 This test method is used to compare the adhesion of coatings to plastic or other substrates, thus allowing for a quantitative comparison of various coating/substrate combinations in laboratory conditions. 1.4 Other tensile test methods are Test Methods D4541, D7234, D7522, and ISO 4624 (but are not technically equivalent). 1.5 The values stated in SI units are to be regarded as standard. The values given in parentheses are mathematical conversions to inch-pound units that are provided for information only and are not considered standard. 1.6 This standard does not purport to address all of the safety concerns, if any, associated with its use. It is the responsibility of the user of this standard to establish appropriate safety, health, and environmental practices and determine the applicability of regulatory limitations prior to use. 1.7 This international standard was developed in accordance with internationally recognized principles on standardization established in the Decision on Principles for the Development of International Standards, Guides and Recommendations issued by the World Trade Organization Technical Barriers to Trade (TBT) Committee.
ASTM D5179-16(2021) is classified under the following ICS (International Classification for Standards) categories: 25.220.60 - Organic coatings. The ICS classification helps identify the subject area and facilitates finding related standards.
ASTM D5179-16(2021) has the following relationships with other standards: It is inter standard links to ASTM D7234-12, ASTM D4541-09, ASTM D7234-05, ASTM D4541-95e1, ASTM D4541-02. Understanding these relationships helps ensure you are using the most current and applicable version of the standard.
ASTM D5179-16(2021) is available in PDF format for immediate download after purchase. The document can be added to your cart and obtained through the secure checkout process. Digital delivery ensures instant access to the complete standard document.
Standards Content (Sample)
This international standard was developed in accordance with internationally recognized principles on standardization established in the Decision on Principles for the
Development of International Standards, Guides and Recommendations issued by the World Trade Organization Technical Barriers to Trade (TBT) Committee.
Designation: D5179 − 16 (Reapproved 2021)
Standard Test Method for
Measuring Adhesion of Organic Coatings in the Laboratory
by Direct Tensile Method
This standard is issued under the fixed designation D5179; the number immediately following the designation indicates the year of
original adoption or, in the case of revision, the year of last revision. A number in parentheses indicates the year of last reapproval. A
superscript epsilon (´) indicates an editorial change since the last revision or reapproval.
1. Scope 2. Referenced Documents
2.1 ASTM Standards:
1.1 This test method covers the laboratory determination of
D4541 Test Method for Pull-Off Strength of Coatings Using
organic coating adhesion to plastic substrates by mounting and
Portable Adhesion Testers
removing a metal stud from the surface of the coating and
D7234 Test Method for Pull-OffAdhesion Strength of Coat-
measuring the force required to break the coating/substrate
ings on Concrete Using Portable Pull-Off Adhesion Tes-
bond with a tensile tester.This test method may also be applied
ters
to substrates other than plastic.
D7522 Test Method for Pull-Off Strength for FRP Laminate
1.2 This test method requires that the metal stud be adhered Systems Bonded to Concrete or Masonry Substrates
2.2 Other Standard:
directly to the surface of a coated, cured panel (Fig. 1).
ISO 4624 Paints and Varnishes—Pull-off test for adhesion
1.3 This test method is used to compare the adhesion of
3. Summary of Test Method
coatings to plastic or other substrates, thus allowing for a
quantitative comparison of various coating/substrate combina-
3.1 Ametal stud is bonded directly to a coated cured panel.
tions in laboratory conditions.
The adhesive is allowed to cure according to manufacturer’s
recommendations. The specimen is then subjected to test on a
1.4 Other tensile test methods are Test Methods D4541,
tensile tester equipped with an upper coupling adapter (Fig. 2),
D7234, D7522, and ISO 4624 (but are not technically equiva-
and a restraining device (Fig. 3).
lent).
3.2 If a coating is to fulfill its function of protecting or
1.5 The values stated in SI units are to be regarded as
decorating a substrate, it must adhere to it for the expected
standard. The values given in parentheses are mathematical
service life. Because the substrate and its surface preparation
conversions to inch-pound units that are provided for informa-
(or lack of it) has a drastic effect on the adhesion of coatings,
tion only and are not considered standard.
a method of evaluating the adhesion of a coating to different
substrates or surface treatments, or of different coatings to the
1.6 This standard does not purport to address all of the
same substrate and treatment, is of considerable usefulness in
safety concerns, if any, associated with its use. It is the
the industry.
responsibility of the user of this standard to establish appro-
priate safety, health, and environmental practices and deter- 4. Significance and Use
mine the applicability of regulatory limitations prior to use.
4.1 The pull-off strength (commonly referred to as adhe-
1.7 This international standard was developed in accor-
sion)ofacoatingisanimportantperformancepropertythathas
dance with internationally recognized principles on standard-
been used in specifications.This test method serves as a means
ization established in the Decision on Principles for the
for uniformly preparing and testing organic coatings on plastic
Development of International Standards, Guides and Recom-
or other substrates. Further information may be found in
mendations issued by the World Trade Organization Technical Appendix X1.
Barriers to Trade (TBT) Committee.
For referenced ASTM standards, visit the ASTM website, www.astm.org, or
contact ASTM Customer Service at service@astm.org. For Annual Book of ASTM
Standards volume information, refer to the standard’s Document Summary page on
This test method is under the jurisdiction of ASTM Committee D01 on Paint the ASTM website.
and Related Coatings, Materials, andApplications and is the direct responsibility of Available from American National Standards Institute (ANSI), 25 W. 43rd St.,
Subcommittee D01.23 on Physical Properties of Applied Paint Films. 4th Floor, New York, NY 10036, http://www.ansi.org.
Current edition approved Nov. 1, 2021. Published November 2021. Originally Gray, K. N., Buckley, S. E., and Nelson, G. L., “Accessing Measurement
approved in 1991. Last previous edition approved in 2016 as D5179 – 16. DOI: Standards for Coating Adhesion to Plastics,” Modern Paint and Coatings Journal,
10.1520/D5179-16R21. Vol 75, No. 10, October 1985, p. 160.
Copyright ©ASTM International, 100 Barr Harbor Drive, PO Box C700, West Conshohocken, PA19428-2959. United States
D5179 − 16 (2021)
5.5 WoodenApplicators, or Cotton Swabs or other means to
clean excess adhesive from around the metal stud.
5.6 Adhesive, a suitable glue.
5.7 BondingWeight,aweightfoundsuitableforconsistently
establishing the desired adhesive bond line for the chosen
adhesive during samples preparation.
6. Preparation and Conditioning of Specimen
6.1 SandingProcedure—Sandthelargefaceofthestudwith
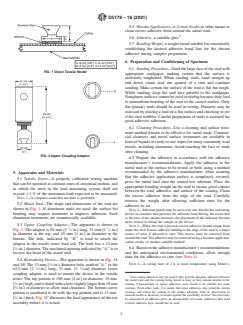
FIG. 1 Direct Tensile Model
appropriate sandpaper, making certain that the surface is
uniformly roughened. When sanding studs, sand straight up
and down; rotate stud one quarter of a turn and continue
sanding. Make certain the surface of the stud is flat but rough.
While sanding, keep the stud face parallel to the sandpaper.
Nonplanar surfaces cannot be used in testing because they lead
to nonuniform bonding of the stud to the coated surface. Only
flat (planar) studs should be used in testing. Planarity may be
assessed by placing a stud on a flat surface and checking to see
if the stud wobbles. Careful preparation of studs is essential for
good adhesive adhesion.
6.2 Cleaning Procedure—Use a cleaning and surface treat-
ment method known to be effective for metal studs. Commer-
cial cleansers and metal surface treatments are available in
formofliquidsorready-to-usewipesformanycommonlyused
metals, including aluminum. Avoid touching the face of studs
after cleaning.
FIG. 2 Upper Coupling Adaptor
6.3 Prepare the adhesive in accordance with the adhesive
manufacturer’s recommendations. Apply the adhesive to the
metal stud or the surface to be tested, or both, using a method
recommended by the adhesive manufacturer. After assuring
5. Apparatus and Materials
that the adhesive application surface is completely covered,
5.1 Tensile Tester—A properly calibrated testing machine
press the metal stud onto the coated test substrate. Place the
that can be operated at constant rates of crosshead motion, and
appropriate bonding weight on the stud to ensure good contact
in which the error in the load measuring system shall not
between the stud, adhesive, and surface of the coating. Clean
exceed 61 % of the maximum load expected to be measured.
the excess adhesive from the edge of the stud. Carefully
NOTE 1—A computer-controlled machine is preferable.
remove the weight after allowing sufficient time for the
5.2 Metal Stud—The shape and dimensions of the stud are
adhesive to set.
shown in Fig. 1. If aluminum studs are used, the surface for
NOTE2—Substratepanelsmaybecuttoanysizethatfitstherestraining
bonding may require treatment to improve adhesion. Such
device in a manner that prevents the substrate from flexing. Be aware that
as the area of the sample increases, the placement of the stub may become
aluminum treatments are commercially available.
more critical in fitting the sample in the device.
5.3 Upper Coupling Adaptor—The apparatus is shown in
NOTE 3—When the stud is pressed, excess adhesive should escape from
3 1
Fig. 2. The adaptor is 94 mm [3 ⁄4 in.] long, 31 mm [1 ⁄4 in.]
under the stud. Excess adhesive buildup at the edge of the stud is a major
source of error if allowed to cure. This excess must be removed from
in diameter at the top, and 25 mm [1 in.] in diameter at the
aroundthestud.Theadhesivemayberemovedusingawoodenapplicator,
bottom. The hole, indicated by “B,” is used to attach the
cotton swabs, or another suitable method.
adaptor to the tensile tester load cell. The hole has a 13-mm
6.4 Based on the adhesive manufacturer’s recommendations
[ ⁄2-in.]diameter.Themachinedopeningindicatedby“A,”isto
and the anticipated environmental conditions, allow enough
receive the head of the metal stud.
time for the adhesive to cure (see Note 4).
5.4 Restraining Device—The apparatus is shown in Fig. 3A
NOTE 4—A curing time of2hat room temperature using Elmer’s,
and 3B. The 13-mm [ ⁄2-in.] diameter hole, marked “A,” in the
1 1
63.5-mm [2 ⁄2-in.] long, 31-mm. [1 ⁄4-in] diameter lower
coupling adapter, is used to mount the device in the tensile
Fast-curing adhesives may be used if they provide adequate adhesion between
tester. The top portion is 100 mm [4 in.] in diameter, 19 mm
the metal stud and the coating being tested as long as they remain neutral to the
[ ⁄4in.]high,andisfittedwithaholeslightlylargerthan19mm
coating. Cyanoacrylate or epoxy adhesives were found to be suitable for some
coatings. From other work, it is noted, that some adhesives may penetrate certain
[ ⁄4 in.] in diameter to allow stud clearance. The bottom screw
coatings and soften the coating or the plastic substrate. Care in observation of
portion is machined to fit with the top portion and is 13 mm
unusual results is necessary to ensure against the possibility of error. The error may
[ ⁄2 in.] thick. Fig. 3C illustrates the final appearance of the test
be suspected if an adhesive gives an unexpectedly low result. Adhesives that yield
assembly before it is tested. a brittle adhesive layer should not be used.
D5179 − 16 (2021)
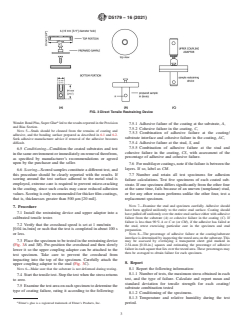
FIG. 3 Direct Tensile Restraining Device
WonderBondPlus,SuperGlue ledtotheresultsreportedinthePrecision
7.5.1 Adhesive failure of the coating at the substrate, A,
and Bias Section.
7.5.2 Cohesive failure in the coating, C,
NOTE 5—Studs should be cleaned from the remains of coating and
7.5.3 Combination of adhesive failure at the coating/
adhesive, and the bonding surface prepared as described in 6.1 and 6.2.
substrate interface and cohesive failure in the coating, AC,
Seek adhesive manufacturer advice if removal of the adhesive becomes
difficult. 7.5.4 Adhesive failure at the stud, S, and
7.5.5 Combination of adhesive failure at the stud and
6.5 Conditioning—Condition the coated substrates and test
cohesive failure in the coating, CS, with assessment of the
inthesameenvironmentorimmediatelyonremovaltherefrom,
percentage of adhesive and cohesive failure.
as specified by manufacturer’s recommendations or agreed
upon by the purchaser and the seller.
7.6 Formultilayercoatings,noteifthefailureisbetweenthe
layers. If so, label as CM.
6.6 Scoring—Scored samples constitute a different test, and
this procedure should be clearly reported with the results. If
7.7 Number and retain all test specimens for adhesion
scoring around the test surface adhered to the metal stud is
failure calculations. Test five specimens of each coated sub-
employed, extreme care is required to prevent micro-cracking
strate. If one specimen differs significantly from the other four
in the coating, since such cracks may cause reduced adhesion
at the same time, fails because of an uneven (nonplanar) stud,
values. Scoring is only recommended for thicker film coatings,
or for any other reason performs unlike the other four, test a
that is, thicknesses greater than 500 µm [20 mil].
replacement specimen.
NOTE 7—Examine the stud and specimen carefully. Adhesive should
7. Procedure
have been applied uniformly to the entire stud surface. Coating should
7.1 Install the restraining device and upper adaptor into a
have pulled off uniformly over the entire stud surface either with adhesive
calibrated tensile tester. failure from the substrate (A) or cohesive failure in the coating (C). If
failure is less than 90 % A or C or (or CM), if the adhesive has failed at
7.2 Verify that the crosshead speed is set at 1 mm/min
the stud, retest exercising particular care in the specimen and stud
[0.04 in./min] or such that the test is completed in about 100 s
preparation.
NOTE 8—The percentage of adhesive failure at the coating/substrate
or less.
interface is determined by inspecting the tested area on the substrate. This
7.3 Place the specimen to be tested in the restraining device
may be assessed by overlaying a transparent sheet grid marked in
(Fig. 3A and 3B). Pre-position the crosshead and then slowly 2.54-mm [0.10-in.] squares and estimating the percentage of adhesive
failure in each square that lies over the tested area.These percentages may
lower it so the upper coupling adaptor can be attached to the
then be averaged to obtain failure for each specimen.
test specimen. Take care to prevent the crosshead from
impacting into the top of the specimen. Carefully attach the
8. Report
upper coupling adaptor to the stud (Fig. 3C).
NOTE 6—Make sure that the substrate is not deformed during testing.
8.1 Report the following information:
8.1.1 Number of tests, the maximum stress obtained in each
7.4 Startthetensiletest.Stopthetestwhenthestressreturns
test, and the type of failure. Calculate and report mean and
to zero.
standard deviation for tensile strength for each coating/
7.5 Examinethetestareaoneachspecimentodeterminethe
substrate combination tested
type of coating failure, rating it according to the following:
8.1.2 Conditioning of the specimens.
8.1.3 Temperature and relative humidity during the test
Elmer’s glue is a registered trademark of Elmer’s Products, Inc. period.
D5179 − 16 (2021)
8.1.4 Description of the coating, including its thickness and device, the care exercised in stud and specimen preparation,
method of application. and the care in testing.
8.1.5 Descriptionofthesubstrate,includingitstype,surface
9.2 A round robin involving five different types of coatings
preparation, thickness, orientation, etc.
and
...


Questions, Comments and Discussion
Ask us and Technical Secretary will try to provide an answer. You can facilitate discussion about the standard in here.
Loading comments...