ASTM D3603-93(2002)
(Test Method)Standard Test Method for Rust-Preventing Characteristics of Steam Turbine Oil in the Presence of Water (Horizontal Disk Method)
Standard Test Method for Rust-Preventing Characteristics of Steam Turbine Oil in the Presence of Water (Horizontal Disk Method)
SCOPE
1.1 This test method covers the ability of steam-turbine oils to prevent the rusting of horizontal and vertical ferrous surfaces when water becomes mixed with the oil.
1.2 The values stated in SI units are to be regarded as the standard. The values given in parentheses are for information only.
1.3 This standard does not purport to address all of the safety concerns, if any, associated with its use. It is the responsibility of the user of this standard to establish appropriate safety and health practices and determine the applicability of regulatory limitations prior to use.
General Information
Relations
Standards Content (Sample)
NOTICE: This standard has either been superseded and replaced by a new version or withdrawn.
Contact ASTM International (www.astm.org) for the latest information
An American National Standard
Designation:D3603–93 (Reapproved 2002)
Standard Test Method for
Rust-Preventing Characteristics of Steam Turbine Oil in the
Presence of Water (Horizontal Disk Method)
This standard is issued under the fixed designation D 3603; the number immediately following the designation indicates the year of
original adoption or, in the case of revision, the year of last revision. A number in parentheses indicates the year of last reapproval. A
superscript epsilon (e) indicates an editorial change since the last revision or reapproval.
1. Scope Annex II, Reference Materials and Blending Accessories,
Motor Section
1.1 This test method covers the ability of steam-turbine oils
topreventtherustingofhorizontalandverticalferroussurfaces
3. Summary of Test Method
when water becomes mixed with the oil.
3.1 The test method involves completely immersing a hori-
1.2 The values stated in SI units are to be regarded as the
zontal steel disk and vertical steel cylinder in a stirred mixture
standard. The values given in parentheses are for information
of 275 mL of the oil under test and 25 mL of distilled water
only.
(water conforming to Specification D 1193, Type II) at a
1.3 This standard does not purport to address all of the
temperature at 60°C (140°F).
safety concerns, if any, associated with its use. It is the
3.2 The horizontal specimen allows water to puddle on the
responsibility of the user of this standard to establish appro-
surface, and the vertical specimen is continually washed with
priate safety and health practices and determine the applica-
the oil-water mixture during the test.
bility of regulatory limitations prior to use.
3.3 The test is run for 6 h and the specimens are evaluated.
2. Referenced Documents
4. Significance and Use
2.1 ASTM Standards:
4.1 Horizontal metal surfaces, on which water droplets tend
A 108 Specification for Steel Bars, Carbon, Cold-Finished,
to be retained, are more prone to rusting and corrosion than
Standard Quality
vertical or sloping surfaces. This test method is therefore more
A 240/A 240M Specification for Chromium and
discriminating than Test Method D 665 (ProcedureA), since it
Chromium-Nickel Stainless Steel Plate, Sheet, and Strip
3 gives a separate evaluation of the oil on a horizontal and a
for Pressure Vessels and for General Applications
vertical surface. The test method indicates the ability of oils to
D 91 Test Method for Precipitation Number of Lubricating
4 prevent rusting and corrosion of all ferrous surfaces in steam
Oils
turbines under full flow and quasi-static conditions. It is used
D 665 Test Method for Rust-Preventing Characteristics of
4 for specification of new oils.
Inhibited Mineral Oil in the Presence of Water
D 1193 Specification for Reagent Water
5. Apparatus
D 4057 Practice for Manual Sampling of Petroleum and
6 5.1 Oil Bath—A thermostatically controlled liquid bath
Petroleum Products
capable of maintaining a temperature in the oil sample of 60 6
E 1 Specification for ASTM Thermometers
1°C (140 6 2°F). The bath shall have a cover with holes to
2.2 Other Documents:
accommodate the test beakers.
IP 60/80 Specification for Petroleum Spirit
NOTE 1—The bath used forTest Method D 665 may be used with slight
modification, that is, the centers of the beaker holes are moved from 6.4
1 23
This test method is under the jurisdiction of ASTM Committee D02 on
mm to 18.3 mm ( ⁄4 to ⁄32 in.) from the axes of the stirrers.
Petroleum Products and Lubricants and is the direct responsibility of D02.C0.02 on
NOTE 2—To indicate the temperature, a thermometer conforming to the
Corrosion and Water/Air Separability.
requirements of ASTM Thermometer 9C or 9F, or IP Thermometer 21C,
Current edition approved Dec. 10, 2002. Published March 2003. Originally
as prescribed in Specification E 1 should be used.
approved in 1977. Last previous edition approved in 1997 as D 3603 – 93 (1997).
Annual Book of ASTM Standards, Vol 01.05.
5.2 Beaker—A 400-mL, Berzelius-type, tall-form heat-
Annual Book of ASTM Standards, Vol 01.03. 10
resistant glass beaker without pourout, as shown in Fig. 1,
Annual Book of ASTM Standards, Vol 05.01.
Annual Book of ASTM Standards, Vol 11.01.
Annual Book of ASTM Standards,Vol 05.02.
Annual Book of ASTM Standards, Vol 14.03.
8 9
Available fromApplied Science Publishers, Ltd., Ripple Road, Barking, Essex, Annual Book of ASTM Standards, Vol 05.04.
England. Borosilicate glass is satisfactory for this purpose.
Copyright © ASTM International, 100 Barr Harbor Drive, PO Box C700, West Conshohocken, PA 19428-2959, United States.
D3603–93 (2002)
NOTE—All dimensions are in millimetres (inches).
NOTE—All dimensions are in millimetres (inches).
FIG. 3 Specimen Holder
FIG. 1 Rusting Test Apparatus
approximately 127 mm (5 in.) in height measured from the
inside bottom center and approximately 70 mm (2 ⁄4 in.) in
inside diameter measured at the middle.
5.3 Beaker Cover and Specimen Holder—A flat beaker
cover (Fig. 2) of methyl methacrylate resin or other fluid
resistantmaterialiskeptinpositionbyasuitablegroove.Three
holes are provided. Two are located on any diameter of the
cover, one for a stirrer, and the other for attachment of a disk NOTE—All dimensions are in millimetres (inches).
FIG. 4 Holding Rod
specimentotheundersideofthecoverforoptionalvaporphase
testing. The third hole is for a thermometer, located on a
diameter perpendicular to that of the other two holes. The
cover by two stainless steel holding rods (Fig. 4). Both ends of
outside of the polytetrafluoroethylene (PTFE) specimen holder
each holding rod are threaded. The surfaces between the
(Fig. 3) is a square, but from the ends of one diagonal, two
threads are polished with No. 180 grit emery. The 12.7-mm
equal pieces of PTFE are cut off over the height of the holder.
threaded ends of the holding rods are screwed into the two
Two vertical threaded holes are made on the other diagonal of
vertical threaded holes of the specimen holder. The 19.0-mm
the square. The inside of the holder consists of two cylindrical
threaded ends of the holding rods are connected to the beaker
holes, one on top of the other. Four horizontal holes are drilled
cover by putting them through two holes on a line perpendicu-
90° apart on the circumference where the two cylindrical holes
lartotheconnectionlineofthecentersoftheearliermentioned
meet. The PTFE specimen holder is connected to the beaker
first and second hole of the beaker cover. Each holding rod is
fastened by two 10-32 stainless steel nuts.
NOTE 3—An alternative design for the specimen holder assembly has
also been used successfully. See Test Method D 3603–82.
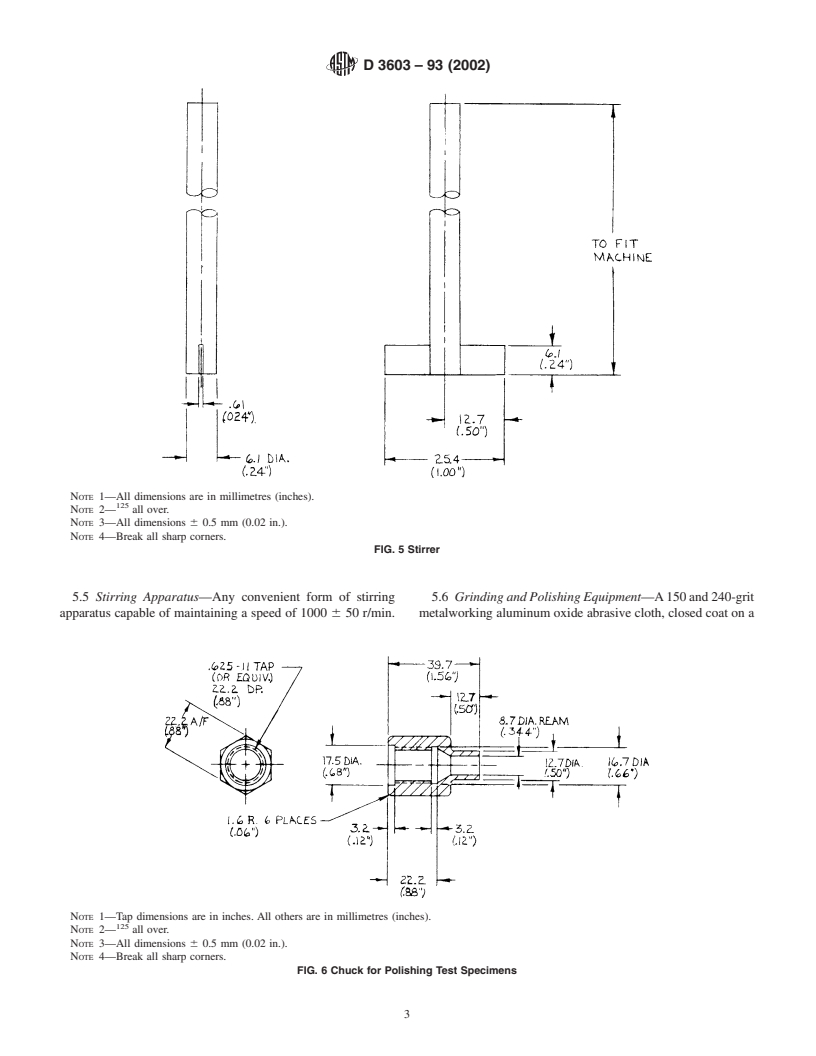
5.4 Stirrer—A stirrer constructed entirely from stainless
steel in the form of an inverted T (Fig. 5).Aflat blade 25.4 by
6.1 by 0.6 mm (1 by 0.24 by 0.024 in.) shall be attached to a
6.1-mm (0.24-in.) rod in such a way that the blade is sym-
metrical with the rod and has its flat surface in the vertical
plane.
NOTE 4—A suitable material is an 18 % chromium, 8 % nickel alloy
steel conforming to Type 304 of ASTM Specification A 240 or SAE No.
11 12
30304, or BS 970: Part I:1983:302531.
NOTE 5—If stainless steel is not obtainable, stirrers made of heat-
resistant glass and having approximately the same dimensions as the
stainless steel stirrers may be used.
NOTE—All dimensions are in millimetres (inches).
1988 SAE Handbook.
FIG. 2 Beaker Cover British Standard 2, 1965 Section 5, or equivalent, may be used.
D3603–93 (2002)
NOTE 1—All dimensions are in millimetres (inches).
NOTE 2— all over.
NOTE 3—All dimensions 6 0.5 mm (0.02 in.).
NOTE 4—Break all sharp corners.
FIG. 5 Stirrer
5.5 Stirring Apparatus—Any convenient form of stirring 5.6 GrindingandPolishingEquipment—A150and240-grit
apparatus capable of maintaining a speed of 1000 6 50 r/min. metalworking aluminum oxide abrasive cloth, closed coat on a
NOTE 1—Tap dimensions are in inches. All others are in millimetres (inches).
NOTE 2— all over.
NOTE 3—All dimensions 6 0.5 mm (0.02 in.).
NOTE 4—Break all sharp corners.
FIG. 6 Chuck for Polishing Test Specimens
D3603–93 (2002)
jeans backing, a suitable chuck (Fig. 6) for holding the
specimen, and a means of rotating the specimen at a speed of
1700 to 1800 r/min.
6. Reagents and Materials
6.1 Cleaning Agents—One of the following shall be used:
6.1.1 ASTM Precipitation Naphtha, conforming to Test
Method D 91. (Warning—Flammable. Health hazard.)
6.1.2 Isooctane, conforming to Annex II on Reference
Materials and BlendingAccessories (see 2.2). Previously used,
unrustedspecimensshallbestoredinthisreagent.(Warning—
Flammable. Health hazard.)
NOTE—All dimensions are in millimetres (inches).
6.1.3 IP Petroleum Spirit, conforming to IP
FIG. 8 Vertical Specimen
Specification 60/80. (Warning—Flammable. Health hazard.)
7. Test Specimens and Their Preparation
7.1 Thehorizontalandverticalspecimens(Fig.7andFig.8,
respectively) are attached to one another, separated by a
2.4-mm ( ⁄32-in.) fluorocarbon washer (Fig. 9). A methyl
methacrylate cap (Fig. 10) is attached to the vertical specimen
for handling.
7.2 The horizontal specimen when new shall be 30.2
3 3
mm(1 ⁄16 in.) in diameter and 4.8 mm ( ⁄16 in.) thick, with a NOTE—All dimensions are in millimetres (inches).
1 3
FIG. 9 Washer
6.4-mm ( ⁄4-in.) central threaded shaft 9.5 mm ( ⁄8 in.) long.
Specimens should be discarded when they reach a thickness of
1.6 mm ( ⁄16 in.) after
...


Questions, Comments and Discussion
Ask us and Technical Secretary will try to provide an answer. You can facilitate discussion about the standard in here.