ASTM F812-12(2022)
(Specification)Standard Specification for Surface Discontinuities of Nuts, Inch and Metric Series
Standard Specification for Surface Discontinuities of Nuts, Inch and Metric Series
ABSTRACT
This specification establishes allowable limits for the various types of surface discontinuities such as cracks that may occur during the manufacture and processing of metric-series nuts and inch-series nuts. The different types of surface discontinuities and allowable limits are presented in details. The nuts shall be inspected for surface discontinuities to meet the requirements prescribed. Cone proof load test shall be performed to meet the requirements prescribed.
SCOPE
1.1 This specification establishes allowable limits for the various types of surface discontinuities that may occur during the manufacture and processing of metric-series nuts with nominal diameters 5 mm and larger and inch-series nuts with nominal diameters 1/4 in. and larger.
1.2 The values stated in either SI (metric) or inch-pound units are to be regarded separately as standard. The values stated in each system are not exact equivalents; therefore, each system must be used independently of the other. Combining values from the two systems may result in nonconformance with the specification.
1.3 When the engineering requirements of the application necessitate control of surface discontinuities on nuts, the purchaser shall specify conformance to this ASTM specification in the original inquiry and purchase order.
1.3.1 When the engineering requirements of the application necessitate that surface discontinuities on nuts be controlled within limits closer than those specified in this specification, the purchaser shall specify the applicable limits in the original inquiry and purchase order.
1.4 The allowable limits established in this specification for metric nuts, with nominal diameters 5 to 24 mm inclusive, are essentially identical with requirements given in ISO/DIS 6157/II. There are no ISO standards for surface discontinuities on metric-series nuts with nominal diameters larger than 24 mm or on any inch-series nuts.
1.5 The following precautionary caveat pertains only to the test method portion, Section 7, of this specification: This standard does not purport to address all of the safety concerns, if any, associated with its use. It is the responsibility of the user of this standard to establish appropriate safety, health, and environmental practices and determine the applicability of regulatory limitations prior to use.
1.6 This international standard was developed in accordance with internationally recognized principles on standardization established in the Decision on Principles for the Development of International Standards, Guides and Recommendations issued by the World Trade Organization Technical Barriers to Trade (TBT) Committee.
General Information
Buy Standard
Standards Content (Sample)
NOTICE: This standard has either been superseded and replaced by a new version or withdrawn.
Contact ASTM International (www.astm.org) for the latest information
Designation: F812 − 12 (Reapproved 2022)
Standard Specification for
Surface Discontinuities of Nuts, Inch and Metric Series
This standard is issued under the fixed designation F812; the number immediately following the designation indicates the year of original
adoption or, in the case of revision, the year of last revision. A number in parentheses indicates the year of last reapproval. A superscript
epsilon (´) indicates an editorial change since the last revision or reapproval.
This standard has been approved for use by agencies of the U.S. Department of Defense.
1. Scope* 1.6 This international standard was developed in accor-
dance with internationally recognized principles on standard-
1.1 This specification establishes allowable limits for the
ization established in the Decision on Principles for the
various types of surface discontinuities that may occur during
Development of International Standards, Guides and Recom-
the manufacture and processing of metric-series nuts with
mendations issued by the World Trade Organization Technical
nominal diameters 5 mm and larger and inch-series nuts with
Barriers to Trade (TBT) Committee.
nominal diameters ⁄4 in. and larger.
1.2 The values stated in either SI (metric) or inch-pound 2. Referenced Documents
units are to be regarded separately as standard. The values
2.1 ASTM Standards:
stated in each system are not exact equivalents; therefore, each
F606/F606M Test Methods for Determining the Mechanical
system must be used independently of the other. Combining
Properties of Externally and Internally Threaded
values from the two systems may result in nonconformance
Fasteners, Washers, Direct Tension Indicators, and Rivets
with the specification.
F1470 Practice for Fastener Sampling for Specified Me-
1.3 When the engineering requirements of the application
chanical Properties and Performance Inspection
necessitate control of surface discontinuities on nuts, the
F1789 Terminology for F16 Mechanical Fasteners
purchaser shall specify conformance to this ASTM specifica-
2.2 ISO Standard:
tion in the original inquiry and purchase order.
ISO/DIS 6157 ⁄II Fasteners, Surface Discontinuities on
1.3.1 When the engineering requirements of the application
Nuts
necessitate that surface discontinuities on nuts be controlled
within limits closer than those specified in this specification, 3. Ordering Information
the purchaser shall specify the applicable limits in the original
3.1 Orders for nuts requiring surface discontinuity control
inquiry and purchase order.
shall include:
3.1.1 ASTM designation and date of issue of this specifica-
1.4 The allowable limits established in this specification for
tion.
metric nuts, with nominal diameters 5 to 24 mm inclusive, are
3.1.2 Special requirements, for example, closer discontinu-
essentially identical with requirements given in ISO/
ity limits (1.3.1) and inspection sampling plan (6.2).
DIS 6157 ⁄II. There are no ISO standards for surface disconti-
nuities on metric-series nuts with nominal diameters larger
4. Types of Surface Discontinuities (See Standard F1789
than 24 mm or on any inch-series nuts.
for definitions not provided)
1.5 The following precautionary caveat pertains only to the
4.1 Crack:
test method portion, Section 7, of this specification: This
4.1.1 Quench Cracks—Typical quench cracks are shown in
standard does not purport to address all of the safety concerns,
Fig. 1; limits are specified in 5.2.
if any, associated with its use. It is the responsibility of the user
4.1.2 Forging Cracks—Typical forging cracks are shown in
of this standard to establish appropriate safety, health, and
Fig. 2; limits are specified in 5.3.
environmental practices and determine the applicability of
4.1.3 Inclusion Cracks—Normally caused by nonmetallic
regulatory limitations prior to use.
inclusions or stringers inherent in the raw material. Typical
1 2
This specification is under the jurisdiction of ASTM Committee F16 on For referenced ASTM standards, visit the ASTM website, www.astm.org, or
Fasteners and is the direct responsibility of Subcommittee F16.93 on Quality contact ASTM Customer Service at service@astm.org. For Annual Book of ASTM
Assurance Provisions for Fasteners. Standards volume information, refer to the standard’s Document Summary page on
Current edition approved Aug. 1, 2022. Published August 2022. Originally the ASTM website.
approved in 1983. Last previous edition approved in 2017 as F812 – 12(2017). DOI: Available from American National Standards Institute (ANSI), 25 W. 43rd St.,
10.1520/F0812-12R22. 4th Floor, New York, NY 10036, http://www.ansi.org.
*A Summary of Changes section appears at the end of this standard
Copyright © ASTM International, 100 Barr Harbor Drive, PO Box C700, West Conshohocken, PA 19428-2959. United States
F812 − 12 (Reapproved 2022)
inclusion cracks are shown in Fig. 2; limits are specified in 5.3.
F812 − 12 (2022)
FIG. 1 Typical Quench Cracks in Nuts
FIG. 4 Typical Washer Retainer Cracks in Nuts
FIG. 2 Typical Forging and Inclusion Cracks in Nuts
4.1.4 Locking-Element Cracks—Occur due to application of
pressure when forming the locking element of prevailing
torque-type nuts. Such cracks are usually located in the vicinity
of the locking element and may be either on the internal or
external surface. Typical locking element cracks are shown in
Fig. 3; limits are specified in 5.4.
4.1.5 Washer-Retainer Cracks—Openings in the lip or hub
of metal used to retain a washer on a nut. Washer-retainer
cracks may occur when pressure is applied to the lip or hub
during assembly of the washer. Typical washer-retainer cracks
FIG. 5 Typical Bursts and Shear Bursts in Nuts
are shown in Fig. 4; limits are specified in 5.5.
4.2 Burst—A typical burst is shown in Fig. 5; limits are
specified in 5.6.
4.2.1 Shear Burst—A typical shear burst is shown in Fig. 5;
limits are specified in 5.6.
4.3 Seam—Typical seams are shown in Fig. 6; limits are
specified in 5.7.
FIG. 6 Typical Seams in Nuts
4.4 Fold—Typical folds are shown in Fig. 7; limits are
specified in 5.8.
4.5 Void—Voids are produced by marks or impressions of
FIG. 3 Typical Locking Element Cracks in Prevailing-Torque Nuts chips (shear burrs) or by rust formation on the raw material.
F812 − 12 (2022)
FIG. 7 Typical Folds on Surfaces of Nuts
They are not planished during forging. Typical voids are shown
in Fig. 8; limits are specified in 5.9.
4.6 Tool Marks—Typical tool marks are shown in Fig. 9;
limits are specified in 5.10.
4.7 Gouge and Nick—an indentation on the surface of a
fastener produced by impact with another fastener, or from
processing equipment during manufacture, handling, or trans-
port.
5. Allowable Limits
5.1 Letter Definitions—Throughout the following
requirements, D designates the nominal nut size (basic major
diameter of thread); Dc designates flange diameter (specified
maximum) on flanged nuts; S designates nominal (specified
maximum) width across flats. For metric-series nuts, D, Dc,
and S are in millimetres; for inch series nuts, D, Dc, and S are
FIG. 9 Typical Tool Marks on Nut Surface
in inches.
5.2 Quench Cracks—Quench cracks of any depth, any
length, or in any location are not permitted.
a depth of 0.5 times the thread height; and (d) the width of any
5.3 Forging Cracks and Inclusion Cracks—Forging and
crack does not exceed 0.02 D or 0.30 mm or 0.012 in.,
inclusion cracks located in the top and bottom faces of nuts of
whichever is greater.
all sizes are permitted provided that (a) there are not more than
5.3.1 Additionally, hex nuts with nominal diameters 5 to 36
two cracks that extend from the tapped hole across the full
1 1
mm inclusive and ⁄4 to 1 ⁄2 in. inclusive, showing discontinuity
width of the face; (b) no crack extends into the tapped hole
indications, shall meet the requirements of the cone proof load
beyond the first full thread; (c) no crack in the threads exceeds
test when sampled in accordance with 6.1, using samples
selected in accordance with 6.5.2.
5.4 Locking Element Cracks:
5.4.1 Locking-element cracks (or seams) located on the
exte
...
This document is not an ASTM standard and is intended only to provide the user of an ASTM standard an indication of what changes have been made to the previous version. Because
it may not be technically possible to adequately depict all changes accurately, ASTM recommends that users consult prior editions as appropriate. In all cases only the current version
of the standard as published by ASTM is to be considered the official document.
Designation: F812 − 12 (Reapproved 2017) F812 − 12 (Reapproved 2022)
Standard Specification for
Surface Discontinuities of Nuts, Inch and Metric Series
This standard is issued under the fixed designation F812; the number immediately following the designation indicates the year of original
adoption or, in the case of revision, the year of last revision. A number in parentheses indicates the year of last reapproval. A superscript
epsilon (´) indicates an editorial change since the last revision or reapproval.
This standard has been approved for use by agencies of the U.S. Department of Defense.
1. Scope*
1.1 This specification establishes allowable limits for the various types of surface discontinuities that may occur during the
manufacture and processing of metric-series nuts with nominal diameters 5 mm and larger and inch-series nuts with nominal
diameters ⁄4 in. and larger.
1.2 The values stated in either SI (metric) or inch-pound units are to be regarded separately as standard. The values stated in each
system are not exact equivalents; therefore, each system must be used independently of the other. Combining values from the two
systems may result in nonconformance with the specification.
1.3 When the engineering requirements of the application necessitate control of surface discontinuities on nuts, the purchaser shall
specify conformance to this ASTM specification in the original inquiry and purchase order.
1.3.1 When the engineering requirements of the application necessitate that surface discontinuities on nuts be controlled within
limits closer than those specified in this specification, the purchaser shall specify the applicable limits in the original inquiry and
purchase order.
1.4 The allowable limits established in this specification for metric nuts, with nominal diameters 5 to 24 mm inclusive, are
essentially identical with requirements given in ISO/DIS 6157 ⁄II. There are no ISO standards for surface discontinuities on
metric-series nuts with nominal diameters larger than 24 mm or on any inch-series nuts.
1.5 The following precautionary caveat pertains only to the test method portion, Section 7, of this specification: This standard
does not purport to address all of the safety concerns, if any, associated with its use. It is the responsibility of the user of this
standard to establish appropriate safety, health, and environmental practices and determine the applicability of regulatory
limitations prior to use.
1.6 This international standard was developed in accordance with internationally recognized principles on standardization
established in the Decision on Principles for the Development of International Standards, Guides and Recommendations issued
by the World Trade Organization Technical Barriers to Trade (TBT) Committee.
2. Referenced Documents
2.1 ASTM Standards:
This specification is under the jurisdiction of ASTM Committee F16 on Fasteners and is the direct responsibility of Subcommittee F16.93 on Quality Assurance
Provisions for Fasteners.
Current edition approved Sept. 1, 2017Aug. 1, 2022. Published September 2017.August 2022. Originally approved in 1983. Last previous edition approved in 20122017
as F812 – 12.F812 – 12(2017). DOI: 10.1520/F0812-12R17.10.1520/F0812-12R22.
For referenced ASTM standards, visit the ASTM website, www.astm.org, or contact ASTM Customer Service at service@astm.org. For Annual Book of ASTM Standards
volume information, refer to the standard’s Document Summary page on the ASTM website.
*A Summary of Changes section appears at the end of this standard
Copyright © ASTM International, 100 Barr Harbor Drive, PO Box C700, West Conshohocken, PA 19428-2959. United States
F812 − 12 (2022)
F606/F606M Test Methods for Determining the Mechanical Properties of Externally and Internally Threaded Fasteners,
Washers, Direct Tension Indicators, and Rivets
F1470 Practice for Fastener Sampling for Specified Mechanical Properties and Performance Inspection
F1789 Terminology for F16 Mechanical Fasteners
2.2 ISO Standard:
ISO/DIS 6157 ⁄II Fasteners, Surface Discontinuities on Nuts
3. Ordering Information
3.1 Orders for nuts requiring surface discontinuity control shall include:
3.1.1 ASTM designation and date of issue of this specification.
3.1.2 Special requirements, for example, closer discontinuity limits (1.3.1) and inspection sampling plan (6.2).(6.2).
4. Types of Surface Discontinuities (See Standard F1789 for definitions not provided)
4.1 Crack:
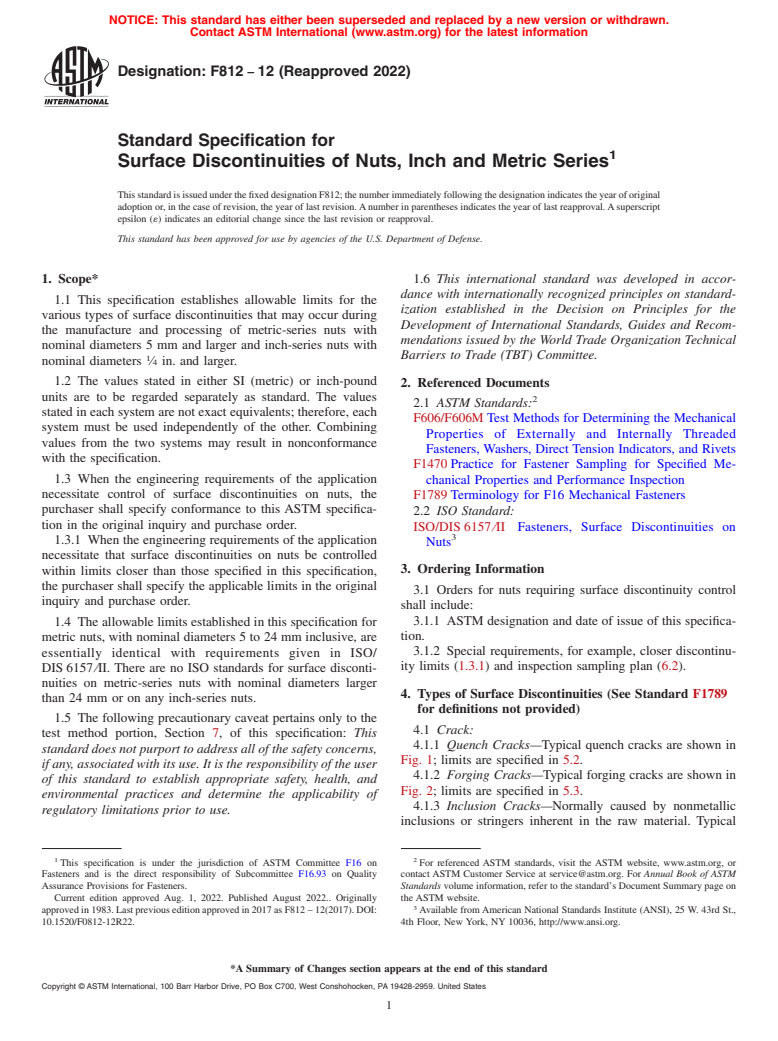
4.1.1 Quench Cracks—Typical quench cracks are shown in Fig. 1; limits are specified in 5.2.
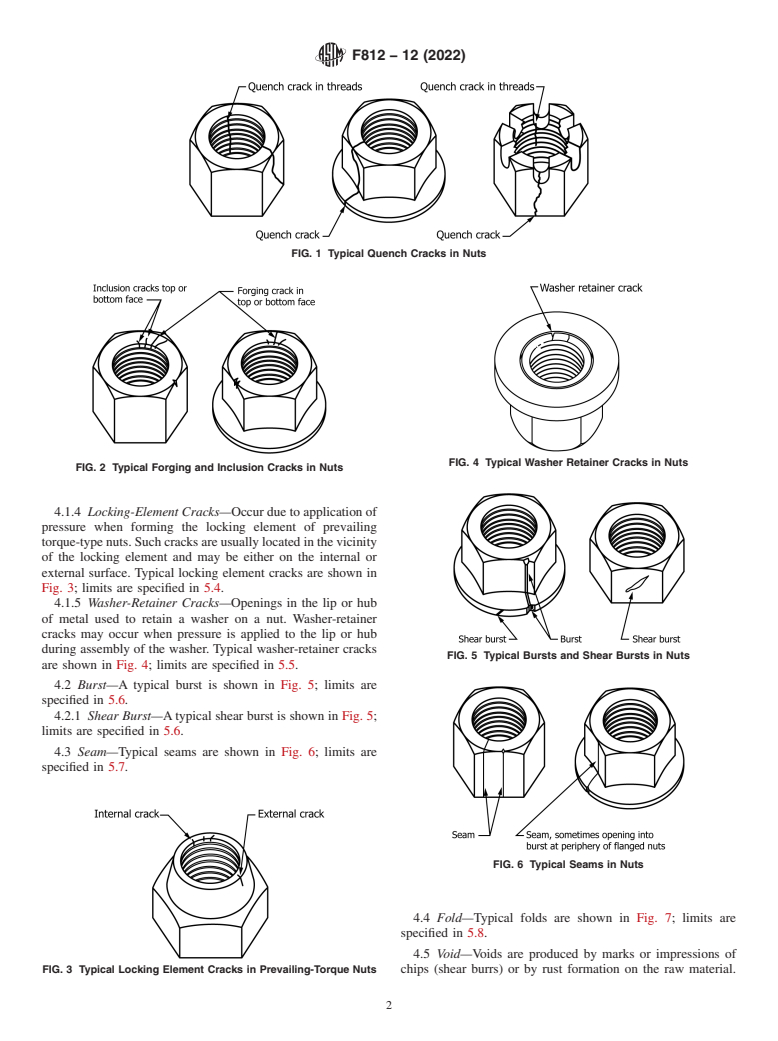
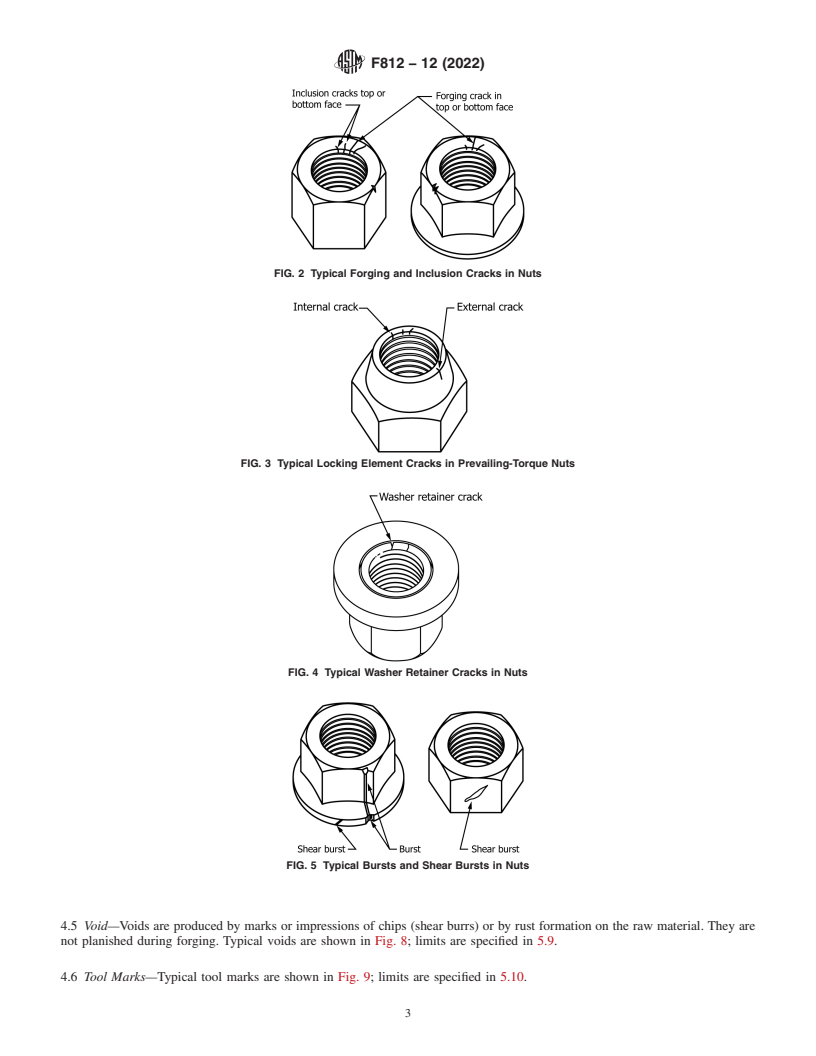
4.1.2 Forging Cracks—Typical forging cracks are shown in Fig. 2; limits are specified in 5.3.
4.1.3 Inclusion Cracks—Normally caused by nonmetallic inclusions or stringers inherent in the raw material. Typical inclusion
cracks are shown in Fig. 2; limits are specified in 5.3.
4.1.4 Locking-Element Cracks—Occur due to application of pressure when forming the locking element of prevailing torque-type
nuts. Such cracks are usually located in the vicinity of the locking element and may be either on the internal or external surface.
Typical locking element cracks are shown in Fig. 3; limits are specified in 5.4.
4.1.5 Washer-Retainer Cracks—Openings in the lip or hub of metal used to retain a washer on a nut. Washer-retainer cracks may
occur when pressure is applied to the lip or hub during assembly of the washer. Typical washer-retainer cracks are shown in Fig.
4; limits are specified in 5.5.
4.2 Burst—A typical burst is shown in Fig. 5; limits are specified in 5.6.
4.2.1 Shear Burst—A typical shear burst is shown in Fig. 5; limits are specified in 5.6.
4.3 Seam—Typical seams are shown in Fig. 6; limits are specified in 5.7.
4.4 Fold—Typical folds are shown in Fig. 7; limits are specified in 5.8.
FIG. 1 Typical Quench Cracks in Nuts
Available from American National Standards Institute (ANSI), 25 W. 43rd St., 4th Floor, New York, NY 10036, http://www.ansi.org.
F812 − 12 (2022)
FIG. 2 Typical Forging and Inclusion Cracks in Nuts
FIG. 3 Typical Locking Element Cracks in Prevailing-Torque Nuts
FIG. 4 Typical Washer Retainer Cracks in Nuts
FIG. 5 Typical Bursts and Shear Bursts in Nuts
4.5 Void—Voids are produced by marks or impressions of chips (shear burrs) or by rust formation on the raw material. They are
not planished during forging. Typical voids are shown in Fig. 8; limits are specified in 5.9.
4.6 Tool Marks—Typical tool marks are shown in Fig. 9; limits are specified in 5.10.
F812 − 12 (2022)
FIG. 6 Typical Seams in Nuts
4.7 Gouge and Nick—an indentation on the surface of a fastener produced by impact with another fastener, or from processing
equipment during manufacture, handling, or transport.
5. Allowable Limits
5.1 Letter Definitions—Throughout the following requirements, D designates the nominal nut size (basic major diameter of
thread); Dc designates flange diameter (specified maximum) on flanged nuts; S designates nominal (specified maximum) width
across flats. For metric-series nuts, D,Dc, and S are in millimetres; for inch series nuts, D,Dc, and S are in inches.
5.2 Quench Cracks—Quench cracks of any depth, any length, or in any location are not permitted.
5.3 Forging Cracks and Inclusion Cracks—Forging and inclusion cracks located in the top and bottom faces of nuts of all sizes
are permitted provided that (a) there are not more than two cracks that extend from the tapped hole across the full width of the
face; (b) no crack extends into the tapped hole beyond the first full thread; (c) no crack in the threads exceeds a depth of 0.5 times
the thread height; and (d) the width of any crack does not exceed 0.02 D or 0.30 mm or 0.012 in., whichever is greater.
1 1
5.3.1 Additionally, hex nuts with nominal diameters 5 to 36 mm inclusive and ⁄4 to 1 ⁄2 in. inclusive, showing discontinuity
indications, shall meet the requirements of the cone proof load test when sampled in accordance with 6.1, using samples selected
in accordance with 6.5.2.
5.4 Locking Element Cracks:
5.4.1 Locking-element cracks (or seams) located o
...


Questions, Comments and Discussion
Ask us and Technical Secretary will try to provide an answer. You can facilitate discussion about the standard in here.